# Pluggy Docs
> Developer documentation for the Pluggy API
Links below point at the markdown source. Drop the .md for the rendered page.
The full text of every page is at /llms-full.txt.
OpenAPI: /openapi/pluggy-api.json, /openapi/status-api.json, /openapi/enrichment-api.json
MCP server: https://mcp.pluggy.ai/mcp
## integrations
- [Slack Integration](https://docs.pluggy.ai/en/docs/integrations/slack.md): Add Pluggy's hosted docs bot to your Slack workspace — ask questions and get answers from the live documentation. No setup, no self-hosting.
## Getting Started
- [Overview](https://docs.pluggy.ai/en/docs/overview.md): What Pluggy is, the three objects the whole API is built on, and the two ways to build your first integration.
- [Quick Start](https://docs.pluggy.ai/en/docs/quickstart.md): Create your first item and read its transactions — with an agent connected to the live docs, or by hand.
- [Authentication](https://docs.pluggy.ai/en/docs/authentication.md): Learn how to authenticate with the Pluggy API.
- [Glossary](https://docs.pluggy.ai/en/docs/get-started/glossary.md): Before you start working with our API there are some important concepts that you need to know.
- [FAQ](https://docs.pluggy.ai/en/docs/get-started/faq.md): The questions we are asked most often about items, connectors, environments and updates.
## Guides
- [Sandbox](https://docs.pluggy.ai/en/docs/guides/sandbox.md): Test your integration with Pluggy's sandbox environment.
## Pluggy Connect Widget
- [Introduction](https://docs.pluggy.ai/en/docs/connect-widget/introduction.md): Pluggy Connect is a drop-in widget that helps you quickly get started with Pluggy, allowing your users to connect their accounts within your app directly to the Pluggy API.
- [Authentication](https://docs.pluggy.ai/en/docs/connect-widget/authentication.md): When connecting to Pluggy from a client-side application (i.e. Connect Widget), a Connect Token is required. This token provides limited access scoped to the generated Item resource data.
- [Environments and Configurations](https://docs.pluggy.ai/en/docs/connect-widget/environments.md): Learn about the available environments and configuration options for the Pluggy Connect widget, including sandbox testing and production setup.
- [Updating an Item](https://docs.pluggy.ai/en/docs/connect-widget/updating-item.md): Learn how to update an existing Item using the Pluggy Connect widget instead of creating a new connection from scratch.
- [Customization](https://docs.pluggy.ai/en/docs/connect-widget/customization.md): From the Dashboard, it is possible to customize certain visual aspects of Pluggy Connect so that you can provide your users with a more tailored, branded experience.
- [OAuth Support Guide](https://docs.pluggy.ai/en/docs/connect-widget/oauth-support.md): By following these guidelines, you can ensure a smooth OAuth integration experience for your users across various platforms and devices.
## Connections
- [Item](https://docs.pluggy.ai/en/docs/connections/item.md): An Item is the representation of a connection with a specific Connector of an Institution and serves as the entry point to access the set of products recovered from the user who gave consent to collect their data.
- [Item lifecycle](https://docs.pluggy.ai/en/docs/connections/item-lifecycle.md): Understand the different statuses and execution states an Item goes through during creation, update, and synchronization with financial institutions.
- [Errors & Validations](https://docs.pluggy.ai/en/docs/connections/errors-validations.md): Learn about the different statuses and errors you could face using Pluggy's API.
- [Warnings & Status Codes](https://docs.pluggy.ai/en/docs/connections/warnings-status-codes.md): Understanding warning codes and their meanings when retrieving data from Pluggy connectors.
- [Consents and expiration](https://docs.pluggy.ai/en/docs/connections/consents.md): The first time an Item connects, a Consent is created with an expiration date. The Consent shows which financial products an item is authorized to recover for a given period.
- [Connectors coverage](https://docs.pluggy.ai/en/docs/connections/connectors-coverage.md): Here you will find all the connectors available in Pluggy listed by type of connector, detailing which products are supported in each case.
- [Credit Cards coverage](https://docs.pluggy.ai/en/docs/connections/credit-cards-coverage.md): Here you will find the coverage we have for each connector regarding Credit Card product.
- [Accounts coverage](https://docs.pluggy.ai/en/docs/connections/accounts-coverage.md): Here you will find the coverage we have for each connector regarding Account product.
- [Payment data coverage](https://docs.pluggy.ai/en/docs/connections/paymentdata-coverage.md): Here you will find the data coverage we have for each connector regarding Payment Data product.
- [Investments coverage](https://docs.pluggy.ai/en/docs/connections/investments-coverage.md): Here you will find the coverage we have for each connector regarding Investments product.
- [Investment Transactions coverage](https://docs.pluggy.ai/en/docs/connections/investment-transactions-coverage.md): Here you will find the coverage we have for each connector regarding Investment Transactions product.
- [Loans coverage](https://docs.pluggy.ai/en/docs/connections/loans-coverage.md): Here you will find the coverage we have for each connector regarding the Loans product.
- [Identity coverage](https://docs.pluggy.ai/en/docs/connections/identity-coverage.md): Here you will find the coverage we have for each connector regarding Identity product.
- [Reporting Issues](https://docs.pluggy.ai/en/docs/connections/reporting-issues.md): This guide explains how to understand issues that users may have and how to report them to Pluggy's support team.
- [Open Finance vs Direct: field differences](https://docs.pluggy.ai/en/docs/connections/open-finance-vs-direct-fields.md): Which API fields you get only from Open Finance connections, and which only from Direct ones.
## Open Finance
- [Open Finance Connectors](https://docs.pluggy.ai/en/docs/open-finance/overview.md): Pluggy supports obtaining data from the Brazilian Open Finance Network with Open Finance Connectors, following the same data model as standard connectors.
- [Open Finance Institutions Coverage](https://docs.pluggy.ai/en/docs/open-finance/institutions-coverage.md): All institutions available via Open Finance, their contexts (Personal, Business, Investments) and the products each connector exposes.
- [Creating an Item](https://docs.pluggy.ai/en/docs/open-finance/creating-item.md): How to create your first Open Finance Regulated connection, step by step through Pluggy's Connect Widget or through API.
- [Considerations & FAQ](https://docs.pluggy.ai/en/docs/open-finance/considerations-faq.md): Things to keep in mind when integrating Open Finance Regulated data that can be different from Direct Connections.
- [Payment Data Open Finance Coverage](https://docs.pluggy.ai/en/docs/open-finance/payment-data.md): Coverage details for CPF/CNPJ counterpart data availability in Open Finance transaction payment data, by connector and operation type.
- [Investments Open Finance Coverage](https://docs.pluggy.ai/en/docs/open-finance/investments.md): Coverage table for investment subtypes supported by each Open Finance institution connector.
- [Operational Rate Limits](https://docs.pluggy.ai/en/docs/open-finance/rate-limits.md): Open Finance operational limits imposed by the Brazilian Open Finance Network on data fetching per product, institution, and CPF/CNPJ, plus the network's response time and timeout requirements.
- [SCR — Credit Information System](https://docs.pluggy.ai/en/docs/open-finance/scr.md): Query Bacen's Sistema de Informações de Crédito for the document behind a connected Open Finance item, and read the payload the Banco Central returns.
## Products
- [Account](https://docs.pluggy.ai/en/docs/products/accounts.md): The account product is the list of bank accounts such as Checking or Savings Account and Credit Card, that were available in the selected connector.
- [Real Time Balance](https://docs.pluggy.ai/en/docs/products/real-time-balance.md): The real-time balance endpoint fetches the account balance directly from the financial institution without triggering a full item sync.
- [Credit Card Bills](https://docs.pluggy.ai/en/docs/products/credit-card-bills.md): The Bill entity is recovered from institutions that support this product. It represents a bill (fatura) associated with an account of type Credit, specifically the subtype CREDIT_CARD.
- [Transaction](https://docs.pluggy.ai/en/docs/products/transactions.md): Retrieve up to 12 months of transaction data. Transactions data of the accounts provide insights into the user's financial behavior.
- [Transaction Categorization](https://docs.pluggy.ai/en/docs/products/transaction-categorization.md): Transaction categorization is a feature where we classify your Transactions into useful categories (Restaurants, Gas Stations, Income, etc.) using our categorizer AI engine.
- [Investment](https://docs.pluggy.ai/en/docs/products/investments.md): The Investment entity is recovered from not only Brokers (XP, Clear) but also from retail and business Bank institutions.
- [Investment's Transactions](https://docs.pluggy.ai/en/docs/products/investment-transactions.md): Each investment contains a list of transactions corresponding to Applications or Withdrawals. The transaction schema contains a set of details of that operation.
- [Loan](https://docs.pluggy.ai/en/docs/products/loans.md): The Loan entity is recovered from institutions that support this product. It represents a loan contracted by the user, including data like contract number, taxes, interest rates, warranties, installments, etc.
- [Identity](https://docs.pluggy.ai/en/docs/products/identity.md): The Identity entity is recovered from institutions that support this product, accessing details of personal information related to the owner of the connection's account.
- [Credit Card Installments](https://docs.pluggy.ai/en/docs/products/credit-card-installments.md): How Pluggy captures, synchronizes, and delivers credit card installment purchases via API, including institution-specific behaviors, Open Finance rate limits, and webhook best practices.
## Intelligence APIs
- [Connection Insights](https://docs.pluggy.ai/en/docs/intelligence/connection-insights.md): Based on connected accounts you can recover user's insights, book of variables, income analysis & recurring patterns.
- [Transaction Enrichment](https://docs.pluggy.ai/en/docs/intelligence/transaction-enrichment.md): If you need to enhance your own data, we offer different solutions engine as an API for you to use.
- [Recurring Payments Analysis](https://docs.pluggy.ai/en/docs/intelligence/recurring-payments.md): We offer a Recurring Payments API that allows you to identify a user's repeating expenses and repeating incomes, useful for financial profiling.
## Payments
- [Payments Overview](https://docs.pluggy.ai/en/docs/payments/overview.md): With Pluggy Payments, you can easily create payment links to bill your customers and automatically track their payments, leveraging secure OAuth integrations with institutions using the Open Finance Payment Initiation infrastructure.
- [Payment Intent Lifecycle and Errors](https://docs.pluggy.ai/en/docs/payments/intent-lifecycle.md): Here you can find the possible statuses of a Payment Intent and the error codes that may occur when attempting to process a payment.
- [Scheduled Payments (Pix Agendado)](https://docs.pluggy.ai/en/docs/payments/scheduled-payments.md): With our payment initiation functionality, you can schedule payments to occur in the future (also called PIX RECORRENTE) using different scheduling modes.
- [Scheduled Payment Webhooks](https://docs.pluggy.ai/en/docs/payments/scheduled-webhooks.md): Learn about the webhook flow and payloads for scheduled payments, including error codes that may occur during payment processing.
- [FAQ](https://docs.pluggy.ai/en/docs/payments/scheduled-faq.md): The purpose of this page is to answer common questions about Scheduled Payments.
- [PIX Automatico](https://docs.pluggy.ai/en/docs/payments/pix-automatico.md): Introduction to Pix Automático with Pluggy - your gateway to seamless, automated recurring payments in Brazil.
- [Getting Started](https://docs.pluggy.ai/en/docs/payments/pix-getting-started.md): Integrating with Pluggy's payment gateway for Pix Automático - learn how to create your first payment request, handle authorization, schedule payments, and manage retries.
- [Automatic PIX Scheduler (Beta)](https://docs.pluggy.ai/en/docs/payments/pix-scheduler.md): The Automatic PIX Scheduler automates recurring payment scheduling without manual intervention, respecting the allowed D+2 to D+10 scheduling window.
- [Automatic retries (Beta)](https://docs.pluggy.ai/en/docs/payments/pix-retries.md): When an Automatic Pix Payment fails, Pluggy can automatically handle retries for you - no extra API calls, no polling, no cron jobs on your side.
- [FAQ](https://docs.pluggy.ai/en/docs/payments/pix-faq.md): Common questions related to how Pix Automatico works, including payment requests, first payments, scheduling, cancellation, and retries.
- [Coverage](https://docs.pluggy.ai/en/docs/payments/coverage.md): Here you will understand how to keep track of which Institutions support each type of payment.
## Smart Transfers
- [Introduction](https://docs.pluggy.ai/en/docs/smart-transfers/introduction.md): Pluggy's Smart Transfers API makes payments instant, easy, and secure. Here we describe in a simple way how you can implement it.
- [Creating a preauthorization](https://docs.pluggy.ai/en/docs/smart-transfers/preauthorization.md): In this section, you will learn how to create a preauthorization to do payments without user interaction.
- [Creating a payment](https://docs.pluggy.ai/en/docs/smart-transfers/creating-payment.md): In this section, you will learn how to create a payment associated with a Smart Transfer Preauthorization.
- [Smart Transfers Sandbox](https://docs.pluggy.ai/en/docs/smart-transfers/sandbox.md): The easiest way to try the Smart Transfers product is by using the sandbox connector.
## Developer Tools
- [Basic concepts](https://docs.pluggy.ai/en/docs/developer-tools/basic-concepts.md): Security protocols, API conventions, environment, request identifiers, and pagination used by the Pluggy API.
- [Run in Postman](https://docs.pluggy.ai/en/docs/developer-tools/postman.md): Access Pluggy's Postman Collection to test all available API endpoints using your CLIENT_ID and CLIENT_SECRET.
- [Connect an account](https://docs.pluggy.ai/en/docs/developer-tools/connect-account.md): Learn how to connect the Pluggy API with a financial institution, including connectors with and without verification codes.
- [Tutorials](https://docs.pluggy.ai/en/docs/developer-tools/tutorials.md): Get step-by-step guides on how to successfully connect your account with specific financial institutions.
- [Server-Side SDKs](https://docs.pluggy.ai/en/docs/developer-tools/server-sdks.md): Pluggy offers client libraries for Node.js, .NET, and Java to simplify API integration.
- [No-Code integrations](https://docs.pluggy.ai/en/docs/developer-tools/no-code.md): Here is a list of integrations that don't require any development to start running Pluggy.
- [Bubble](https://docs.pluggy.ai/en/docs/developer-tools/bubble.md): Step-by-step guide to integrating Pluggy Connect in a Bubble application.
- [Errors Codes](https://docs.pluggy.ai/en/docs/developer-tools/error-codes.md): The following errors describe in general what you will get for the different endpoints available in Pluggy API.
- [Rate limits](https://docs.pluggy.ai/en/docs/developer-tools/rate-limits.md): Pluggy's API implements a rate limiter to maximize its stability when dealing with large bursts of incoming requests.
- [Status Page API](https://docs.pluggy.ai/en/docs/developer-tools/status-page-api.md): Programmatically consume Pluggy's public status page — connector health, incidents and infrastructure components.
- [Webhook](https://docs.pluggy.ai/en/docs/developer-tools/webhooks-ref.md): Learn about the webhooks sent by Pluggy to create a reactive integration to data and payment changes.
- [Configure & Troubleshoot](https://docs.pluggy.ai/en/docs/developer-tools/webhook-troubleshoot.md): View, create and edit webhooks from Dashboard, visualize which webhooks were sent, their payloads and retry them to sync collected data.
- [MCP Server](https://docs.pluggy.ai/en/docs/developer-tools/mcp.md): Connect any AI agent — Claude, ChatGPT/Codex, Cursor, VS Code, Windsurf, Gemini — to Pluggy's live documentation, API reference, changelog, recipes, and curated Q&A through the hosted, no-auth MCP server.
- [Agent Skills](https://docs.pluggy.ai/en/docs/developer-tools/ai-skills.md): Official Pluggy skills for AI coding agents like Claude Code, Cursor, and GitHub Copilot — install with one command so your agent builds and reviews integrations following Pluggy's documented patterns.
## Integration Checklist
- [Creating a use case from scratch](https://docs.pluggy.ai/en/docs/integration-checklist/use-case.md): This article is a step by step guide to build a simple example app that integrates with Pluggy.
- [Pluggy's Integration Checklist](https://docs.pluggy.ai/en/docs/integration-checklist/overview.md): Follow these steps to ensure your Application is fully integrated with Pluggy API.
- [Get your API keys](https://docs.pluggy.ai/en/docs/integration-checklist/api-keys.md): Get to know Dashboard. Create your first Application and obtain your access keys.
- [Create your first Item](https://docs.pluggy.ai/en/docs/integration-checklist/first-item.md): Get to know our Demo application. Get to know Pluggy Connect and our Sandbox environment.
- [Use our SDKs to Authenticate](https://docs.pluggy.ai/en/docs/integration-checklist/sdk-auth.md): Using your Application CLIENT_ID and CLIENT_SECRET credentials, set up authentication with Pluggy API.
- [Setup PluggyConnect Widget on your app](https://docs.pluggy.ai/en/docs/integration-checklist/setup-widget.md): The Connect Widget is Pluggy's plug and play frontend solution that allows users to connect their financial accounts on a step by step flow.
- [Data sync: Update an Item](https://docs.pluggy.ai/en/docs/integration-checklist/data-sync.md): After creating an Item, the next step is keeping it up to date.
- [Setup Two-way sync with Webhooks](https://docs.pluggy.ai/en/docs/integration-checklist/webhooks-sync.md): Webhooks allow Pluggy to notify your application of events without requiring you to request updates, keeping you up to date with the latest changes.
- [Consent management: Delete an Item](https://docs.pluggy.ai/en/docs/integration-checklist/consent-management.md): It's of utmost importance for your integration to allow your users to revoke the consent given when sharing their financial data.
- [Subscribe to our Status Page](https://docs.pluggy.ai/en/docs/integration-checklist/status-page.md): Check out our public status page where we post any incident and outages, so you can keep awareness on any existing issues.
## Boleto
- [Boleto Management API](https://docs.pluggy.ai/en/docs/boleto/management-api.md): Issue boletos, track their payment and receive a webhook the moment one is settled — through a single API that hides each bank's differences.
- [Coverage](https://docs.pluggy.ai/en/docs/boleto/coverage.md): Which institutions the Boleto Management API can issue through today, which are being built, and how each one authorises a connection.
## Tutorials
- [Caixa PF Tutorial (Mobile)](https://docs.pluggy.ai/en/docs/developer-tools/tutorials/caixa-pf-mobile.md): Step-by-step guide to authorize your device and connect a Caixa Econômica Federal personal account using the Caixa mobile app.
- [Caixa PF Tutorial (Web)](https://docs.pluggy.ai/en/docs/developer-tools/tutorials/caixa-pf-web.md): Step-by-step guide to authorize your device and connect a Caixa Econômica Federal personal account using Internet Banking on the web.
- [Caixa PJ Tutorial](https://docs.pluggy.ai/en/docs/developer-tools/tutorials/caixa-pj.md): Which credentials to use when connecting a Caixa Empresas business account: the same username and password used in Internet Banking.
- [Banco Inter MEI Tutorial](https://docs.pluggy.ai/en/docs/developer-tools/tutorials/inter-mei.md): How to connect a Banco Inter MEI account by logging into the Inter app with your MEI account number and scanning the access QR code.
- [Banco Inter Empresas Tutorial](https://docs.pluggy.ai/en/docs/developer-tools/tutorials/inter-pj.md): How to create an API integration in Banco Inter Empresas to obtain the Client ID, Client Secret, key, and certificate needed to connect with Pluggy.
- [Sicredi Tutorial](https://docs.pluggy.ai/en/docs/developer-tools/tutorials/sicredi.md): Which credentials to use when connecting a Sicredi Empresas account: CNPJ, username, and password — the same ones used in the Sicredi app.
- [Sicoob PJ Tutorial](https://docs.pluggy.ai/en/docs/developer-tools/tutorials/sicoob-pj.md): Which credentials to use when connecting a Sicoob Empresas account: cooperative number, access key, and password from Internet Banking.
- [Santander PJ Secondary User Tutorial](https://docs.pluggy.ai/en/docs/developer-tools/tutorials/santander-pj-secondary-user.md): Step-by-step guide to create a secondary user in Santander Empresas so you can connect your business account with Pluggy.
- [Santander PJ Tutorial](https://docs.pluggy.ai/en/docs/developer-tools/tutorials/santander-pj.md): Which credentials to use when connecting a Santander Empresas business account: branch, account, username and password — the same used in Internet Banking.
- [Itaú PJ Tutorial](https://docs.pluggy.ai/en/docs/developer-tools/tutorials/itau-pj.md): Which credentials to use when connecting an Itaú Empresas business account: branch, account, password and CPF — the same used in Internet Banking.
- [Itaú PJ Tutorial — User Without a Token](https://docs.pluggy.ai/en/docs/developer-tools/tutorials/itau-pj-user-without-token.md): How to create an operator user without a token in Itaú Empresas: create an access profile, add an operator and validate it via the web.
- [Banco do Brasil PJ Tutorial — Device Authorization](https://docs.pluggy.ai/en/docs/developer-tools/tutorials/bb-pj-device-authorization.md): How to authorize a device in Banco do Brasil's Internet Banking so you can connect your Banco do Brasil Empresas account.
- [Banco do Brasil PJ Tutorial](https://docs.pluggy.ai/en/docs/developer-tools/tutorials/bb-pj.md): Which credentials to use when connecting a Banco do Brasil Empresas business account: J key, J password and 8-digit password — plus best practices for a successful connection.
- [Bradesco PJ Tutorial — Enable Mobile App Access](https://docs.pluggy.ai/en/docs/developer-tools/tutorials/bradesco-pj-mobile-access.md): How to enable mobile app access for a Bradesco Empresas user through the Internet Banking administration section.
- [Bradesco PJ Tutorial](https://docs.pluggy.ai/en/docs/developer-tools/tutorials/bradesco-pj.md): Which credentials to use when connecting a Bradesco Empresas business account: username, password and the security key generated in the Bradesco app.
- [Bradesco PF Open Finance Tutorial](https://docs.pluggy.ai/en/docs/developer-tools/tutorials/bradesco-pf-of.md): Step-by-step guide to connect a Bradesco personal (PF) account via Open Finance, using the QR code validation in the Bradesco app.
- [Efí Bank PJ Tutorial](https://docs.pluggy.ai/en/docs/developer-tools/tutorials/efi-pj.md): How to create an API application in Efí Bank Empresas to obtain the Client ID, Client Secret and certificate needed to connect with Pluggy.
## API Reference
- [Authentication](https://docs.pluggy.ai/en/docs/reference/authentication.md): The two credentials the Pluggy API accepts, how each is issued, how long it lives and what it can reach.
- [Basic Concepts](https://docs.pluggy.ai/en/docs/reference/basic-concepts.md): Base URL, transport, request and response conventions, and how paginated endpoints are read.
- [Error Codes](https://docs.pluggy.ai/en/docs/reference/error-codes.md): The HTTP status codes the Pluggy API returns, what each means, and the shape of an error body.
- [Rate Limits](https://docs.pluggy.ai/en/docs/reference/rate-limits.md): Per-endpoint request limits, the 429 response, and the headers that say when to retry.
- [Webhook](https://docs.pluggy.ai/en/docs/reference/webhooks.md): Subscribing to events, the event list, the payload every notification carries, and the delivery and retry rules.
- [Server-Side SDKs](https://docs.pluggy.ai/en/docs/reference/server-sdks.md): The official client libraries, how to install each, and the OpenAPI document to generate your own.
## API Reference: Status
- [GET /api/status](https://docs.pluggy.ai/en/reference/status/status-snapshot): Retrieve status snapshot
- [GET /api/connectors-incidents](https://docs.pluggy.ai/en/reference/status/status-connector-incidents): Retrieve active incidents by connector
- [GET /api/summary](https://docs.pluggy.ai/en/reference/status/status-summary): Retrieve status summary
## API Reference: Enrichment
- [POST /categorize](https://docs.pluggy.ai/en/reference/enrichment/categorize): Categorize
- [POST /behavior-analysis](https://docs.pluggy.ai/en/reference/enrichment/behavior-analysis): Behavior Analysis
- [POST /recurring-payments](https://docs.pluggy.ai/en/reference/enrichment/recurring-payments): Recurring Payments
## API Reference: Auth
- [POST /auth](https://docs.pluggy.ai/en/reference/auth/auth-create): Create API Key
- [POST /connect_token](https://docs.pluggy.ai/en/reference/auth/connect-token-create): Create Connect Token
## API Reference: Connector
- [GET /connectors](https://docs.pluggy.ai/en/reference/connector/connectors-list): List
- [GET /connectors/{id}](https://docs.pluggy.ai/en/reference/connector/connector-retrieve): Retrieve
- [POST /connectors/{id}/validate](https://docs.pluggy.ai/en/reference/connector/connectors-validate): Validate
## API Reference: Items
- [POST /items](https://docs.pluggy.ai/en/reference/items/items-create): Create
- [GET /items/{id}](https://docs.pluggy.ai/en/reference/items/items-retrieve): Retrieve
- [PATCH /items/{id}](https://docs.pluggy.ai/en/reference/items/items-update): Update
- [DELETE /items/{id}](https://docs.pluggy.ai/en/reference/items/items-delete): Delete
- [GET /items/{id}/resources](https://docs.pluggy.ai/en/reference/items/items-resources): Retrieve Item resources
- [POST /items/{id}/mfa](https://docs.pluggy.ai/en/reference/items/items-send-mfa): Send MFA
- [PATCH /items/{id}/disable-auto-sync](https://docs.pluggy.ai/en/reference/items/items-disable-autosync): Disable item auto sync
- [GET /v2/items](https://docs.pluggy.ai/en/reference/items/items-list-by-cursor): List
## API Reference: SCR
- [GET /items/{id}/scr](https://docs.pluggy.ai/en/reference/scr/items-retrieve-scr): Retrieve SCR
## API Reference: Consent
- [GET /consents](https://docs.pluggy.ai/en/reference/consent/consents-list): List
- [GET /consents/{id}](https://docs.pluggy.ai/en/reference/consent/consent-retrieve): Retrieve
## API Reference: Account
- [GET /accounts](https://docs.pluggy.ai/en/reference/account/accounts-list): List
- [GET /accounts/{id}](https://docs.pluggy.ai/en/reference/account/accounts-retrieve): Retrieve
- [GET /accounts/{id}/statements](https://docs.pluggy.ai/en/reference/account/account-statements-list): List account statements
- [GET /accounts/{id}/balance](https://docs.pluggy.ai/en/reference/account/account-balance-get): Get real-time balance
## API Reference: Transaction
- [GET /transactions](https://docs.pluggy.ai/en/reference/transaction/transactions-list): List by Page (deprecated)
- [GET /v2/transactions](https://docs.pluggy.ai/en/reference/transaction/transactions-list-by-cursor): List
- [GET /transactions/{id}](https://docs.pluggy.ai/en/reference/transaction/transactions-retrieve): Retrieve
- [PATCH /transactions/{id}](https://docs.pluggy.ai/en/reference/transaction/transactions-Update): Update
## API Reference: Investment
- [GET /investments](https://docs.pluggy.ai/en/reference/investment/investments-list): List
- [GET /investments/{id}](https://docs.pluggy.ai/en/reference/investment/investments-retrieve): Retrieve
- [GET /investments/{id}/transactions](https://docs.pluggy.ai/en/reference/investment/investment-transactions-list): List investment transactions
## API Reference: Identity
- [GET /identity](https://docs.pluggy.ai/en/reference/identity/identity-find-by-item): Find by item
- [GET /identity/{id}](https://docs.pluggy.ai/en/reference/identity/identity-retrieve): Retrieve
## API Reference: Webhook
- [GET /webhooks](https://docs.pluggy.ai/en/reference/webhook/webhooks-list): List
- [POST /webhooks](https://docs.pluggy.ai/en/reference/webhook/webhooks-create): Create
- [GET /webhooks/{id}](https://docs.pluggy.ai/en/reference/webhook/webhooks-retrieve): Retrieve
- [PATCH /webhooks/{id}](https://docs.pluggy.ai/en/reference/webhook/webhooks-update): Update
- [DELETE /webhooks/{id}](https://docs.pluggy.ai/en/reference/webhook/webhooks-delete): Delete
## API Reference: Category
- [GET /categories](https://docs.pluggy.ai/en/reference/category/categories-list): List
- [GET /categories/{id}](https://docs.pluggy.ai/en/reference/category/categories-retrieve): Retrieve
- [GET /categories/rules](https://docs.pluggy.ai/en/reference/category/client-category-rules-list): List Category Rules
- [POST /categories/rules](https://docs.pluggy.ai/en/reference/category/client-category-rules-create): Create Category Rule
- [DELETE /categories/rules/{id}](https://docs.pluggy.ai/en/reference/category/client-category-rules-delete): Delete Category Rule
## API Reference: Loan
- [GET /loans](https://docs.pluggy.ai/en/reference/loan/loans-list): List
- [GET /loans/{id}](https://docs.pluggy.ai/en/reference/loan/loans-retrieve): Retrieve
## API Reference: Merchant
- [GET /merchants](https://docs.pluggy.ai/en/reference/merchant/merchants-get-by-cnpj): Get merchants by CNPJ list
## API Reference: Bill
- [GET /bills](https://docs.pluggy.ai/en/reference/bill/bills-list): List
- [GET /bills/{id}](https://docs.pluggy.ai/en/reference/bill/bills-retrieve): Retrieve
## API Reference: Payment Customer
- [GET /payments/customers](https://docs.pluggy.ai/en/reference/payment-customer/payment-customers-list): List
- [POST /payments/customers](https://docs.pluggy.ai/en/reference/payment-customer/payment-customer-create): Create
- [GET /payments/customers/{id}](https://docs.pluggy.ai/en/reference/payment-customer/payment-customer-retrieve): Retrieve
- [PATCH /payments/customers/{id}](https://docs.pluggy.ai/en/reference/payment-customer/payment-customer-update): Update
- [DELETE /payments/customers/{id}](https://docs.pluggy.ai/en/reference/payment-customer/payment-customer-delete): Delete
## API Reference: Payment Recipient
- [GET /payments/recipients](https://docs.pluggy.ai/en/reference/payment-recipient/payment-recipients-list): List
- [POST /payments/recipients](https://docs.pluggy.ai/en/reference/payment-recipient/payment-recipient-create): Create
- [GET /payments/recipients/{id}](https://docs.pluggy.ai/en/reference/payment-recipient/payment-recipient-retrieve): Retrieve
- [PATCH /payments/recipients/{id}](https://docs.pluggy.ai/en/reference/payment-recipient/payment-recipient-update): Update
- [DELETE /payments/recipients/{id}](https://docs.pluggy.ai/en/reference/payment-recipient/payment-recipient-delete): Delete
- [GET /payments/recipients/institutions](https://docs.pluggy.ai/en/reference/payment-recipient/payment-recipients-institution-list): List Institutions
- [GET /payments/recipients/institutions/{id}](https://docs.pluggy.ai/en/reference/payment-recipient/payment-recipient-institutions-retrieve): Retrieve Institution
## API Reference: Payment Request
- [GET /payments/requests](https://docs.pluggy.ai/en/reference/payment-request/payment-requests-list): List
- [POST /payments/requests](https://docs.pluggy.ai/en/reference/payment-request/payment-request-create): Create
- [POST /payments/requests/pix-qr](https://docs.pluggy.ai/en/reference/payment-request/payment-request-create-pix-qr): Create PIX QR payment request
- [GET /payments/requests/{id}](https://docs.pluggy.ai/en/reference/payment-request/payment-request-retrieve): Retrieve
- [PATCH /payments/requests/{id}](https://docs.pluggy.ai/en/reference/payment-request/payment-request-update): Update
- [DELETE /payments/requests/{id}](https://docs.pluggy.ai/en/reference/payment-request/payment-request-delete): Delete
## API Reference: Automatic PIX
- [POST /payments/requests/automatic-pix](https://docs.pluggy.ai/en/reference/automatic-pix/payment-request-create-automatic-pix): Create Automatic PIX payment request
- [POST /payments/requests/{id}/automatic-pix/schedule](https://docs.pluggy.ai/en/reference/automatic-pix/payment-request-create-automatic-pix-schedule): Schedule Automatic PIX payment
- [GET /payments/requests/{id}/automatic-pix/schedules](https://docs.pluggy.ai/en/reference/automatic-pix/payment-request-get-automatic-pix-schedules): List Automatic PIX scheduled payments
- [GET /payments/requests/{requestId}/automatic-pix/schedules/{paymentId}](https://docs.pluggy.ai/en/reference/automatic-pix/payment-request-get-automatic-pix-schedule): Get an automatic PIX scheduled payment
- [POST /payments/requests/{id}/automatic-pix/cancel](https://docs.pluggy.ai/en/reference/automatic-pix/payment-request-cancel-automatic-pix-consent): Cancel an automatic PIX consent
- [POST /payments/requests/{id}/automatic-pix/schedules/{scheduleId}/cancel](https://docs.pluggy.ai/en/reference/automatic-pix/cancel-automatic-pix-schedule): Cancel an Automatic PIX schedule
- [POST /payments/requests/{id}/automatic-pix/schedules/{scheduleId}/retry](https://docs.pluggy.ai/en/reference/automatic-pix/retry-automatic-pix-schedule): Retry an Automatic PIX schedule
## API Reference: Payment Schedule
- [GET /payments/requests/{id}/schedules](https://docs.pluggy.ai/en/reference/payment-schedule/payment-schedules-list): List Schedules
- [POST /payments/requests/{id}/schedules/cancel](https://docs.pluggy.ai/en/reference/payment-schedule/payment-schedules-cancel): Cancel Payment Schedule Authorization
- [POST /payments/requests/{id}/schedules/{scheduleId}/cancel](https://docs.pluggy.ai/en/reference/payment-schedule/payment-schedules-cancel-specific): Cancel Payment Schedule
## API Reference: Payment Intent
- [GET /payments/intents](https://docs.pluggy.ai/en/reference/payment-intent/payment-intents-list): List
- [POST /payments/intents](https://docs.pluggy.ai/en/reference/payment-intent/payment-intent-create): Create
- [GET /payments/intents/{id}](https://docs.pluggy.ai/en/reference/payment-intent/payment-intent-retrieve): Retrieve
## API Reference: Smart Transfer
- [GET /smart-transfers/preauthorizations](https://docs.pluggy.ai/en/reference/smart-transfer/smart-tranfers-preauthorizations-list): List preauthorizations
- [POST /smart-transfers/preauthorizations](https://docs.pluggy.ai/en/reference/smart-transfer/smart-transfer-preauthorization-create): Create preauthorization
- [GET /smart-transfers/preauthorizations/{id}](https://docs.pluggy.ai/en/reference/smart-transfer/smart-transfer-preauthorization-retrieve): Retrieve preauthorization
- [GET /smart-transfers/preauthorizations/{id}/payments](https://docs.pluggy.ai/en/reference/smart-transfer/smart-transfer-preauthorization-payments-list): List preauthorization payments
- [POST /smart-transfers/payments](https://docs.pluggy.ai/en/reference/smart-transfer/smart-transfer-payment-create): Create payment
- [GET /smart-transfers/payments/{id}](https://docs.pluggy.ai/en/reference/smart-transfer/smart-transfer-paymentretrieve): Retrieve payment
## API Reference: Boleto Management
- [POST /boleto-connections](https://docs.pluggy.ai/en/reference/boleto-management/boleto-connection-create): Connect boleto credentials
- [POST /boleto-connections/from-item](https://docs.pluggy.ai/en/reference/boleto-management/boleto-connection-create-from-item): Create boleto connection from Item
- [POST /boletos](https://docs.pluggy.ai/en/reference/boleto-management/boleto-create): Issue Boleto
- [POST /boletos/{id}/cancel](https://docs.pluggy.ai/en/reference/boleto-management/boleto-cancel): Cancel Boleto
- [GET /boletos/{id}](https://docs.pluggy.ai/en/reference/boleto-management/boleto-get): Get Boleto
## Recipes
- [Deleting your Data](https://docs.pluggy.ai/en/recipes/deleting-your-data.md): Delete Items to remove user consents from Pluggy.
- [Encrypt parameters](https://docs.pluggy.ai/en/recipes/encrypt-parameters.md): Example to encrypt your parameters before create or update an item.
- [Generate a Connect Token with permissions to update an existing Item](https://docs.pluggy.ai/en/recipes/generate-a-connect-token-with-permissions-to-update-an-existing-item.md): In order to update an Item you should generate, in your server, a Connect Token linked to the Item Id you want to update.
- [PluggyConnect: Continue connecting item in background as soon as user's login is completed](https://docs.pluggy.ai/en/recipes/pluggyconnect-continue-connecting-item-in-background-as-soon-as-users-login-is-completed.md): Hide PluggyConnect in background as soon as the login step has been completed, so the User can focus again on your application. PluggyConnect will continue polling the item status until it's completed.
- [Polling an item connector's execution status](https://docs.pluggy.ai/en/recipes/polling-an-item-connectors-execution-status.md): How to check and poll for the Item status, to know when the Item execution finishes and be able to act on it.
- [Update an Item using Pluggy Connect](https://docs.pluggy.ai/en/recipes/update-an-item-using-pluggy-connect.md): Full standalone HTML client example to update an existing Item using Pluggy Connect widget.
## Changelog
- [Product Updates | July/2026](https://docs.pluggy.ai/en/changelog#2026.07): Published 2026-08-13
- [Product Updates | June/2026](https://docs.pluggy.ai/en/changelog#2026.06): Published 2026-08-12
- [Product Updates | May/2026](https://docs.pluggy.ai/en/changelog#2026.05): Published 2026-07-22
- [Product Updates | March/2026](https://docs.pluggy.ai/en/changelog#2026.03): Published 2026-04-09
- [Product Updates | February 2026](https://docs.pluggy.ai/en/changelog#2026.02): Published 2026-03-18
- [Atualizações de Produto | Setembro 2025](https://docs.pluggy.ai/en/changelog#2025.09): Published 2025-10-07
- [[Atualizações de Produto] Agosto-25](https://docs.pluggy.ai/en/changelog#2025.08): Published 2025-09-15
- [[Atualizações de Produto] Julho-25](https://docs.pluggy.ai/en/changelog#2025.07): Published 2025-08-07
- [[Atualizações de Produto] Junho-25](https://docs.pluggy.ai/en/changelog#2025.06): Published 2025-07-04
- [[Atualizações de Produto] Maio-25](https://docs.pluggy.ai/en/changelog#2025.05): Published 2025-06-05
- [[Atualizações de Produto] Abril-25](https://docs.pluggy.ai/en/changelog#2025.04): Published 2025-05-05
- [[Atualizações de Produto] Março-25](https://docs.pluggy.ai/en/changelog#2025.03): Published 2025-04-04
- [[Atualizações de Produto] Fevereiro-25](https://docs.pluggy.ai/en/changelog#2025.02): Published 2025-03-05
- [[Atualizações de Produto] Janeiro-25](https://docs.pluggy.ai/en/changelog#2025.01): Published 2025-02-05
- [[Atualizações de Produto] Dezembro-24](https://docs.pluggy.ai/en/changelog#2024.12): Published 2025-01-05
- [Product Updates | December-24](https://docs.pluggy.ai/en/changelog#2024.12): Published 2024-12-16
- [[Atualizações de Produto] Novembro-24](https://docs.pluggy.ai/en/changelog#2024.11): Published 2024-11-18
- [[Atualizações de Produto] Outubro-24](https://docs.pluggy.ai/en/changelog#2024.10): Published 2024-10-08
- [Q3 (Jun-Sep) 2024](https://docs.pluggy.ai/en/changelog#2024.Q3): Published 2024-08-27
- [Q1 (Jan-Mar) 2024](https://docs.pluggy.ai/en/changelog#2024.Q1): Published 2024-06-21
- [Q2 (Apr-Jun) 2024](https://docs.pluggy.ai/en/changelog#2024.Q2): Published 2024-06-21
- [Q2 (Apr-Jun) 2024](https://docs.pluggy.ai/en/changelog#2024.Q2): Published 2024-06-21
- [Q1 (Jan-Mar) 2024](https://docs.pluggy.ai/en/changelog#2024.Q1): Published 2024-06-21
- [Initial Platform Launch](https://docs.pluggy.ai/en/changelog#1.0.0): Published 2024-01-10
- [December 2023 (Monthly Update)](https://docs.pluggy.ai/en/changelog#2023.12): Published 2023-12-07
- [December 2023 (Monthly Update)](https://docs.pluggy.ai/en/changelog#2023.12): Published 2023-12-07
- [September 2023 (Monthly Update)](https://docs.pluggy.ai/en/changelog#2023.09): Published 2023-10-08
- [September 2023 (Monthly Update)](https://docs.pluggy.ai/en/changelog#2023.09): Published 2023-10-08
- [August 2023 (Monthly Update)](https://docs.pluggy.ai/en/changelog#2023.08): Published 2023-09-07
- [August 2023 (Monthly Update)](https://docs.pluggy.ai/en/changelog#2023.08): Published 2023-09-07
- [July 2023 (Monthly Update)](https://docs.pluggy.ai/en/changelog#2023.07): Published 2023-08-07
- [July 2023 (Monthly Update)](https://docs.pluggy.ai/en/changelog#2023.07): Published 2023-08-07
- [June 2023 (Monthly Update)](https://docs.pluggy.ai/en/changelog#2023.06): Published 2023-07-04
- [June 2023 (Monthly Update)](https://docs.pluggy.ai/en/changelog#2023.06): Published 2023-07-04
- [May 2023 (Monthly Update)](https://docs.pluggy.ai/en/changelog#2023.05): Published 2023-05-31
- [May 2023 (Monthly Update)](https://docs.pluggy.ai/en/changelog#2023.05): Published 2023-05-31
- [April 2023 (Monthly Update)](https://docs.pluggy.ai/en/changelog#2023.04): Published 2023-05-03
- [April 2023 (Monthly Update)](https://docs.pluggy.ai/en/changelog#2023.04): Published 2023-05-03
- [March 2023 (Monthly Update)](https://docs.pluggy.ai/en/changelog#2023.03): Published 2023-04-03
- [March 2023 (Monthly Update)](https://docs.pluggy.ai/en/changelog#2023.03): Published 2023-03-14
- [February 2023 (Monthly Update)](https://docs.pluggy.ai/en/changelog#2023.02): Published 2023-02-20
- [February 2023 (Monthly Update)](https://docs.pluggy.ai/en/changelog#2023.02): Published 2023-02-20
- [January 2023 (Monthly Update)](https://docs.pluggy.ai/en/changelog#2023.01): Published 2023-01-10
- [January 2023 (Monthly Update)](https://docs.pluggy.ai/en/changelog#2023.01): Published 2023-01-10
- [December 2022 (Monthly Update)](https://docs.pluggy.ai/en/changelog#2022.12): Published 2022-12-15
- [December 2022 (Monthly Update)](https://docs.pluggy.ai/en/changelog#2022.12): Published 2022-12-15
---
## Slack Integration
Source: https://docs.pluggy.ai/en/docs/integrations/slack.md
## Overview
Pluggy runs a **hosted, public Slack bot** that answers questions from Pluggy's live documentation right inside Slack. Add it to your workspace and your team can ask about the API, look things up, and get answers with doc links — without leaving Slack and without building anything.
Just like the [MCP server](/docs/developer-tools/mcp), the bot is **hosted by Pluggy**: there's no Slack app to create, no OAuth scopes to configure, no request URLs, and no environment variables. You add it and use it.
## Add the bot to your workspace
Click **Add to Slack** and approve the install for your workspace (you'll need workspace-admin permission to install apps):
That's the whole setup. Once installed, invite the bot to any channel where you want to use it.
## Use it
- **Mention it** in a channel it's in:
```
@Pluggy Docs how do I create a connect token and open the Connect Widget?
```
- **Direct-message it** a question — no command needed:
```
What scopes does the Connect Widget need?
```
The bot replies with a concise answer grounded in Pluggy's documentation, with links to the relevant guides.
## What it can access (today)
For now the bot answers from Pluggy's **public documentation** only — the same content served at [v2.docs.pluggy.ai](https://v2.docs.pluggy.ai): guides, API reference, changelog, recipes, and curated Q&A. It does **not** access your Pluggy account, applications, or data.
Like the MCP server, the bot will optionally let you **sign in with your Pluggy dashboard account** and keep a session, so it can answer questions scoped to **your team** — your applications, items, and usage. Until you sign in — and today, in v0 — it stays on the **public docs**.
## Privacy
The bot only reads the messages that mention it or that you DM it, uses them to search the documentation, and replies. It doesn't store your Slack data.
## Troubleshooting
- **The bot doesn't reply** — make sure it's been **invited to the channel** (mentions only work where the bot is a member), or try a direct message.
- **"Add to Slack" didn't install** — you need **workspace-admin** permission to add apps; ask your Slack admin to run the install.
- **Answers look off or outdated** — the bot answers from the live public docs; if something's wrong in the docs themselves, let the Pluggy team know.
## Overview
Source: https://docs.pluggy.ai/en/docs/overview.md
Pluggy is an open finance platform for Latin America. One API integration reaches
hundreds of financial institutions — bank accounts, credit cards, investments, loans,
identity and payments — and returns their data in a single, normalized shape, whether
it came from a regulated Open Finance connector or from one of Pluggy's own.
## The three objects
Almost everything in the API is one of these, and the rest hangs off them:
- **Connector** — one financial institution, and the products it can return.
- **Item** — one user's connection through a connector, created after they consent.
It is the entry point to their data and the thing you store on your side.
- **Product** — the normalized data an item gives you: accounts, transactions,
investments, identity, loans.
The [Glossary](/docs/get-started/glossary) has the rest of the vocabulary; the
[Item](/docs/connections/item) guide covers the lifecycle you will actually spend
your time on.
## Two ways to build the first integration
Both end in the same place — an item created and its transactions on your screen.
Connect your coding agent to these docs with one URL, then hand it the prompt
that builds the whole flow.
Five steps with curl: an application, an API key, a connect token, the widget,
the data.
### Point an agent at the live docs
If you code with Claude, Cursor, Copilot, Codex or Gemini, connect them to our
documentation first. It is one URL, hosted, no key:
```bash
claude mcp add --transport http pluggy-docs https://mcp.pluggy.ai/mcp
```
The agent then reads the current guides and OpenAPI spec at runtime instead of
recalling whatever version of our API was in its training data — the difference
between code that runs and code that looks right. Setup for every other client is on
the [MCP server](/docs/developer-tools/mcp) page, and the prompt that builds the
whole flow is in the [Quick Start](/docs/quickstart).
Two more surfaces, for agents you cannot configure: every page here has a markdown
twin — add `.md` to its URL — and [`/llms.txt`](https://v2.docs.pluggy.ai/llms.txt)
indexes all of them. Anything that can fetch a URL can read our docs properly.
### Or follow the steps yourself
The [Quick Start](/docs/quickstart) is five steps: create an application, get an API
key, issue a connect token, open the widget, read the data. Nothing on this site
assumes you use an agent.
## Sandbox first
New applications start with access to the [Sandbox connectors](/docs/guides/sandbox),
so you can run the entire flow — including the failure cases you would rather find
now than in production — against fake institutions, with no real credentials
involved.
## Quick Start
Source: https://docs.pluggy.ai/en/docs/quickstart.md
By the end of this page a user has connected a financial institution and you are
reading their accounts and transactions. Five steps, whichever way you go through
them: create an application, get an API key, issue a connect token, open the widget,
read the data.
## Build it with an agent
Your agent can write this integration, and it writes a much better one when it is
reading our current documentation instead of remembering an older version of it.
### 1. Connect the docs
One hosted URL, no API key, nothing to install:
```bash
claude mcp add --transport http pluggy-docs https://mcp.pluggy.ai/mcp
```
Cursor, ChatGPT, Codex, VS Code, Windsurf and Gemini each take the same URL in their
own config — the exact snippet for each is on the
[MCP server](/docs/developer-tools/mcp) page. Adding our
[Agent Skill](/docs/developer-tools/ai-skills) on top gives it the integration
patterns to go with the reference.
### 2. Describe what you want
Paste this, with your stack filled in:
```text
Use the Pluggy Docs MCP server (pluggy-docs) for every Pluggy question — read the
current guides and OpenAPI spec before writing code, and cite the pages you used.
Build a minimal Pluggy integration in :
1. A server route that exchanges CLIENT_ID and CLIENT_SECRET for an API key.
2. A server route that issues a connect token for a given user.
3. A frontend page that opens the Pluggy Connect widget with that token and
stores the itemId from its onSuccess callback.
4. A server route that lists that item's accounts and its transactions,
handling pagination.
Rules: CLIENT_SECRET never leaves the server, credentials come from environment
variables, and the item's status is handled — not every connection is ready the
moment the widget closes.
```
Then ask it the questions you would otherwise have searched for — *why is this item
in `WAITING_USER_INPUT`?*, *what does this webhook event mean?* — and it will answer
from the same pages you are reading now.
### 3. What is still yours to do
An agent cannot sign up for you. Create the account and the application in step 1
below, put the credentials in your environment, and read the code it wrote before
running it against anything real — the Sandbox exists for exactly that.
Every page here has a markdown twin: add `.md` to any docs URL. The full index is at
[`/llms.txt`](https://v2.docs.pluggy.ai/llms.txt), the whole site as one file is at
[`/llms-full.txt`](https://v2.docs.pluggy.ai/llms-full.txt), and the OpenAPI spec is
at [`/openapi/pluggy-api.json`](https://v2.docs.pluggy.ai/openapi/pluggy-api.json).
The **Copy for LLM** button at the top of each page gives you the same thing for a
single page.
## Or do it by hand
> **Start even faster**
>
> Check out our [quickstart repository](https://github.com/pluggyai/quickstart) on GitHub -- it contains ready-to-run sample apps (Node, Python, Java, and frontend examples) that implement this entire flow.
### 1. Create your account and application
1. Sign up at the [Pluggy Dashboard](https://dashboard.pluggy.ai).
2. Create an **application**. Every application has its own `CLIENT_ID` and `CLIENT_SECRET` -- you'll find them on the application's page in the Dashboard.
New applications start with access to our [Sandbox connectors](/docs/guides/sandbox), so you can test the whole flow with fake institutions before going to production.
### 2. Get an API Key
Authenticate with your credentials to get an API Key. This step must be done from your **server** -- never expose your `CLIENT_SECRET` in client-side code.
```bash
curl -X POST https://api.pluggy.ai/auth \
-H "Content-Type: application/json" \
-d '{
"clientId": "YOUR_CLIENT_ID",
"clientSecret": "YOUR_CLIENT_SECRET"
}'
```
The response contains an `apiKey`, valid for 2 hours, with full access to the API:
```json
{
"apiKey": "eyJhbGciOiJIUzI1..."
}
```
### 3. Create a Connect Token
To let your users connect their accounts from your app, create a short-lived Connect Token (valid for 30 minutes) with your API Key:
```bash
curl -X POST https://api.pluggy.ai/connect_token \
-H "Content-Type: application/json" \
-H "X-API-KEY: YOUR_API_KEY" \
-d '{}'
```
The response contains an `accessToken` -- this is the token you pass to the widget. See [Authentication](/docs/authentication) for the full details on scopes and options.
### 4. Open the Connect Widget
Use the [Connect Widget](/docs/connect-widget/introduction) in your frontend, initialized with the `accessToken` from the previous step. The widget handles the entire authentication flow with the financial institution and creates an [Item](/docs/connections/item) -- the representation of the user's connection. Grab the `itemId` from the widget's `onSuccess` event.
### 5. Fetch the data
With the connection created, use your API Key (server-side) to retrieve the data:
```bash
# List the accounts of the connection
curl "https://api.pluggy.ai/accounts?itemId=YOUR_ITEM_ID" \
-H "X-API-KEY: YOUR_API_KEY"
# List the transactions of an account
curl "https://api.pluggy.ai/transactions?accountId=YOUR_ACCOUNT_ID" \
-H "X-API-KEY: YOUR_API_KEY"
```
## Next steps
- Understand the core concepts in the [Glossary](/docs/get-started/glossary)
- Test every flow with the [Sandbox](/docs/guides/sandbox)
- Explore all endpoints in the [API Reference](/reference)
## Authentication
Source: https://docs.pluggy.ai/en/docs/authentication.md
Pluggy uses two kinds of credentials, depending on where the request is made from:
- **API Key** -- used for server-side requests. It gives full access to all Pluggy API endpoints.
- **Connect Token** -- used from client-side applications (i.e. the [Connect Widget](/docs/connect-widget/introduction)). Its access is limited in scope.
The Connect Token access is limited to only the generated Item resource data ([GET /items/:id](/reference/items-retrieve)), and a reduced access to the data of the recovered Accounts ([GET /accounts?itemId=](/reference/accounts-list)).
So, for example, a newly created Connect Token can't be used to access information that was created previously with a different Connect Token.
For any other kind of request, such as retrieving all the Item related products data, configuring webhooks, [and more](/reference/auth), you'll need to do server-side requests using your API Key.
## Create an API Key
First, you'll need to authenticate with the Pluggy API, using your `CLIENT_ID` and `CLIENT_SECRET`, to [create an API Key](/reference/auth-create) via `POST /auth`.
*Note that these credentials are extremely **sensitive**, so please ensure to do this step in your secured server only.*
This API Key expires after 2 hours and will give you full access to all Pluggy API endpoints.
## Create a Connect Token
Then, with your API Key, you'll have to make a call to [POST /connect_token](/reference/connect-token-create).
> **Important**
>
> The `connectToken` is valid for 30 minutes only.
> The recommended usage is 1-per-connection, so we suggest creating a new one each time you want to create or update an Item.
The usage of this **Connect Token** is identical to the **API Key**: simply pass it in the request authentication header, and the Pluggy API will take care of validating its scope.
> **Warning**
>
> Attempts to access detailed products data using a Connect Token (instead of an API Key) will result in a `403 Forbidden` API response.
### Configuring a Connect Token
When you are creating a Connect Token you can provide some `ItemOptions` that will be passed down to all Items created using the same Connect Token. **They must be sent nested inside the `options` attribute of the request body** -- this is the complete payload:
```json
{
"options": {
"webhookUrl": "https://example.com/webhook",
"clientUserId": "My App UserId",
"oauthRedirectUri": "https://pluggy.ai/demo",
"avoidDuplicates": true
}
}
```
- `webhookUrl`: URL where you will receive all the events of the Items created with this token.
- `clientUserId`: You can use this field to link an Item with your user's identifier.
- `oauthRedirectUri`: URL to redirect the user to after the connect flow.
- `avoidDuplicates`: Avoids creating a new Item if there is already one with the same credentials.
The only other attribute accepted at the root of the body is `itemId`, used when the widget updates an existing Item (see [Updating an Item](/docs/connect-widget/updating-item)).
> **Warning**
>
> Any other property sent at the **root** of the body is ignored. Sending `clientUserId`
> at the root instead of inside `options` still returns `200 OK`, but the value is
> discarded: the Items created with that token will have `clientUserId: null`, and the
> field will also be `null` in the `item/created`, `item/updated` and `item/error`
> webhook payloads.
>
> ```json
> // ❌ Wrong -- clientUserId is silently discarded
> { "clientUserId": "My App UserId", "options": { "avoidDuplicates": true } }
>
> // ✅ Correct
> { "options": { "clientUserId": "My App UserId", "avoidDuplicates": true } }
> ```
>
> If you already have Items created this way, you can backfill the value with
> [PATCH /items/{id}](/reference/items-update).
## Creating an Item
To summarize, the flow to create an [Item](/docs/connections/item) using a `connectToken` is:
1. Your server authenticates with `CLIENT_ID` and `CLIENT_SECRET` to get an API Key.
2. Your server creates a Connect Token and sends it to your client application.
3. Your client application uses the Connect Token to create the Item.
If you are using our [Connect Widget](/docs/connect-widget/introduction), you'll only need to take care of providing the Connect Token -- the rest will be handled by us.
### Keeping a connection reference
When initializing the Connect Widget for your user, you may want to track which user the created connection belongs to. This can be done in a few ways:
- **Connect Widget `onSuccess` event**: When the connection is created and returned, you can recover the `itemId` to store on your side.
- **Webhooks**: After the Item has been successfully created and synchronized, you will receive events. See [Webhooks](/docs/developer-tools/webhooks-ref).
- **Linking your user identifier with an Item**: If you need to link the Item to your user, you can store a reference on our Item by using the `clientUserId`. This value can be provided when creating the `connectToken` or when creating an Item directly through the [Items endpoint](/docs/connections/item).
## Glossary
Source: https://docs.pluggy.ai/en/docs/get-started/glossary.md
## Product
A Product represents standardized data from a financial institution with a specific set of attributes for a specific purpose. ie. Accounts, Credit Cards, Investments, Identity, Transactions.
## Connector
A Connector represents an integration with a financial institution that recovers specific products based on the user's access.
## Item
An Item is the representation of a connection through a specific connector of an Institution, and serves as the entry point to access the set of products recovered, after the user gave their consent to collect his data.
To create an Item, the easiest way for an user is interacting with our [Pluggy Connect Widget](/docs/pluggy-connect-introduction) where he can provide his consent, follow through authentication steps, and finally enable access to all their products through our API.
## API key
An **API key** works as an API secret and expires 2 hours after creation. This one will be used to authenticate all requests done to Pluggy's API. Once the token expires, a new one has to be created, by using your corresponding **CLIENT_ID** and **CLIENT_SECRET** secret credentials.
You can obtain your own **Client ID** and **Client Secret** credentials by signing up in our [Dashboard](http://dashboard.pluggy.ai/).
> All API keys can be revoked from our Dashboard in case you need, and get new fresh ones.
## Connect Token
The **Connect Token** is another type of API secret. It expires 30 minutes after creation. It's orientated to be used on the `client-side` since its access is restricted to ([`GET /items/:id`](/reference/items-retrieve)), and reduced access to the data of the recovered Accounts ([`GET /accounts?itemId`](/reference/accounts-list)).
To generate it, (note: this must be done on the `server-side`) you should make a call to [POST /connect_token](/reference/connect-token-create) using your **API key**. See more information about **Connect Token** [here](/docs/authentication).
## FAQ
Source: https://docs.pluggy.ai/en/docs/get-started/faq.md
## Basic concepts
### What is an item?
An item represents the connection between a user and a financial institution, together with all the data returned by that connection.
### What is an application, and which types are available?
An application is the pair of `clientId` and `clientSecret` keys used to reach the API. Handle them carefully: they are the only thing standing between the outside world and your data. You can create applications in both the `Development` and `Production` environments.
### What is the difference between an apiKey and a connectToken?
The [apiKey](/reference/auth/auth-create) grants access to the API. You obtain it from your Pluggy credentials (`clientId` and `clientSecret`) and it is valid for 2 hours.
The [connectToken](/reference/auth/connect-token-create) is the key used to open the Pluggy Connect widget — the graphical interface on top of the API. Getting a connectToken requires an apiKey first, and it lasts 30 minutes.
## Connectors and financial institutions
### What is the difference between Pluggy connectors and Open Finance connectors?
| | Pluggy connectors (unregulated) | Open Finance connectors (regulated) |
| -------------- | --------------------------------------- | ---------------------------------------- |
| **Technology** | Pluggy's own | Framework regulated by the Central Bank |
| **Access** | Direct to the financial institution | Through the user's consent |
| **Data** | As shown in the internet banking | Standardised and enriched |
For more detail, see [Item](/docs/connections/item).
### How do I check which financial institutions are available?
There are three ways to look up the available institutions (connectors):
- **Documentation** — [Open Finance (regulated)](/docs/open-finance/overview#institutions-supported-by-open-finance) and [Pluggy connectors (unregulated)](/docs/connections/connectors-coverage).
- **API** — [`GET /connectors`](/reference/connector/connectors-list).
- **Dashboard** — the [Customization](https://dashboard.pluggy.ai/customization) tab.
### Which institutions need a token to connect?
The institutions that require a token are listed in [Connectors coverage](/docs/connections/connectors-coverage).
### How do I enable connectors in my application?
Open the **Customization** tab in the [dashboard](https://dashboard.pluggy.ai/customization).
### Can I skip the bank-selection step in the Pluggy Connect widget?
Yes. The `selectedConnectorId` attribute shows only the connector you pre-select. See [Environments and configurations](/docs/connect-widget/environments#available-configurations).
## Managing items and connections
### If a user connects the same account twice, are two different connections created?
Yes. Every time the user gives consent — entering credentials on a Pluggy connector, or picking which data to share on an Open Finance one — a new connection is created with a new `itemId`. To avoid this, create the connection once and update that same `itemId` whenever you need fresher data.
There is also a setting that checks whether the account has been connected before: see [avoiding duplicates](/docs/connections/item#avoiding-duplicates).
### How can I tell which of my users an `itemId` belongs to?
Send the `clientUserId` field when the item is created, or when you open the Pluggy Connect widget. It takes any string you like; we recommend `"name | email | cpf_or_cnpj"`. See the [connect token options](/reference/auth/connect-token-create).
### How do I revoke a consent (a connection)?
Delete the corresponding item through the API. That ends the connection and removes the data associated with it.
### Why did my `itemId` stop updating?
The most common cause is hitting the institution's request limit, which happens when the same account is connected many times over.
**Limit per CPF/CNPJ**: this limit is shared across every `itemId` belonging to the same CPF or CNPJ. Once it is reached, transactions only resume updating the **following month**.
### The item hit the limit — what can I do?
The limit cannot be lifted within the current month. To keep it from happening again, avoid creating multiple connections for the same account: reuse the same `itemId` and update it when you need more recent data.
### Can I list every item I have created at Pluggy?
No. Listing items is not available for security reasons, so that no data can leak across clients.
### Are new transactions on an account updated in real time?
No. New transactions become available only after the connection is updated — see [updating an item](/docs/connect-widget/updating-item).
On Open Finance (regulated) connectors, new transactions can take up to 24h to become available.
### How does automatic updating work?
Pluggy can update your `itemId`s on a schedule — just ask through any of our channels. You can choose the hour the updates start; items are queued and updated according to available processing capacity, so nothing is overloaded.
## Environments and production
### How do I go to production?
Create a production application in the dashboard, under `Applications`, using `Go to production`. A production application matters because:
- automatic updating is available;
- there is no limit on the number of `itemId`s;
- there is no demo page, so no customer data is exposed.
### Can I keep Development and Production separate? Does the client_id/secret change?
Yes. Create the environments in the [dashboard](https://dashboard.pluggy.ai/); each new environment gets its own `clientId` and `clientSecret`.
The **Development** environment is capped at **100 items**.
## Webhooks and events
### Which webhook events are available?
The full list is in the [webhooks reference](/docs/developer-tools/webhooks-ref).
## Sandbox
Source: https://docs.pluggy.ai/en/docs/guides/sandbox.md
Using our production environment you can access `Live` and `Sandbox` connectors. For testing purposes, you can experiment with your integration using our **Sandbox connector** (which represents our `Sandbox` environment). This will let you see how the transactions update daily and test all the possible valid connections and erroneous flows.
> **Warning**
>
> All the sandbox items that are not updated for more than **30 days** will be deleted without any possibility to get them back in the future.
**You will find different flows:**
1. Basic flow (we also include a special Caixa flow)
2. Basic flow Business
3. MFA 1-step
4. MFA 2-step
5. Joint accounts (Bradesco Conta Conjunta flow)
6. QR Login flow
7. Open Finance flow
**For a successful flow, the credentials are:**
- **Correct password**: `password-ok`
- **Correct MFA Token**: `123456`
Each test user name below maps to a specific execution status. See [Item lifecycle](/docs/connections/item-lifecycle) for the full description of item and execution statuses.
## Sandbox response structure
The Sandbox (Pluggy Bank connector) returns synthetic data, but with the same field structure as production responses. Below is the field mapping observed in `/accounts` , `/transactions` , `/investments` , and `/loans` for a test item queried.
### Accounts
```json /accounts
// Always returns at least 1 BANK/CHECKING_ACCOUNT and 1 CREDIT/CREDIT_CARD account:
{
"type": "BANK", "subtype": "CHECKING_ACCOUNT",
"balance": 21544.6, "currencyCode": "BRL",
"marketingName": "GOLD Conta Corrente", "taxNumber": "416.799.495-00", "owner": "John Doe",
"bankData": {
"transferNumber": "123/0001/12345-0",
"closingBalance": 21544.6,
"automaticallyInvestedBalance": 2154.46,
"hasReservedBalance": true,
"reservedBalances": [{ "name": "Caixinha Para Férias", "availableAmounts": [{ "amount": 1000.04, "remuneration": { "indexer": "CDI", "rateType": "LINEAR", "preFixedRate": 0.3 } }] }]
},
"creditData": null
}
{
"type": "CREDIT", "subtype": "CREDIT_CARD",
"balance": -503.1,
"creditData": {
"level": "BLACK", "brand": "MASTERCARD",
"balanceCloseDate": "2026-07-23", "balanceDueDate": "2026-07-28",
"creditLimit": 300000, "availableCreditLimit": 300000,
"minimumPayment": 100.62, "holderType": "MAIN", "status": "ACTIVE"
}
}
// Note that bankData/creditData are mutually exclusive depending on the account's type - the Sandbox even simulates reservedBalances ("piggy banks") inside bankData, which isn't trivial to find documented elsewhere.
```
### Transactions
```json /transactions
// Simple transaction (recurring, no extra metadata) — salary, recurring debits:
{ "description": "SALARIO EMPRESA XYZ LTDA", "amount": 8500, "type": "CREDIT", "category": "Salary", "categoryId": "01010000", "paymentData": null,
"creditCardMetadata": null }
// Bank slip (boleto) payment — the only record with paymentData populated:
{
"description": "Pagamento de boleto", "amount": -100, "type": "DEBIT",
"category": "Transfer - Bank Slip", "categoryId": "05010000",
"paymentData": {
"payer": { "documentNumber": { "type": "CPF", "value": "111.111.111-11" }, "name": "Francisco Souza", "routingNumberISPB": "60701190" },
"paymentMethod": "BOLETO",
"receiver": { "documentNumber": { "type": "CNPJ", "value": "PL.UGG.Y12/AB00-42" }, "name": "Pluggy Brasil Instituição de Pagamento LTDA" },
"boletoMetadata": { "baseAmount": 90, "discountAmount": 0, "interestAmount": 10, "digitableLine": "11190000111001113911100000021110600000000111000" }
}
}
// Installment credit card purchase — the only record with creditCardMetadata populated:
{
"description": "NETFLIX.COM", "amount": -55.9,
"creditCardMetadata": { "installmentNumber": 2, "totalInstallments": 6, "totalAmount": -335.4, "payeeMCC": 5812, "billId":
"3b3341e4-d30c-48d6-bcbe-79a3fe47d704" }
}
// In other words: the Sandbox simulates bank-slip (boleto) payments and installment card purchases, but the checking account queried here has no Pix, TED, or inter-account transfers — all 17 checking-account transactions are: boleto payment, recurring debits (telecom, electricity, condo fees), salary, and bill payment. On the credit card, all 9 transactions are purchases (subscriptions/gym), with no dispute, refund, or cash-advance examples.
```
### Investments
```json /investments
// 8 investments across 6 type/subtype combinations:
// SECURITY/PGBL — pension plan
{
"type": "SECURITY", "subtype": "PGBL", "name": "ITAU Sandbox previdencia",
"balance": 11720.42, "value": 3.605103, "amount": 1720.42,
"lastMonthRate": -0.8, "lastTwelveMonthsRate": 5.97, "annualRate": 7.64,
"issuer": "ITAU UNIBANCO ASSET MANAGEMENT LTDA", "issuerCNPJ": "40.430.971/0001-96"
}
// SECURITY/RETIREMENT — pension plan issued by Pluggy itself
{
"type": "SECURITY", "subtype": "RETIREMENT", "name": "Pluggy PREVIDENCIA",
"balance": 1359.39, "amountProfit": 359.39, "amountOriginal": 1000,
"issuer": "Banco do Pluggy", "dueDate": "2026-07-23T16:16:27.300Z"
}
// MUTUAL_FUND/INVESTMENT_FUND — appears twice (Premium/Basic)
{
"type": "MUTUAL_FUND", "subtype": "INVESTMENT_FUND", "name": "Fondo de Investimento Premium",
"balance": 1359.39, "quantity": 3, "value": 500, "amount": 1500,
"taxes": 40.61, "taxes2": 100, "amountProfit": 359.39, "amountOriginal": 1000
}
// FIXED_INCOME/CDB — fixed-income bond
{
"type": "FIXED_INCOME", "subtype": "CDB", "name": "CDR",
"balance": 2000, "rate": 150, "rateType": "CDI", "fixedAnnualRate": 2.5,
"dueDate": "2026-07-23T16:16:27.300Z", "issuer": "Banco do Pluggy",
"institution": { "name": "BANCO BTG PACTUAL S/A", "number": "30306294000145" }
}
// ETF/ETF — appears twice: one active, one fully withdrawn
{
"type": "ETF", "subtype": "ETF", "name": "ISUS11 STOCK", "code": "ISUS11", "isin": "123456789",
"quantity": 1, "amount": 2000, "status": "ACTIVE"
}
{
"type": "ETF", "subtype": "ETF", "name": "BOVA11", "code": "BOVA11",
"quantity": 0, "value": 118.4, "status": "TOTAL_WITHDRAWAL"
}
// EQUITY/REAL_ESTATE_FUND — REIT (FII)
{
"type": "EQUITY", "subtype": "REAL_ESTATE_FUND", "name": "GGRC11", "code": "GGRC11", "isin": "BRGGRCCTF002",
"quantity": 1, "amount": 118.4, "issuer": "GGR COVEPI RENDA FDO INV IMOB"
}
// No SECURITY/individual-stock example (equity held outside a fund), and nothing explicitly
// labeled Treasury Direct — the closest analog available is the FIXED_INCOME/CDB above.
```
### Loans
```json /loans
{
"productName": "Crédito Pessoal Consignado",
"type": "CREDITO_PESSOAL_COM_CONSIGNACAO",
"kind": "LOAN",
"contractAmount": 50000, "currencyCode": "BRL",
"contractDate": "2022-08-01T00:00:00.000Z", "dueDate": "2028-01-15T00:00:00.000Z",
"installmentPeriodicity": "MONTHLY", "amortizationScheduled": "SAC", "CET": 0.29,
"interestRates": [{ "interestRateType": "SIMPLE", "postFixedRate": 0.55, "preFixedRate": 0.6, "referentialRateIndexerSubType": "TJLP" }],
"installments": { "dueInstallments": 57, "paidInstallments": 73, "pastDueInstallments": 73, "totalNumberOfInstallments": 130632 },
"payments": { "contractOutstandingBalance": 1000.04 }
}
// Only one loan type/kind is simulated: payroll-deductible personal credit. No mortgage, vehicle financing, or unsecured personal loan without consignação is represented.
```
The values above are illustrative examples of what the Sandbox can return - they exist to help you build against the right field structure. The Sandbox is not intended to be used as a target for automated tests that assert on Pluggy's specific behavior.
## 1- Basic flows
> **Note**
>
> The basic flow also works for **Business connectors**.
| Execution status | User name | Description |
|---|---|---|
| `SUCCESS` | `user-ok` | Successful connection. |
| `ALREADY_LOGGED_IN` | `user-logged` | The user already has an opened login session (needs to manually log out). |
| `ACCOUNT_LOCKED` | `user-locked` | User account is locked, needs manual action to be unlocked. |
| `UNEXPECTED_ERROR` | `user-error` | Connector had a random error. |
| `SITE_NOT_AVAILABLE` | `user-unavailable` | Provider site was not available. |
| `ACCOUNT_NEEDS_ACTION` | `user-account-need-actions` | Provider is requesting some manual action from the user (ie. accept new terms of use). |
| `ACCOUNT_NEEDS_ACTION` + `providerMessage` | `user-account-need-actions-provider-message` | Provider is requesting some manual action from the user, including instructions to address it in the item error `providerMessage` field. |
| `CONNECTION_ERROR` | `user-connection-error` | There was an internal connection error with the provider (ie. Proxy issue). |
| `INVALID_CREDENTIALS` | anything else | The user/password credentials were invalid. |
| `PARTIAL_SUCCESS` | `user-ok-account-error` | Error recovering account product. |
| `SUCCESS` with warnings | `user-ok-account-warning` | Warning in account product. |
| `ACCOUNT_CREDENTIALS_RESET` | `user-account-credentials-reset` | The user needs to update some of their credentials in the institution. |
| `USER_NOT_SUPPORTED` | `user-not-supported` | The user is not allowed to perform login in the institution through Pluggy. |
| `SUCCESS` with two checking accounts data | `user-ok-two-checking-accounts` | Success, but returns an example of two checking accounts. |
### Enlarge result data
In cases in which it is necessary to test large amounts of transactions in the result, you can use the `user-ok-perf` or `user-ok-perf-XXx` username to recreate this situation. `XX` represents the multiplier for the number of transactions to be retrieved. For example, if you choose 1000 as XX, the resulting username would be `user-ok-perf-1000x`, in order to multiply the result by this number.
The limit of this multiplier is 5000, so if you use a larger number, the multiplier will be just 5000.
### Basic Flow | Authorization Pending status (Caixa flow)
This is a special case that emulates the Caixa flow. It consists of three possible execution statuses to be returned.
When a user connects for the first time, the expected execution returned will be to confirm the user device shown (i.e. "1234-5678").
So, the first execution (after the user confirms the device on his side) will return `USER_AUTHORIZATION_PENDING` and a message that informs the time that the user must wait until authorization is granted from Caixa.
Once this step is completed, there are two possible scenarios:
1. If the user updates the item within the time to be awaited, the execution result will be `USER_AUTHORIZATION_NOT_GRANTED` and a message to remind the time to be awaited until the authorization is granted from Caixa (in the Sandbox case, the time is 2 minutes).
2. If the user updates the item after the wait is over, the data of the account will be retrieved successfully and the execution report will be `SUCCESS`.
See the table below for more details:
| Execution status | User name | Description |
|---|---|---|
| `USER_AUTHORIZATION_PENDING` | `user-ok-auth-pending` | This will report a `USER_AUTHORIZATION_PENDING` status, and a message to wait for 2 minutes until the institution grants authorization. Then, you can update the item to retrieve the data after those 2 minutes, or get a not-yet-granted authorization message (please read the next rows). |
| `USER_AUTHORIZATION_NOT_GRANTED` | re-use credentials (update) | If the item is updated before the institution grants authorization, the status reported will be `USER_AUTHORIZATION_NOT_GRANTED` and you will be newly asked to wait for the 2 minutes after the first execution. |
| `SUCCESS` | re-use credentials (update) | If the item is updated once the institution authorization is completed, then the data should be retrieved and the status report will be `SUCCESS`. |
## 3- MFA 1-step
| Scenario | User name | MFA | Description |
|---|---|---|---|
| Login Ok | `user-ok` | `123456` | Successful connection. |
| `INVALID_CREDENTIALS_MFA` | `user-ok` | ≠ `123456` | The MFA parameter provided was incorrect. |
## 4- MFA 2-step
| Scenario | User name | MFA | Description |
|---|---|---|---|
| Login Ok | `user-ok` | `123456` | Successful connection. |
| `INVALID_CREDENTIALS_MFA` | `user-ok` | ≠ `123456` | The MFA parameter provided was incorrect. |
| Login Ok (MFA with QR image) | `user-ok-img` | `123456` | Successful connection. |
| `INVALID_CREDENTIALS_MFA` (MFA with QR image) | `user-ok-img` | ≠ `123456` | The MFA parameter provided was incorrect. |
| Login Ok (MFA with options to select) | `user-ok-select` | any | Successful connection. |
| Login OK (with phone selection before MFA) | `user-ok-phone` | `123456` | Successful connection. |
| `INVALID_CREDENTIALS_MFA` (with phone selection before MFA) | `user-ok-phone` | ≠ `123456` | The MFA parameter provided was incorrect. |
| Login Ok (with company selection after MFA) | `user-ok-multi-company` | `123456` | Successful connection. |
| `INVALID_CREDENTIALS_MFA` | `user-ok-multi-company` | ≠ `123456` | The MFA parameter provided was incorrect. |
| `UNEXPECTED_ERROR` | `user-ok-mfa-error` | `123456` | Connector had a random error. |
| `ACCOUNT_LOCKED` | `user-ok-mfa-locked` | `123456` | User account is locked, needs manual action to be unlocked. |
| `SITE_NOT_AVAILABLE` | `user-ok-mfa-unavailable` | `123456` | Provider site was not available. |
| `CONNECTION_ERROR` | `user-ok-mfa-connection-error` | `123456` | There was an internal connection error with the provider (ie. Proxy issue). |
| `ALREADY_LOGGED_IN` | `user-ok-mfa-logged` | `123456` | The user already has an opened login session (needs to manually log out). |
| `ACCOUNT_NEEDS_ACTION` | `user-ok-mfa-account-need-actions` | `123456` | Provider is requesting some manual action from the user (ie. accept new terms of use). |
## 5- Joint Accounts (Bradesco Conta Conjunta flow)
This is a special case that emulates the Bradesco Conta Conjunta flow.
**Below you will find two examples:**
1. Testing in the Pluggy Connect widget
2. Testing via Postman
### 1- Testing in the Pluggy Connect widget
When using the [Pluggy Connect widget](/docs/developer-tools/connect-account), the user will be presented to choose first from either a "Single account" or a "Joint account".
- If the user selects **"Single account"**, they will be asked for bank credentials and MFA in the same step as the credentials.
- If the user selects **"Joint account"**, they will be asked only for bank credentials. Then, they will be asked which account they want to connect, and after that, the MFA will be required. If the MFA is correct, the account will connect successfully.
### 2- Testing via Postman
- When testing "single account", the request is the same as sandbox MFA 1-step. The bank credentials and MFA are sent together.
- When testing "joint account", you have to include an MFA 1-step parameter, with the mock value: `000000`.
Note that this is the same as the Connect widget flow. When the user selects the "joint account" flow, the UI is not asking to complete the MFA parameter.
## 6- QR Login flow
This is a case that originally simulates a flow similar to Inter QR. No credentials are necessary. Once started, the item will enter a `WAITING_USER_ACTION` status, and return a QR code for the user to scan.
This flow will simulate a rapidly changing QR code for 10 seconds and then simulate the user reading the QR and advancing the state to a normal login flow.
## 7- Open Finance flow
To connect using our sandbox connection (see [Creating an Open Finance item](/docs/open-finance/creating-item)), you will be required to send a CPF:
| Scenario | CPF |
|---|---|
| Basic flow | 761.092.776-73 |
| Multiple authorization flow - approved | 238.242.640-30 |
| Multiple authorization flow - rejected | 051.177.670-55 |
| Basic flow - with slow authentication | 002.502.737-99 |
| Basic flow - force error getting OF resources | 163.511.711-99 |
This will redirect you to the mock bank login page. Please use the following credentials:
- User: `ralph.bragg@gmail.com`
- Password: `P@ssword01`
### How does the multiple authorization (múltipla alçada) flow work?
This flow simulates a scenario where, in order to retrieve account data, the item must be approved by another person (typically another company associate). To test this scenario, follow these steps:
1. Create a sandbox item using one of the CPFs listed in the table above. The item will not return accounts immediately. Instead, the `statusDetail` field will indicate that the accounts require authorization.
2. Update that item. Depending on the CPF you provided, the accounts may or may not be returned.
## Introduction
Source: https://docs.pluggy.ai/en/docs/connect-widget/introduction.md
## What is Pluggy Connect?
Pluggy Connect is a drop-in widget we offer to help you quickly get started with Pluggy. Your users will use it to connect their accounts, within your app, directly to the Pluggy API.
The Connect Widget is Pluggy's plug & play frontend solution that allows users to connect their financial accounts on a step-by-step flow, so you will only need to worry about interacting with their data instead of worrying about painful login flows.
Throughout the connection process, the widget handles:
- Credential validation
- Multi-factor authentication (MFA)
- Error management
## How it Works
The typical integration follows these key steps:
1. **Backend Token Setup**: First, you'll need to set up an endpoint on your backend that obtains and provides a **Connect Token**. This token grants Pluggy Connect authorization to access the Pluggy API on behalf of your application. This process must be done on your backend, since the endpoint requires authentication using your application's `CLIENT_ID` and `CLIENT_SECRET`.
2. **Frontend Integration**: With your Connect Token endpoint deployed, you are ready to integrate Pluggy Connect in your client-side application. There are fully working frontend examples that you can clone and start using right away to launch the Pluggy Connect interface, by replacing the Connect Token endpoint URL with your own.
3. **User Connection**: When your user clicks on "Connect my account", a Connect Token is obtained and the Connect Widget instantiates with this token and opens up a modal for the user to input their credentials.
4. **Data Retrieval**: Once the widget finishes, it emits an `onSuccess` event with the `id` of the newly created **Item**. This Item ID is needed for any future action you want to do with the connected banking data.
## Platform Support
Pluggy Connect is an easy-to-integrate and quick-to-setup tool that works across all browsers and platforms, including:
- Web (React, Next.js, Plain JavaScript)
- iOS
- Android
- React Native
- Flutter
- Mobile Webviews
## Event Callbacks
The widget supports several callbacks to improve the user experience, such as redirecting users to a success page or showing error messages. You can pass the widget a function to execute when an event happens:
- **onSuccess**: Triggered when the connection is successful. Receives an object containing the item data (e.g., `onSuccess={({ item }) => console.log(item.id)}`).
- **onError**: Triggered when an error occurs. Receives error information and can access the item data if available (e.g., `onError={({ message, data: { item } }) => showErrorPage(message)}`).
- **onClose**: Triggered when the user closes the widget modal.
- **onOpen**: Triggered when the widget is opened.
- **onEvent**: Handles specific user interaction events such as `LOGIN_SUCCESS`, `LOGIN_MFA_SUCCESS`, `LOGIN_STEP_COMPLETED`, and `ITEM_RESPONSE`.
## MFA Support
Pluggy Connect handles multi-factor authentication flows automatically. The first time linking an MFA connection, the user receives an extra parameter in the credentials list (a one-use parameter). If you use the Pluggy Connect widget, you won't need to go into further details of the flow -- Pluggy has already covered it all for you.
## Getting Started
To start using Pluggy Connect, you will need:
1. A Pluggy account with `CLIENT_ID` and `CLIENT_SECRET` (available from the [Dashboard](https://dashboard.pluggy.ai))
2. A backend endpoint that generates Connect Tokens
3. A frontend integration using one of the available SDKs
Check the following sections for more details on [Authentication](/docs/connect-widget/authentication), [Environments and Configurations](/docs/connect-widget/environments), [Updating an Item](/docs/connect-widget/updating-item), [Customization](/docs/connect-widget/customization), and [OAuth Support](/docs/connect-widget/oauth-support).
## Authentication
Source: https://docs.pluggy.ai/en/docs/connect-widget/authentication.md
## Overview
When connecting to Pluggy from a client-side application (i.e. the Connect Widget), we require the use of a **Connect Token**. The Connect Token access is limited to only the generated Item resource data (`GET /items/:id`), and a reduced access to the data of the recovered Accounts (`GET /accounts?itemId`).
A newly created Connect Token can't be used to access information that has been created previously with a different Connect Token.
## Connect Token
A Connect Token is a limited-access token that:
- **Expires 30 minutes** after creation
- Is meant to be used by **frontend applications** (Web or Mobile) to authenticate with Pluggy
- Is specially useful for end-users to connect their accounts through the Pluggy Connect widget
- Has visibility only for the connections that were created using this token
## Authentication Flow
Both API Keys and Connect Tokens can be recovered using the `CLIENT_ID` and `CLIENT_SECRET` provided in the [Dashboard](https://dashboard.pluggy.ai).
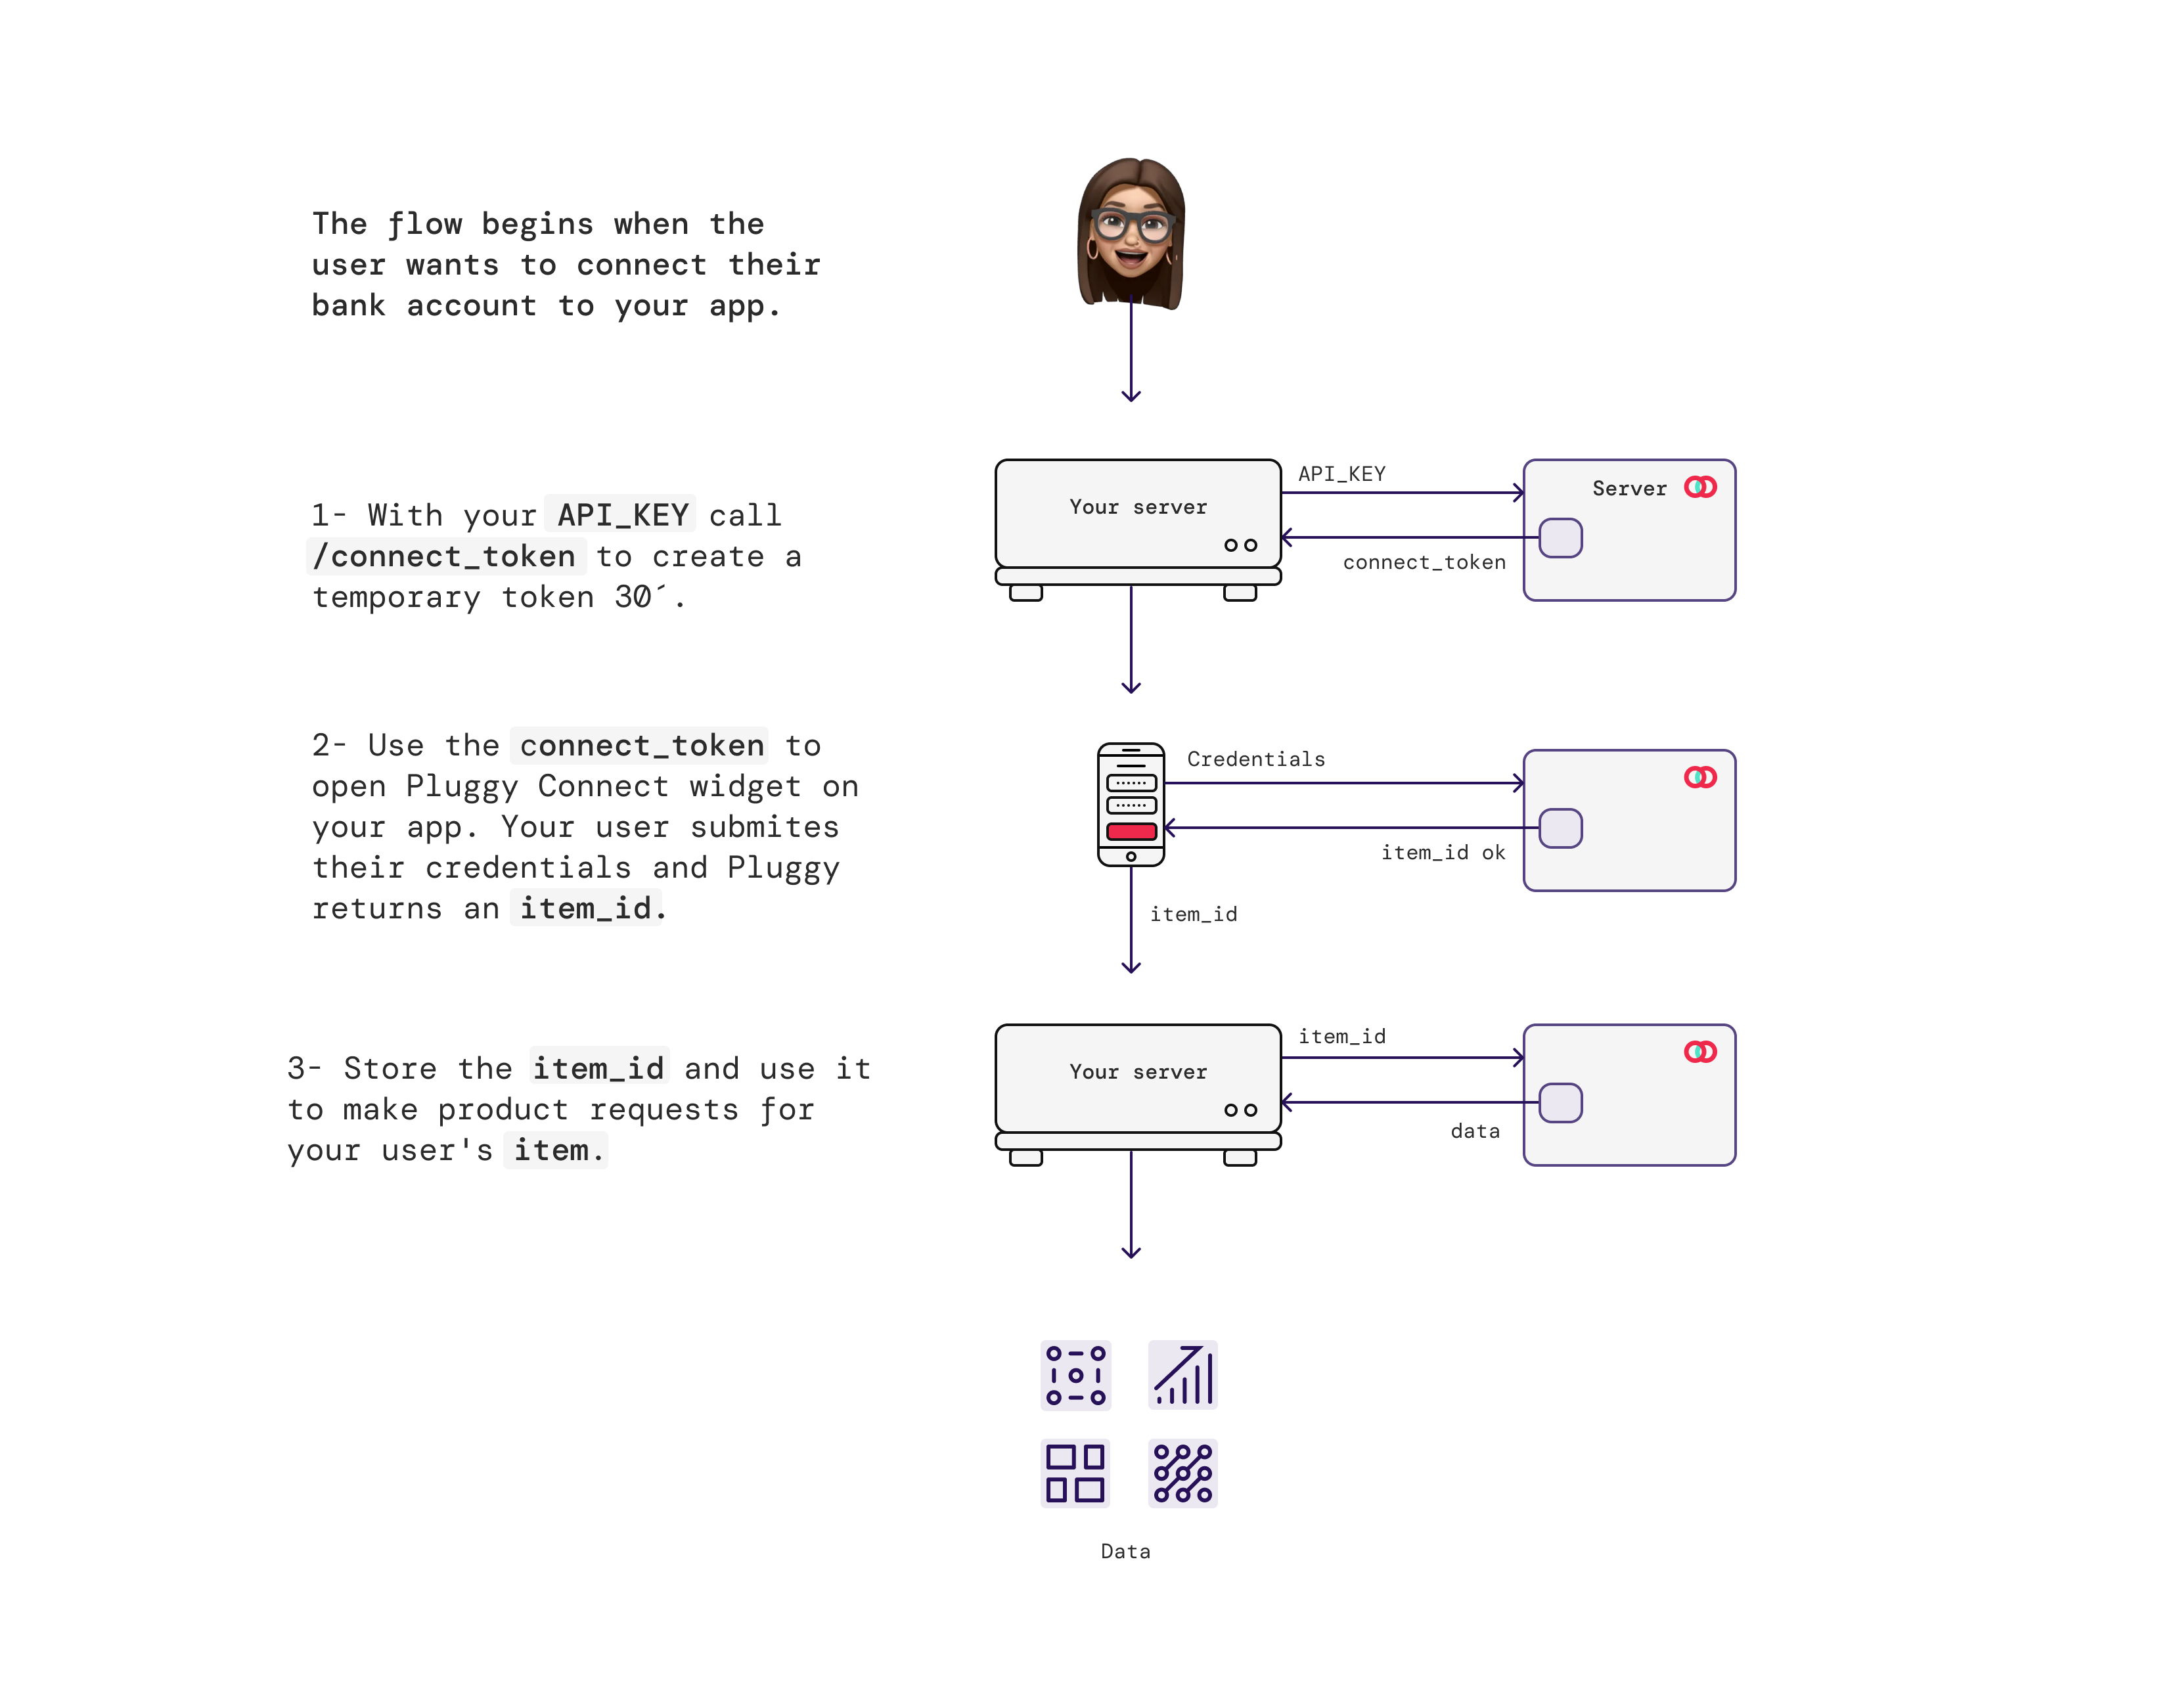
The authentication process works as follows:
### 1. Backend Authentication
First, authenticate with the Pluggy API using your `CLIENT_ID` and `CLIENT_SECRET` to create an API Key:
```bash
curl --request POST \
--url https://api.pluggy.ai/auth \
--header 'Content-Type: application/json' \
--data '{
"clientId": "YOUR_CLIENT_ID",
"clientSecret": "YOUR_CLIENT_SECRET"
}'
```
### 2. Create a Connect Token
Set up an endpoint on your backend that obtains and provides a Connect Token, which grants Pluggy Connect authorization to access the Pluggy API on behalf of your application:
```bash
curl --request POST \
--url https://api.pluggy.ai/connect_token \
--header 'Content-Type: application/json' \
--header 'X-API-KEY: YOUR_API_KEY' \
--data '{
"options": {
"clientUserId": "your-user-id",
"webhookUrl": "https://www.myapi.com/notifications"
}
}'
```
When creating a Connect Token you can provide some `ItemOptions` that will be passed down to all items created using the same token:
| Parameter | Description |
|-----------|-------------|
| `clientUserId` | An identifier for the user in your application, useful for traceability |
| `webhookUrl` | URL where Pluggy will send webhook notifications |
| `oauthRedirectUri` | URI to redirect users after OAuth process |
| `avoidDuplicates` | Whether to avoid creating duplicate items |
### 3. Frontend Widget Integration
Use the Connect Token in your frontend application to initialize the Pluggy Connect widget:
```javascript
import PluggyConnect from 'pluggy-connect-sdk';
const pluggyConnect = new PluggyConnect({
connectToken: 'your-connect-token',
onSuccess: (itemData) => {
console.log('Connection successful!', itemData);
},
onError: (error) => {
console.error('Connection error:', error);
},
});
pluggyConnect.init();
```
Or with React:
```jsx
import { PluggyConnect } from 'react-pluggy-connect';
function App() {
return (
console.log(item.id)}
onError={({ message }) => console.error(message)}
/>
);
}
```
## Security Warning
> **Important**: Do not store `clientId` and `clientSecret` in the frontend. If this information is visible in your page's code, an attacker can steal all of your user's banking data.
You need to create a backend endpoint that generates a Connect Token for every user that visits your page. This Connect Token has restricted permissions and duration for security reasons.
The proper architecture is:
1. **Backend** generates the Connect Token using `CLIENT_ID` and `CLIENT_SECRET` (kept secure on the server)
2. **Frontend** receives only the limited-scope Connect Token
3. **Frontend** uses the Connect Token with the Pluggy Connect Widget
## Environments and Configurations
Source: https://docs.pluggy.ai/en/docs/connect-widget/environments.md
Get your web application quickly and seamlessly integrated with our platform by using our drop-in Connect Widget!
## Environments
The Connect Widget runs on a single **Production** environment, available at:
```
https://connect.pluggy.ai
```
Using the production environment you can access both `Live` and `Sandbox` connectors — there is no separate sandbox URL.
### Sandbox testing
For testing purposes, you can experiment with your integration using our **Pluggy Bank** Sandbox connectors. Pluggy Bank provides everyday updated transactions and lets you test all the login flows and scenarios you would encounter when using any of the available Live connectors.
To display Sandbox connectors in the Connector selection step, set the `includeSandbox` property to `true` (not intended for production use):
```javascript
const pluggyConnect = new PluggyConnect({
connectToken: 'your-connect-token',
includeSandbox: true,
onSuccess: (itemData) => {
console.log('Success!', itemData);
},
});
```
#### Pluggy Bank test credentials
For a successful connection with the Pluggy Bank connector, use:
| Field | Value |
| :-------------------------- | :------------- |
| User | `user-ok` |
| Password | `password-ok` |
| MFA token (when requested) | `123456` |
Any other username will result in an `INVALID_CREDENTIALS` error. For the full list of test users covering error scenarios (locked account, site not available, MFA flows, Open Finance, and more), check the [Sandbox guide](/docs/guides/sandbox).
## Available SDKs
The Connect Widget is currently available for the following environments:
| Platform | Package / Example |
| :---------------------- | :---------------------------------------------------------------------------------------------------- |
| React | [react-pluggy-connect](https://www.npmjs.com/package/react-pluggy-connect) |
| React Native | [react-native-pluggy-connect](https://www.npmjs.com/package/react-native-pluggy-connect) |
| Flutter | [flutter_pluggy_connect](https://pub.dev/packages/flutter_pluggy_connect) |
| Vanilla JavaScript | [pluggy-connect-sdk](https://www.npmjs.com/package/pluggy-connect-sdk) |
| Next.js | [Quickstart example](https://github.com/pluggyai/quickstart/tree/master/frontend/nextjs) |
| Plain JavaScript (HTML) | [Quickstart example](https://github.com/pluggyai/quickstart/blob/master/frontend/html/index.html) |
Navigate to each project to find more detailed usage information in each README. You can also check out our [Quickstarts](https://github.com/pluggyai/quickstart) repo to help you get started with your own integration.
> **Interested in contributing?**
>
> Let us know if you require, or are interested in contributing, a library for a language not represented here! Write us at [hello@pluggy.ai](mailto:hello@pluggy.ai)
## Available configurations
**Note:** all parameters are optional, except for the `connectToken`.
| Property | Description | Type |
| :------- | :---------- | :--- |
| `connectToken` | Your Pluggy Connect token, which will be used to access the API. | `string` |
| `includeSandbox` | Whether to display Sandbox connectors in the Connector selection step (not intended for production use). | `boolean` |
| `allowConnectInBackground` | If `true`, Connect can be minimized by the user to continue the connection with the component hidden. | `boolean` |
| `allowFullscreen` | If set to `false`, Connect won't be displayed as fullscreen on small/mobile screens; it will be displayed as a modal instead. Defaults to `true`. | `boolean` |
| `updateItem` | Item ID to update. If specified, the widget will directly display the credentials form of the Item to be updated. | `string` |
| `selectedConnectorId` | If specified, and the Connector is available, after accepting terms the widget will navigate directly to this Connector's login form, skipping the connector selection step. | `number` |
| `connectorTypes` | List of Connector Types. If defined, only Connectors of the specified connector types (`PERSONAL_BANK`, `BUSINESS_BANK`, etc.) will be listed. Useful for cases of different flows for PF or PJ users. | `ConnectorType[]` |
| `connectorIds` | List of Connector IDs. If defined, only Connectors with the specified connector IDs will be listed. | `number[]` |
| `countries` | List of country codes (ISO-3166-1 alpha-2 format). If defined, only Connectors of the specified countries will be listed. | `CountryCode[]` |
| `products` | If defined, only the products specified in this array will be executed in the Item creation (in order to be executed, you should have them enabled in your team subscription). **Important**: product types must be specified in uppercase letters (`ACCOUNTS`, `CREDIT_CARDS`, `TRANSACTIONS`, etc.). | `ProductType[]` |
| `language` | Language ISO string used to display the widget. If not specified, or if the selected language is not supported, the default language `'pt'` will be used. | `string` |
| `theme` | Theme to use for displaying the UI. Can be `'light'` or `'dark'`. Defaults to `'light'`. | `'light' \| 'dark'` |
| `openFinanceParameters` | Object with CPF and CNPJ for Open Finance connectors only; the form will be pre-filled with these values. Contains optional `cpf` and `cnpj` string fields. | `{ cpf?: string; cnpj?: string }` |
| `forceOauthInBrowser` | If set to `true`, OAuth URLs will always open in the system browser instead of a webview. This helps avoid webview-related issues. This prop takes precedence over the API config value. | `boolean` |
| `forceAskForCredentials` | If set to `true`, the widget will always prompt for credentials when updating an Item, even if the system would normally attempt to update automatically. | `boolean` |
| `onSuccess` | Function to execute when an Item has been created/updated successfully. | `(data: { item: Item }) => void \| Promise` |
| `onError` | Function to execute on a general error loading the widget, or when an Item creation/update status has not been successful. To validate which error happened, check `item.executionStatus`. | `(error: { message: string; data?: { item: Item } }) => void \| Promise` |
| `onOpen` | Function to execute when the widget modal has been opened. | `() => void \| Promise` |
| `onClose` | Function to execute when the widget modal has been closed. | `() => void \| Promise` |
| `onHide` | Function to execute when the widget modal has been hidden. It will only be called if the `allowConnectInBackground` prop is set to `true`. | `() => void \| Promise` |
| `onEvent` | Function to execute to handle custom user interaction events. See [onEvent](#onevent) below for more info. | **Since v2.0.0:** `(payload: ConnectEventPayload) => void \| Promise` **Until v1.x:** `(event: string, metadata: { timestamp: number }) => void` |
## onEvent
Use this callback to handle specific user interaction events.
The `event` property inside the `payload` of `onEvent` is the current event triggered. The available events that can be handled through this method are:
| Event name | Description |
| :----------------------- | :------------------------------------------------------------------------------------------------------------------------------------------------------------------------ |
| `'SUBMITTED_CONSENT'` | User has confirmed terms & privacy consent on the first Welcome screen. |
| `'SELECTED_INSTITUTION'` | User has selected an institution to connect to. |
| `'SUBMITTED_LOGIN'` | User has submitted credentials to create the connection Item. |
| `'SUBMITTED_MFA'` | User has submitted an extra parameter that has been requested by the institution to connect. |
| `'LOGIN_SUCCESS'` | User has submitted credentials to create the connection Item **successfully**. |
| `'LOGIN_MFA_SUCCESS'` | User has submitted an extra parameter that has been requested by the institution to connect **successfully**. |
| `'LOGIN_STEP_COMPLETED'` | Successful completion of the login. User effectively logged in to the institution. |
| `'ITEM_RESPONSE'` | Called every time the Item object is retrieved from the Pluggy API, either when just created, updated, or each time it's retrieved to poll its connection/execution status. |
The `payload` object has a `timestamp` property, and some events include extra data:
- `'SELECTED_INSTITUTION'` includes the `connector` property, which is the connector selected by the user.
- `'LOGIN_SUCCESS'`, `'LOGIN_MFA_SUCCESS'`, `'LOGIN_STEP_COMPLETED'` and `'ITEM_RESPONSE'` include the `item` property, which is the Item data related to the current connection.
> **v2.0.0 signature change**
>
> Since widget version 2.0.0, `onEvent` receives a single payload object: `(payload: ConnectEventPayload) => void`.
> In versions 1.x, it received two arguments: `(event: string, metadata: { timestamp: number }) => void`.
## Webhooks and callbacks
After a user makes a connection with the Pluggy Connect Widget, there are two ways to get the recently created Item ID.
### Connect Widget callbacks
In the frontend of your application (website, application, etc.), when you're using the Connect Widget, you get access to [callbacks](#available-configurations). This way, you can pass the widget a function to execute when an event happens (for example, an account connected successfully or with an error). What's important for you to know here is that callbacks are used to improve the user experience, like redirecting users to a success page or showing an error message.
```jsx
console.log(item.id)}
onError={({ message, data: { item } }) => showErrorPage(message)}
/>
```
This approach is great for handling frontend logic, but it is inconsistent by nature: you cannot rely on it for your business logic or database integrity. For example, a user can close the application before the connection finishes successfully, and you will never realize that the connection finished. To be consistent, use webhooks.
> **onSuccess won't always be called!**
>
> Caixa Econômica Federal (PF & PJ) has authorization flows that require the user to authorize Pluggy as a trusted device, and the process has a delay of around 30 minutes.
> In this scenario, you will receive an `onError` with the status `USER_AUTHORIZATION_PENDING`, and the SUCCESS event will be communicated via webhooks.
### Webhooks
A webhook (also known as a web callback) is a simple method that makes it easy for an app or system to provide real-time information whenever an event happens — that is, it is a way to passively receive data between two systems through an `HTTP POST`.
Webhooks will send your API / backend a notification when events related to connections happen. For example, you can get notified when an Item is created or updated (read more in the [Webhooks reference](/docs/developer-tools/webhooks-ref)).
You'll need to create an endpoint to listen to Pluggy's webhook events, and then create a webhook pointing to that endpoint. More details can be found in the [Webhooks reference](/docs/developer-tools/webhooks-ref), but what's important to understand here is that webhooks are the way to get the Item ID of a connection for you to work on. Even though you can also retrieve the Item ID with callbacks in the frontend, handling business logic with them is a bad practice: for example, a user closing the website while making the connection will result in you losing the Item ID of that connection, meaning you'll never be able to retrieve the Item data.
### Summary
| | Callbacks | Webhooks |
| :--------------------------- | :--------------------------------- | :------------------------------------------------------------------------ |
| Where to use them | Frontend | Backend |
| How information is delivered | JavaScript callback function calls | HTTP POST requests |
| Purpose | Improve UX | Deliver notifications to your backend when Pluggy-related events happen |
## Updating an Item
Source: https://docs.pluggy.ai/en/docs/connect-widget/updating-item.md
## Overview
After creating an Item successfully, you can continue to collect products data that appears in the following days by triggering an update for your existing Item reference, instead of creating a whole new Item from scratch.
Updating an existing Item is more cost-efficient, as it only retrieves institution products data generated after the last collection process.
## How to Update an Item
To update an existing Item using Pluggy Connect, follow these steps:
### 1. Create a Connect Token with the Item ID
Create a new Connect Token, specifying the `itemId` parameter of the corresponding Item connection you want to refresh. This is necessary to let Pluggy properly validate that you are authorized to access and update this specific Item.
```bash
curl --request POST \
--url https://api.pluggy.ai/connect_token \
--header 'Content-Type: application/json' \
--header 'X-API-KEY: YOUR_API_KEY' \
--data '{
"itemId": "ITEM_ID_TO_UPDATE"
}'
```
### 2. Pass the Connect Token and Item ID to the Widget
Pass to Connect both the recently created `connectToken` and the corresponding Item `id` through the `updateItem` property:
```javascript
import PluggyConnect from 'pluggy-connect-sdk';
const pluggyConnect = new PluggyConnect({
connectToken: 'your-connect-token',
updateItem: 'ITEM_ID_TO_UPDATE',
onSuccess: (itemData) => {
console.log('Item updated successfully!', itemData);
},
onError: (error) => {
console.error('Update error:', error);
},
});
pluggyConnect.init();
```
Or with React:
```jsx
import { PluggyConnect } from 'react-pluggy-connect';
function UpdateWidget({ connectToken, itemId }) {
return (
console.log('Updated!', item.id)}
onError={({ message }) => console.error(message)}
/>
);
}
```
## Widget Behavior During Update
- If there is **no further input from the user required**, Pluggy Connect will just start the update process automatically.
- Otherwise, when **new credentials and/or a MFA parameter is required**, Pluggy Connect will prompt the user to complete them before the update process begins.
> **Code Example**
>
> Check out a full standalone HTML example in our recipe: [Update an Item using Pluggy Connect](/recipes/update-an-item-using-pluggy-connect).
## When User Input Is Required
In most cases, you can simply start the Item update process without any problem or further input from the user. However, there are some scenarios where this is not possible, due to limitations related to extra authentication requirements from the institution (such as an MFA requirement), or due to the Item having an invalid credentials state which requires new credentials input from the user.
These scenarios are the following:
- Items that could not succeed due to a problem with their credentials (Item status: `INVALID_CREDENTIALS`).
- Items that are not able to be auto-synced by Pluggy on our daily synchronization process, due to the connection needing an extra input from the user, such as a MFA parameter.
### Case: INVALID_CREDENTIALS
This happens when:
- The credentials provided by the user have not been correct, for example due to an incorrect input.
- The credentials were correct, but when we tried to auto-sync the Item by reusing the last valid credentials, we found an invalid login error.
For any of these situations, the user will need to use Pluggy Connect to update this Item and provide new credentials.
After this, if the login step succeeded, any further update of this Item will just reuse the newly provided credentials, and our auto-sync process will resume working again.
### Case: Item Not Auto-Syncheable
This is the case for institutions that require an extra MFA login step.
In this scenario, the only option for the Item to be updated is to have the user open Pluggy Connect configured for the corresponding Item, and have them solve the required MFA challenge as needed.
Some examples are:
- XP
- Bradesco
- Easynvest
You can find in the complete list of [Connectors](/docs/connections/connectors-coverage) which ones require an MFA.
> **Note**
>
> There are some institutions that only require an initial verification or device authorization as a MFA for the first time. After this, no more manual input is needed from the user, so we'll be able to auto-sync these Items as well.
## Forcing Credential Re-entry with `forceAskForCredentials`
By default, when updating an Item that is already in a valid/connected state, the widget may attempt to re-execute the connection automatically — without showing the credentials form — since the credentials are already stored.
Setting `forceAskForCredentials: true` overrides this behavior and always presents the credentials form to the user, requiring them to explicitly re-enter their credentials before the update proceeds.
> **Note**
>
> `forceAskForCredentials` only has a meaningful effect when `updateItem` is also set. It is intended exclusively for Item update flows, not for new Item creation.
```javascript
pluggyConnect.init({
updateItem: "",
forceAskForCredentials: true,
// ...other options
});
```
### When to Use This Option
| Scenario | Why `forceAskForCredentials` helps |
|----------|-----------------------------------|
| The user changed their banking password | Ensures the new password is captured instead of retrying with stale credentials |
| Your flow requires explicit credential confirmation for compliance or security | Guarantees the user actively re-enters credentials, creating an intentional re-authorization step |
| You suspect stored credentials may be outdated | Forces a fresh input rather than relying on an automatic reconnection attempt that may fail |
### Behavior Summary
| `forceAskForCredentials` | Item state | Widget behavior |
|--------------------------|------------|-----------------|
| `false` (default) | Valid / connected | May skip the credentials form and attempt reconnection automatically |
| `true` | Valid / connected | Always shows the credentials form before proceeding |
| `true` or `false` | Any | No effect if `updateItem` is not set |
## Limitations When Updating Items Through the API
When new users create teams and applications, these client IDs have a limit for updating Items directly through the API with the `PATCH /items` endpoint: updates cannot be performed more than once per hour.
This limitation does not affect manual updates done through the widget — there are no limitations there. Also, when you are about to move your application to production, we recommend talking with our support team to remove this limitation.
## Automatic Updates
Pluggy provides [automatic Item updates](/docs/connections/item#auto-sync) for **Production** applications, every 24, 12 or 8 hours depending on your plan.
## Completion and Webhooks
Once an update has been completed:
1. The Item changes its status to `UPDATED`
2. The `item/updated` webhook is triggered
3. It is expected that customers implement a **sync process** after the webhook to sync the data
## Best Practices
- Always create a new Connect Token with the specific `itemId` before triggering an update
- Listen for the `onSuccess` callback to confirm the update was completed
- Implement webhook handlers to process updated data asynchronously
- Use the `item/updated` webhook event to trigger your data synchronization process
## Customization
Source: https://docs.pluggy.ai/en/docs/connect-widget/customization.md
## Overview
From our [Dashboard](https://dashboard.pluggy.ai), it's possible to customize certain visual aspects of Pluggy Connect so that you can provide your users with a more tailored, branded experience. Below we list and explain each of these aspects.
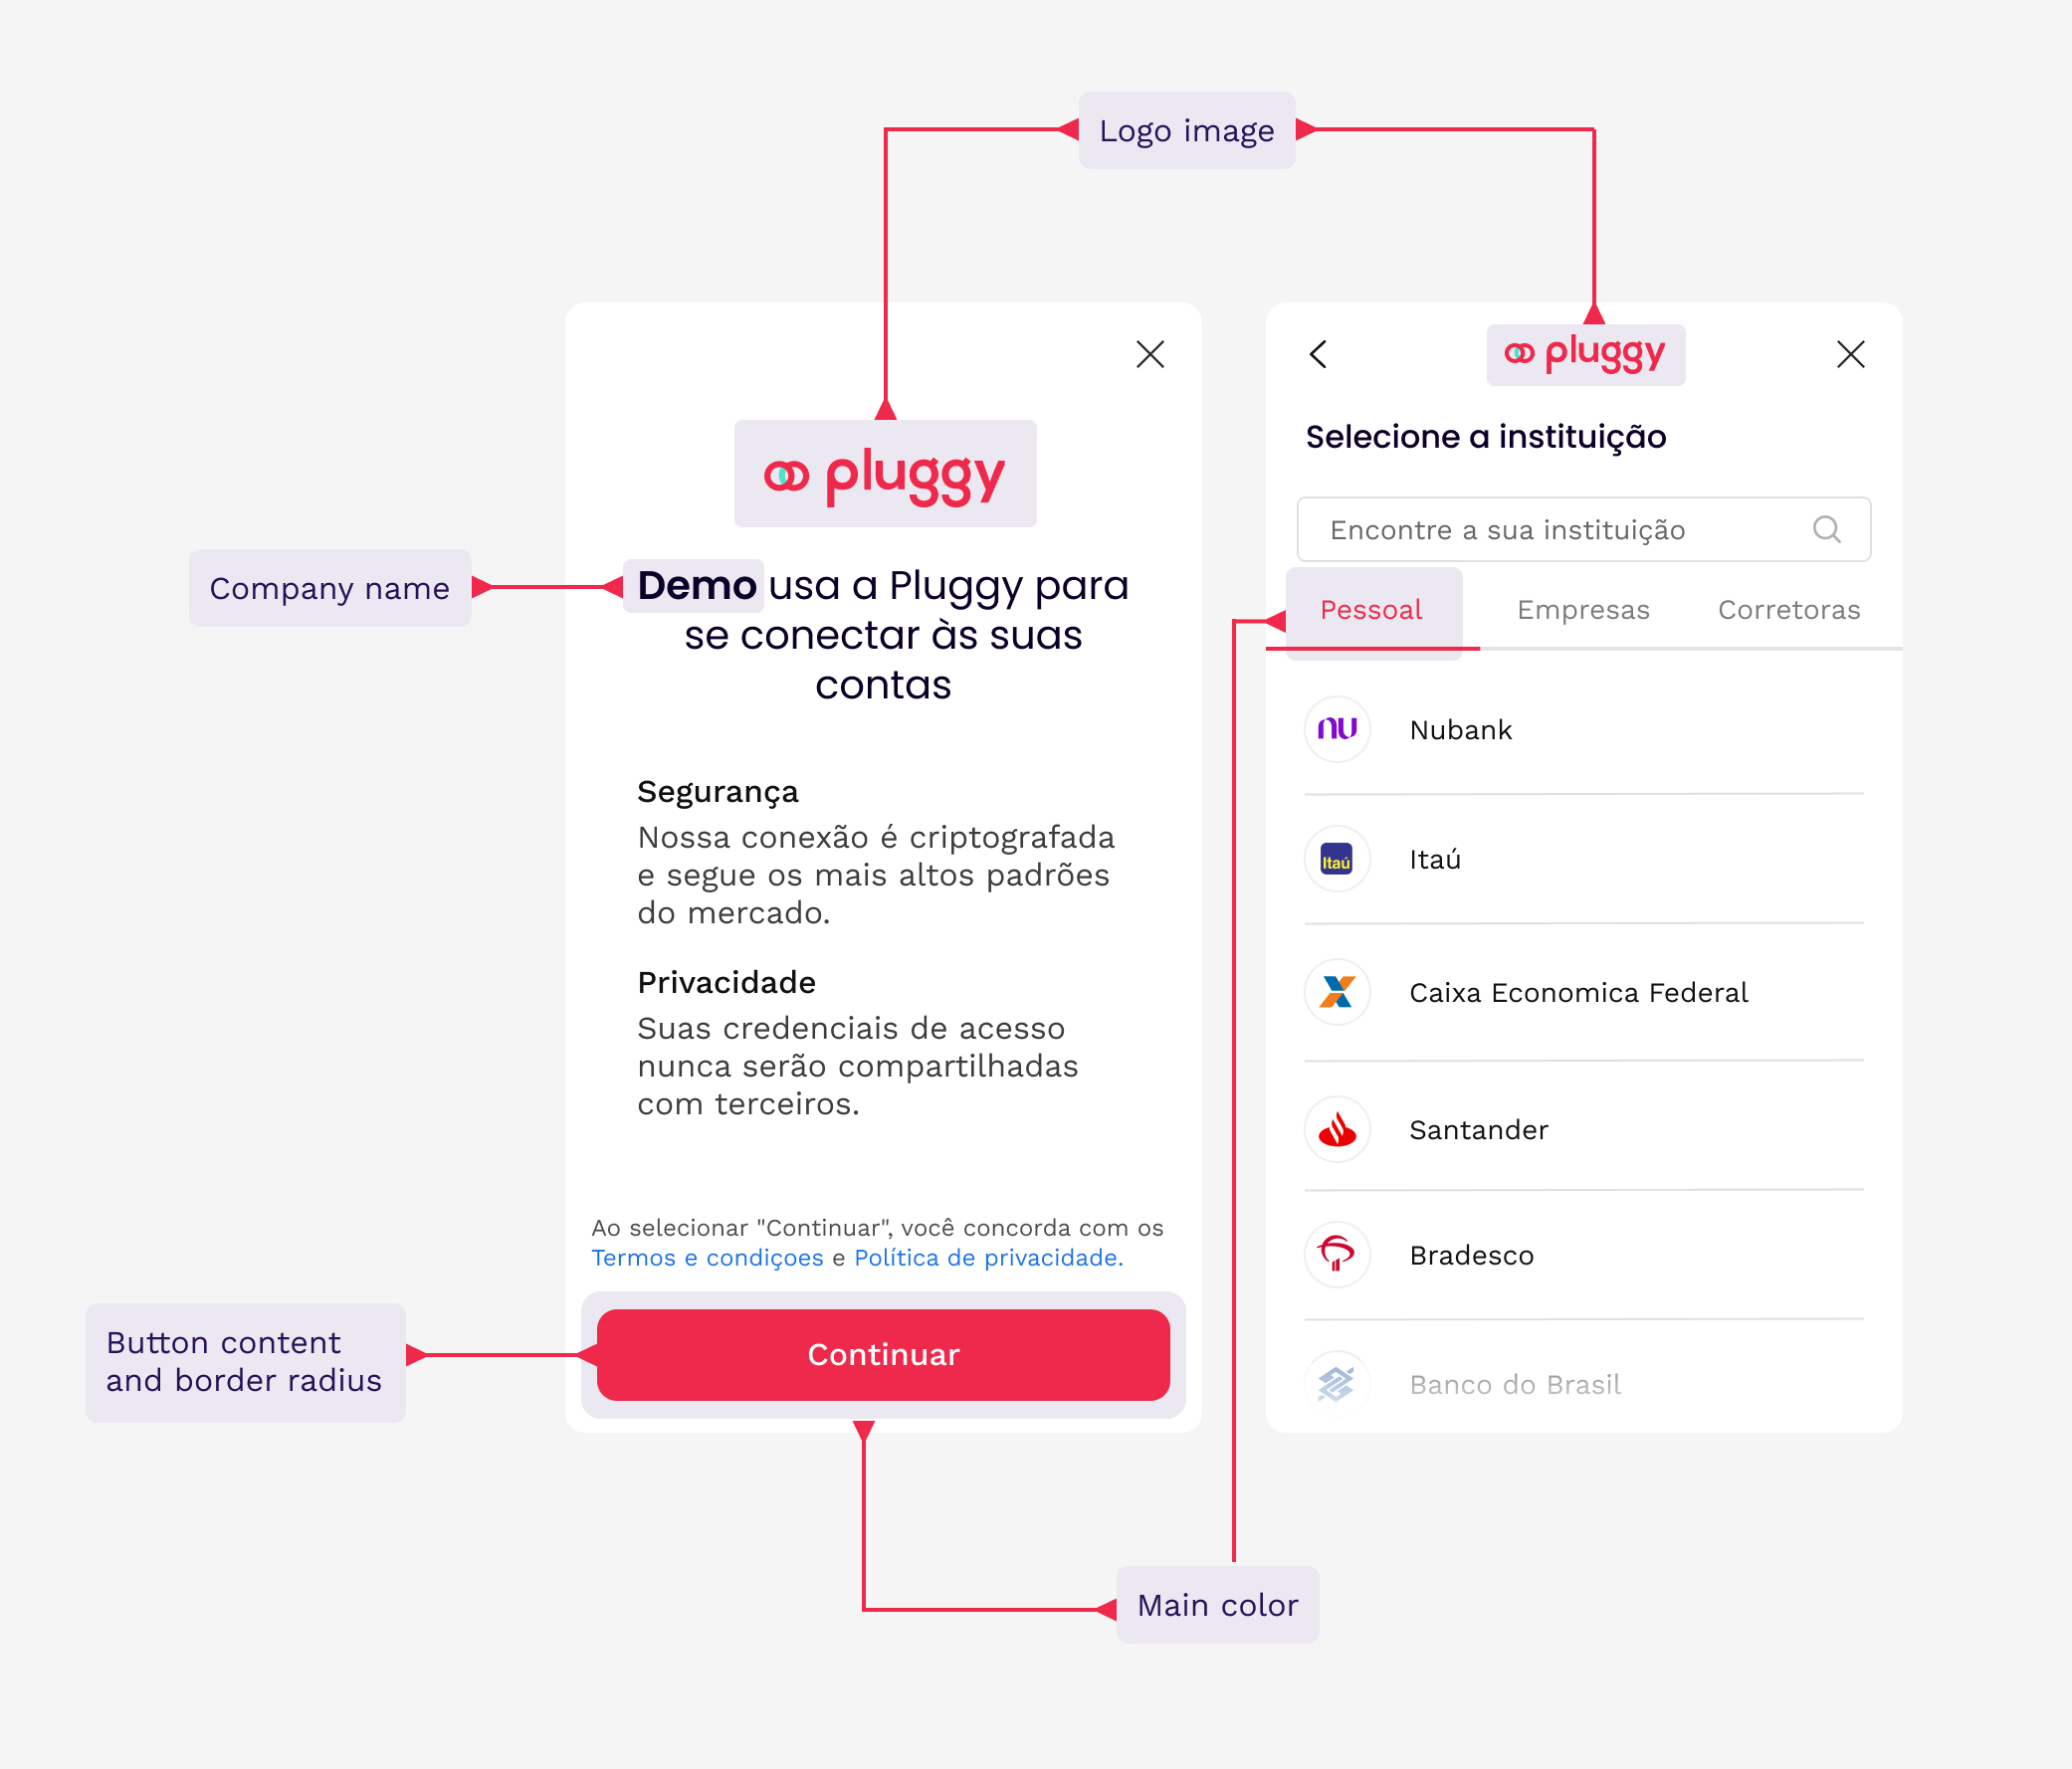
> **Note**: This feature is available for the **Pro subscription** and also on our **Free Trial**.
## Company Name
You can edit the text included in the first screen the user sees and thus highlight the name of your company. This field has a limit of **20 characters**.
The company name appears prominently on the welcome screen of the Pluggy Connect widget, providing users with immediate recognition of your brand.
## Logo
You can add your company logo to make Pluggy Connect more aligned with your aesthetics. There are two ways to add your logo:
- **Upload a file**: Upload an image file directly from your computer
- **Paste a URL**: Provide a URL pointing to your logo image
The logo will be displayed on the main screens of the widget, reinforcing your brand identity throughout the connection flow.
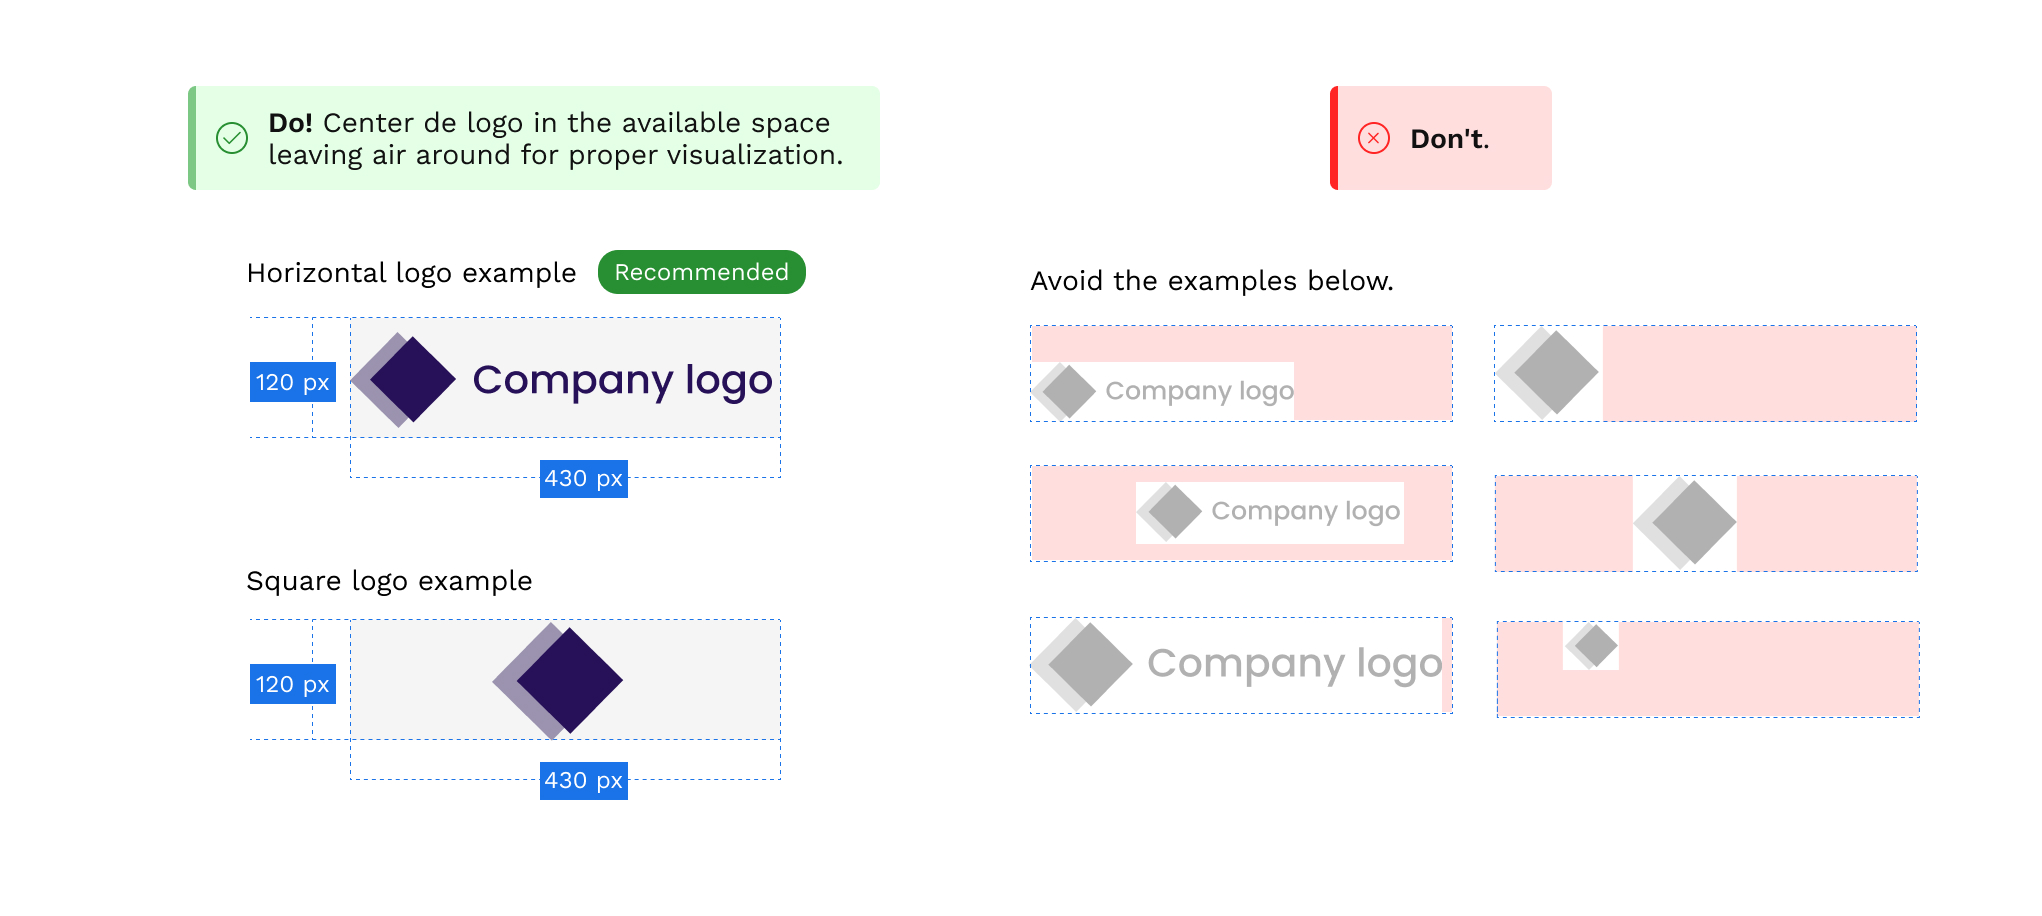
## Primary Color
The primary, main color of your brand will finish giving a special touch to your integration with Pluggy Connect, giving your users a greater sense of belonging.
You will see the primary color applied on:
- Main screens
- Buttons
- Most relevant UI components
- Interactive elements
This helps maintain visual consistency between your application and the Pluggy Connect widget.
## Border Radius
You can edit the **border radius** of all the buttons on the Pluggy Connect widget. This allows you to match the button style typically used in your company's design system.
For example:
- A border radius of `0px` gives buttons sharp, square corners
- A higher border radius gives buttons more rounded corners
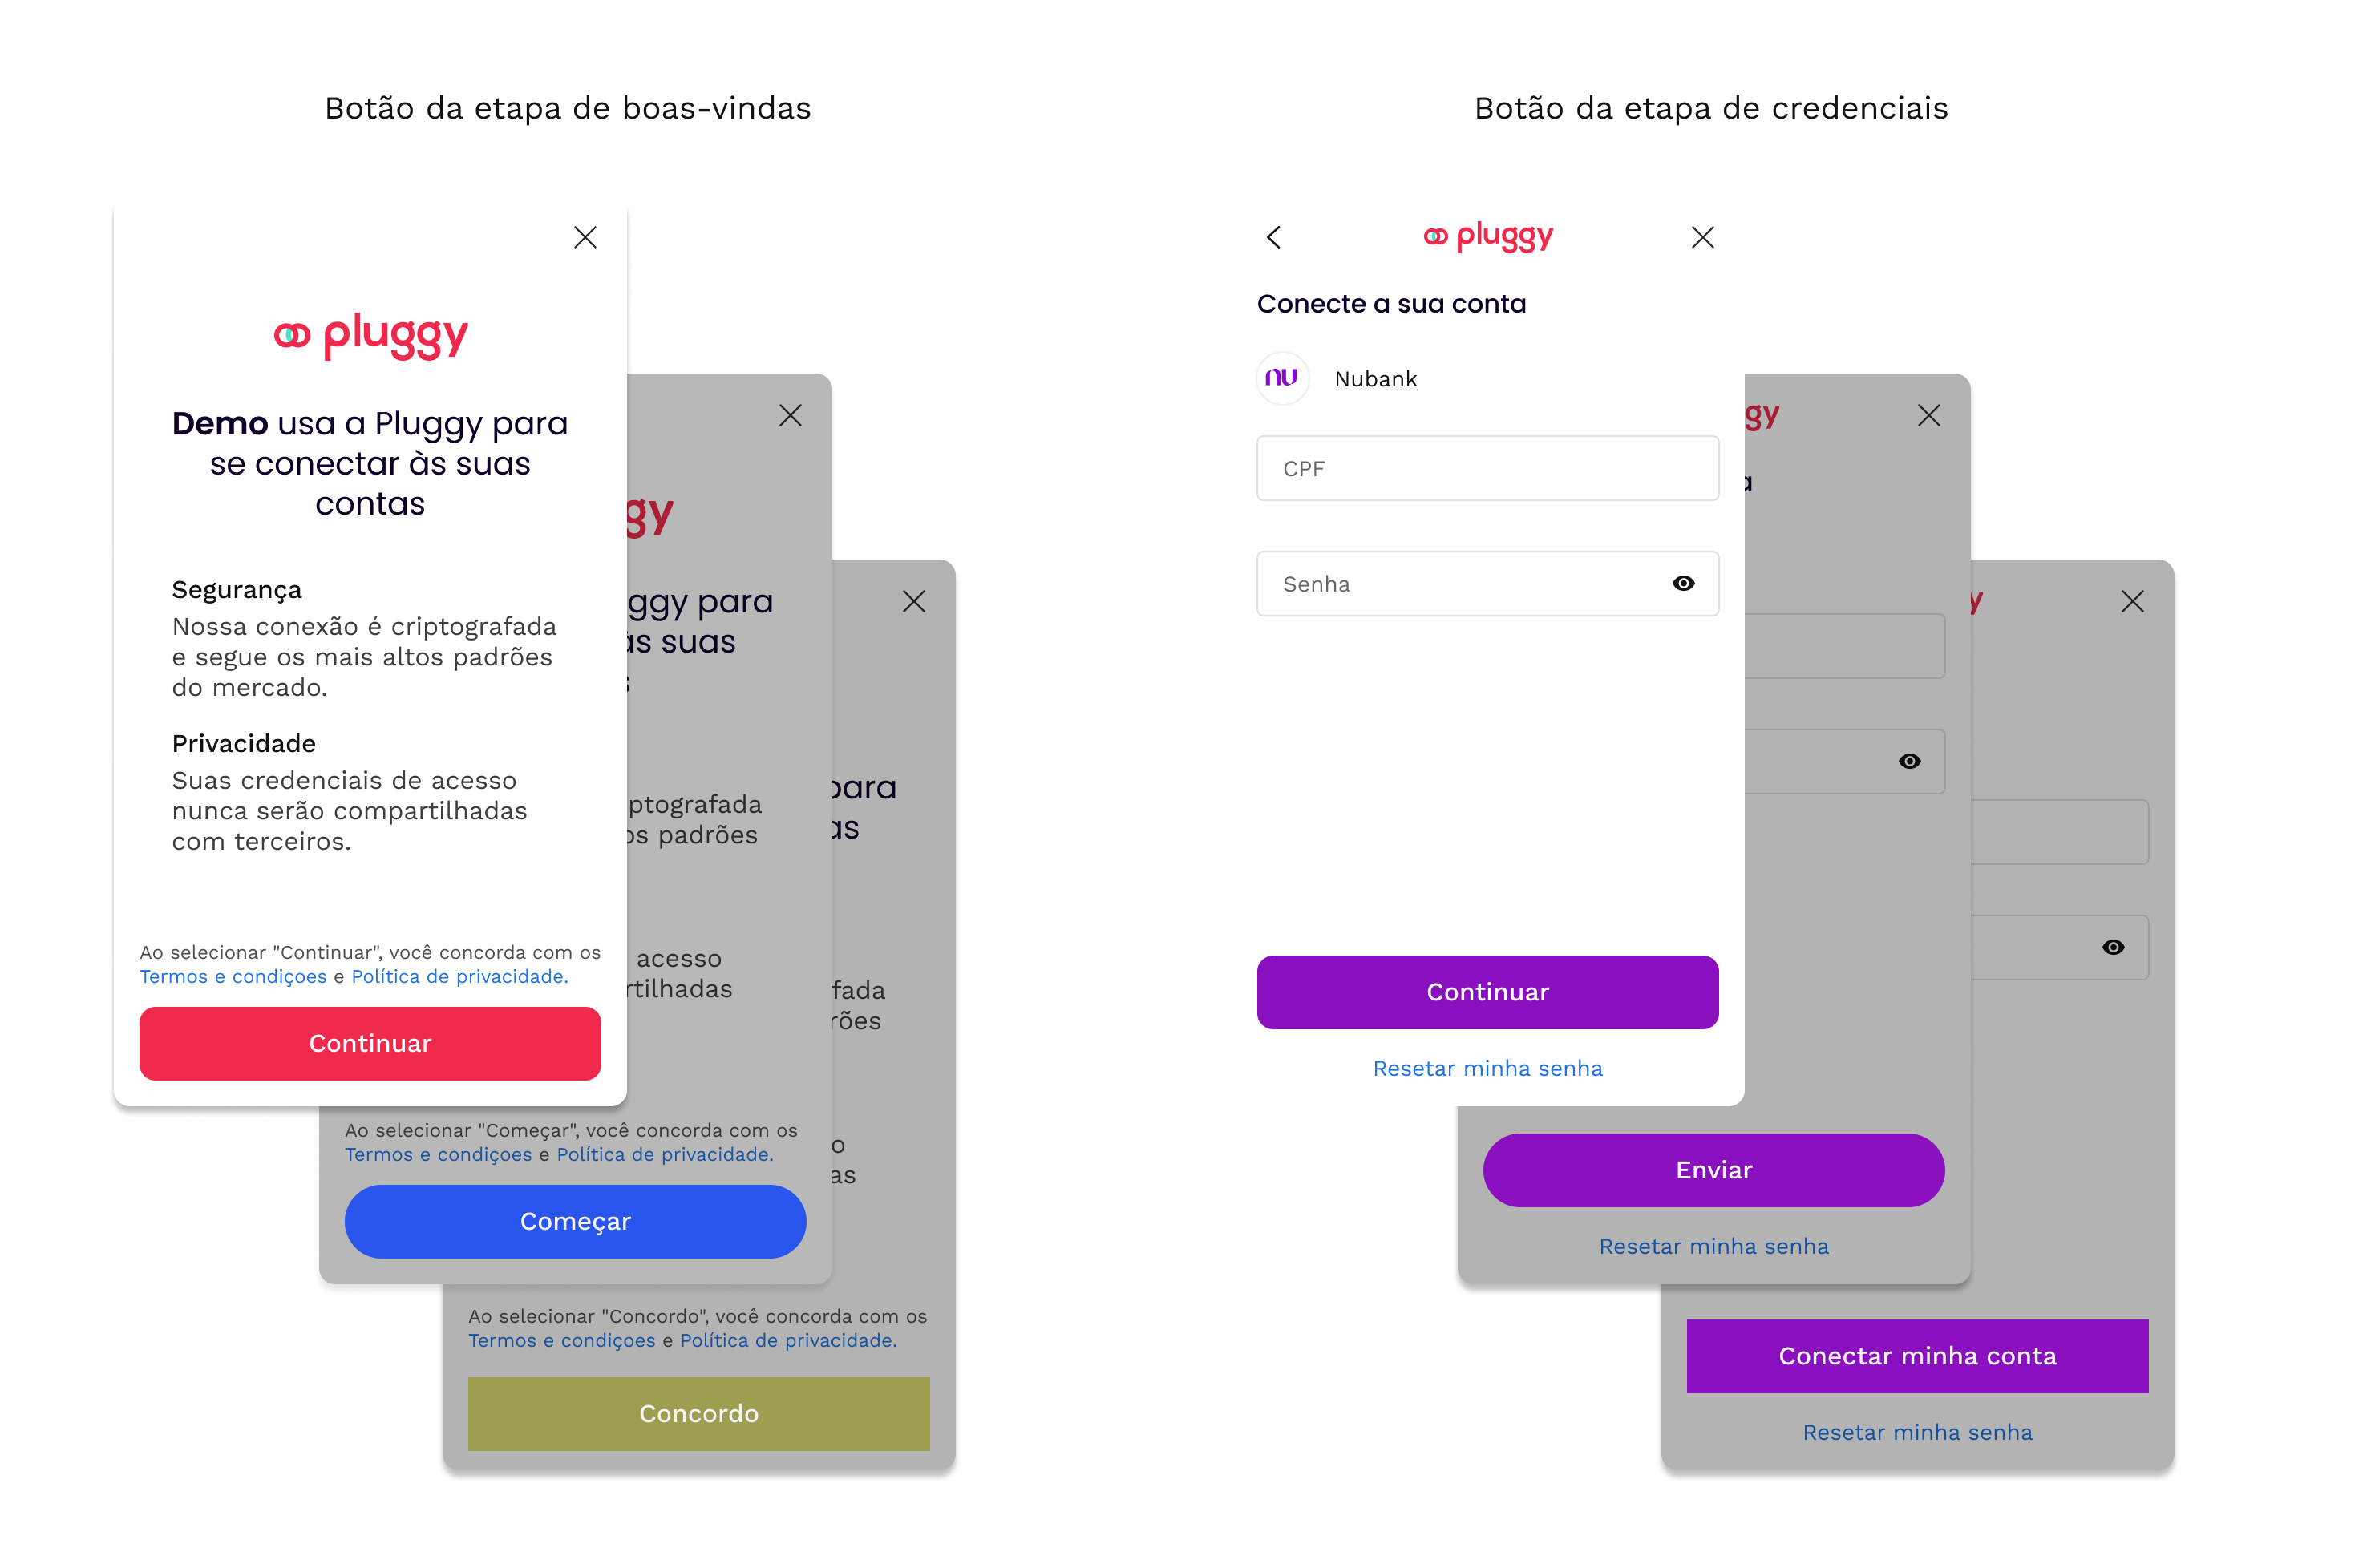
## Button Text
Besides the border radius, the **text of the buttons** can be changed: the one on the
first screen and the ones on the credentials screen — the wording a brand guideline
usually dictates, "Continue" against "Connect my account".
## Connector Selection
You can select the connectors you want to show in Pluggy Connect. You will find them separated by type of connectors, and it will allow you to easily **enable and disable** them.
> **Note**: You need to always have at least one connector selected.
The available connector types include:
- **Personal Banking** - Personal bank account connectors
- **Business Banking** - Business and corporate bank account connectors
- **Investment** - Investment platform connectors
By selecting only the connectors relevant to your use case, you can provide a more focused experience for your users.
## Consent Texts
The consent texts are what the user reads on the first screen of Pluggy Connect, under
**Terms and Conditions of use** and **Privacy policies**.
These are not self-service. To use your own, contact our Sales team: the documents are
read and validated first, to check there is no conflict with Pluggy's own terms, and
the approved text is then included in your integration.
## Applying Customizations
All customization changes are made through the [Pluggy Dashboard](https://dashboard.pluggy.ai/customization). Changes take effect immediately for all new Pluggy Connect widget sessions.
To customize your widget:
1. Log in to the [Pluggy Dashboard](https://dashboard.pluggy.ai)
2. Navigate to the **Customization** section
3. Update the desired fields (company name, logo, primary color, border radius, button text, connectors)
4. Save your changes
The widget will automatically reflect the updated customization for all subsequent user sessions.
## OAuth Support Guide
Source: https://docs.pluggy.ai/en/docs/connect-widget/oauth-support.md
## Overview
Some financial institutions require an OAuth authorization flow to connect user accounts. This guide explains how to properly configure the Pluggy Connect widget to handle OAuth redirections across different platforms and devices.
By following these guidelines, you can ensure a smooth OAuth integration experience for your users across various platforms and devices.
### What OAuth changes for your integration
OAuth is an access-delegation standard: instead of typing credentials into your
application, the user authorizes it inside the institution's own interface and the
institution issues a token. Two things follow from that, and both are why these
connectors need extra setup on your side:
- **The user leaves your application** — they authenticate at the institution and
have to be brought back. That return trip is what `oauthRedirectUri` is for.
- **The connection refreshes without asking again.** An OAuth token can be renewed,
so the connection stays alive without sending the user through the login every
time — which is also why these connections tend to break less than credential-based
ones.
The one thing that reliably goes wrong is the return trip. Some mobile browsers will
not let the authorization window close itself, and without a redirect URI the user is
left staring at a finished authorization page with no way back to your app.
## Setting Up the OAuth Redirect URI
To handle redirections after the OAuth process, you need to define an `oauthRedirectUri`. This URI is used to redirect users back to your application after they have completed the OAuth process with the financial institution.
### Requirements
The `oauthRedirectUri` must comply with the following rules:
- Must be **HTTPS** or a **deep link**
- **Cannot** be `localhost` or `127.0.0.1`
### Creating a Connect Token with OAuth Redirect
When creating a Connect Token, include the `oauthRedirectUri` in the options:
```bash
curl --request POST \
--url https://api.pluggy.ai/connect_token \
--header 'Content-Type: application/json' \
--header 'X-API-KEY: YOUR_API_KEY' \
--data '{
"options": {
"clientUserId": "your-user-id",
"oauthRedirectUri": "https://your-own-url.com"
}
}'
```
> **Note**: If you create an item with a Connect Token and also specify the `oauthRedirectUri` at the time of item creation, the system will prioritize the `oauthRedirectUri` parameter provided at the item level.
### Example redirect URIs
| URI | Valid | Why |
|-----|-------|-----|
| `https://app.example.com/pluggy/callback` | Yes | HTTPS page in your application |
| `myapp://my-deep-link` | Yes | Deep link into a native app |
| `http://app.example.com/callback` | No | Plain HTTP is rejected |
| `http://localhost:3000/callback` | No | `localhost` and `127.0.0.1` are rejected |
Testing locally, use the deep-link scheme of your app or an HTTPS tunnel to your
machine — a `localhost` URI is refused when the token is created, not later.
## Browser-Specific Behavior
The OAuth flow behaves differently depending on the user's platform:
### Desktop Browsers
For **desktop browsers**, the authorization window will attempt to **close automatically** after the OAuth process is complete.
If closing the window is not possible, the user will be redirected to the provided `oauthRedirectUri`.
### Mobile Browsers
For **mobile browsers**, users will be **redirected to the `oauthRedirectUri`** after completing the OAuth authorization.
Some mobile browsers do not allow closing the OAuth authorization window after completion. To address this, you must provide an `oauthRedirectUri` in the Connect Token request, which will be used to redirect users back to your application.
## Handling the Redirect
Your application should be prepared to handle the redirection back to the `oauthRedirectUri`. When the user is redirected, you should:
1. Verify the connection status
2. Resume the user experience in your application
3. Handle any errors that may have occurred during the OAuth process
## Platform Considerations
### Web Applications
For web applications, the `oauthRedirectUri` should be a valid HTTPS URL that points to a page in your application that can handle the redirect and resume the connection flow.
### Mobile Applications (Native)
For native mobile applications, you can use a **deep link** as the `oauthRedirectUri`. This allows the OAuth flow to redirect back to your native app after the authorization is complete.
Ensure that your app is properly configured to handle the deep link scheme on both iOS and Android.
### React Native / Flutter
When using React Native or Flutter with the Pluggy Connect SDK, configure the `oauthRedirectUri` to use your app's deep link scheme. The SDK will handle the redirect and resume the connection flow within the widget.
## Backend integration, without the widget
If you create items from your own backend rather than through the widget, you do not
need a Connect Token at all: authenticate with your API key and pass
`oauthRedirectUri` to [items-create](/reference/items/items-create), exactly as you
would in the token's options.
```bash
curl --request POST \
--url https://api.pluggy.ai/items \
--header 'Content-Type: application/json' \
--header 'X-API-KEY: YOUR_API_KEY' \
--data '{
"connectorId": 600,
"parameters": {
"user": "user-ok",
"password": "password-ok"
},
"oauthRedirectUri": "https://your-own-url.com"
}'
```
The response carries the OAuth URL to send the user to. When a value is given in both
places — the Connect Token's options and the item creation — the one on the item
wins, because it is the more specific of the two.
## Best Practices
- Always provide an `oauthRedirectUri` when your users may connect to institutions that use OAuth
- Use HTTPS URLs for web applications and deep links for native mobile apps
- Test the OAuth flow on both desktop and mobile browsers to ensure a smooth experience
- Handle edge cases where the authorization window cannot be closed automatically
- The `connectToken` is valid for **30 minutes only** -- the recommended usage is one token per connection
## Item
Source: https://docs.pluggy.ai/en/docs/connections/item.md
As we've introduced [before](/docs/glossary), an Item is the representation of a connection with a specific Connector of an Institution and serves as the entry point to access the set of products recovered from the user who gave his consent to collect his/her data.
## Creating an Item: Institution authentication flow
To create an Item, the easiest, most polished, battle-tested, and least error-prone way for a user, is to interact with our [Pluggy Connect Widget](/docs/pluggy-connect-introduction), where they can provide consent, follow through the Institution authentication steps, and quickly have their products available in our API.
Otherwise, you can develop an application that implements the Item creation flow yourself, although this can be a daunting, complex task, and difficult to get right; so it's not the preferred choice we recommend.
When an Item is created and the institution sync finishes successfully, we'll retrieve all the latest financial products data, for up to the last 365 days.
### Accessing Item collected data
To access the data of the Item collected products, you'll have to interact with our API using the related endpoints. To help reduce development times, we provide several [Server side SDKs](/docs/server-side-sdks). If none suits you please let us know! We'll be happy to help.
> **Avoid reinventing the wheel, use our SDKs!**
>
> We strongly recommend that if there is an existing SDK for your language, that you use it, since its fully supported by our development team and error proof.
>
> If you end up creating your own integration, we won't be providing support for that specific implementation.
### Products
When *Pluggy* creates an Item, it automatically collects all the products requested as a step-by-step execution, pulling the information from the FI and storing it on our DB. *By default will collect all the products enabled on your team's subscription.*
When recovering an item, you will find the list of products enabled for this item, and you can specify this value as well on creation.
To customize which products you want to collect for a specific `item` you can send the `products` parameter (using the product type in uppercase) when [creating](/reference/items-create) the `item` (if you integrate through api) or the [widget's configuration](/docs/environments-and-configurations#available-configurations) using the `products` property.
## Updating an Item
The process to update an Item is quite similar to the creation one. The recommended way to do it, is also using our Pluggy Connect widget, as explained [here](/docs/updating-an-item). It can also be done via API: [Update an Item](/reference/items-update) (also review: [Item Send MFA](/reference/items-send-mfa)).
When an Item update is successful, we retrieve all the products data since the last time we did a data collection, and merge it with the previously collected data.
Also, data for *up to 4 days before* the last successful update date will be collected and merged too, to make up for any possible changes or additions that could have occurred in the institution data and not lose track of them.
### Auto-sync
Once created, an **Item** will have a reference to the stored user parameters and credentials needed to execute the data collection from the institution. Note that all credentials are encrypted, and can **never** be retrieved from the API.
This enables *Pluggy* to run our auto-sync process: on a schedule agreed with you, we'll collect the transaction data of the last few days and automatically add it on top of the existing collected data.
This way, you'll always have up-to-date access to the product data of the connected Institution, and you **won't be required to set up any batch process** to update your connections, just listen to webhook notifications of new updates.
#### Choosing a schedule
Auto-sync can follow one of two schedules. Both are configured by Pluggy on your application — reach out to your account manager to set one up or change it.
- **Every N hours.** Syncs run at a fixed interval, counted from the end of the previous sync. Available intervals are 6, 8, 12, 24, 30, 48 and 96 hours. Optionally, we can anchor the daily cycle to a starting hour, so the first sync of each day lands close to a time you choose. Because each sync is counted from when the previous one finished, the exact time of day drifts. If you need syncs to land at predictable times, use the option below.
- **At specific times of day.** Syncs run at up to **4 fixed times a day** — for example 09:00, 11:00, 13:00 and 18:00. This is the better fit when your product depends on data being fresh at particular moments — for example, reconciling during business hours, or checking for incoming transfers before a daily cut-off. Within each window, individual syncs are spread across the hour rather than all firing at the exact minute. On an account with many connections, expect them to complete progressively through the window rather than all at once.
When there is an error in an auto-sync update, two things can happen:
- If it was a `LOGIN_ERROR` (for example, when the credentials are invalid), the update will not be retried and the Item will no longer be updated by auto-sync. Auto-syncing will only resume when the client connects the Item successfully again.
- If it was a different error, we retry the update every 1 hour up to 5 attempts, after that, the Item is also dropped from auto-sync.
The `nextAutoSyncAt` in the [GET /items/\{id\}](/reference/items-retrieve) endpoint indicates when is the next auto-sync update for the Item, or null if it does not have auto-sync. Remember that this is the **minimum** date at which the next auto-sync update will run: it can be slightly delayed depending on the load of the institution's connector at the time.
> **Premium Feature**
>
> The auto-sync feature is only available for **Production** applications. It can be configured to run every 24, 12, or 8 hours based on your subscription.
>
> If you require to maintain the connections in sync, the only way would be using our Auto-Sync, batch update process will be mitigated and should never be created.
#### Meu Pluggy connections are a separate case
[Meu Pluggy](https://meu.pluggy.ai) is a standalone service for end users connecting their own accounts, and it has its own rules. Connections made **inside Meu Pluggy** are refreshed automatically **every 24 hours**, for free -- that cadence belongs to the service itself and does not depend on any application's subscription.
This matters when your application connects through the **MeuPluggy connector**, because there are then **two distinct Items**:
| Item | Where it lives | How it refreshes |
|---|---|---|
| The original Item | Inside Meu Pluggy | Automatically, every 24 hours |
| The proxy Item | In your application | Reflects the original Item; it does **not** run its own auto-sync |
So both of these statements are true at the same time, and they are not in conflict: *"Meu Pluggy connections are updated daily"* (the original Item) and *"MeuPluggy proxy Items are not auto-synced"* (the proxy Item). They are different objects.
For any other connector, the Item in your application follows the auto-sync rules described above.
> **Reading `nextAutoSyncAt`**
>
> `nextAutoSyncAt` is only returned when the application has auto-sync enabled. A `null` there means *"this application has no auto-sync configured"*, not *"the connection is broken"*.
## Webhook Notifications
It's possible to listen to Webhook Notifications to recover all events related to a specific `Item`. For this, you'll only need to provide a valid URL in the `webhookUrl` parameter, either when creating a [Connect Token](/reference/connect-token-create), or in the [Item creation request](/reference/items-create) itself.
You can find more information in the [Webhook](/docs/webhooks) section.
> **Multiple webhooks**
>
> If you create multiple webhooks for an item using the `webhookUrl` and the client-level Webhook configuration, you will receive multiple notifications.
### Avoiding duplicates
To avoid a user from connecting more than once his account at Pluggy, we provide a configuration while creating your connection, that will validate if the credentials already exist before going through the authentication process.
Using this configuration, the user will receive an error from the API specifying that there is already an Item created for those credentials.
You can set it up in two ways:
- If you are using *Pluggy Connect* you can [create the token](/reference/connect-token-create) with the item options for `avoidDuplicates` in true, and all items generated with that `connectToken` will be validated.
- If you are connected directly through API, you [can create the item](/reference/items-create) with the same option in the payload.
When creating an item that already exists will recover a 400 HTTP error.
```json
{
"code": 400,
"codeDescription": "ITEM_USER_ALREADY_EXISTS",
"message": "There are other items with the same credentials, you can't create a new one",
"data": {
"items": [
"d0f8a8c0-e8e3-11e9-b210-d663bd873d93",
"d0f8a8c0-e8e3-11e9-b210-d663bd873d94"
]
}
}
```
The `data.items` array holds the ids of the existing items that already use those
credentials, so you can point your user at the connection they already have
instead of asking them to try again. Note the ids are nested under `data` — they
are not returned at the root of the response body.
These connectors support the Avoid duplicates feature:
- Pluggy direct connectors: all
- Open Finance connectors:
- Nubank
### Referencing your user
When you create an `Item` you can use the `clientUserId` as an external identifier from your systems. This will help you identify an item with your user.
You can setup this up in two ways:
- Using our Pluggy Connect widget, you can create a connectToken with the value for `clientUserId`. All items created with that connect token will have that value.
- When creating Items through our API, the payload has an `clientUserId` parameter to receive this reference.
### Searching and listing items
You can retrieve the connections that belong to your account with [GET /v2/items](/reference/items-list-by-cursor), most recently created first. Results can be narrowed with `clientUserId` — the external identifier you assigned when creating the Item — or with `connectorId`, to list only the connections to a given institution.
This endpoint is **opt-in and disabled by default**. Listing lets an API key enumerate every connection you hold, which is a wider level of access than retrieving a known Item by its id, so it is enabled per agreement: contact support if you want it for your team. Until then the endpoint responds `403` with `LIST_ITEMS_FEATURE_NOT_ENABLED`.
Responses are cursor-paginated. Instead of a page number, each response carries a `next` value pointing at the following page: append it as-is to the endpoint path, and stop once it comes back `null`. Any filters you sent are already part of `next`, so there is no need to repeat them.
```javascript
let next = ''
const items = []
do {
const response = await fetch(`https://api.pluggy.ai/v2/items${next}`, {
headers: { 'X-API-KEY': apiKey },
})
const page = await response.json()
items.push(...page.results)
next = page.next
} while (next !== null)
```
The `after` parameter takes only the cursor value. Sending the whole `next` string as `after` is rejected with `INVALID_CURSOR`.
Listing is a convenience, not a replacement for your own bookkeeping: we still recommend tracking your connections in your datasource by their `itemId`, and keeping those references in sync.
## Item lifecycle
Source: https://docs.pluggy.ai/en/docs/connections/item-lifecycle.md
If you decide to use our Pluggy Connect widget, you won't require to go into further details of the flow - we've already it all covered up for you.
## Item Status
To understand the current status of an item, we must review its `status` field. This will give a first glance about the connection's health.
| Value | Description | Meaning |
|---|---|---|
| `UPDATING` | The connection is syncing with the provider. | An update process is in progress and will be updated soon. |
| `LOGIN_ERROR` | The sync process finished with errors. | The connection must be updated to execute again. We won't trigger auto-sync updates until new credentials parameters are provided. |
| `OUTDATED` | The sync process finished with errors. | The parameters were correctly validated, but there was an error in the last execution. It can be retried. |
| `WAITING_USER_INPUT` | The sync process needs user's input to continue. | The connection requires user's input to continue the sync process, this is common for MFA authentication connectors. |
| `UPDATED` | The sync process finished successfully. | The last sync process has completed successfully and all new data is available to collect. |
As mentioned above, when we trigger an update, the connection status will be set to `UPDATING`. This is an in-progress status which means you will need to check it again in a couple of seconds.
If the credentials sent were invalid, you will encounter a `LOGIN_ERROR` status and will be required to update it while also providing new credentials.
In case there was an unexpected error, you will encounter the `OUTDATED` status, and you will have to review the `executionStatus` field for further details.
Finally, the most common scenario, is the `UPDATED` status, which means that the connection was successfully synced with the institution.
## Execution Status step by step
Each item is created or updated through an execution, which, like the item, goes through different states as it is executed.
Each Item status is associated to a set of possible `executionStatus` values, according to the following diagram.
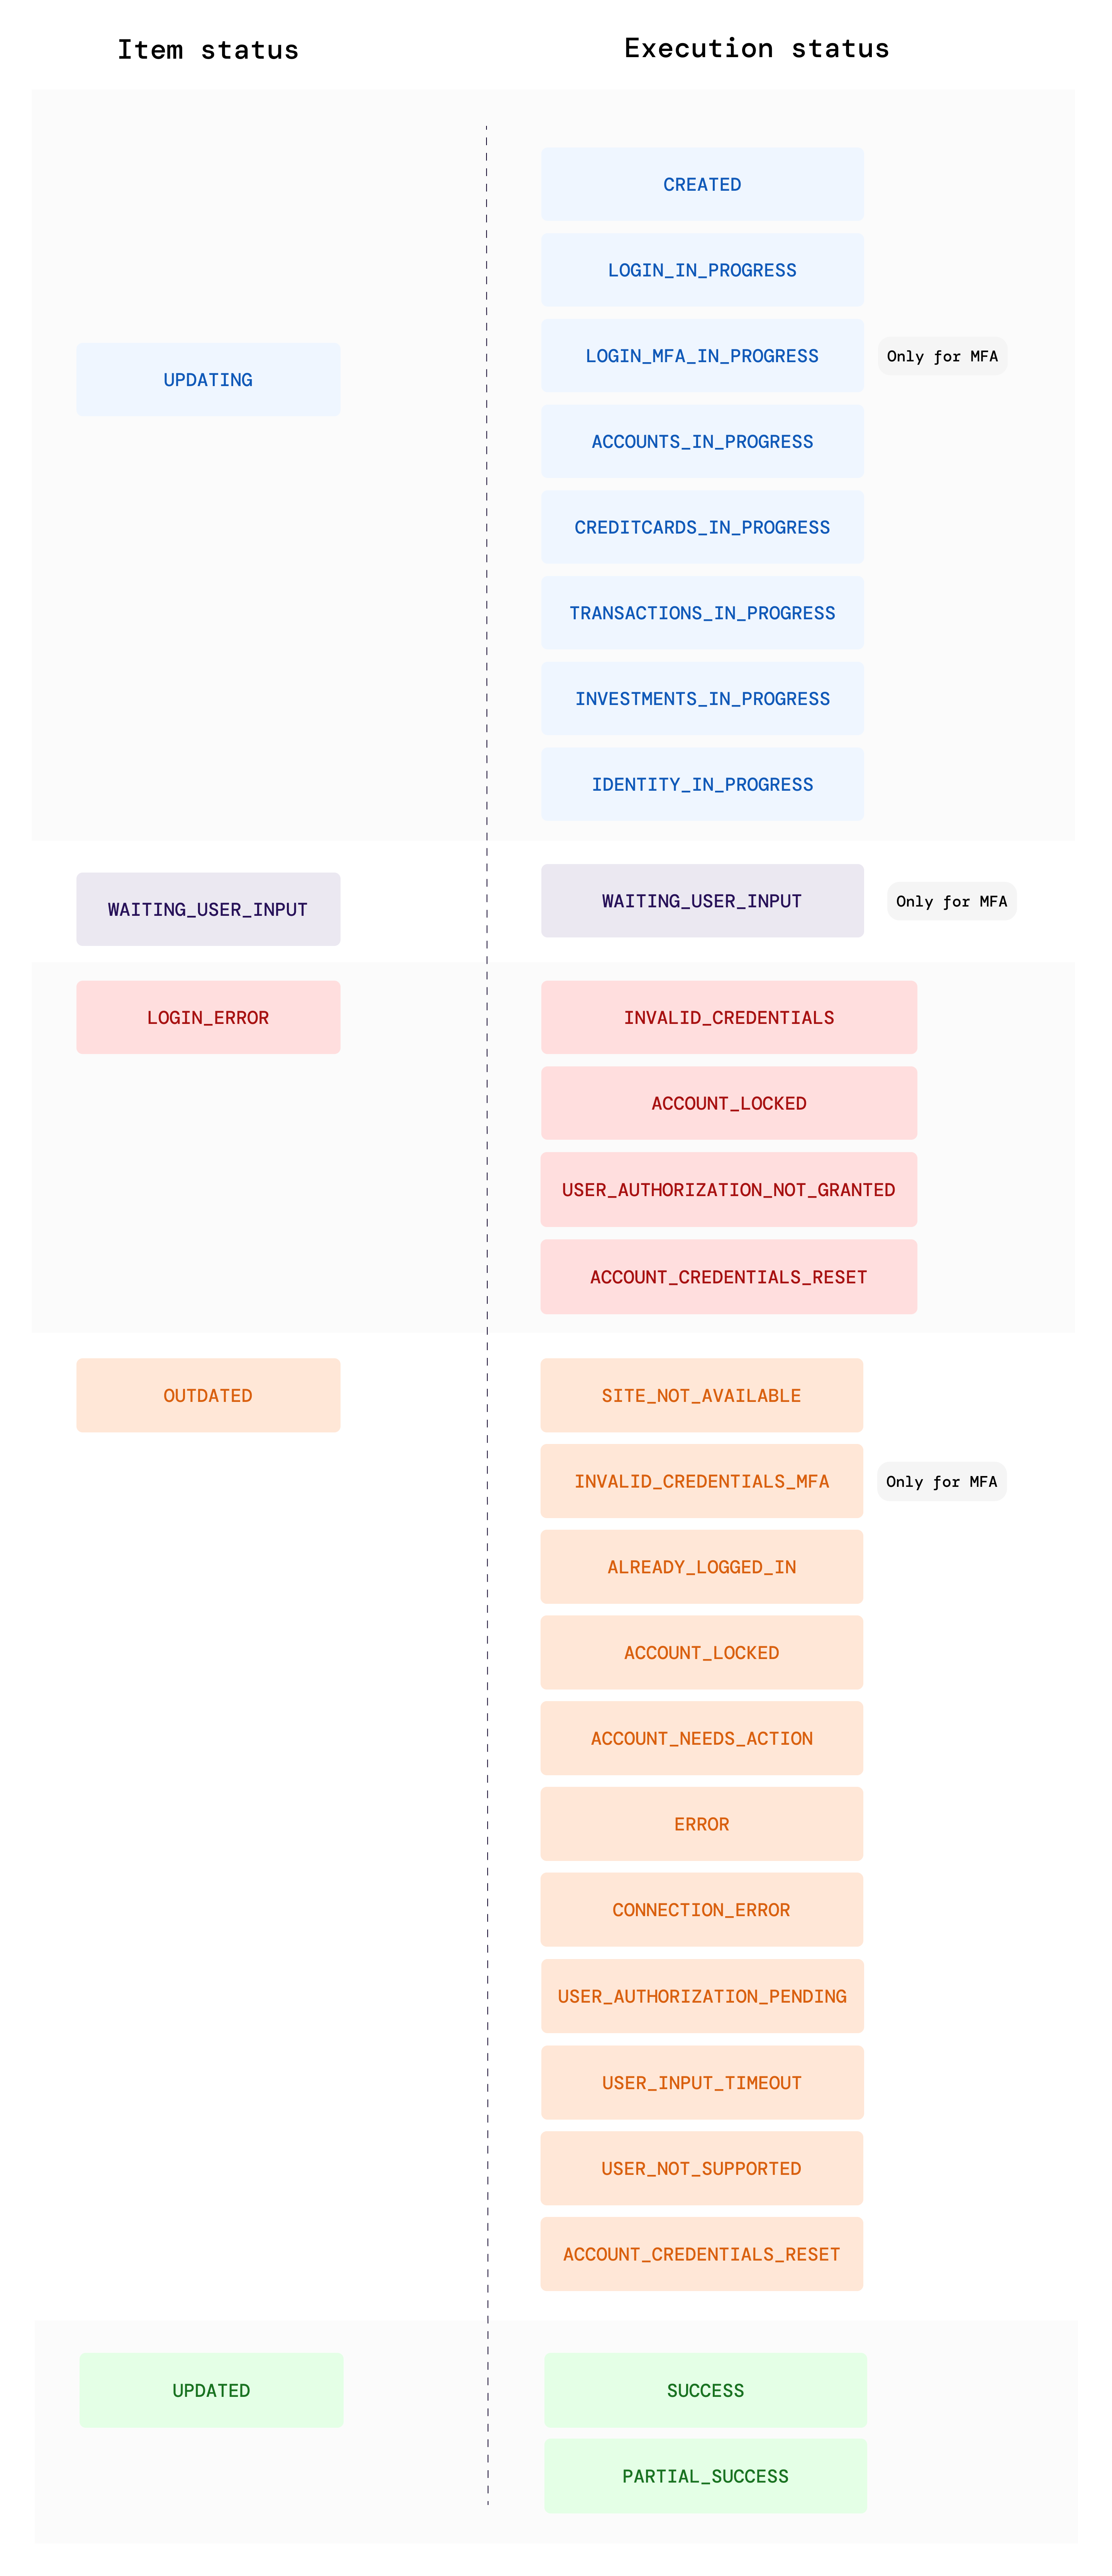
These combinations of statuses give specific information not only about the steps that are being executed while the Item is updating, but also about the final result of the execution. Thus, for example, if the item status is `OUTDATED`, we can check the related `executionStatus` value to know the specific cause of it not having finished successfully.
You can review the detailed Item's current execution status through this field, `executionStatus`.
This value indicates the current step the execution is at, which can be a transitive (in-progress) state, or a final state.
### Transitive states
The following states represent that the Item execution is still running, so it's likely it will continue to change by itself.
| Value | Description |
|---|---|
| `CREATED` | The connection was successfully initiated. |
| `LOGIN_IN_PROGRESS` | The connection is currently in the Login authentication step. |
| `LOGIN_MFA_IN_PROGRESS` | The connection is currently in the second Login authentication step. This state happens after submitting an MFA token parameter only. |
| `ACCOUNTS_IN_PROGRESS` | Currently collecting Accounts data. Implies Login step has just been completed. |
| `CREDITCARDS_IN_PROGRESS` | Currently collecting Credit Cards data. Implies Accounts collection step has just been completed (or skipped). |
| `TRANSACTIONS_IN_PROGRESS` | Currently collecting Accounts and Credit Cards Transactions data. Implies Credit Cards collection step has just been completed (or skipped). |
| `INVESTMENT_TRANSACTIONS_IN_PROGRESS` | Currently collecting Investment Transactions. Implies Transactions collection step has just been completed (or skipped). Note: only few connectors support this product. |
| `PAYMENT_DATA_IN_PROGRESS` | Currently collecting Transactions Payment data. Implies Investment Transactions collection step has just been completed (or skipped). Note: only few connectors support this product. |
| `IDENTITY_IN_PROGRESS` | Currently collecting Identity data. Implies Transactions (and Payment Data, if any) steps have just been completed (or skipped). |
| `MERGING` | Analyzing and storing all the collected data. Implies all of the available Institution data has been collected. |
### Final states
These states represent an Execution that has finished running.
We can distinguish two possible types of final states:
- A finished state, either with a success, or error result.
- An intermediate state, which means more input from the User is needed. In this case, a new Execution needs to be started by fulfilling the required actions.
#### Success states
| Value | Description |
|---|---|
| `SUCCESS` | The execution was completed successfully, products have been collected. |
| `PARTIAL_SUCCESS` | The execution was completed successfully, products has been collected, but some of them have failed. Check the Item `statusDetail` attribute for more information. |
#### Error states
| Value | Description |
|---|---|
| `ERROR` | There was an unexpected error in the connection. |
| `MERGE_ERROR` | The connection has finished successfully and data has been collected, but we had an unexpected error storing it in our records. |
| `INVALID_CREDENTIALS` | Couldn't authenticate to the user Institution's account due to incorrect credentials. |
| `ALREADY_LOGGED_IN` | Couldn't login because there is an active session and the Institution didn't allow creating a new one. |
| `SITE_NOT_AVAILABLE` | Failed to get a response from the Institution's site. Possibly it has went into maintenance, out of service, or temporarily unavailable. |
| `INVALID_CREDENTIALS_MFA` | The second login step failed due to an incorrect or expired MFA token parameter provided. |
| `USER_INPUT_TIMEOUT` | The second login step has been aborted after the MFA parameter request has timed out. |
| `ACCOUNT_LOCKED` | Couldn't login because the user's account has been locked. User needs to get in contact with the Institution to unlock it. |
| `ACCOUNT_NEEDS_ACTION` | Couldn't proceed with the data collection because a manual user action is needed, such as resolving an Institution's request of accepting new Terms of Use, providing more/new personal information, or else. |
| `USER_NOT_SUPPORTED` | Pluggy currently doesn't support the kind of account the user is currently trying to connect, for the selected institution. For example, an "Operador" account in Caixa Business connector. |
| `ACCOUNT_CREDENTIALS_RESET` | The financial institution is requesting to reset the credentials of the user, this could happen due to an expired password or new security measures implemented by the institution. |
| `CONNECTION_ERROR` | Failed to establish a connection to the Institution's site. |
| `USER_AUTHORIZATION_NOT_GRANTED` | Couldn't proceed with data collection because the User has not granted Device authorization to the Pluggy Connector. |
| `USER_AUTHORIZATION_REVOKED` | The user removed the consent to share their data in the Financial Institution. |
#### Intermediate states
| Value | Description |
|---|---|
| `WAITING_USER_INPUT` | After a successful initial login step, the Institution is expecting an additional user's input to continue the execution, ie. an extra MFA token parameter. More info [here](/reference/items-send-mfa). |
| `USER_AUTHORIZATION_PENDING` | A special case, similar to the `ACCOUNT_NEEDS_ACTION`, but in this scenario the User needs to provide manual authorization in his Device or Institution's account. Once the user resolves this, Pluggy will proceed with the data collection automatically a few minutes later, no more external action is needed. |
> See [Items in our API reference](/reference/items) for more information.
## Synchronization flow
During the process of creating or updating an Item, it will go through different states until the data collection is finished.
When the process starts, the status will be set to `UPDATING` and from there, there are a few possible state values that we'll detail below, based on the Connector-specific login flow.
There are 3 Connector-specific login flow possibilities: when the connector doesn't require an MFA parameter, when the connector requires an MFA that is accessible by the user beforehand (ie. using Google Authenticator), or when the connector requires an MFA that is generated/requested to the user right after the initial login step has been completed.
### 1- Connectors without MFA parameter
This is the simplest case. The login flow will proceed with just the user credentials.
**A- If user credentials have been correct**, then the connection will proceed and it will attempt to retrieve products data. Then:
1. If everything went well, the final Item status will be `UPDATED`, and the related `executionStatus` will be `SUCCESS`.
2. If something went wrong but at least some of the products data could be retrieved, the Item status will also be `UPDATED`, and the related `executionStatus` will be `PARTIAL_SUCCESS`. Further information about what has failed will be available in the Item `executionReport` field.
3. If something went fatally wrong with the connection, such as an unexpected error, and no data could be retrieved, the Item status will be `OUTDATED` and the related `executionStatus` will be `ERROR`.
> In the above cases, all items are considered updatable, since the initial credentials have been correct.
> By default, updatable Items are automatically synced by us, once per day.
**B- If user credentials have not been correct**, then the Item status will be `LOGIN_ERROR`.
> **Warning**
>
> In this case the Item is not considered updatable. The user will have to manually trigger an update, and start over by providing a new set of credentials.
> **Warning**
>
> The `LOGIN_IN_PROGRESS` status could take up to 5 minutes, as some institutions may take that long to start returning user account data, so please consider this time window in your implementation.
### 2- Connectors with 1-step verification step
This case of Connector can be identified by finding in one of the connector data credentials field values, a credential that has the `mfa` field set as `true`.
The same flow as in the previous step will occur.
> **Warning**
>
> Here Items are not updatable, since an extra input provided by the user is required for each connection execution.
>
> **Exceptions**
> There are a few exceptions, like Banco do Brasil PJ, which allows us to continue syncing with the institution (with no more MFA requests), once the initial device authorization has been granted.
In cases in which MFA parameter is sent repeated between executions, API will return a bad request with the specific message without execute the connector.
### 3- Connectors with a 2-step verification step
This case of Connector can be identified by checking the base connector data `mfa` field, set as `true`.
So, after providing the initial user credentials, if they have been correct, then the Item will jump to a different state: `WAITING_USER_INPUT`.
In this state, the connection will be suspended, until the user submits the validation code. Once the user sends the new parameter, if the parameter submitted was correct, the execution will resume as in the previous scenarios until the item finishes the execution in one of the three possible final states `UPDATED`, `OUTDATED` or `LOGIN_ERROR`.
> **Warning**
>
> This case of Items are not updatable, since an extra input provided by the user is required for each connection execution.
>
> The only exception is Nubank, which can be updated after an initial device authorization.
## Summary
The following state diagram summarizes the Item connection flow.
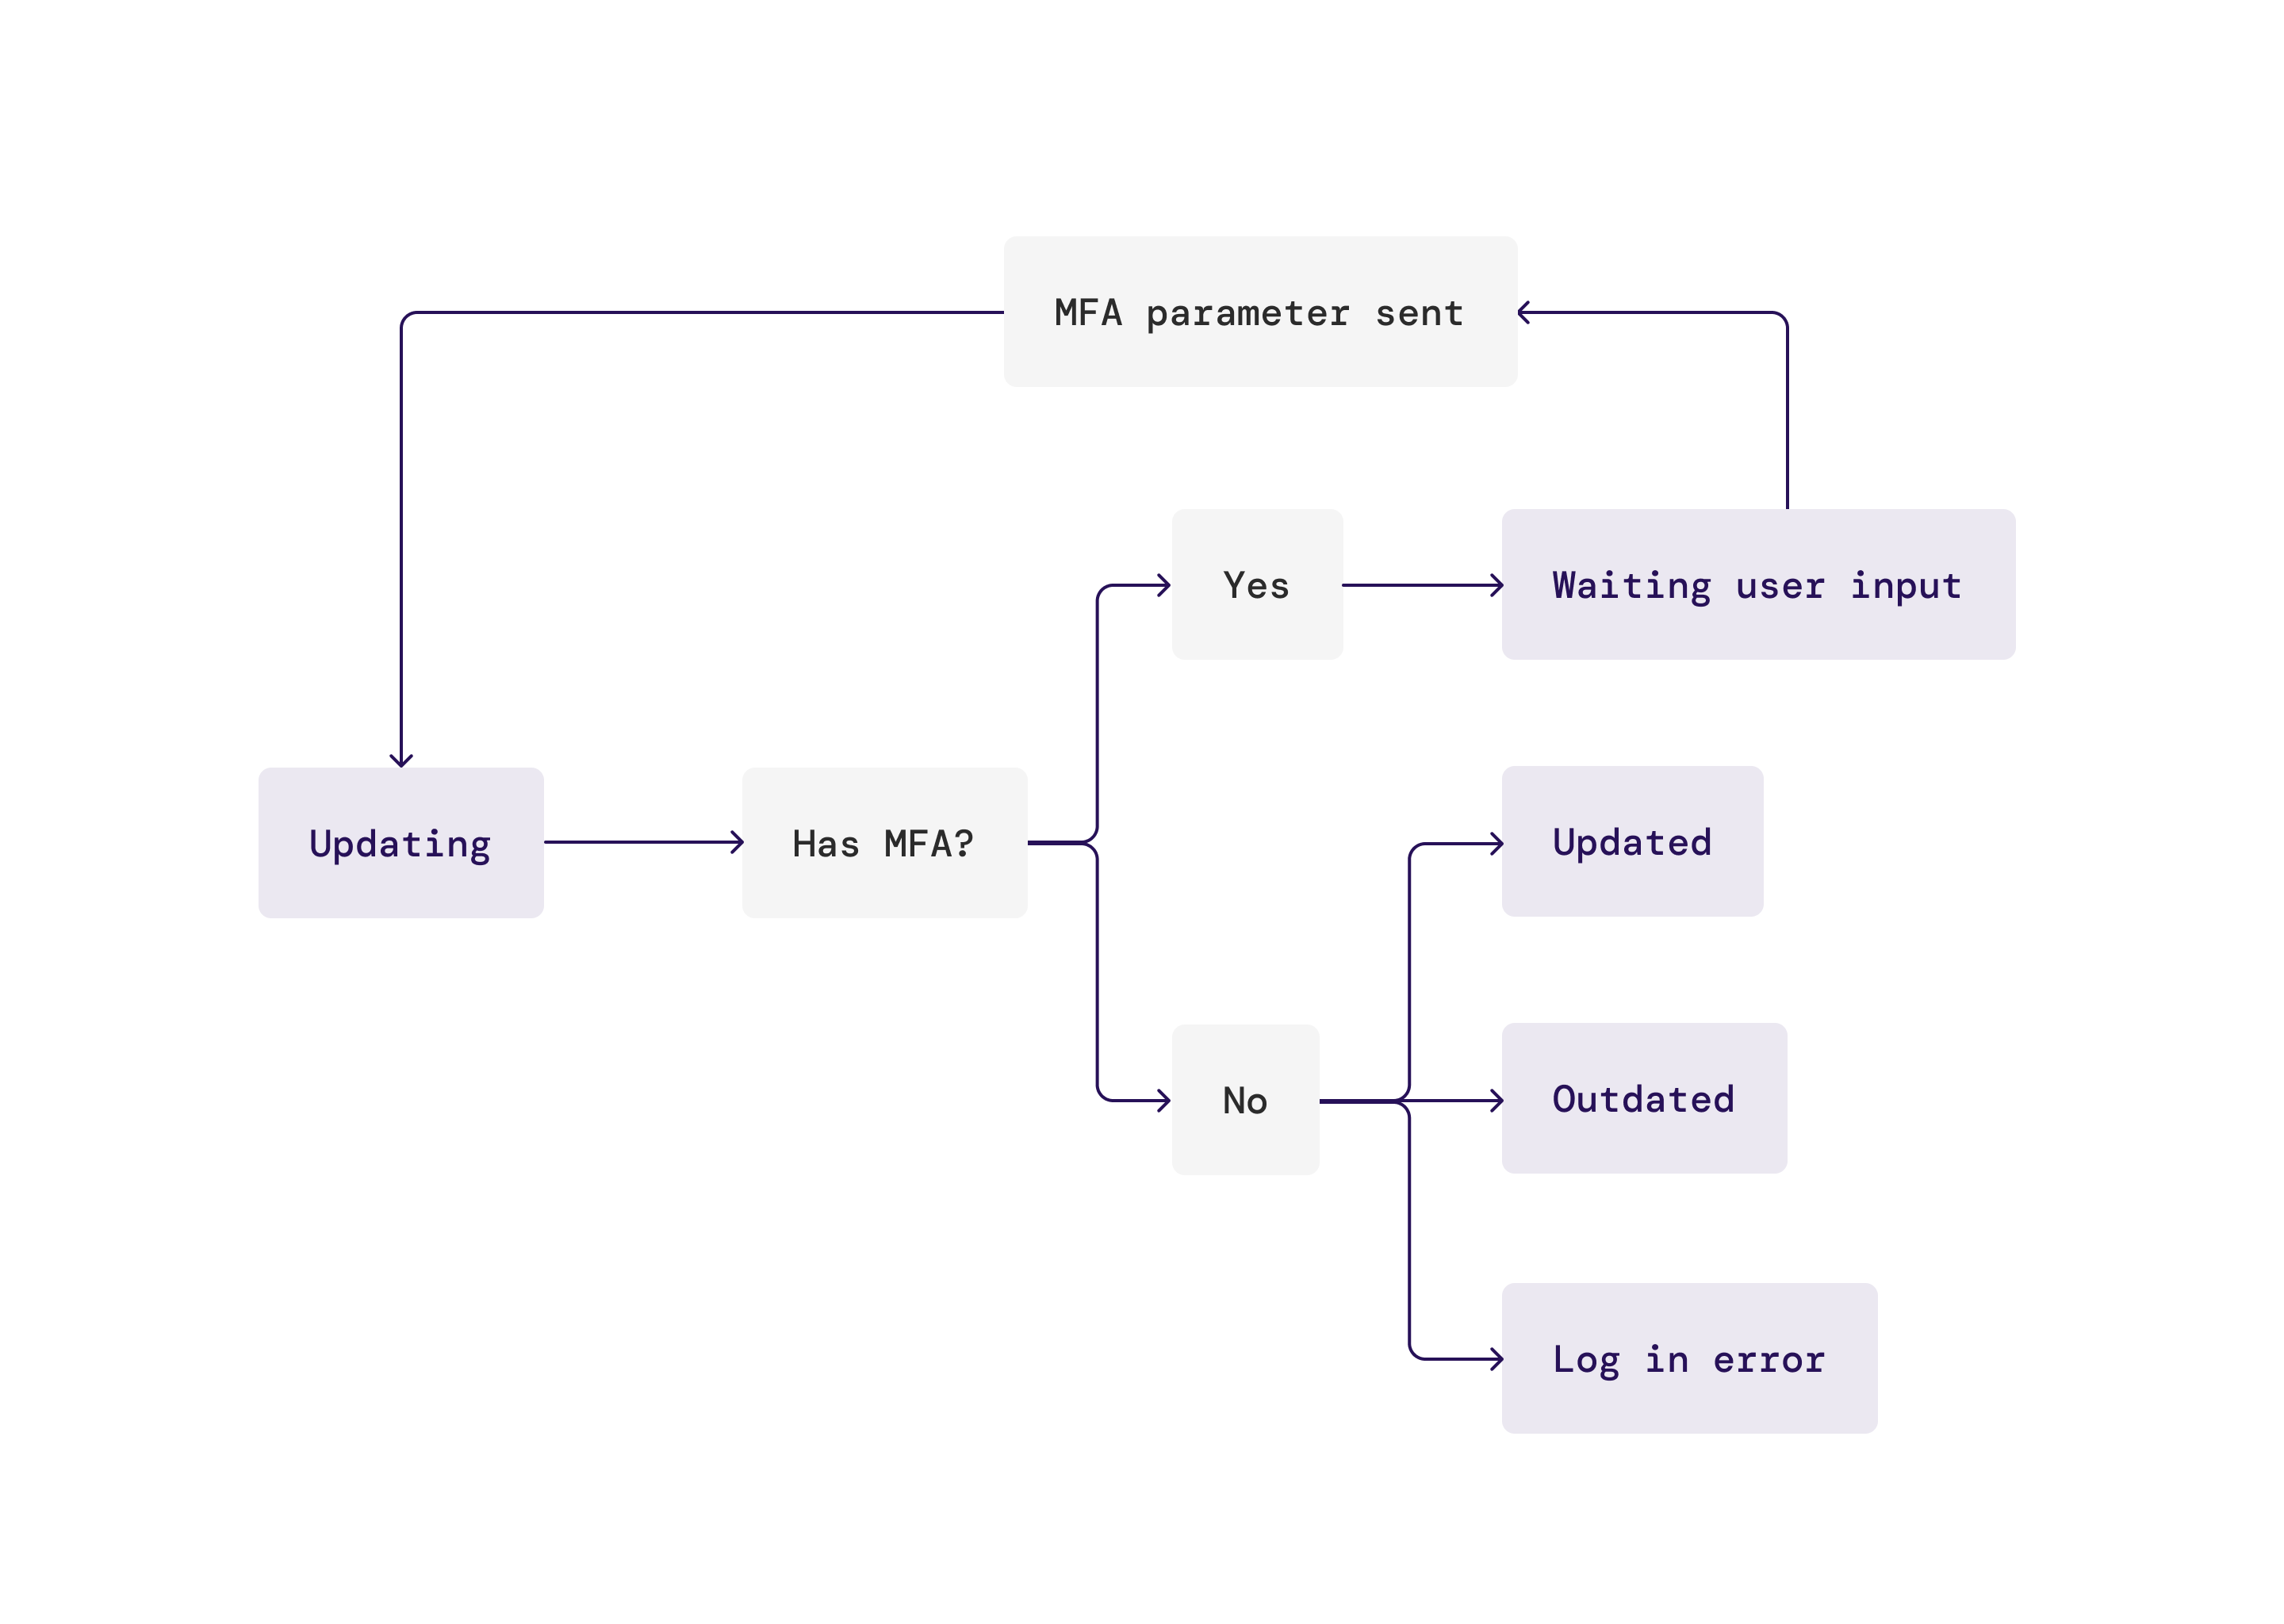
## Data retention and automatic cleanup
Pluggy automatically removes stored data once it's no longer needed. The three policies below run as background jobs and apply to all items regardless of how they were created.
> Whenever an item is removed by any of these processes, the `item/deleted` webhook event is emitted. See [Webhooks](/docs/developer-tools/webhooks-ref) for the payload.
| Scenario | When it triggers | What happens |
|---|---|---|
| Item deleted by client | Immediately, on `DELETE /items/{id}` | The item is marked as deleted, stored credentials are wiped, the Open Finance consent is revoked (when applicable), and OAuth authorizations are expired. The item's data (accounts, transactions, etc.) is permanently deleted. |
| Sandbox item not in use | When `updatedAt` is older than **30 days** | The item and all of its related data are permanently removed. Re-create the item to keep testing. |
| Connector deprecated by Pluggy | **30 days** after the connector is deprecated | Every item still attached to that connector is automatically deleted, following the same process as a client-initiated deletion (`item/deleted` webhook emitted). Data is then permanently removed, in line with the policy above. |
### What this means for you
- **Connector deprecation gives you a 30-day window.** When Pluggy announces a connector deprecation, prompt affected end users to reconnect through a still-supported connector before the 30-day mark. After that window, the item is deleted and the stored credentials and historical data become inaccessible.
- **Subscribe to `item/deleted`** if you need to react to automatic deletions in your system (e.g. to update your own user state, remove cached data, or notify the end user).
- **Stored credentials & data are never retained beyond what's strictly necessary.** Once an item enters any of the deletion flows above, its credentials are cleared before any further processing.
> Sandbox items follow a stricter timeline because they exist only for testing — production items are never removed solely due to inactivity.
## Errors & Validations
Source: https://docs.pluggy.ai/en/docs/connections/errors-validations.md
Learn about the different statuses and errors you could face using Pluggy's API.
When connecting an Item, if connection was successful and all products were retrieved correctly, `GET /items/:id` will return something like this:
```json
{
"id": "1b0f3cd5-c902-4836-b68b-04cbd847f99a",
"status": "UPDATED",
"executionStatus": "SUCCESS",
"lastUpdatedAt": "2024-09-27T14:51:46.216Z",
"error": null,
"statusDetail": null
}
```
If the execution status is `SUCCESS`, it means every product (accounts, transactions, etc) was retrieved correctly from the institution, and is ready to be retrieved.
## Item failed to log in
When creating or updating an item, we could fail to log in, which returns a status `LOGIN_ERROR`:
```json
{
"id": "1b0f3cd5-c902-4836-b68b-04cbd847f99a",
"status": "LOGIN_ERROR",
"executionStatus": "INVALID_CREDENTIALS",
"error": {
"code": "INVALID_CREDENTIALS",
"message": "Invalid credentials."
},
"statusDetail": null
}
```
Here, no product was retrieved, and we cannot retry the connection: we require the user to update their credentials.
## Item failed to begin retrieving products
There are situations where we are unable to retrieve any products (for example, the institution is down, the institution tells us there is another active session and kicks us out, etc), but it is not necessarily a problem with the login. In these cases the item will have status `OUTDATED`:
```json
{
"id": "1b0f3cd5-c902-4836-b68b-04cbd847f99a",
"status": "OUTDATED",
"executionStatus": "CONNECTION_ERROR",
"error": {
"code": "CONNECTION_ERROR",
"message": "Connectivity error, please try again."
},
"statusDetail": null
}
```
When the institution is having an instability the `executionStatus` will be `SITE_NOT_AVAILABLE`, however, when it's an unexpected error on our side, the `executionStatus` will be `ERROR` or `CONNECTION_ERROR`.
You can try to update the item again to see if the issue persists (for example, the bank could be unstable in the morning, but recover later during the day).
If you have auto-sync, `OUTDATED` items are retried automatically up to 5 times, with 1 hour between each attempt. If it fails 5 times, it is dropped from auto-sync.
## Item failed to retrieve a specific product
Sometimes we access the institution correctly, but a certain product cannot be retrieved. This will yield a status of `UPDATED` with an execution status of `PARTIAL_SUCCESS`. The field `statusDetail` will have information about which products failed.
```json
{
"id": "1b0f3cd5-c902-4836-b68b-04cbd847f99a",
"status": "UPDATED",
"executionStatus": "PARTIAL_SUCCESS",
"error": null,
"statusDetail": {
"accounts": {
"warnings": [],
"isUpdated": true,
"lastUpdatedAt": "2024-01-23T22:39:55.622Z"
},
"transactions": {
"warnings": [],
"isUpdated": false,
"lastUpdatedAt": "2024-01-21T22:39:55.622Z"
},
"creditCards": null
}
}
```
You can also retry these cases to see if the issue persists. Auto-sync does not retry `PARTIAL_SUCCESS`.
> **Understanding Warnings**
>
> When products fail or have issues, the `statusDetail` includes warnings that explain why. Learn more about warnings and how to handle them in the [Warnings & Status Codes](/docs/warnings-status-codes) guide.
## The Error object
The following type represents the complete error structure:
```typescript
type ExecutionErrorResult = {
code: ExecutionErrorCodes
message: string
providerMessage?: string
attributes?: Record
}
```
With certain errors, the error object is returned with an `attributes` key with additional information necessary for future executions:
```json
{
"error": {
"code": "USER_AUTHORIZATION_PENDING",
"message": "The user needs to grant necessary permissions for their account.",
"attributes": {
"deviceNickname": "123456789"
}
}
}
```
When the error code is `ACCOUNT_NEEDS_ACTION`, we use a field called `providerMessage` in portuguese, with any relevant alert message from the institution:
```json
{
"error": {
"code": "ACCOUNT_NEEDS_ACTION",
"message": "Account needs a manual user action.",
"providerMessage": "Your password should be changed"
}
}
```
The `providerMessage` field is the exact message returned by the Financial Institution when running into an error, without any treatment. This way, the user can have a friendly and clear message of why this is happening. We don't provide a list of these messages since they are subject to changes by the FI.
## Handling errors
Error handling logic, in general, can look something like this:
- **If `executionStatus` is `SUCCESS`**
- Fetch all products (transactions, accounts, etc)
- Check the warnings (if any) to see information about how data could be improved.
- **If `executionStatus` is `PARTIAL_SUCCESS`**
- Fetch all `isUpdated: true` products
- Raise an internal alert if it's a critical product (e.g. `TRANSACTIONS`) or add a user alert.
- Check the warnings (if any) to see information about why the product failed.
- **If status is `LOGIN_ERROR`** (Open Finance doesn't require handling this case):
- Don't fetch any products
- Prompt the user to input their credentials again
- **If status is `OUTDATED`**:
- Don't fetch any products
- Raise an internal alert or add a user alert
For direct connectors, all error cases are described [here](/docs/item-lifecycle#error-states).
### Open Finance error cases
For Open Finance, there is only a subset of possible error cases, as follows, divided by status and `executionStatus`:
- **`LOGIN_ERROR`**:
- `INVALID_CREDENTIALS`: the CPF/CNPJ is invalid
- `USER_AUTHORIZATION_NOT_GRANTED`: the user rejected the consent while in the authorization flow
- `USER_AUTHORIZATION_REVOKED`: the user revoked the consent from their bank
- **`OUTDATED`**:
- `USER_INPUT_TIMEOUT`: the user never finished the authorization flow
- `SITE_NOT_AVAILABLE`: the institution is currently unstable
- `ERROR`/`CONNECTION_ERROR`: an unexpected error occurred while accessing the institution
- **`UPDATED`**:
- `PARTIAL_SUCCESS`: failed to retrieve a product, most likely because the monthly rate limit has been reached, or because the institution has a temporary instability on that product.
A product can also fail because the institution did not answer within the network's **15-second timeout**. See [Response time and timeout](/docs/open-finance/rate-limits#response-time-and-timeout) for how that limit works and how it differs from the network's performance (P95) target.
## Item Creation Validations
Validations in Pluggy API are very important. They are used to avoid executing connectors with invalid parameters and to create item connections that won't be synced due to invalid credentials or parameters. When creating or updating an item, validations will be executed for that item based on the connector's credentials.
This is an example of a validation response when creating an item:
```json
// HTTP 400
{
"message": "Connector parameters do not match validation rules",
"errors": [
{
"code": "002",
"message": "user parameter length must be at least 6.",
"parameter": "user"
},
{
"code": "002",
"message": "password parameter length must be at least 6.",
"parameter": "password"
}
]
}
```
## Update rejection errors
There are some cases in which an item could not be updated due to the state of the item:
| Code | Error Code | Description | Action Item |
|---|---|---|---|
| 409 | `ITEM_IS_ALREADY_UPDATING` | The item is already updating | Wait for the item to finish the existing sync. |
| 409 | `ITEM_CREATION_LIMIT_EXCEEDED` | Can't update on the item is not allowed because the item was updated before the client's minimum frequency | Wait until the contracted delay has happened. |
| 409 | `CLIENT_HAS_ITEM_UPDATES_DISABLED` | The client can't trigger manual updates since it was disabled by Pluggy | Contact the support team to understand why the client was disabled for updates. |
| 400 | `ITEM_ORIGINAL_CONNECTED_WITH_DIFFERENT_ACCOUNT` | Item was originally connected with a different account, please use the original account | The user initially connected with a different company/account, they can't change the connection configuration. |
## Warnings & Status Codes
Source: https://docs.pluggy.ai/en/docs/connections/warnings-status-codes.md
Understanding warning codes and their meanings when retrieving data from Pluggy connectors.
## Overview
When retrieving data from financial institutions through Pluggy, you may encounter situations where some data is unavailable or cannot be retrieved due to various reasons. Pluggy uses a standardized warning system to inform you about these situations without failing the entire data collection process.
Warnings are returned as part of the `statusDetail` for each product type (Accounts, Credit Cards, Transactions, etc.) and include:
- A **code**: A unique identifier for the warning type
- A **message**: A human-readable description of the issue
- A **providerMessage** (optional): The exact message from the Financial Institution in Portuguese, without treatment
This allows you to handle these situations gracefully in your application and provide appropriate feedback to your users.
> **Difference between Errors and Warnings**
>
> Errors indicate that the entire request failed and no data was retrieved (see [Errors & Validations](/docs/errors-validations)). Warnings indicate that the request succeeded but some data may be incomplete or unavailable. Your application should handle both scenarios appropriately.
## When Warnings Occur
Warnings are included in the `statusDetail` on these scenarios:
- The product failed to be retrieved, and it contains the reason (`isUpdated: false`)
- The product was retrieved correctly, but it can be improved with some user action (`isUpdated: true`)
For instance: if the user doesn't have access to transactions, we return them as empty, but a warning on transactions informs that, with more permissions, we could be retrieving transactions.
### Common Scenarios
#### Permission Issues
The user hasn't granted the necessary permissions during the consent flow, or the consent has expired.
#### Resource Status
A specific resource (account, credit card, or loan) is in a state that prevents data retrieval:
- **Pending Authorization**: The resource is awaiting user authorization at the financial institution
- **Temporarily Unavailable**: The resource is temporarily unavailable (e.g., maintenance)
- **Unavailable**: The resource is permanently unavailable
#### Rate Limits
The financial institution has reached its operational rate limit for the current period. See [Operational Rate Limits](/docs/rate-limits-of) for more information about Open Finance rate limits.
#### Sync Issues
Some data could not be synchronized, but fallback data from a previous successful sync is being used instead.
## Handling Warnings
Warnings are included in the response for each product. Here's an example of how warnings appear in the API response:
**OF Connectors**
```json title="OF Connectors"
{
"accounts": [],
"warnings": {
"accounts": [
{
"code": "ACCT_002",
"message": "Account c0a7d38c-d967-3b94-9d0b-c391068f4b20 is pending authorization"
}
],
"creditCards": [],
"transactions": [],
"loans": []
}
}
```
**Direct Connectors**
```json title="Direct Connectors"
{
"accounts": [],
"warnings": {
"investments": [
{
"code": "001",
"message": "User lacks permissions to view investments on this account",
"providerMessage": "Seu perfil de usuário não está habilitado para esta transação."
}
],
"creditCards": [],
"transactions": [],
"loans": []
}
}
```
In this example, one account is pending authorization and wasn't included in the accounts list.
## Warning Codes Reference
### Open Finance Connectors
Open Finance connectors use a standardized, typed warning system with specific codes per product.
#### Accounts (ACCOUNTS)
| Code | Reason | Description |
|---|---|---|
| `ACCT_001` | Missing permission | User hasn't granted permission to collect accounts (`ACCOUNTS_ALL`) |
| `ACCT_002` | Pending authorization | Account is pending authorization at the financial institution |
| `ACCT_003` | Temporarily unavailable | Account is temporarily unavailable |
| `ACCT_004` | Unavailable | Account is unavailable |
| `ACCT_005` | Missing overdraft limits permission | User hasn't granted permission to collect accounts overdraft limits (`ACCOUNTS_LIMITS`) |
| `ACCT_006` | Accounts hard limit | There are more than 260 checking accounts to retrieve but we only return until this number |
#### Credit Cards (CREDIT_CARDS)
| Code | Reason | Description |
|---|---|---|
| `CC_001` | Missing permission | User hasn't granted permission to collect credit cards (`CREDIT_CARDS_ALL`) |
| `CC_002` | Pending authorization | Credit Card is pending authorization at the financial institution |
| `CC_003` | Temporarily unavailable | Credit Card is temporarily unavailable |
| `CC_004` | Unavailable | Credit Card is unavailable |
| `CC_005` | Missing bills permission | User hasn't granted permission to collect credit card bills (`CREDIT_CARDS_BILLS`) |
| `CC_006` | Missing transactions permission | User hasn't granted permission to collect credit card transactions (`CREDIT_CARDS_TRANSACTIONS`) |
| `CC_007` | Missing limits | Institution does not return limit for this credit card |
#### Transactions (TRANSACTIONS)
| Code | Reason | Description |
|---|---|---|
| `TXN_001` | Missing permission | User hasn't granted permission to collect accounts transactions (`ACCOUNTS_ALL` or `ACCOUNTS_TRANSACTIONS`) |
| `TXN_002` | No accounts available | No accounts available to fetch transactions for |
| `TXN_003` | Rate limit reached | Transactions step skipped due to rate limit error in accounts step and no accounts available |
| `TXN_004` | No permission to collect accounts | User hasn't granted permission to collect accounts, transactions step skipped |
| `TXN_005` | Accounts step had errors | Transactions step skipped due to errors in accounts step |
| `TXN_006` | Rate limit reached | Rate limit error in accounts step, but proceeding with transactions using available accounts |
#### Loans (LOANS)
| Code | Reason | Description |
|---|---|---|
| `LOAN_001` | Missing permission | User hasn't granted permission to collect loans (`CREDIT_OPERATIONS_ALL`) |
| `LOAN_002` | Pending authorization | Loan is pending authorization at the financial institution |
| `LOAN_003` | Temporarily unavailable | Loan is temporarily unavailable |
| `LOAN_004` | Unavailable | Loan is unavailable |
| `LOAN_005` | Installments sync failed | Failed to sync Loan Installments, using fallback data from previous sync |
| `LOAN_006` | Payments sync failed | Failed to sync Loan Payments, using fallback data from previous sync |
#### Investments (INVESTMENTS)
| Code | Reason | Description |
|---|---|---|
| `INV_001` | Missing permission | User hasn't granted permission to collect investments (`INVESTMENTS_ALL`) |
| `INV_002` | Permission not granted | Investment product permission has not been granted |
| `INV_003` | Not supported by FI | Investment product not supported by the financial institution |
| `INV_004` | Rate limit reached | Open Finance monthly rate limit reached |
| `INV_005` | Product type not supported | Specific investment product type not supported by the financial institution |
#### Identity (IDENTITY)
| Code | Reason | Description |
|---|---|---|
| `ID_001` | Missing permission | User hasn't granted permission to collect identity (`REGISTRATION_ALL`) |
| `ID_002` | Subproduct permission not granted | Specific identity subproduct permission has not been granted |
| `ID_003` | Subproduct rate limit reached | Specific identity subproduct rate limit has been reached |
| `ID_004` | Known error | Known 400 error for specific identity subproduct |
### Direct Connectors
Direct connectors may use generic codes (like `001`, `002`, `003`) with connector-specific meanings. The `providerMessage` field provides context in Portuguese from the institution.
Here is a list of known warnings for Direct Connectors:
| Connector + Product | Code | Message | Provider Message (PT-BR) | Action Item |
|---|---|---|---|---|
| Itaú PJ PAYMENT_DATA | `001` | User doesn't have permission to obtain received PIX QR code payment data | Consulte seu gerente ou Central de Atendimento para liberar permissões | Contact manager to grant PIX permissions |
| Itaú PJ PAYMENT_DATA | `001` | Client does not have permissions to see PIX payment data | Cliente não tem permissão para acesso a PIX | Grant user access to PIX section |
| Itaú PJ INVESTMENTS | `001` | User doesn't have permissions to view investments | Seu perfil de usuário não está habilitado para esta transação | Grant user access to investments section |
| Itaú PJ CREDIT_CARDS | `001` | User doesn't have access to credit cards resumes | - | Grant access to credit cards section |
| Santander PJ ACCOUNTS | `001` | Operator doesn't have access to Accounts | - | Allow operator to access the accounts section |
| Santander PJ ACCOUNTS | `002` | User doesn't have access to 'Extrato 365 dias' | - | Information retrieved from 'Saldo e Extrato' instead |
| Santander PJ CREDIT_CARDS | `001` | User doesn't have permissions, cannot recover credit cards | - | Allow operator to access credit cards section |
| Santander PJ TRANSACTIONS | `003` | User doesn't have access to 'Extrato 365 dias' or it's offline | - | Allow access to 'Extrato 365' to remove data limitations |
| Bradesco PJ PAYMENT_DATA | `001` | User doesn't have permissions to obtain TED / PIX / TEF payments | - | - |
| Bradesco PJ INVESTMENTS | `001` | User does not have access to mutual funds / fixed income investments | Solicite ao usuário máster para ter acesso a esse serviço | Request master user to grant access |
| Bradesco PJ INVESTMENTS_TRANSACTIONS | `001` | User does not have access to investments transactions information | Solicite ao usuário máster para ter acesso a esse serviço | Request master user to grant access |
| Bradesco PJ INVESTMENTS_TRANSACTIONS | `001` | User doesn't have permissions to view fixed income / mutual funds txs | - | - |
| Bradesco PJ TRANSACTIONS | `001` | Transactions are not enabled for this account | Solicite ao usuário máster para ter acesso a esse serviço | Request master user to grant access |
| Caixa PJ TRANSACTIONS | `001` | Blocking situation to move your account | Situação impeditiva para movimentar sua conta. Procure sua agência para regularizar | Contact branch to regularize |
| XP INVESTMENTS | `001` | User does not have permissions to access Treasury assets | A Conta não está habilitada para operar no Tesouro Direto pois já existe outra conta XP Inc atrelada ao CPF do cliente. Caso queira trocar a conta habilitada, entre em contato com a XP | User must grant access to Treasury Direct |
| Sicoob PJ ACCOUNTS | `001` | User does not have permissions to get accounts | Usuário não tem permissão para executar a transação - Consultas - Saldo de conta corrente | Allow user access through Mobile App to account balance section |
> **Provider Messages**
>
> The `providerMessage` field contains the exact message from the Financial Institution in Portuguese, without any treatment. This way, the user can have a friendly and clear message of why this is happening. We don't provide a complete list of these messages since they are subject to changes by the FI.
## Consents and expiration
Source: https://docs.pluggy.ai/en/docs/connections/consents.md
The first time an Item connects, a Consent is created with an expiration date. The Consent shows which financial products an item is authorized to recover for a given period. You can use the Consents API to get all consents given to an item.
> **Default expiration**
>
> By default, Open Finance Consents have no expiration. However, the user can revoke them from their connected Bank's app whenever necessary.
```json
{
"id": "a182a0ae-16b3-4790-9396-3724aa0bc14b",
"itemId": "ed893a30-5fab-45d8-917c-e71a313dbe5e",
"products": [
"ACCOUNTS",
"CREDIT_CARDS",
"TRANSACTIONS",
"INVESTMENTS",
"IDENTITY",
"INVESTMENTS_TRANSACTIONS",
"PAYMENT_DATA",
"LOANS"
],
"openFinancePermissionsGranted": [
"REGISTRATION_ALL",
"ACCOUNTS_ALL",
"CREDIT_CARDS_ALL",
"CREDIT_OPERATIONS_ALL",
"INVESTMENTS_ALL"
],
"createdAt": "2024-06-11T15:10:45.362Z",
"expiresAt": null,
"revokedAt": null
}
```
| Property | Description | Required |
|---|---|---|
| `id` | Consent primary identifier | Yes |
| `itemId` | Primary identifier of the item associated to the consent | Yes |
| `products` | Products to be collected in the connection | Yes |
| `openFinancePermissionsGranted` | Products consented by the user to be collected. Only available for Open Finance connectors. | |
| `createdAt` | Date when the consent was given | Yes |
| `expiresAt` | Date when the consent expires. Null if the consent doesn't expire | |
| `revokedAt` | Date when the consent was revoked. | |
See [Consent Management Docs](/reference/consent/consents-list) for more information.
## Consent expiration / revocation
When a consent expires (for example, old Open Finance items) or is revoked by the user from the app, all its data endpoints (accounts, transactions, etc) will return empty data.
To continue using the Item after expiration (indicated by the field `consentExpiresAt`) you will need to run an update on the item (`PATCH` on the Item), asking the user to connect again. The user will go through the consent flow once again, renewing the consent.
Once this is completed successfully, the item will go back to execution status `SUCCESS`, and data endpoints will now be available again, with a new `consentExpiresAt` date on the Item.
There is no need to create a new item to renew a consent; expired items work the same as login error ones. Updates will require a successful login to start syncing daily.
> **Expirations**
>
> By default, we request non-expiring consents, while the user is able to readjust as he wants this setting. If null, there isn't any expiration for that connection.
>
> There are some connectors like Inter PJ that have a default consent expiration of one year.
## Connectors coverage
Source: https://docs.pluggy.ai/en/docs/connections/connectors-coverage.md
> **Note:** This list is kept in sync with the Pluggy API. You can always query `GET /connectors` for the live list.
🏦 Here you will find all the connectors available in Pluggy listed by type of connector, detailing which products are supported in each case.
🟢 Available
🟡 Conditionally available (see footnotes)
🔴 Not available
## Personal
| Connector | Identity | Accounts | Credit Cards | Transactions | Payment Data | Investments | Investment Transactions | Loans | MFA | Auto Updates |
| --- | --- | --- | --- | --- | --- | --- | --- | --- | --- | --- |
| Banco do Brasil Previdência | 🟢 | 🔴 | 🔴 | 🔴 | 🔴 | 🟢 | 🔴 | 🔴 | 🟢 | 🔴 |
| Caixa Economica Federal ¹ | 🟢 | 🟢 | 🟢 | 🟢 | 🟢 | 🟢 | 🟢 | 🔴 | 🔴 | 🟢 |
| Ethereum networks | 🔴 | 🔴 | 🔴 | 🔴 | 🔴 | 🟢 | 🔴 | 🔴 | 🔴 | 🟢 |
| Inter | 🟢 | 🟢 | 🟢 | 🟢 | 🔴 | 🟢 | 🟢 | 🔴 | 🟢 | 🔴 |
| Itaú Cartões | 🟢 | 🔴 | 🟢 | 🔴 | 🔴 | 🔴 | 🔴 | 🔴 | 🔴 | 🟢 |
| Mercado Pago | 🟢 | 🟢 | 🔴 | 🟢 | 🔴 | 🔴 | 🔴 | 🔴 | 🔴 | 🟢 |
| MeuPluggy | 🟢 | 🟢 | 🟢 | 🟢 | 🟢 | 🟢 | 🟢 | 🔴 | 🔴 | 🟢 |
| Wise | 🟢 | 🟢 | 🔴 | 🟢 | 🔴 | 🔴 | 🔴 | 🔴 | 🔴 | 🟢 |
## Business
| Connector | Identity | Accounts | Credit Cards | Transactions | Payment Data | Investments | Investment Transactions | Loans | MFA | Auto Updates |
| --- | --- | --- | --- | --- | --- | --- | --- | --- | --- | --- |
| Banco do Brasil Empresas² | 🟢 | 🟢 | 🟢 | 🟢 | 🔴 | 🟢 | 🔴 | 🔴 | 🟢 | 🟡 |
| Banco do Nordeste do Brasil Empresas | 🔴 | 🟢 | 🔴 | 🟢 | 🔴 | 🔴 | 🔴 | 🔴 | 🔴 | 🟢 |
| Banrisul Empresas | 🟢 | 🟢 | 🔴 | 🟢 | 🔴 | 🔴 | 🔴 | 🔴 | 🔴 | 🟢 |
| Bradesco Empresas³ | 🔴 | 🟢 | 🔴 | 🟢 | 🟢 | 🔴 | 🔴 | 🔴 | 🟢 | 🟡 |
| Caixa Economica Federal Empresas⁴ | 🟢 | 🟢 | 🟢 | 🟢 | 🟢 | 🟢 | 🟢 | 🔴 | 🔴 | 🟢 |
| Cora | 🔴 | 🟢 | 🔴 | 🟢 | 🔴 | 🔴 | 🔴 | 🔴 | 🟢 | 🔴 |
| Efí Bank | 🔴 | 🟢 | 🔴 | 🟢 | 🔴 | 🔴 | 🔴 | 🔴 | 🔴 | 🟢 |
| Inter Empresas⁴ | 🟢 | 🟢 | 🔴 | 🟢 | 🟢 | 🔴 | 🔴 | 🔴 | 🔴 | 🟢 |
| Itaú Empresas⁵ | 🟢 | 🟢 | 🟢 | 🟢 | 🟢 | 🟢 | 🟢 | 🔴 | 🔴 | 🟢 |
| Santander Empresas⁶ | 🟢 | 🟢 | 🔴 | 🟢 | 🟢 | 🟢 | 🔴 | 🔴 | 🟢 | 🟡 |
| Sicredi Empresas⁴ | 🔴 | 🟢 | 🔴 | 🟢 | 🟢 | 🔴 | 🔴 | 🔴 | 🔴 | 🟢 |
## Investment
| Connector | Identity | Accounts | Credit Cards | Transactions | Payment Data | Investments | Investment Transactions | Loans | MFA | Auto Updates |
| --- | --- | --- | --- | --- | --- | --- | --- | --- | --- | --- |
| Avenue | 🟢 | 🟢 | 🔴 | 🔴 | 🔴 | 🟢 | 🟢 | 🔴 | 🟢 | 🔴 |
| BTGPactual | 🟢 | 🟢 | 🔴 | 🟢 | 🔴 | 🟢 | 🟢 | 🔴 | 🟢 | 🔴 |
| Caixa Previdência | 🟢 | 🔴 | 🔴 | 🔴 | 🔴 | 🟢 | 🔴 | 🔴 | 🔴 | 🟢 |
| EQI | 🟢 | 🟢 | 🔴 | 🟢 | 🔴 | 🟢 | 🟢 | 🔴 | 🟢 | 🔴 |
| Mercado Bitcoin | 🔴 | 🟢 | 🔴 | 🔴 | 🔴 | 🟢 | 🟢 | 🔴 | 🔴 | 🟢 |
| Necton | 🟢 | 🟢 | 🔴 | 🟢 | 🔴 | 🟢 | 🟢 | 🔴 | 🟢 | 🔴 |
| XP Investimentos⁷⁸ | 🟢 | 🔴 | 🟢 | 🔴 | 🔴 | 🟢 | 🟢 | 🔴 | 🟢 | 🟡 |
## Other
| Connector | Identity | Accounts | Credit Cards | Transactions | Payment Data | Investments | Investment Transactions | Loans | MFA | Auto Updates |
| --- | --- | --- | --- | --- | --- | --- | --- | --- | --- | --- |
| Splitwise | 🟢 | 🟢 | 🔴 | 🟢 | 🔴 | 🔴 | 🔴 | 🔴 | 🔴 | 🟢 |
***
* ¹ Caixa's connector depends on the user's action in completing a multi-factor authorization. When the user enters their credentials, it can take up to 30 minutes to complete the login process.
* ² MFA required on first access only. Auto updates supported for both admin and operator access.
* ³ MFA required for admin access only. Auto updates supported with operator access only — admin access does not support auto updates.
* ⁴ Auto updates supported with admin access only.
* ⁵ MFA is required for some accounts. Accounts with MFA will not be auto-updated.
* ⁶ MFA required for admin access only. Auto updates supported for both admin (requires mobile access enabled) and operator access.
* ⁷ Auto updates only for business accounts (without MFA).
* ⁸ Investment Transactions for SECURITY type are not available.
> 📘 You can see connector's status on our [status page](https://status.pluggy.ai/)
## Credit Cards coverage
Source: https://docs.pluggy.ai/en/docs/connections/credit-cards-coverage.md
Here you will find the coverage we have for each connector regarding Credit Card product
## References
🟢 Available;
🔴 Not available.
## Personal
| Connector | Multiple Cards | Installments | Flexible Limit | Close Date | Due Date | Credit Limit | Available Credit Limit | Minimum Payment | Bills |
| :-- | :-- | :-- | :-- | :-- | :-- | :-- | :-- | :-- | :-- |
| Caixa Econômica Federal | 🟢 (2 months) | 🟢 installmentNumber 🟢 totalInstallments 🟢 totalAmount | 🔴 | 🔴 | 🟢 | 🟢 | 🟢 | 🟢 | 🔴 |
| Mercado Pago | 🔴 | 🔴 | 🔴 | 🔴 | 🔴 | 🔴 | 🔴 | 🔴 | 🔴 |
| Safra Bank | 🔴 | 🔴 | 🔴 | 🔴 | 🔴 | 🔴 | 🔴 | 🔴 | 🔴 |
| Ethereum Network | 🔴 | 🔴 | 🔴 | 🔴 | 🔴 | 🔴 | 🔴 | 🔴 | 🔴 |
| Inter | 🔴 | 🟢 | 🔴 | 🔴 | 🟢 | 🟢 | 🟢 | | 🟢 |
| Itaú Cartões | 🟢 | 🟢 | 🟢 | 🟢 | 🟢 | 🟢 | 🟢 | 🟢 | 🟢 |
## Business
| Connector | Multiple Cards | Installments | Flexible Limit | Close Date | Due Date | Credit Limit | Available Credit Limit | Minimum Payment | Bills |
| :-- | :-- | :-- | :-- | :-- | :-- | :-- | :-- | :-- | :-- |
| Santander Empresas | 🔴 | 🔴 | 🔴 | 🔴 | 🔴 | 🔴 | 🔴 | 🔴 | 🔴 |
| Bradesco Empresas | 🟢 (1 month) | 🔴 | 🔴 | 🟢 | 🔴 | 🔴 | 🔴 | 🔴 | 🔴 |
| Itaú Empresas | 🟢 (2 months) | 🟢 | 🔴 | 🟢 | 🟢 | 🟢 | 🟢 | 🔴 | 🔴 |
| Caixa Econômica Federal Empresas | 🟢 (2 months) | 🔴 | 🔴 | 🔴 | 🟢 | 🟢 | 🟢 | 🟢 | 🔴 |
| Banco do Brasil Empresas | 🟢 | 🔴 | 🔴 | 🟢 | 🟢 | 🔴 | 🔴 | 🔴 | 🔴 |
| Banco Inter Empresas | 🔴 | 🔴 | 🔴 | 🔴 | 🔴 | 🔴 | 🔴 | 🔴 | 🔴 |
| Sicredi Empresas | 🔴 | 🔴 | 🔴 | 🔴 | 🔴 | 🔴 | 🔴 | 🔴 | 🔴 |
| Conta Simples | 🔴 | 🔴 | 🔴 | 🔴 | 🔴 | 🔴 | 🔴 | 🔴 | 🔴 |
## Investment
| Connector | Multiple Cards | Installments | Flexible Limit | Close Date | Due Date | Credit Limit | Available Credit Limit | Minimum Payment | Bills |
| :-- | :-- | :-- | :-- | :-- | :-- | :-- | :-- | :-- | :-- |
| XP Investimentos | 🔴 | 🔴 | 🔴 | 🔴 | 🟢 | 🟢 | 🟢 | 🟢 | 🔴 |
## Accounts coverage
Source: https://docs.pluggy.ai/en/docs/connections/accounts-coverage.md
Here you will find the coverage we have for each connector regarding Account product
## References
🟢 Available.
🔴 Not available.
## Personal
| Connector | Checking Account | Saving Account | Admin Access | Operator Access | Joint Account Flow | Multiple Accounts Flow |
| :-- | :-- | :-- | :-- | :-- | :-- | :-- |
| Caixa Econômica Federal | 🟢 | 🟢 | 🟢 | 🔴 | 🔴 | 🔴 |
| Banco Inter | 🟢 | 🟢 | 🟢 | 🔴 | 🔴 | 🔴 |
| Mercado Pago | 🟢 | 🔴 | 🔴 | 🔴 | 🔴 | 🔴 |
| Safra Bank | 🟢 | 🔴 | 🔴 | 🔴 | 🔴 | 🔴 |
## Business
| Connector | Checking Account | Saving Account | Admin Access | Operator Access | Joint Account Flow | Multiple Accounts Flow |
| :-- | :-- | :-- | :-- | :-- | :-- | :-- |
| Santander Empresas | 🟢 (90 days of transactions) | 🔴 | 🟢 | 🟢 | 🔴 | 🟢 |
| Bradesco Empresas | 🟢 | 🔴 | 🟢 | 🟢 | 🔴 | 🟢 |
| Itaú Empresas | 🟢 | 🔴 | 🟢 | 🟢 | 🔴 | 🟢 |
| Caixa Econômica Federal Empresas | 🟢 | 🔴 | 🟢 | 🔴 | 🔴 | 🔴 |
| Banco do Brasil Empresas | 🟢 | 🔴 | 🟢 | 🟢 | 🔴 | 🟢 |
| Banco Inter Empresas | 🟢 | 🔴 | 🟢 | 🔴 | 🔴 | 🟢 |
| Sicredi Empresas | 🟢 | 🔴 | 🟢 | 🔴 | 🔴 | 🔴 |
| Cora | 🟢 | 🔴 | 🟢 | 🟢 | 🔴 | 🔴 |
| Conta Simples | 🟢 | 🔴 | 🟢 | 🔴 | 🔴 | 🔴 |
## Investment
| Connector | Checking Account | Saving Account | Admin Access | Operator Access | Joint Account Flow | Multiple Accounts Flow |
| :-- | :-- | :-- | :-- | :-- | :-- | :-- |
| XP Investimentos | 🟢 Conta Investimento 🟢 Conta digital | 🔴 | 🟢 | 🟢 | 🔴 | 🔴 |
| BTG Pactual | 🟢 | 🔴 | 🟢 | 🔴 | 🟢 | 🔴 |
| Avenue | 🟢 | 🔴 | 🟢 | 🔴 | 🔴 | 🔴 |
| XP Wealth | 🟢 | 🔴 | 🔴 | 🟢 | 🔴 | 🔴 |
| EQI | 🟢 | 🔴 | 🟢 | 🔴 | 🟢 | 🔴 |
| Empiricus | 🟢 | 🔴 | 🟢 | 🔴 | 🟢 | 🔴 |
| Necton | 🟢 | 🔴 | 🟢 | 🔴 | 🟢 | 🔴 |
## Payment data coverage
Source: https://docs.pluggy.ai/en/docs/connections/paymentdata-coverage.md
Here you will find the data coverage we have for each connector regarding Payment Data product.
## References
🟢 Available.
🔴 Not available.
## Personal
| Connector | PIX (cash-in) | PIX (cash-out) | TED (cash-in) | TED (cash-out) | DOC (cash-in) | DOC (cash-out) | TEF (cash-in) | TEF (cash-out) | BOLETO (cash-out) |
| :-- | :-- | :-- | :-- | :-- | :-- | :-- | :-- | :-- | :-- |
| Caixa Econômica Federal | 🟢 (12 months) | 🟢 (12 months) | 🟢 (12 months) | 🟢 (12 months) | 🟢 (12 months) | 🟢 (12 months) | 🟢 (12 months) | 🟢 (12 months) | 🔴 |
| Banco Inter | 🔴 | 🔴 | 🔴 | 🔴 | 🔴 | 🔴 | 🔴 | 🔴 | 🔴 |
## Business
| Connector | PIX (cash-in) | PIX (cash-out) | TED (cash-in) | TED (cash-out) | DOC (cash-in) | DOC (cash-out) | TEF (cash-in) | TEF (cash-out) | BOLETO (cash-out) |
| :-- | :-- | :-- | :-- | :-- | :-- | :-- | :-- | :-- | :-- |
| Santander Empresas | 🟢 (12 months) | 🟢 (3 months) | 🔴 | 🟢 (3 months) | 🔴 | 🟢 (3 months) | 🔴 | 🟢 (3 months) | 🟢 (3 months) |
| Bradesco Empresas | 🟢 (12 months) | 🟢 (12 months) | 🔴 | 🟢 (12 months) | 🔴 | 🟢 (12 months) | 🔴 | 🟢 (12 months) | 🟢 (12 months) |
| Itaú Empresas | 🟢 (3 months) | 🟢 (12 months) | 🟢 (12 months) | 🟢 (12 months) | 🟢 (12 months) | 🟢 (12 months) | 🟢 (12 months) | 🟢 (12 months) | 🟢 (12 months) |
| Caixa Econômica Federal Empresas | 🟢 (12 months) | 🟢 (12 months) | 🟢 (12 months) | 🟢 (12 months) | 🟢 (12 months) | 🟢 (12 months) | 🟢 (12 months) | 🟢 (12 months) | 🔴 |
| Banco do Brasil Empresas | 🟢 (12 months) | 🟢 (12 months) | 🟢 (12 months) | 🟢 (12 months) | 🟢 (12 months) | 🟢 (12 months) | 🟢 (12 months) | 🟢 (12 months) | 🟢 (12 months) |
| Banco Inter Empresas | 🟢 (24 months) | 🟢 (24 months) | 🟢 (24 months) | 🟢 (24 months) | 🔴 | 🔴 | 🔴 | 🔴 | 🟢 (24 months) |
| Sicredi Empresas | 🟢 (12 months) | 🟢 (12 months) | 🟢 (12 months) | 🟢 (12 months) | 🟢 (12 months) | 🟢 (12 months) | 🔴 | 🔴 | 🟢 (12 months) |
| Conta Simples | 🔴 | 🔴 | 🔴 | 🔴 | 🔴 | 🔴 | 🔴 | 🔴 | 🔴 |
## Investments coverage
Source: https://docs.pluggy.ai/en/docs/connections/investments-coverage.md
Here you will find the coverage we have for each connector regarding Investments product
## References
🟢 Available.
🔴 Not available.
## Personal
| Connector | Fixed Income | Mutual Funds | Equity | ETF | Real Estate | Security | COE |
| :-- | :-- | :-- | :-- | :-- | :-- | :-- | :-- |
| Caixa Econômica Federal | 🟢 | 🟢 | 🔴 | 🔴 | 🔴 | 🟢 | 🔴 |
| Banco Inter | 🟢 | 🟢 | 🟢 | 🟢 | 🔴 | 🔴 | 🔴 |
| Mercado Pago | 🔴 | 🔴 | 🔴 | 🔴 | 🔴 | 🔴 | 🔴 |
| Safra Bank | 🟢 | 🟢 | 🟢 | 🟢 | 🟢 | 🟢 | 🟢 |
| Ethereum Network | 🔴 | 🔴 | 🔴 | 🟢 | 🔴 | 🔴 | 🔴 |
| Caixa Previdência | 🔴 | 🔴 | 🔴 | 🔴 | 🔴 | 🟢 | 🔴 |
| Banco do Brasil Previdência (Brasilprev) | 🔴 | 🔴 | 🔴 | 🔴 | 🔴 | 🟢 | 🔴 |
## Business
| Connector | Fixed Income | Mutual Funds | Equity | ETF | Real Estate | Security | COE |
| :-- | :-- | :-- | :-- | :-- | :-- | :-- | :-- |
| Santander Empresas | 🟢 | 🟢 | 🔴 | 🔴 | 🔴 | 🔴 | 🔴 |
| Bradesco Empresas | 🟢 | 🟢 | 🔴 | 🔴 | 🔴 | 🔴 | 🔴 |
| Itaú Empresas | 🟢 | 🟢 | 🔴 | 🔴 | 🔴 | 🔴 | 🔴 |
| Caixa Econômica Federal Empresas | 🟢 | 🟢 | 🔴 | 🔴 | 🔴 | 🔴 | 🔴 |
| Banco do Brasil Empresas | 🔴 | 🔴 | 🔴 | 🔴 | 🔴 | 🔴 | 🔴 |
| Banco Inter Empresas | 🔴 | 🔴 | 🔴 | 🔴 | 🔴 | 🔴 | 🔴 |
| Sicredi Empresas | 🔴 | 🔴 | 🔴 | 🔴 | 🔴 | 🔴 | 🔴 |
| Conta Simples | 🔴 | 🔴 | 🔴 | 🔴 | 🔴 | 🔴 | 🔴 |
## Investment
| Connector | Fixed income | Mutual funds | Equity | ETF | Real Estate | Security | COE | Total Withdrawal | Brokerage Note |
| :-- | :-- | :-- | :-- | :-- | :-- | :-- | :-- | :-- | :-- |
| XP Investimentos | 🟢 | 🟢 | 🟢 | 🟢 | 🟢 | 🟢 | 🟢 | 🟢 | 🔴 |
| BTG Pactual | 🟢 | 🟢 | 🟢 | 🟢 | 🟢 | 🟢 | 🟢 | 🟢 Only for Equity | 🔴 |
| Avenue | 🔴 | 🔴 | 🟢 | 🟢 | 🔴 | 🔴 | 🔴 | 🔴 | 🔴 |
| Empiricus | 🟢 | 🟢 | 🟢 | 🟢 | 🟢 | 🔴 | 🔴 | 🔴 | 🔴 |
| XP - Wealth | 🟢 | 🟢 | 🟢 | 🟢 | 🟢 | 🟢 | 🟢 | 🔴 | 🔴 |
| BTG - Advisor | 🟢 | 🟢 | 🟢 | 🟢 | 🟢 | 🟢 | 🟢 | 🔴 | 🔴 |
| EQI | 🟢 | 🟢 | 🟢 | 🟢 | 🟢 | 🟢 | 🟢 | 🟢 Only for Equity | 🔴 |
| Empiricus | 🟢 | 🟢 | 🟢 | 🟢 | 🟢 | 🔵 | 🔵 | 🔵 | 🔵 |
## Investment Transactions coverage
Source: https://docs.pluggy.ai/en/docs/connections/investment-transactions-coverage.md
Here you will find the coverage we have for each connector regarding Investment Transactions product
## Keep in mind the following references
🟢 Available on the institution and implemented;
🔵 Available on the institution and not implemented;
🔴 Not available at the institution.
## Personal
| Connector | Mutual Funds | Fixed Income | Treasury | Equities | Securities | COE |
| :-- | :-- | :-- | :-- | :-- | :-- | :-- |
| Banco do Brasil | 🟢 | 🟢 | 🟢 | 🔴 | 🟢 | 🟢 |
| Inter | 🟢 | 🟢 | 🟢 | 🟢 | 🔴 | 🔴 |
## Business
| Connector | Mutual Funds | Fixed Income | Treasury | Equities | Securities | COE |
| :-- | :-- | :-- | :-- | :-- | :-- | :-- |
| Itaú Empresas | 🟢 | 🟢 | 🔴 | 🔴 | 🔴 | 🔴 |
| Caixa Econômica Federal Empresas | 🟢 | 🟢 | 🔴 | 🔴 | 🔴 | 🔴 |
| Banco do Brasil | 🟢 | 🟢 | 🔴 | 🔴 | 🔴 | 🔴 |
| Bradesco | 🟢 | 🟢 | 🔴 | 🔴 | 🔴 | 🔴 |
| Semear | 🔴 | 🟢 | 🔴 | 🔴 | 🔴 | 🔴 |
## Investment
| Connector | Mutual Funds | Fixed Income | Treasury | Equities | Securities | COE |
| :-- | :-- | :-- | :-- | :-- | :-- | :-- |
| XP Investimentos | 🟢 | 🟢 | 🟢 | 🟢 | 🔴 | 🟢 |
| BTG Pactual | 🟢 | 🟢 | 🟢 | 🟢 | 🟢 | 🟢 |
| Avenue | 🟢 | 🔴 | 🔴 | 🟢 | 🔴 | 🔴 |
| Empiricus | 🟢 | 🟢 | 🟢 | 🟢 | 🟢 | 🔴 |
| Caixa Previdência | 🔴 | 🔴 | 🔴 | 🔴 | 🟢 | 🔴 |
| Empiricus | 🟢 | 🟢 | 🟢 | 🟢 | 🔴 | 🔴 |
## Loans coverage
Source: https://docs.pluggy.ai/en/docs/connections/loans-coverage.md
## Personal
| Connector | Loans supported |
| :-- | :-- |
| Open Finance | 🟢 |
## Identity coverage
Source: https://docs.pluggy.ai/en/docs/connections/identity-coverage.md
Here you will find the coverage we have for each connector regarding Identity product
## Personal
| Connector | Identity |
| :-- | :-- |
| Caixa Econômica Federal | fullName document documentType |
| Banco Inter | fullName |
| Mercado Pago | fullName document documentType phoneNumbers.type phoneNumbers.value emails.type emails.value addresses.fullAddress |
| Banco do Brasil Previdência | fullName document documentType birthDate phoneNumbers.type phoneNumbers.value emails.value emails.type addresses.city addresses.state addresses.country addresses.postalCode addresses.type |
## Business
| Connector | Identity |
| :-- | :-- |
| Santander Empresas | taxNumber companyName |
| Bradesco Empresas | fullName taxNumber emails.type emails.value companyName addresses.fullAddress addresses.city addresses.state addresses.postalCode addresses.type phoneNumbers.type phoneNumbers.value |
| Itaú Empresas | fullName companyName taxNumber |
| Caixa Econômica Federal Empresas | fullName addresses.type addresses.postalCode addresses.fullAddress addresses.city addresses.state addresses.country addresses.primaryAddress phoneNumbers.type phoneNumbers.value taxNumber |
| Banco do Brasil Empresas | fullName companyName document documentType phoneNumber.value email.value |
| Banco Inter Empresas | taxNumber companyName |
## Investment
| Connector | Identity |
| :-- | :-- |
| XP Investimentos | fullName document documentType birthDate phoneNumbers.type phoneNumbers.value emails.type emails.value relations.type relations.name addresses.type addresses.primaryAddress addresses.fullAddress addresses.postalCode addresses.state addresses.city addresses.country jobTitle companyName investorProfile |
| BTG Pactual | fullName birthDate document documentType phoneNumbers.type phoneNumbers.value emails.type emails.value investorProfile |
| XP - Wealth | companyName providerId |
## Reporting Issues
Source: https://docs.pluggy.ai/en/docs/connections/reporting-issues.md
## Overview
This guide explains how to understand issues that users may have and how to report them to Pluggy's support team.
## Understanding Errors
When an item runs into an expected error, it will return in `OUTDATED` status, with `ERROR` as the execution status. Errors can occur after providing credentials, when the item starts connecting to the financial institution and begins providing responses/webhooks.
### Unexpected Errors
Unexpected errors are usually returned when the financial institution (FI) is unstable or when there is a case that was not mapped by Pluggy. If unexpected errors are consistent, you should report them to the team.
When the institution is having an instability, the `executionStatus` will be `SITE_NOT_AVAILABLE`. However, when it is an unexpected error on Pluggy's side, the `executionStatus` will be `ERROR` or `CONNECTION_ERROR`.
### Connection Errors
Connection errors occur after providing credentials, when the item starts connecting to the financial institution. These errors are typically related to:
- Institution instability or downtime
- Unmapped scenarios on Pluggy's side
- Authentication changes at the institution
## How to Report Issues
When you are experiencing issues, the key is to provide enough context for the support team to investigate.
### Using the Widget
When using the widget, the user will end up on a screen with an unexpected error and an ErrorCode. If you are using Pluggy's Connect widget, this error will be shown in the widget. Report a screenshot of the widget to give the support team enough context.
### Using the API Directly
If you are creating your own UX, you will see the error in the HTTP POST `/items` response. Report the HTTP response to give the support team enough context.
> **Evidence: the itemId is mandatory**
>
> When using the widget, a screenshot of the **error screen or the error code** is enough.
>
> It's strongly recommended for customers to track their users' attempts to connect, storing them as unsuccessful connections. You can capture the `itemId` through your Pluggy Connect widget implementation by catching the `onError` event, or through the `item/error` [webhook event](/docs/developer-tools/webhooks-ref).
>
> When connecting directly through the API, send the **itemId** exchanged in the API flow.
>
> **We can't analyze errors without an itemId, so it's mandatory that you capture and provide it.**
### Execution Report
Further information about what has failed will be available in the Item `executionReport` field. If something goes fatally wrong with the connection, such as an unexpected error, and no data could be retrieved, the Item status will be `OUTDATED` and the related `executionStatus` will be `ERROR`.
The widget and HTTP response provide enough information for you to understand what is going wrong, and they give the support team the context needed to investigate the issue.
## Errors When Providing Credentials (HTTP 400)
Usually, this problem occurs when the user sends their credentials, but the creation of the Item is not successful. This means that the Item creation returns an HTTP 400 error for validations.
Usually, this means:
- The credentials are not in the correct format.
- There are missing credentials.
- There is an active connection, or a duplicate connection was detected.
If you are using Pluggy's Connect widget, this error will be shown in the **widget**; if you are creating your own UX, you will see this error in the HTTP POST `/items` **response**. For more details on what errors are returned, you can check out the [API reference](/reference/items-create).
> **Evidence**
>
> When you are having this type of issue, report a **screenshot of the widget** or the **HTTP response** to give the support team enough context. We expect that the widget and HTTP response provide enough information for you to understand what's going wrong.
## Status Page
Pluggy has a public status page where they post any incidents and outages so you can keep awareness of any existing issues. You can visit the status page at [status.pluggy.ai](https://status.pluggy.ai).
You can also subscribe using the top button on the status page to get notified about incidents as soon as they happen. You can receive incident updates and maintenance status messages in Slack by subscribing.
For more information on subscribing to the status page, see [Subscribe to our Status Page](/docs/subscribe-to-our-status-page).
## Related Pages
- [Errors & Validations](/docs/errors-validations)
- [Item lifecycle](/docs/item-lifecycle)
- [Connectors coverage](/docs/connectors-coverage)
## Open Finance vs Direct: field differences
Source: https://docs.pluggy.ai/en/docs/connections/open-finance-vs-direct-fields.md
Pluggy returns the same objects — `Transaction`, `Account`, `Identity` — whichever way an item
was connected. **The objects are the same shape, but not every field is filled from both
sources.** A field that is always present for one customer can be permanently `null` for another,
purely because of the connection type.
This page lists the fields that exist on **one side only**, so you can tell "this institution
does not send it" apart from "this never arrives through this kind of connection".
Then it is a per-institution coverage question, not a connection-type one. The coverage pages break it down per connector: [Credit Cards](/docs/connections/credit-cards-coverage), [Accounts](/docs/connections/accounts-coverage), [Payment Data](/docs/connections/paymentdata-coverage), [Identity](/docs/connections/identity-coverage).
## Why they differ
**Open Finance (regulated)** connections read the institution's regulated APIs. The schema is
fixed by the Open Finance Brasil specification, so every institution returns the same shape and
Pluggy maps it once. If the specification has no field for something, no institution can send
it — the gap is regulatory, not technical, and no amount of per-institution work closes it.
**Direct** connections read the institution's own channels. There is no common schema, so what
arrives depends on what each institution exposes. This is why direct coverage is published per
connector, while Open Finance coverage is essentially uniform.
The practical consequence: Open Finance gives you **breadth and consistency**, direct connectors
sometimes give you **fields the regulation never defined**.
## Open Finance only
| Field | Object | Notes |
| :-- | :-- | :-- |
| `providerId` | `Transaction` | The institution's own transaction id. The only stable provider-side identifier we expose. Direct connectors have no guaranteed equivalent — reconcile on `date` + `amount` + `description` instead. |
| `creditCardMetadata.billId` | `Transaction` | Links the transaction to the bill it was charged to. |
| `brandAdditionalInfo` | `Account` | Free text describing the brand when `brand` is `OTHER`. |
| `investorProfile` | `Identity` | Investor profile classification (Conservative, Moderate, Aggressive). |
| `qualifications` | `Identity` | Income, patrimony and occupation data. |
| `financialRelationships` | `Identity` | The customer's products and relationship start date with the institution. |
| `openFinancePermissionsGranted` | `Consent` | The permissions the user actually consented to. Has no meaning for a direct connection. |
The [real-time balance endpoint](/docs/products/real-time-balance) is also Open Finance only —
calling it on a non-Open-Finance account returns an error.
## Direct only
| Field | Object | Notes |
| :-- | :-- | :-- |
| `creditCardMetadata.totalAmount` | `Transaction` | The total value of an instalment purchase (the sum of every instalment). The Open Finance credit-card schema has no equivalent: it reports each instalment, never the purchase total. Available on some direct connectors — see [Credit Cards Coverage](/docs/connections/credit-cards-coverage). |
| `balance` on each transaction | `Transaction` | Running balance after the transaction. Supported by Itaú PJ, Sicredi PF & PJ and Bradesco PJ. |
- `creditCardMetadata.totalAmount`, on a **transaction** — the purchase total of an instalment plan. **Direct only.**
- `totalAmount`, on a **bill** — the amount of the whole bill. **Available on Open Finance**, mapped from `billTotalAmount`.
Seeing a populated `totalAmount` on a bill in an Open Finance connection does not mean the transaction-level field will be populated too.
## Fields people expect to be exclusive, but are not
`paymentData` — the payer/payee detail on a transfer — is **populated by both**. Open Finance
maps it from the regulated transaction parties, and direct connectors extract it where the
institution exposes it. What varies is *how completely* it is filled, per institution, which is
what [Payment Data Coverage](/docs/connections/paymentdata-coverage) tracks.
The same holds for `merchant`, `category` and `operationType`: both sides can populate them, with
per-institution differences in how much detail arrives.
## Scope and freshness
This page covers **Transactions, Accounts, Identity and Consents**, which is where the question
comes up in practice. Investments, Loans and Brokerage Notes are not broken down here yet; for
those, treat the per-connector coverage pages as the source of truth.
The list is derived from the connector mappers, not from sampling production data — a field
listed as available can still be `null` for a given institution or a given transaction. Presence
here means *this connection type can return it*, not *it is always there*.
Last reviewed: **2026-09-07**, against the Open Finance Brasil Credit Card API v2.4.0 mapping.
## Open Finance Connectors
Source: https://docs.pluggy.ai/en/docs/open-finance/overview.md
At Pluggy, apart from our usual Connectors, we now also support obtaining data from the [Brazilian Open Finance Network](https://openfinancebrasil.org.br) with Open Finance Connectors.
Open Finance Connectors follow Pluggy's data model like any other Connector (Items, Accounts, Transactions, etc.), so there is **no breaking change** when obtaining data from Open Finance. However, they are some differences in the **products** they retrieve, the **institutions** they support and **the way the user connects** their account. In this guide we will discuss those differences so you can choose which connector type is best suited for your use case.
> **Premium feature**
>
> If you are interested in using Open Finance Connectors, please contact our sales team to enable it for your plan.
## Products supported by Open Finance
Right now, Open Finance supports the following products:
- `ACCOUNTS`
- `CREDIT_CARDS`
- `TRANSACTIONS`
- `IDENTITY`
- `LOANS`
- `INVESTMENTS` & `INVESTMENT_TRANSACTIONS` & `BROKERAGE_NOTES`
- `EXCHANGE_OPERATIONS`
## Institutions supported by Open Finance
Here is a comparison of support of **brazilian institutions** from Open Finance and Direct connectors:
| Institution | Open Finance Connector | Direct Connector |
| --- | --- | --- |
| Itau | Personal, Business | Personal, Business |
| Bradesco | Personal, Business | Personal, Business |
| Caixa | Personal, Business | Personal, Business |
| Santander | Personal, Business | Personal, Business |
| Banco do Brasil | Personal, Business | Personal, Business |
| Nubank | Personal, Business | None |
| BTGPactual | Personal, Business, Investments | Personal, Investments |
| Sicredi | Personal, Business | Business |
| Sicoob | Personal, Business | Business |
| Banrisul | Personal, Business | None |
| Mercado Pago | Personal, Business | Personal |
| Itau Cartoes | Personal, Business | Personal |
| Banco Bmg | Personal, Business | None |
| Unicred | Personal, Business | None |
| XP Investimentos | Personal, Business | Personal, Business |
| Next | Personal, Business | None |
| PicPay | Personal, Business | None |
| Banco PAN | Personal | None |
| Banco Digio | Personal | None |
| Banco do Nordeste do Brasil S.A. | Personal, Business | None |
| Uber Conta by Digio | Personal | None |
| Woop | Personal | None |
| Investimentos BB | Investments | None |
| Agora Investimentos | Investments, Business | Investments |
| Ion | Investments | None |
| Modal Mais | None | Personal |
| Safra | Personal, Business | Personal |
| Cora | None | Business |
| Banco Paulista | Personal, Business | None |
| SafraPay | Personal, Business | None |
| Citi | Business | None |
| Safra Financeira | Personal, Business | None |
| Banco Sofisa | Personal, Business | None |
| Banco BV | Personal, Business | None |
| Meliuz | Personal | None |
| Rico Investimentos | Personal | Investments |
| Clear Corretora | Personal | Investments |
| Bradescard | Personal | None |
| InfinitePay | Personal, Business | None |
| Caixa Tem | Personal | None |
| Necton | Personal | None |
| RecargaPay | Personal, Business | None |
| Stone Pagamentos | Personal, Business | None |
| Itau BBA | Business | Business |
| Toro Investimentos | Personal, Business | None |
| Santander Cartoes | Personal, Business | None |
| Porto Bank | Personal, Business | None |
| Neon | Personal | None |
| EQI | Investments | Investments |
| Rede Celcoin | Personal, Business | None |
| Santander Corretora | Personal, Business | None |
| PagueVeloz (Serasa) | Personal, Business | None |
| Itau Emps | Business | None |
| C6 Bank | Personal, Business | None |
| PagBank | Personal, Business | None |
| Inter | Personal, Business | Personal, Business |
| Midway | Personal | None |
| Banco BRB | Personal, Business | None |
| Banco Mercantil | Personal, Business | None |
| Banco Master | Personal | None |
| Cartao Sam's Club | Personal | None |
| Cartao Atacadao | Personal | None |
| Cartao Carrefour | Personal | None |
| 99Pay | Personal | None |
| Dock | Personal | None |
| QI SCD | Personal, Business | None |
| Crefisa | Personal, Business | None |
| Porto Bank Empresas | Business | None |
| Monte Bravo | Investments | None |
Investment Connectors that were not mentioned here, and other types like Digital Economy and Payment Processors, are not currently supported by Open Finance, but have Direct Connectors available.
Check out the [Connectors Coverage](/docs/connectors-coverage) docs for all supported Direct Connectors.
> **Keeping up to date with the institutions**
>
> Our API offers the `/connectors?isOpenFinance=true` endpoint that describe all the Financial Institutions supported for Regulated Open Finance connections. Each connector may support different products, validate each one using the `products` list returned by the institution. New connectors will appear automatically in this endpoint so information will be most updated on our API.
## Using Open Finance Connectors in my Application
Once you have Open Finance enabled for your plan, to add an Open Finance Connector, follow these steps:
1. Go to Dashboard -> Customization

2. Find the Open Finance connectors and add them to your Personal, Business or Investment connector list
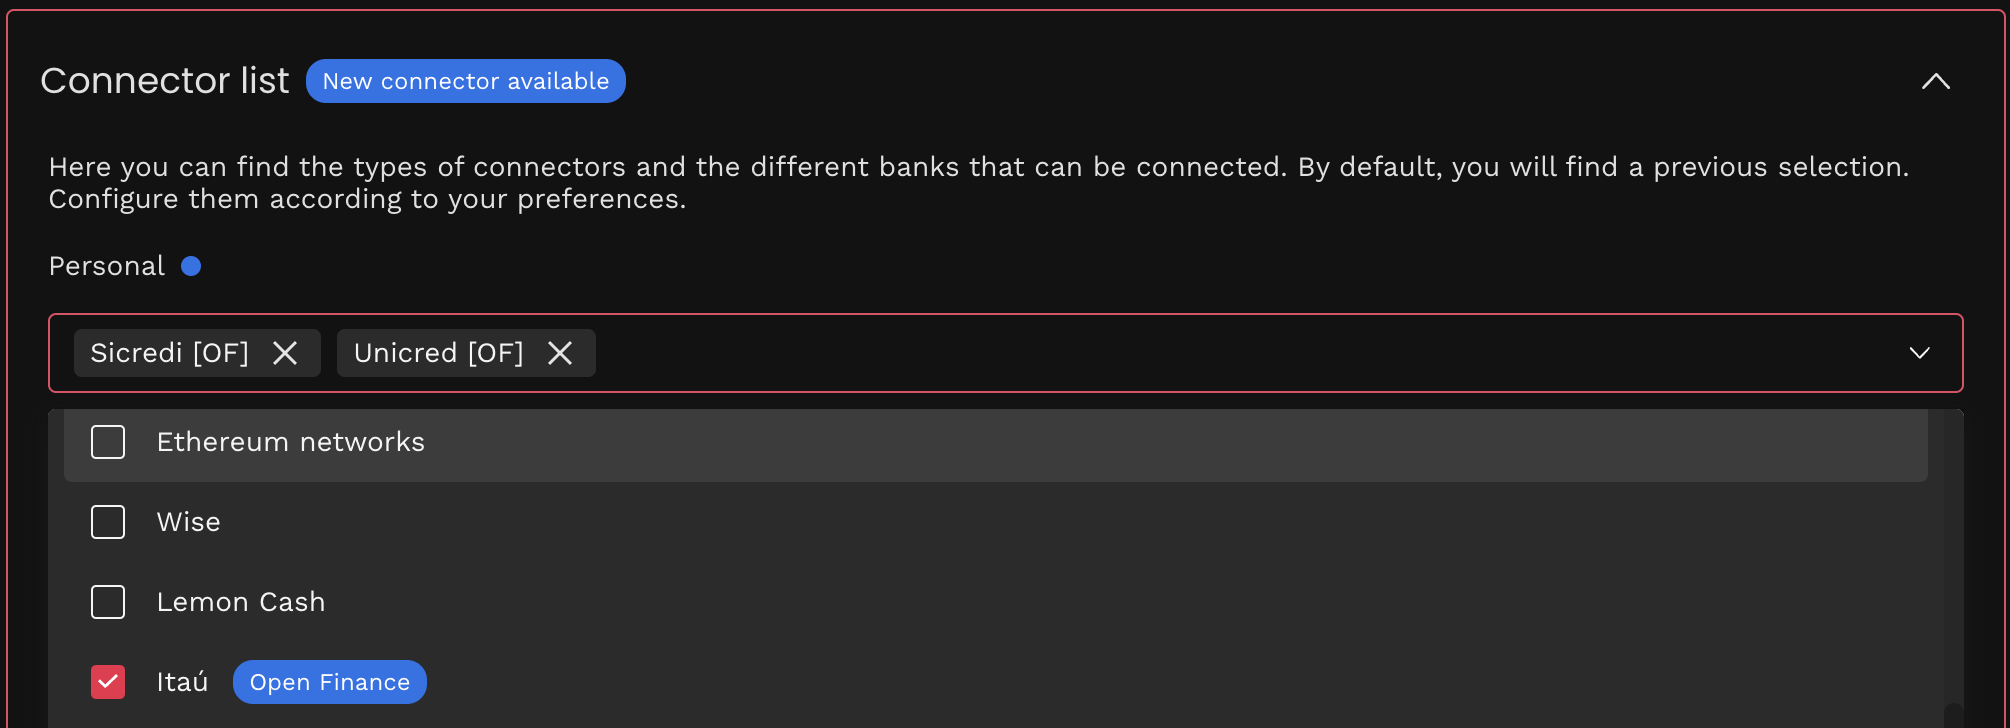
Open Finance connectors will have an Open Finance tag, and appear as "[OF]" in the selected connectors list.
Now, users will be able to choose those institutions in Pluggy Connect (they look just like any usual connector).
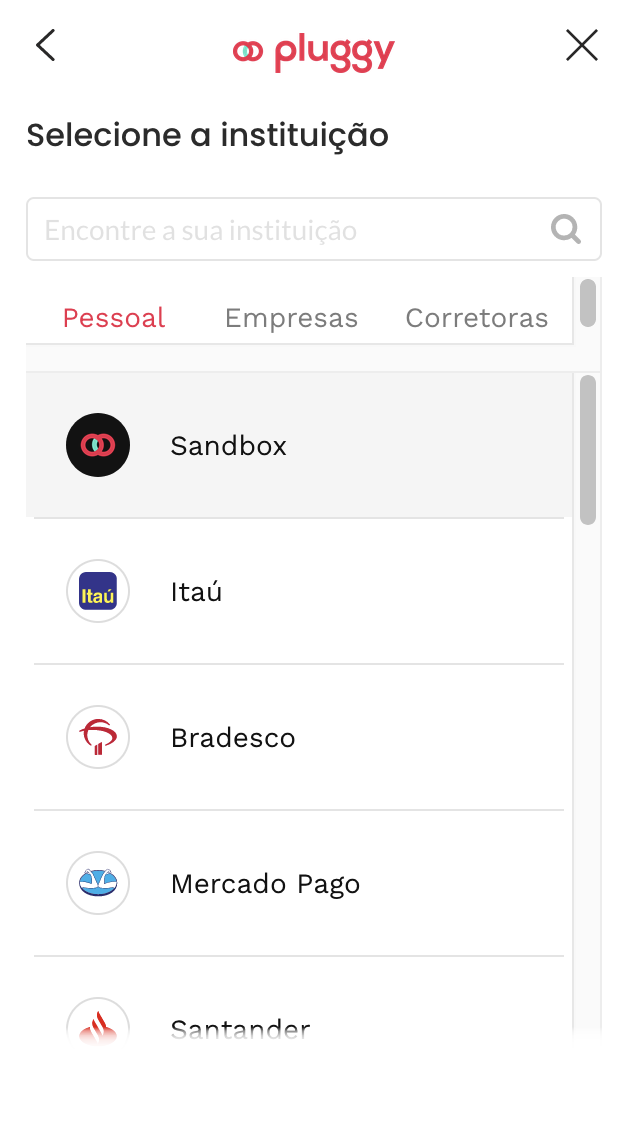
## Open Finance Rate Limits
> **Moved to different section**
>
> Access the following link: [Operational Rate Limits](/docs/open-finance/rate-limits)
## Open Finance Institutions Coverage
Source: https://docs.pluggy.ai/en/docs/open-finance/institutions-coverage.md
The table below lists all institutions available via Open Finance, the contexts in which they are available (Personal / Business / Investments), and which products each connector exposes. Product coverage is shown as the union across all contexts — a product marked 🟢 may only be available in a specific context (e.g. Personal or Business).
| Institution | OF Context | Accounts | Transactions | Credit Cards | Investments | Inv. Transactions |
| --------------------------- | --------------------- | -------- | ------------ | ------------ | ----------- | ----------------- |
| 6P Bank | Personal, Business | 🟢 | 🟢 | 🔴 | 🔴 | 🔴 |
| 99Pay | Personal | 🟢 | 🟢 | 🔴 | 🔴 | 🔴 |
| Ágora Investimentos | Business, Investments | 🔴 | 🟢 | 🔴 | 🟢 | 🟢 |
| Apex | Personal, Business | 🟢 | 🟢 | 🔴 | 🔴 | 🔴 |
| ASA | Personal, Business | 🟢 | 🟢 | 🟢 | 🔴 | 🔴 |
| Atlanta | Personal | 🟢 | 🟢 | 🔴 | 🔴 | 🔴 |
| Axiis Bank | Personal, Business | 🟢 | 🟢 | 🔴 | 🔴 | 🔴 |
| Banco Bmg | Personal, Business | 🟢 | 🟢 | 🟢 | 🟢 | 🟢 |
| Banco BRB | Personal, Business | 🟢 | 🟢 | 🟢 | 🟢 | 🟢 |
| Banco Digio | Personal | 🟢 | 🟢 | 🟢 | 🟢 | 🟢 |
| Banco do Brasil | Personal, Business | 🟢 | 🟢 | 🟢 | 🟢 | 🟢 |
| Banco do Nordeste do Brasil | Personal, Business | 🟢 | 🟢 | 🟢 | 🟢 | 🟢 |
| Banco Guanabara | Personal, Business | 🟢 | 🟢 | 🔴 | 🟢 | 🟢 |
| Banco Master | Personal | 🟢 | 🟢 | 🔴 | 🟢 | 🟢 |
| Banco Mercantil | Personal | 🟢 | 🟢 | 🟢 | 🟢 | 🟢 |
| Banco PAN | Personal | 🟢 | 🟢 | 🟢 | 🟢 | 🟢 |
| Banco Sofisa | Personal, Business | 🟢 | 🟢 | 🟢 | 🟢 | 🟢 |
| Banrisul | Personal, Business | 🟢 | 🟢 | 🟢 | 🟢 | 🟢 |
| BPO Bank | Personal, Business | 🟢 | 🟢 | 🔴 | 🔴 | 🔴 |
| Bradescard | Personal | 🔴 | 🟢 | 🟢 | 🔴 | 🔴 |
| Bradesco | Personal, Business | 🟢 | 🟢 | 🟢 | 🟢 | 🟢 |
| BTGPactual | Personal, Business | 🟢 | 🟢 | 🟢 | 🟢 | 🟢 |
| BTGPactual Investimentos | Business, Investments | 🟢 | 🟢 | 🟢 | 🟢 | 🟢 |
| BV - Corporate | Business | 🟢 | 🟢 | 🔴 | 🟢 | 🟢 |
| BV - Pessoa Física - APP | Personal | 🟢 | 🟢 | 🟢 | 🟢 | 🟢 |
| BV - Pessoa Física - Web | Personal | 🟢 | 🟢 | 🟢 | 🔴 | 🔴 |
| C6 Bank | Personal, Business | 🟢 | 🟢 | 🟢 | 🟢 | 🟢 |
| CAIXA - clientes sem conta | Personal, Business | 🔴 | 🟢 | 🟢 | 🔴 | 🔴 |
| Caixa Econômica Federal | Personal, Business | 🟢 | 🟢 | 🟢 | 🟢 | 🟢 |
| Caixa Tem | Personal | 🟢 | 🟢 | 🟢 | 🔴 | 🔴 |
| Cartão Atacadão | Personal | 🔴 | 🟢 | 🟢 | 🔴 | 🔴 |
| Cartão Carrefour | Personal | 🟢 | 🟢 | 🟢 | 🔴 | 🔴 |
| Cartão Sam's Club | Personal | 🔴 | 🟢 | 🟢 | 🔴 | 🔴 |
| CEAPE BANK | Personal | 🟢 | 🟢 | 🔴 | 🔴 | 🔴 |
| Celcoin Baas | Personal | 🟢 | 🟢 | 🔴 | 🔴 | 🔴 |
| Cielo | Business | 🟢 | 🟢 | 🔴 | 🔴 | 🔴 |
| Citi | Business | 🟢 | 🟢 | 🟢 | 🟢 | 🟢 |
| Clear Corretora | Investments | 🟢 | 🟢 | 🟢 | 🟢 | 🟢 |
| Concept | Personal | 🟢 | 🟢 | 🔴 | 🔴 | 🔴 |
| Conta Bemol | Personal | 🟢 | 🟢 | 🔴 | 🔴 | 🔴 |
| Conta Universal | Personal | 🟢 | 🟢 | 🔴 | 🔴 | 🔴 |
| CRB Money | Personal | 🟢 | 🟢 | 🔴 | 🔴 | 🔴 |
| Dezbrazil | Personal | 🟢 | 🟢 | 🔴 | 🔴 | 🔴 |
| DMX | Personal | 🟢 | 🟢 | 🔴 | 🔴 | 🔴 |
| Dock | Personal | 🟢 | 🟢 | 🔴 | 🔴 | 🔴 |
| Ease Bankly | Personal | 🟢 | 🟢 | 🔴 | 🔴 | 🔴 |
| Ella Bank | Personal, Business | 🟢 | 🟢 | 🔴 | 🔴 | 🔴 |
| EMCASH | Personal, Business | 🟢 | 🟢 | 🔴 | 🔴 | 🔴 |
| EQI | Investments | 🟢 | 🟢 | 🟢 | 🟢 | 🟢 |
| ESBank | Personal | 🟢 | 🟢 | 🔴 | 🔴 | 🔴 |
| Exclusive | Personal | 🟢 | 🟢 | 🔴 | 🔴 | 🔴 |
| Fixxbank | Personal | 🟢 | 🟢 | 🔴 | 🔴 | 🔴 |
| Genius | Personal | 🟢 | 🟢 | 🔴 | 🔴 | 🔴 |
| Giffty | Personal | 🟢 | 🟢 | 🔴 | 🔴 | 🔴 |
| Gift Premium | Personal | 🟢 | 🟢 | 🔴 | 🔴 | 🔴 |
| Glorya | Personal | 🟢 | 🟢 | 🔴 | 🔴 | 🔴 |
| GoalBox | Personal | 🟢 | 🟢 | 🔴 | 🔴 | 🔴 |
| Gold Pass | Personal | 🟢 | 🟢 | 🔴 | 🔴 | 🔴 |
| GS3 | Personal, Business | 🟢 | 🟢 | 🔴 | 🔴 | 🔴 |
| H+ plus | Personal | 🟢 | 🟢 | 🔴 | 🔴 | 🔴 |
| HausBank | Personal | 🟢 | 🟢 | 🔴 | 🔴 | 🔴 |
| Health Cash | Personal, Business | 🟢 | 🟢 | 🔴 | 🔴 | 🔴 |
| Hiperbanco | Personal, Business | 🟢 | 🟢 | 🔴 | 🔴 | 🔴 |
| Hyak Bank | Personal | 🟢 | 🟢 | 🔴 | 🔴 | 🔴 |
| Ibanx | Personal | 🟢 | 🟢 | 🔴 | 🔴 | 🔴 |
| iHold | Personal | 🟢 | 🟢 | 🔴 | 🔴 | 🔴 |
| IlevaCard | Personal | 🟢 | 🟢 | 🔴 | 🔴 | 🔴 |
| Imobi Bank | Personal, Business | 🟢 | 🟢 | 🔴 | 🔴 | 🔴 |
| Incentivale | Personal | 🟢 | 🟢 | 🔴 | 🔴 | 🔴 |
| InfinitePay | Personal, Business | 🟢 | 🟢 | 🟢 | 🟢 | 🟢 |
| Inova | Personal | 🟢 | 🟢 | 🔴 | 🔴 | 🔴 |
| Inter | Personal, Business | 🟢 | 🟢 | 🟢 | 🟢 | 🟢 |
| Investimentos BB | Investments | 🟢 | 🟢 | 🔴 | 🟢 | 🟢 |
| Íon | Investments | 🟢 | 🟢 | 🔴 | 🟢 | 🟢 |
| Itaú | Personal, Business | 🟢 | 🟢 | 🟢 | 🟢 | 🟢 |
| Itaú BBA | Business | 🟢 | 🟢 | 🟢 | 🟢 | 🟢 |
| Itaú Emps | Business | 🟢 | 🟢 | 🟢 | 🔴 | 🔴 |
| JoyCard | Personal | 🟢 | 🟢 | 🔴 | 🔴 | 🔴 |
| Lemon | Personal | 🟢 | 🟢 | 🔴 | 🔴 | 🔴 |
| Lothus | Personal, Business | 🟢 | 🟢 | 🔴 | 🔴 | 🔴 |
| Mais Todos | Personal, Business | 🟢 | 🟢 | 🔴 | 🔴 | 🔴 |
| Mark Up | Personal | 🟢 | 🟢 | 🔴 | 🔴 | 🔴 |
| Meirelles | Personal, Business | 🟢 | 🟢 | 🔴 | 🔴 | 🔴 |
| Méliuz | Personal | 🟢 | 🟢 | 🟢 | 🟢 | 🟢 |
| Mercado Pago | Personal, Business | 🟢 | 🟢 | 🟢 | 🟢 | 🟢 |
| Meu Premio | Personal | 🟢 | 🟢 | 🔴 | 🔴 | 🔴 |
| Meu Premio 360 | Personal | 🟢 | 🟢 | 🔴 | 🔴 | 🔴 |
| Midway | Personal | 🟢 | 🟢 | 🟢 | 🟢 | 🟢 |
| Monte Bravo | Investments | 🟢 | 🟢 | 🟢 | 🟢 | 🟢 |
| Moovi | Personal | 🟢 | 🟢 | 🔴 | 🔴 | 🔴 |
| MOTTU | Personal | 🟢 | 🟢 | 🔴 | 🔴 | 🔴 |
| Multipremium | Personal | 🟢 | 🟢 | 🔴 | 🔴 | 🔴 |
| Necton | Personal | 🟢 | 🟢 | 🔴 | 🟢 | 🟢 |
| Neon | Personal | 🟢 | 🟢 | 🟢 | 🟢 | 🟢 |
| Next | Personal, Business | 🟢 | 🟢 | 🟢 | 🟢 | 🟢 |
| Nitybank | Personal, Business | 🟢 | 🟢 | 🔴 | 🔴 | 🔴 |
| Nubank | Personal, Business | 🟢 | 🟢 | 🟢 | 🟢 | 🟢 |
| Omnion | Personal | 🟢 | 🟢 | 🔴 | 🔴 | 🔴 |
| Onn Marketing | Personal | 🟢 | 🟢 | 🔴 | 🔴 | 🔴 |
| Ovni | Personal, Business | 🟢 | 🟢 | 🔴 | 🔴 | 🔴 |
| P2x | Personal | 🟢 | 🟢 | 🔴 | 🔴 | 🔴 |
| PagBank | Personal, Business | 🟢 | 🟢 | 🟢 | 🟢 | 🟢 |
| Pague Veloz Serasa | Personal, Business | 🟢 | 🟢 | 🔴 | 🔴 | 🔴 |
| PayCard | Personal | 🟢 | 🟢 | 🔴 | 🔴 | 🔴 |
| PicPay | Personal | 🟢 | 🟢 | 🟢 | 🟢 | 🟢 |
| PicPay Negócios | Business | 🟢 | 🟢 | 🔴 | 🔴 | 🔴 |
| Player's Bank | Personal | 🟢 | 🟢 | 🟢 | 🟢 | 🟢 |
| Pocket | Personal | 🟢 | 🟢 | 🔴 | 🔴 | 🔴 |
| Porto Bank | Personal, Business | 🟢 | 🟢 | 🔴 | 🔴 | 🔴 |
| POWPAY | Personal | 🟢 | 🟢 | 🔴 | 🔴 | 🔴 |
| Prix | Personal | 🟢 | 🟢 | 🔴 | 🔴 | 🔴 |
| Pulse | Personal | 🟢 | 🟢 | 🔴 | 🔴 | 🔴 |
| QI SCD | Personal, Business | 🟢 | 🟢 | 🔴 | 🔴 | 🔴 |
| Rapidium Bank | Personal, Business | 🟢 | 🟢 | 🔴 | 🔴 | 🔴 |
| RecargaPay | Personal, Business | 🟢 | 🟢 | 🟢 | 🟢 | 🟢 |
| Rede Celcoin | Personal, Business | 🟢 | 🟢 | 🔴 | 🔴 | 🔴 |
| RelacionaMais | Personal | 🟢 | 🟢 | 🔴 | 🔴 | 🔴 |
| Resolve Bank | Personal, Business | 🟢 | 🟢 | 🔴 | 🔴 | 🔴 |
| Rhiza Bank | Personal, Business | 🟢 | 🟢 | 🔴 | 🔴 | 🔴 |
| Rico Investimentos | Investments | 🟢 | 🟢 | 🟢 | 🟢 | 🟢 |
| Safra | Personal, Business | 🟢 | 🟢 | 🟢 | 🟢 | 🟢 |
| Safra Financeira | Business | 🔴 | 🟢 | 🔴 | 🔴 | 🔴 |
| Santander | Personal, Business | 🟢 | 🟢 | 🟢 | 🟢 | 🟢 |
| Santander Cartões | Personal, Business | 🟢 | 🟢 | 🟢 | 🟢 | 🟢 |
| Santander Corretora | Investments | 🔴 | 🟢 | 🔴 | 🟢 | 🟢 |
| SEMEC BANK | Personal, Business | 🟢 | 🟢 | 🔴 | 🔴 | 🔴 |
| Sicoob | Personal, Business | 🟢 | 🟢 | 🟢 | 🟢 | 🟢 |
| Sicredi | Personal, Business | 🟢 | 🟢 | 🟢 | 🟢 | 🟢 |
| Simpbank | Personal, Business | 🟢 | 🟢 | 🔴 | 🔴 | 🔴 |
| Smart | Personal | 🟢 | 🟢 | 🔴 | 🔴 | 🔴 |
| Snob Bank | Personal, Business | 🟢 | 🟢 | 🔴 | 🔴 | 🔴 |
| Spin | Personal | 🟢 | 🟢 | 🔴 | 🔴 | 🔴 |
| Stone Pagamentos | Personal, Business | 🟢 | 🟢 | 🔴 | 🟢 | 🟢 |
| Suppero | Personal | 🟢 | 🟢 | 🔴 | 🔴 | 🔴 |
| Tokpay | Personal | 🟢 | 🟢 | 🔴 | 🔴 | 🔴 |
| Toro Investimentos | Business, Investments | 🔴 | 🟢 | 🔴 | 🟢 | 🟢 |
| Uber Conta by Digio | Personal | 🟢 | 🟢 | 🔴 | 🟢 | 🟢 |
| Unicred | Personal, Business | 🟢 | 🟢 | 🟢 | 🟢 | 🟢 |
| Unique | Personal | 🟢 | 🟢 | 🔴 | 🔴 | 🔴 |
| Uze | Personal, Business | 🟢 | 🟢 | 🔴 | 🔴 | 🔴 |
| Won Bank | Personal, Business | 🟢 | 🟢 | 🔴 | 🔴 | 🔴 |
| Woop | Personal | 🟢 | 🟢 | 🟢 | 🟢 | 🟢 |
| XP Banking | Personal, Business | 🟢 | 🟢 | 🟢 | 🟢 | 🟢 |
Investment Connectors that were not mentioned here, and other types like Digital Economy and Payment Processors, are not currently supported by Open Finance, but have Direct Connectors available.
Check out the [Connectors Coverage](/docs/connectors-coverage) docs for all supported Direct Connectors.
> **Keeping up to date with the institutions**
>
> Our API offers the `/connectors?isOpenFinance=true` endpoint that describe all the Financial Institutions supported for Regulated Open Finance connections.
> Each connector may support different products, validate each one using the `products` list returned by the institution.
> New connectors will appear automatically in this endpoint so information will be most updated on our API.
> For official participant details by brand, also check the Open Finance Brasil participants directory, such as the [Ailos participant page](https://openfinancebrasil.org.br/quem-participa/?marca=ailos&modalidade=).
## Creating an Item
Source: https://docs.pluggy.ai/en/docs/open-finance/creating-item.md
How to create your first Open Finance Regulated connection, step by step through Pluggy's Connect Widget or through API.
## Connecting an Item with Open Finance through Pluggy Connect
When a user connects through Open Finance, the login process is different from a _Direct Connector_.
First, the user is prompted for their CPF (for Personal connectors) or CNPJ.
Then, the user is taken to the institution's Open Finance login page (with a pop-up) to complete the login process.
This step depends on the institution: it can prompt the user to scan a QR, or offer a link that opens the institution's app directly, ask for credentials, etc.
After logging in, the user is prompted to select the information they will share.
After the user accepts to sharing that information, the pop-up is closed and they are taken back to the connection screen, while the connector finishes retrieving the data.
This flow is solved out of the box in Pluggy Connect. If you are not using Pluggy Connect, please refer to the guide at the bottom of this page.
## Connecting an Item with Open Finance through API
Use this approach if you do not use Pluggy Connect and you want to connect using Pluggy's API. Once the Open Finance feature is enabled for your plan, follow these steps:
1. Obtain the connector ID for the Open Finance Connector of your choice. In the /connectors endpoint you will see them starting with ID 600 and higher. For example, Itau's Open Finance Connector has ID 601.
2. Create an Item for that connector's ID. It will require CPF or CNPJ depending on if it's a Personal or Business connector.
3. Follow the [Pluggy OAuth v2](/docs/connect-an-account#oauth-v2) documentation to complete the login. With this flow, from the created Item you will obtain a URL to open for the user, which will transfer them to the institution's login. **Note**: The user will have a few minutes to open the URL before it expires. Then he will have 20' to go through the complete flow in the institution's page.
4. Once the user completes the login, they are redirected to a Pluggy OAuth callback endpoint that starts the connection on the Item automatically.
5. Retrieve the data from the Item.
> **Consent link is one-use**
>
> The link to access the bank and complete the consent flow is a one-use link. When sending this link through messaging apps (Slack, WhatsApp, Google Meet, etc.), the messaging app first visits the link and therefore can invalidate it before the user accessed it. Make sure that this link arrives to the user without those interactions happening first, or else it will show them an error screen.
### Open Finance Test Account
To connect using our sandbox connection, see [Open Finance Flow in Sandbox](/docs/sandbox#7---open-finance-flow).
## Considerations & FAQ
Source: https://docs.pluggy.ai/en/docs/open-finance/considerations-faq.md
Things to keep in mind when integrating Open Finance Regulated data that can be different from Direct Connections.
## Credit Cards
Credit card transactions behave differently in each institution, as a general rule institutions will provide new purchases on a daily basis and once the bill has been close/overdue, it will return all the transactions associated with it.
### Future Installments
When a user makes multiple installments of a purchase, the institutions behave in different ways.
- Most of the institutions will return the first installment in the daily updates, this information is returned when we recover the current transactions' weekly information.
- BTG Pactual (614), the future installments (installment number >= 2) are retrieved in the first connection with the `PENDING` status.
All transactions will be updated to posted, with their corresponding **billId** once the bill is closed.
### Installments
- Some institutions like XP Banking (602) may show transactions for the complete purchase of the operation made in installments. This will be the sum of all installments, and will never have a **billId**.
### Bills
Due to a limitation of the Financial Institutions API, open bills are not returned until the bills are closed or overdue (This depends on the FI).
Once the bill is returned all transactions will have the `billId` relationship assigned. Until the bill appears in the FI, we won't be able to create the `Bill` nor link it with its corresponding `billId`.
Also, some transactions are only returned in the bill's transaction list, so will be returned once the bill has appeared in the FI (ie. Future Installments).
**_Note_**: _Overdue means that it's passed the due's date, not related to the payment status._
### Checking account
Transactions that are blocked or being processed, will appear as `PENDING` until the transactions has been completed. The number of days this process could take would vary between institutions and transactions types. When the transaction is blocked, it will sum in the account's `blockedBalance`. Once the transactions has been processed (Compensado), they will appear as posted, and the balance will shift between `blockedBalance` into the account's `balance`.
> Checking accounts have a hard limit of 260 resources, beyond that threshold, accounts are not collected and a warning will be added in the item's status detail. If you have more accounts please contact to support.
## Known differences between connectors
### XP
| | Regulado | Directo |
| --- | --- | --- |
| Auto-sync | Yes | No (PJ are updatable) |
| MFA | No | Yes (PJ does not) |
| COE assets | No | Yes |
| Security assets | No | Yes |
| Investment transactions time (INITIAL_UPDATE) | 1 year | 4 years |
| Total withdrawal investments before first connection | No | Yes |
| Asset portability transactions | No | Yes |
## Frequently Asked Questions (FAQ)
- _Upon first connection, do Open Finance connectors return fully withdrawn investments?_
- No, only active investments at the moment of the first connection are returned. From that point on, if you fully withdraw one of those investments, it will change status to TOTAL_WITHDRAWAL.
- _Does Itau PJ OF (618) return consolidated (SISPAG CONSOLIDADO, PIX QRS CONSOLIDADO) transactions or detailed transactions?_
- It always returns **detailed** transactions, with the counterpart's CPF / CNPJ inside paymentData.
- What happens when the consent of an **Item** expires?
- The item metadata would still be available, but the user's data wouldn't be available. Customers will be required to ask for a new consent of their user on the existing item to renew the consent. See [Consents Docs](/docs/consents) for more information.
## Payment Data Open Finance Coverage
Source: https://docs.pluggy.ai/en/docs/open-finance/payment-data.md
For Open Finance connectors, the availability of the CPF/CNPJ of the counterpart of a transaction (in its [payment data](/docs/transactions#transaction-payment-data-schema)) will depend on the transaction's operation type (like PIX, TED, BOLETO, etc).
For the following types, it is **not expected** to receive Payment Data for **any institution**:
- **PACOTE_TARIFA_SERVICOS, TARIFA_SERVICOS_AVULSOS, ENCARGOS_JUROS_CHEQUE_ESPECIAL**, because the beneficiary is the institution itself.
- **PORTABILIDADE_SALARIO**, because the beneficiary is the account owner themselves.
- **RENDIMENTO_APLIC_FINANCEIRA, RESGATE_APLIC_FINANCEIRA, SAQUE**: because they do not qualify as "payment" operations.
For the following types, counterpart information is expected to be absent in **specific cases**:
- **TED, PIX, BOLETO, CONVENIO_ARREDACACAO, FOLHA_PAGAMENTO**, for batch operations, counterpart information is not available.
- **DEPOSITO**, for payments under R$2000, counterpart information is not available.
- **CARTAO**
- **Bill payments**: counterpart information is available.
- **Debit and pre-paid cards**: counterpart information is not available.
For more details, please read the [Open Finance documentation on counterpart information](https://openfinancebrasil.atlassian.net/wiki/spaces/OF/pages/193658890/Orienta+es+-+DC+Contas).
## Payment data counterpart coverage
The following table provides coverage status for CPF/CNPJ counterpart data based on the connector, operation type, and transaction type (DEBIT or CREDIT):
- 🟢 - counterpart data is present more than 90% of the time
- 🟠 - counterpart data is present only conditionally (less than 90% of the time)
- 🔴 - counterpart data is **never** present (0%)
- (-) - the connector does not return transactions with that operationType
| Connector | PIX (Cr) | PIX (Dr) | TED (Cr) | TED (Dr) | DOC (Cr) | DOC (Dr) | BOLETO (Cr) | BOLETO (Dr) | CARTAO (Cr) | CARTAO (Dr) | CONV_ARR (Cr) | CONV_ARR (Dr) | DEPOSITO (Cr) | DEPOSITO (Dr) | FOLHA_PAG (Cr) | FOLHA_PAG (Dr) | OP_CRED (Cr) | OP_CRED (Dr) | OUTROS (Cr) | OUTROS (Dr) | TRANSF_MI (Cr) | TRANSF_MI (Dr) |
| --- | --- | --- | --- | --- | --- | --- | --- | --- | --- | --- | --- | --- | --- | --- | --- | --- | --- | --- | --- | --- | --- | --- |
| Itau (601) | 🟢 | 🟢 | 🟢 | 🟢 | - | - | 🟠 | 🟠 | 🔴 | 🔴 | 🟠 | 🟠 | 🟠 | 🔴 | 🟢 | 🔴 | 🟠 | 🟠 | 🟠 | 🟠 | 🟠 | 🟠 |
| XP Banking (602) | 🟢 | 🟢 | 🟢 | 🟢 | - | - | - | - | 🔴 | 🔴 | - | 🔴 | - | - | - | - | 🔴 | 🔴 | 🟠 | 🟠 | 🟢 | - |
| Bradesco (603) | 🟢 | 🟢 | 🟢 | 🟢 | - | - | 🔴 | 🟢 | 🟠 | 🔴 | 🔴 | 🟠 | 🟠 | 🟠 | 🟠 | 🔴 | 🔴 | 🔴 | 🟠 | 🟠 | 🟢 | 🟢 |
| Rico Investimentos (605) | 🟢 | 🟢 | 🟢 | 🟢 | - | - | - | - | 🔴 | 🔴 | - | 🔴 | - | - | - | - | 🔴 | 🔴 | 🟠 | 🟠 | - | - |
| Mercado Pago (606) | 🟢 | 🟢 | 🟢 | 🟢 | - | - | 🟢 | 🟢 | - | - | - | - | 🟢 | - | - | - | 🟢 | - | 🟠 | 🟠 | 🟢 | 🟢 |
| Santander (608) | 🟢 | 🟢 | 🟢 | 🟢 | - | - | - | - | 🔴 | 🟠 | 🟠 | 🟠 | 🟠 | - | 🟢 | - | 🔴 | - | 🟠 | 🟠 | 🟢 | 🟢 |
| Bradesco Empresas (609) | 🟢 | 🟢 | 🟢 | 🟢 | - | - | 🔴 | 🟢 | 🟢 | 🔴 | - | 🟠 | 🟠 | 🟠 | 🔴 | 🟠 | 🔴 | 🔴 | 🟠 | 🟠 | 🟠 | 🟢 |
| Banco do Brasil (611) | 🟢 | 🟢 | 🟢 | 🟢 | - | - | 🔴 | 🟢 | 🔴 | 🔴 | 🔴 | 🟠 | 🟠 | - | 🟢 | 🔴 | 🔴 | 🔴 | 🟠 | 🟠 | 🟢 | 🟢 |
| Nubank (612) | 🟢 | 🟢 | 🟢 | 🟢 | - | - | - | - | - | - | - | - | 🟠 | - | - | - | - | - | 🟠 | 🔴 | 🔴 | 🔴 |
| BTGPactual Investimentos (614) | 🟢 | 🟢 | 🟢 | 🟢 | - | - | - | - | - | - | - | - | 🔴 | - | - | - | - | - | 🔴 | 🔴 | 🟢 | 🟢 |
| Caixa Economica Federal Empresas (616) | 🟢 | 🟢 | 🟠 | 🟠 | - | - | 🔴 | 🟠 | 🔴 | 🟠 | 🟠 | 🟠 | 🔴 | 🔴 | - | 🔴 | 🔴 | 🔴 | 🟠 | 🟠 | 🟠 | 🟠 |
| Itau Empresas (618) | 🟢 | 🟢 | 🟠 | 🔴 | - | - | 🔴 | 🟠 | 🔴 | 🔴 | 🔴 | 🟠 | 🟠 | 🔴 | 🔴 | 🟠 | 🟠 | 🟠 | 🟠 | 🟢 | 🟠 | 🟠 |
| Caixa Economica Federal (619) | 🟢 | 🟢 | 🟢 | 🟢 | - | - | 🔴 | 🟢 | 🔴 | 🟠 | 🟠 | 🟠 | 🔴 | - | 🟢 | 🔴 | 🔴 | 🔴 | 🟠 | 🟠 | 🟢 | 🟢 |
| Santander Empresas (621) | 🟢 | 🟢 | 🟢 | 🟠 | - | - | - | - | 🔴 | 🟠 | 🟠 | 🟠 | 🟠 | - | - | - | 🟠 | - | 🟠 | 🟠 | 🟠 | 🟢 |
| Clear Corretora (623) | 🟢 | 🟢 | 🟢 | 🟢 | - | - | - | - | - | - | - | - | - | - | - | - | - | - | 🟠 | 🟠 | - | - |
| C6 Bank (626) | - | - | - | - | - | - | - | - | - | - | - | - | - | - | - | - | - | - | 🟢 | 🟠 | - | - |
| Sicredi Empresas (627) | 🟢 | 🟢 | 🟢 | 🟠 | - | - | - | - | 🔴 | 🟠 | 🔴 | 🟠 | 🟠 | 🔴 | - | 🔴 | 🔴 | 🔴 | 🟠 | 🟠 | 🟢 | 🟢 |
| Sicoob Empresas (628) | 🟢 | 🟢 | 🟢 | 🟢 | 🟢 | - | 🔴 | 🟢 | 🟢 | 🟢 | - | 🟢 | 🟢 | - | - | - | - | - | 🟢 | 🟠 | 🟢 | 🟢 |
| Safra (629) | 🟢 | 🟢 | 🟢 | 🟢 | - | - | - | - | 🔴 | 🔴 | - | 🟠 | 🔴 | - | 🟢 | - | - | - | 🔴 | 🔴 | 🟢 | 🟢 |
| Iti (638) | 🟢 | 🟢 | 🟢 | - | - | - | - | - | 🔴 | 🔴 | - | 🟢 | - | - | 🟢 | - | - | - | 🟢 | 🟠 | - | - |
| PicPay (651) | 🟢 | 🟢 | 🟢 | - | - | - | - | - | - | - | - | - | 🔴 | - | 🟢 | - | 🔴 | 🔴 | 🟠 | 🟠 | 🟠 | 🟢 |
| Banco Bmg (652) | 🟢 | 🟢 | 🟢 | - | - | - | - | - | - | - | - | - | - | - | 🟢 | - | - | - | 🟢 | 🟢 | 🟢 | - |
| Banco Digio (653) | 🟢 | 🟢 | - | - | - | - | - | - | 🔴 | 🔴 | - | - | - | - | - | - | - | - | 🟠 | 🔴 | - | - |
| BTGPactual Empresas (655) | 🟢 | 🟢 | 🟢 | 🟢 | - | - | 🟢 | 🟠 | 🔴 | 🔴 | - | 🔴 | 🔴 | - | - | - | 🔴 | 🔴 | 🔴 | 🔴 | 🟢 | 🟢 |
| Next (656) | 🟢 | 🟢 | 🟢 | 🟢 | - | - | - | - | 🔴 | 🔴 | - | 🟠 | 🟠 | - | 🟢 | - | - | - | 🟠 | 🟠 | 🟢 | 🟠 |
| Banco PAN (657) | 🟢 | 🟢 | 🟢 | 🟢 | - | - | - | - | - | - | - | - | 🔴 | - | - | - | 🟠 | 🔴 | 🟠 | 🟠 | - | - |
| Sicoob (658) | 🟢 | 🟢 | 🟢 | 🟢 | 🟢 | - | - | 🟢 | - | - | - | - | 🟢 | - | 🟢 | - | - | - | 🟢 | 🟢 | 🟢 | 🟢 |
| Banrisul (659) | 🟢 | 🟢 | 🟢 | 🟢 | - | - | - | - | - | - | 🟢 | 🟢 | 🟢 | - | 🟢 | - | 🔴 | - | 🟠 | 🟠 | 🟢 | 🟢 |
| Banrisul Empresas (660) | 🟢 | 🟢 | 🟢 | 🟢 | - | - | 🔴 | 🟢 | - | 🟢 | 🟢 | 🟠 | 🟢 | - | - | 🟠 | 🔴 | - | 🟢 | 🟠 | 🟢 | 🟢 |
| Sicredi (661) | 🟢 | 🟢 | 🟢 | 🟠 | - | - | - | - | 🔴 | 🟠 | 🔴 | 🟠 | 🟠 | 🔴 | 🟠 | 🔴 | 🔴 | 🔴 | 🟠 | 🟠 | 🟠 | 🟠 |
| Banco do Brasil Empresas (662) | 🟢 | 🟢 | 🟢 | 🟢 | - | - | 🔴 | 🟢 | 🔴 | 🔴 | 🔴 | 🟢 | 🟠 | 🔴 | - | 🔴 | 🔴 | 🔴 | 🔴 | 🟠 | 🟢 | 🟢 |
| Unicred (663) | 🔴 | 🔴 | 🔴 | 🟠 | - | - | 🔴 | 🔴 | 🔴 | 🔴 | - | - | 🔴 | 🔴 | - | - | - | 🔴 | 🔴 | 🔴 | 🔴 | 🔴 |
| Nubank Empresas (664) | 🟢 | 🟢 | 🟢 | 🟢 | - | - | 🔴 | 🟠 | - | - | - | - | 🟠 | - | - | - | - | - | 🟠 | 🔴 | 🔴 | - |
| Mercado Pago Empresas (665) | 🟢 | 🟢 | 🟢 | 🟢 | - | - | 🟠 | 🟢 | - | - | - | - | 🟢 | - | - | - | - | - | 🟠 | 🟠 | 🟢 | 🟢 |
| Unicred Empresas (670) | 🔴 | 🔴 | 🔴 | 🟠 | - | - | 🔴 | 🔴 | 🔴 | 🔴 | - | - | 🔴 | 🔴 | - | - | - | 🔴 | 🔴 | 🔴 | 🔴 | 🔴 |
| Banco do Nordeste do Brasil (671) | 🟢 | 🟠 | 🟠 | 🟢 | - | - | - | - | 🔴 | 🔴 | - | 🟢 | 🔴 | - | - | - | 🔴 | 🔴 | 🔴 | 🔴 | 🟠 | 🟠 |
| Banco do Nordeste do Brasil Empresas (672) | 🟢 | 🟠 | 🟠 | 🟢 | - | - | - | - | 🔴 | 🔴 | - | 🟠 | 🔴 | - | - | - | 🔴 | 🔴 | 🔴 | 🔴 | 🟠 | 🟠 |
| Investimentos BB (673) | 🟢 | 🟢 | 🟢 | 🟢 | - | - | - | - | - | - | 🔴 | 🟢 | 🟠 | - | 🟢 | - | 🔴 | 🔴 | 🔴 | 🟠 | 🟠 | 🟢 |
| Uber Conta by Digio (674) | 🟢 | 🟢 | - | - | - | - | 🔴 | 🟠 | 🔴 | 🔴 | - | - | - | - | - | - | - | - | 🟢 | 🔴 | - | - |
| BTGPactual (675) | 🟢 | 🟢 | 🟢 | 🟢 | - | - | 🟢 | 🟠 | 🔴 | 🔴 | - | - | 🔴 | - | 🟢 | - | - | - | 🔴 | 🔴 | 🟢 | 🟢 |
| Ion (677) | 🟢 | 🟢 | - | - | - | - | - | - | - | - | - | - | - | - | - | - | - | - | 🟠 | 🟠 | - | - |
| Neon (689) | 🔴 | 🔴 | 🔴 | - | - | - | 🔴 | - | 🔴 | 🔴 | - | - | - | - | 🔴 | - | 🔴 | 🔴 | 🔴 | 🔴 | 🔴 | - |
| Safra Empresas (697) | 🟢 | 🟢 | 🟢 | 🔴 | - | - | - | - | 🔴 | 🔴 | - | 🟠 | 🔴 | - | - | - | - | - | 🔴 | 🔴 | 🟢 | 🔴 |
| XP Banking Empresas (702) | 🟢 | 🟢 | 🟢 | 🟢 | - | - | - | - | - | - | - | - | - | - | - | - | - | - | 🟠 | 🟠 | - | 🟢 |
| Banco Paulista (705) | - | - | - | - | - | - | - | - | - | - | - | - | - | - | - | - | - | - | - | - | - | - |
| Banco Sofisa (714) | - | - | - | - | - | - | - | - | - | - | - | - | - | - | - | - | - | - | 🟠 | 🟠 | - | - |
| BV - Pessoa Fisica - APP (716) | 🟢 | 🟢 | 🟢 | 🟢 | - | - | 🟢 | 🟢 | - | 🟢 | - | - | - | - | - | - | - | - | 🟢 | 🟢 | 🟢 | 🟢 |
| BV - Corporate (718) | - | - | - | 🟢 | - | - | - | - | - | - | - | - | - | - | - | - | - | - | - | - | - | - |
| Meliuz (720) | 🟢 | 🟢 | 🟢 | - | - | - | - | - | - | - | - | - | - | - | - | - | - | - | - | - | - | - |
| RecargaPay (767) | 🔴 | 🔴 | - | - | - | - | - | - | - | - | - | - | 🔴 | - | - | - | 🔴 | 🔴 | 🔴 | 🔴 | - | - |
| RecargaPay Empresas (768) | 🔴 | - | - | - | - | - | - | - | - | - | - | - | - | - | - | - | - | - | 🔴 | - | - | - |
| InfinitePay (777) | 🟠 | 🟠 | - | - | - | - | - | - | 🔴 | 🔴 | - | - | - | - | - | - | - | - | 🔴 | 🔴 | - | - |
| InfinitePay Empresas (778) | 🟠 | 🟠 | - | - | - | - | - | - | 🔴 | 🔴 | - | - | - | - | - | - | 🔴 | 🔴 | 🔴 | 🔴 | - | - |
| BTGPactual Investimentos Empresas (779) | 🟢 | 🟢 | 🟢 | - | - | - | - | - | - | - | - | - | - | - | - | - | - | - | 🔴 | 🔴 | - | 🟢 |
| Caixa Tem (783) | 🟢 | 🟢 | - | - | - | - | - | - | 🔴 | 🔴 | 🔴 | 🟠 | 🔴 | - | - | - | 🔴 | - | 🟠 | 🟠 | - | - |
| Itau Emps (786) | 🟢 | - | - | - | - | - | - | - | - | - | - | - | - | - | - | - | - | - | - | - | 🟢 | - |
| Stone Pagamentos (787) | - | 🟢 | - | - | - | - | - | - | - | - | - | - | - | - | - | - | - | - | 🟢 | 🟠 | - | - |
| Stone Pagamentos Empresas (788) | - | 🟢 | - | - | - | - | - | - | - | - | - | - | - | - | - | - | - | - | 🟠 | 🟠 | - | - |
| Necton (793) | 🟢 | - | - | - | - | - | - | - | - | - | - | - | 🔴 | - | - | - | - | - | 🔴 | 🔴 | - | - |
| Itau BBA (794) | 🟢 | 🟢 | 🟢 | 🔴 | - | - | - | - | 🔴 | 🔴 | - | 🟠 | 🟠 | - | - | - | 🔴 | 🔴 | 🟠 | 🟢 | 🟠 | - |
| Monte Bravo (795) | 🟢 | 🟢 | 🟢 | 🟢 | - | - | - | - | - | - | - | - | - | - | - | - | - | - | 🟠 | 🟢 | - | - |
| Porto Bank (800) | 🟢 | 🟢 | 🟢 | - | - | - | - | - | - | - | - | - | - | - | - | - | - | - | 🟠 | 🟢 | - | - |
| EQI (802) | 🟢 | - | - | - | - | - | - | - | - | - | - | - | - | - | - | - | - | - | 🔴 | 🔴 | - | - |
| 99Pay (804) | - | 🔴 | - | - | - | - | - | - | - | - | - | - | - | - | - | - | - | - | 🔴 | 🔴 | - | - |
| Inter (823) | - | 🟢 | - | 🔴 | - | - | - | - | - | - | - | - | - | - | - | - | - | - | - | - | - | - |
## Investments Open Finance Coverage
Source: https://docs.pluggy.ai/en/docs/open-finance/investments.md
For Open Finance, each institution supports certain investment **subtypes** (see [Investment Types and Subtypes](/docs/investments#investments-types--subtypes)).
Here is a table that indicates if the investment subtype is supported (🟢) or not (🔴), depending on the institution:
| Connector | BDR (EQUITY) | REAL_ESTATE_FUND (EQUITY) | STOCK (EQUITY) | ETF (ETF) | CDB (FIXED_INCOME) | CRA (FIXED_INCOME) | CRI (FIXED_INCOME) | DEBENTURES (FIXED_INCOME) | LCA (FIXED_INCOME) | LCI (FIXED_INCOME) | TREASURY (FIXED_INCOME) | EXCHANGE_FUND (MUTUAL_FUND) | FIXED_INCOME_FUND (MUTUAL_FUND) | INVESTMENT_FUND (MUTUAL_FUND) | MULTIMARKET_FUND (MUTUAL_FUND) | STOCK_FUND (MUTUAL_FUND) | FIP_FUND (MUTUAL_FUND) |
| :-------------------------------------- | :----------- | :-------------------------- | :------------- | :-------- | :------------------ | :------------------ | :------------------ | :------------------------- | :------------------ | :------------------ | :----------------------- | :---------------------------- | :--------------------------------- | :------------------------------ | :------------------------------- | :------------------------- | :----------------------- |
| Itaú (601) | 🟢 | 🟢 | 🟢 | 🟢 | 🟢 | 🟢 | 🟢 | 🟢 | 🟢 | 🟢 | 🟢 | 🟢 | 🟢 | 🟢 | 🟢 | 🟢 | 🔴 |
| XP Banking (602) | 🟢 | 🟢 | 🟢 | 🟢 | 🟢 | 🟢 | 🟢 | 🟢 | 🟢 | 🟢 | 🟢 | 🟢 | 🟢 | 🟢 | 🟢 | 🟢 | 🟢 |
| Bradesco (603) | 🔴 | 🔴 | 🔴 | 🔴 | 🟢 | 🟢 | 🟢 | 🟢 | 🟢 | 🟢 | 🔴 | 🟢 | 🟢 | 🟢 | 🟢 | 🟢 | 🔴 |
| Rico Investimentos (605) | 🟢 | 🟢 | 🟢 | 🟢 | 🟢 | 🟢 | 🟢 | 🟢 | 🟢 | 🟢 | 🟢 | 🟢 | 🟢 | 🟢 | 🟢 | 🟢 | 🔴 |
| Mercado Pago (606) | 🔴 | 🔴 | 🔴 | 🔴 | 🟢 | 🔴 | 🔴 | 🔴 | 🟢 | 🟢 | 🔴 | 🔴 | 🟢 | 🟢 | 🟢 | 🟢 | 🔴 |
| Santander (608) | 🔴 | 🟢 | 🟢 | 🟢 | 🟢 | 🟢 | 🟢 | 🟢 | 🟢 | 🟢 | 🟢 | 🟢 | 🟢 | 🟢 | 🟢 | 🟢 | 🔴 |
| Bradesco Empresas (609) | 🔴 | 🔴 | 🔴 | 🔴 | 🟢 | 🔴 | 🔴 | 🔴 | 🔴 | 🔴 | 🔴 | 🟢 | 🟢 | 🟢 | 🟢 | 🟢 | 🔴 |
| Banco do Brasil (611) | 🟢 | 🟢 | 🟢 | 🟢 | 🟢 | 🟢 | 🟢 | 🟢 | 🟢 | 🟢 | 🟢 | 🟢 | 🟢 | 🟢 | 🟢 | 🟢 | 🔴 |
| Nubank (612) | 🟢 | 🟢 | 🟢 | 🟢 | 🟢 | 🟢 | 🟢 | 🟢 | 🟢 | 🟢 | 🟢 | 🟢 | 🟢 | 🟢 | 🟢 | 🟢 | 🔴 |
| BTGPactual Investimentos (614) | 🟢 | 🟢 | 🟢 | 🟢 | 🟢 | 🟢 | 🟢 | 🟢 | 🟢 | 🟢 | 🟢 | 🟢 | 🟢 | 🟢 | 🟢 | 🟢 | 🔴 |
| Caixa Econômica Federal Empresas (616) | 🔴 | 🔴 | 🔴 | 🔴 | 🟢 | 🔴 | 🔴 | 🔴 | 🔴 | 🔴 | 🔴 | 🟢 | 🟢 | 🟢 | 🟢 | 🟢 | 🔴 |
| Itaú Empresas (618) | 🔴 | 🔴 | 🔴 | 🔴 | 🟢 | 🔴 | 🔴 | 🟢 | 🔴 | 🔴 | 🔴 | 🟢 | 🟢 | 🟢 | 🟢 | 🟢 | 🔴 |
| Caixa Econômica Federal (619) | 🔴 | 🟢 | 🟢 | 🔴 | 🟢 | 🔴 | 🔴 | 🔴 | 🟢 | 🟢 | 🟢 | 🟢 | 🟢 | 🟢 | 🟢 | 🟢 | 🔴 |
| Ágora Investimentos (620) | 🟢 | 🟢 | 🟢 | 🟢 | 🟢 | 🟢 | 🟢 | 🟢 | 🟢 | 🟢 | 🟢 | 🟢 | 🟢 | 🟢 | 🟢 | 🟢 | 🔴 |
| Santander Empresas (621) | 🔴 | 🔴 | 🟢 | 🔴 | 🟢 | 🔴 | 🔴 | 🔴 | 🔴 | 🔴 | 🔴 | 🔴 | 🟢 | 🟢 | 🟢 | 🟢 | 🔴 |
| Clear Corretora (623) | 🟢 | 🟢 | 🟢 | 🟢 | 🔴 | 🔴 | 🔴 | 🔴 | 🔴 | 🔴 | 🟢 | 🔴 | 🔴 | 🔴 | 🔴 | 🔴 | 🔴 |
| Sicredi Empresas (627) | 🔴 | 🔴 | 🔴 | 🔴 | 🟢 | 🔴 | 🔴 | 🔴 | 🔴 | 🔴 | 🔴 | 🟢 | 🟢 | 🟢 | 🟢 | 🟢 | 🔴 |
| Sicoob Empresas (628) | 🔴 | 🔴 | 🔴 | 🔴 | 🟢 | 🔴 | 🔴 | 🔴 | 🟢 | 🔴 | 🔴 | 🔴 | 🟢 | 🟢 | 🔴 | 🟢 | 🔴 |
| Safra (629) | 🟢 | 🟢 | 🟢 | 🟢 | 🟢 | 🟢 | 🟢 | 🟢 | 🟢 | 🟢 | 🟢 | 🟢 | 🟢 | 🟢 | 🟢 | 🟢 | 🔴 |
| PicPay (651) | 🔴 | 🔴 | 🔴 | 🔴 | 🟢 | 🔴 | 🔴 | 🔴 | 🟢 | 🟢 | 🔴 | 🔴 | 🟢 | 🟢 | 🟢 | 🟢 | 🔴 |
| Banco Bmg (652) | 🔴 | 🔴 | 🔴 | 🔴 | 🟢 | 🔴 | 🔴 | 🔴 | 🔴 | 🔴 | 🔴 | 🔴 | 🔴 | 🔴 | 🔴 | 🔴 | 🔴 |
| Banco Digio (653) | 🔴 | 🔴 | 🔴 | 🔴 | 🟢 | 🔴 | 🔴 | 🔴 | 🔴 | 🔴 | 🔴 | 🔴 | 🔴 | 🔴 | 🔴 | 🔴 | 🔴 |
| BTGPactual Empresas (655) | 🔴 | 🟢 | 🟢 | 🟢 | 🟢 | 🟢 | 🟢 | 🟢 | 🟢 | 🟢 | 🟢 | 🟢 | 🟢 | 🟢 | 🟢 | 🟢 | 🔴 |
| Next (656) | 🔴 | 🔴 | 🔴 | 🔴 | 🟢 | 🔴 | 🔴 | 🔴 | 🔴 | 🔴 | 🔴 | 🔴 | 🟢 | 🟢 | 🟢 | 🟢 | 🔴 |
| Banco PAN (657) | 🔴 | 🔴 | 🔴 | 🔴 | 🟢 | 🔴 | 🔴 | 🔴 | 🔴 | 🔴 | 🔴 | 🔴 | 🔴 | 🔴 | 🔴 | 🔴 | 🔴 |
| Sicoob (658) | 🔴 | 🔴 | 🔴 | 🔴 | 🟢 | 🔴 | 🔴 | 🔴 | 🟢 | 🟢 | 🟢 | 🔴 | 🟢 | 🟢 | 🔴 | 🟢 | 🔴 |
| Banrisul (659) | 🔴 | 🟢 | 🟢 | 🔴 | 🟢 | 🔴 | 🔴 | 🔴 | 🟢 | 🟢 | 🟢 | 🔴 | 🟢 | 🟢 | 🔴 | 🟢 | 🔴 |
| Banrisul Empresas (660) | 🔴 | 🔴 | 🔴 | 🔴 | 🟢 | 🔴 | 🔴 | 🔴 | 🔴 | 🔴 | 🔴 | 🔴 | 🟢 | 🟢 | 🔴 | 🔴 | 🔴 |
| Sicredi (661) | 🔴 | 🟢 | 🟢 | 🟢 | 🟢 | 🔴 | 🔴 | 🔴 | 🟢 | 🟢 | 🔴 | 🟢 | 🟢 | 🟢 | 🟢 | 🟢 | 🔴 |
| Banco do Brasil Empresas (662) | 🔴 | 🔴 | 🟢 | 🔴 | 🟢 | 🟢 | 🔴 | 🟢 | 🔴 | 🔴 | 🔴 | 🟢 | 🟢 | 🟢 | 🟢 | 🟢 | 🔴 |
| Unicred (663) | 🔴 | 🔴 | 🔴 | 🔴 | 🟢 | 🔴 | 🔴 | 🔴 | 🔴 | 🟢 | 🔴 | 🔴 | 🔴 | 🔴 | 🔴 | 🔴 | 🔴 |
| Nubank Empresas (664) | 🔴 | 🔴 | 🔴 | 🔴 | 🟢 | 🔴 | 🔴 | 🔴 | 🔴 | 🔴 | 🔴 | 🔴 | 🔴 | 🔴 | 🔴 | 🔴 | 🔴 |
| Unicred Empresas (670) | 🔴 | 🔴 | 🔴 | 🔴 | 🟢 | 🔴 | 🔴 | 🔴 | 🔴 | 🟢 | 🔴 | 🔴 | 🔴 | 🔴 | 🔴 | 🔴 | 🔴 |
| Banco do Nordeste do Brasil S.A. (671) | 🔴 | 🔴 | 🔴 | 🔴 | 🔴 | 🔴 | 🔴 | 🔴 | 🔴 | 🔴 | 🔴 | 🔴 | 🟢 | 🟢 | 🔴 | 🟢 | 🔴 |
| Banco do Nordeste do Brasil S.A. (672) | 🔴 | 🔴 | 🔴 | 🔴 | 🟢 | 🔴 | 🔴 | 🔴 | 🔴 | 🔴 | 🔴 | 🔴 | 🟢 | 🟢 | 🔴 | 🔴 | 🔴 |
| Investimentos BB (673) | 🔴 | 🔴 | 🟢 | 🔴 | 🟢 | 🟢 | 🟢 | 🟢 | 🟢 | 🟢 | 🟢 | 🔴 | 🟢 | 🟢 | 🔴 | 🔴 | 🔴 |
| BTGPactual (675) | 🟢 | 🟢 | 🟢 | 🟢 | 🟢 | 🟢 | 🟢 | 🟢 | 🟢 | 🟢 | 🟢 | 🟢 | 🟢 | 🟢 | 🟢 | 🟢 | 🔴 |
| Safra Empresas (697) | 🔴 | 🔴 | 🟢 | 🔴 | 🟢 | 🟢 | 🟢 | 🟢 | 🔴 | 🔴 | 🔴 | 🔴 | 🟢 | 🟢 | 🟢 | 🔴 | 🔴 |
| XP Banking Empresas (702) | 🔴 | 🟢 | 🟢 | 🟢 | 🟢 | 🟢 | 🟢 | 🟢 | 🟢 | 🟢 | 🔴 | 🟢 | 🟢 | 🟢 | 🟢 | 🟢 | 🟢 |
| Banco Sofisa (714) | 🔴 | 🔴 | 🔴 | 🔴 | 🟢 | 🔴 | 🔴 | 🔴 | 🟢 | 🟢 | 🔴 | 🔴 | 🟢 | 🔴 | 🟢 | 🟢 | 🔴 |
| BV - Pessoa Física - APP (716) | 🔴 | 🔴 | 🔴 | 🔴 | 🟢 | 🔴 | 🔴 | 🔴 | 🔴 | 🔴 | 🔴 | 🔴 | 🔴 | 🔴 | 🔴 | 🔴 | 🔴 |
| BV - Corporate (718) | 🔴 | 🔴 | 🔴 | 🔴 | 🟢 | 🔴 | 🔴 | 🔴 | 🔴 | 🔴 | 🔴 | 🔴 | 🔴 | 🔴 | 🔴 | 🔴 | 🔴 |
| Ágora Investimentos Empresas (781) | 🔴 | 🔴 | 🟢 | 🔴 | 🔴 | 🔴 | 🔴 | 🔴 | 🔴 | 🔴 | 🔴 | 🔴 | 🔴 | 🔴 | 🔴 | 🔴 | 🔴 |
| Necton (793) | 🟢 | 🟢 | 🟢 | 🟢 | 🟢 | 🟢 | 🟢 | 🟢 | 🟢 | 🟢 | 🟢 | 🟢 | 🟢 | 🟢 | 🟢 | 🟢 | 🔴 |
| Monte Bravo (795) | 🟢 | 🟢 | 🟢 | 🟢 | 🟢 | 🟢 | 🟢 | 🟢 | 🟢 | 🟢 | 🟢 | 🔴 | 🟢 | 🟢 | 🟢 | 🟢 | 🟢 |
| Toro Investimentos (796) | 🟢 | 🟢 | 🟢 | 🟢 | 🟢 | 🟢 | 🟢 | 🟢 | 🟢 | 🟢 | 🟢 | 🔴 | 🟢 | 🟢 | 🟢 | 🟢 | 🔴 |
| Inter (823) | 🟢 | 🟢 | 🟢 | 🟢 | 🟢 | 🟢 | 🟢 | 🟢 | 🟢 | 🟢 | 🟢 | 🟢 | 🟢 | 🟢 | 🟢 | 🟢 | 🔴 |
| C6 Bank (626) | 🟢 | 🟢 | 🟢 | 🟢 | 🟢 | 🟢 | 🟢 | 🟢 | 🟢 | 🟢 | 🟢 | 🟢 | 🟢 | 🟢 | 🟢 | 🟢 | 🔴 |
| PagBank (692) | 🔴 | 🟢 | 🟢 | 🔴 | 🟢 | 🔴 | 🔴 | 🔴 | 🟢 | 🟢 | 🟢 | 🔴 | 🟢 | 🟢 | 🟢 | 🟢 | 🔴 |
| C6 Bank Empresas (726) | 🔴 | 🔴 | 🔴 | 🔴 | 🟢 | 🔴 | 🔴 | 🟢 | 🔴 | 🔴 | 🔴 | 🔴 | 🟢 | 🟢 | 🟢 | 🔴 | 🔴 |
| PagBank Empresas (816) | 🔴 | 🔴 | 🟢 | 🔴 | 🟢 | 🔴 | 🔴 | 🔴 | 🟢 | 🔴 | 🔴 | 🔴 | 🟢 | 🟢 | 🟢 | 🟢 | 🔴 |
| Íon (677) | 🟢 | 🟢 | 🟢 | 🟢 | 🟢 | 🟢 | 🟢 | 🟢 | 🟢 | 🟢 | 🟢 | 🔴 | 🟢 | 🟢 | 🟢 | 🟢 | 🔴 |
| Neon (689) | 🔴 | 🔴 | 🔴 | 🔴 | 🟢 | 🔴 | 🔴 | 🔴 | 🔴 | 🔴 | 🔴 | 🔴 | 🔴 | 🔴 | 🔴 | 🔴 | 🔴 |
| Sandbox Open Finance | 🔴 | 🔴 | 🟢 | 🟢 | 🟢 | 🔴 | 🟢 | 🔴 | 🔴 | 🔴 | 🟢 | 🔴 | 🔴 | 🟢 | 🔴 | 🔴 | 🔴 |
| InfinitePay (777) | 🔴 | 🔴 | 🔴 | 🔴 | 🟢 | 🔴 | 🔴 | 🔴 | 🔴 | 🔴 | 🔴 | 🔴 | 🔴 | 🔴 | 🔴 | 🔴 | 🔴 |
| EQI (802) | 🟢 | 🟢 | 🟢 | 🟢 | 🟢 | 🟢 | 🟢 | 🟢 | 🟢 | 🟢 | 🟢 | 🔴 | 🟢 | 🟢 | 🟢 | 🟢 | 🔴 |
| Inter Empresas (824) | 🔴 | 🔴 | 🟢 | 🔴 | 🟢 | 🟢 | 🟢 | 🟢 | 🟢 | 🟢 | 🔴 | 🟢 | 🟢 | 🟢 | 🟢 | 🟢 | 🔴 |
| Stone Pagamentos Empresas (788) | 🔴 | 🔴 | 🔴 | 🔴 | 🟢 | 🔴 | 🔴 | 🔴 | 🔴 | 🔴 | 🔴 | 🔴 | 🔴 | 🔴 | 🔴 | 🔴 | 🔴 |
| BTGPactual Investimentos Empresas (779) | 🟢 | 🟢 | 🟢 | 🟢 | 🟢 | 🟢 | 🔴 | 🟢 | 🔴 | 🔴 | 🟢 | 🔴 | 🟢 | 🟢 | 🟢 | 🟢 | 🔴 |
| Méliuz (720) | 🔴 | 🔴 | 🔴 | 🔴 | 🟢 | 🔴 | 🔴 | 🔴 | 🔴 | 🔴 | 🔴 | 🔴 | 🔴 | 🔴 | 🔴 | 🔴 | 🔴 |
| Uber Conta by Digio (674) | 🔴 | 🔴 | 🔴 | 🔴 | 🟢 | 🔴 | 🔴 | 🔴 | 🔴 | 🔴 | 🔴 | 🔴 | 🔴 | 🔴 | 🔴 | 🔴 | 🔴 |
| Banco BRB (817) | 🔴 | 🔴 | 🔴 | 🔴 | 🟢 | 🔴 | 🔴 | 🔴 | 🔴 | 🟢 | 🔴 | 🔴 | 🟢 | 🟢 | 🔴 | 🟢 | 🔴 |
| Stone Pagamentos (787) | 🔴 | 🔴 | 🔴 | 🔴 | 🟢 | 🔴 | 🔴 | 🔴 | 🔴 | 🔴 | 🔴 | 🔴 | 🔴 | 🔴 | 🔴 | 🔴 | 🔴 |
| InfinitePay Empresas (778) | 🔴 | 🔴 | 🔴 | 🔴 | 🟢 | 🔴 | 🔴 | 🔴 | 🔴 | 🔴 | 🔴 | 🔴 | 🔴 | 🔴 | 🔴 | 🔴 | 🔴 |
| Itaú BBA (794) | 🔴 | 🔴 | 🔴 | 🔴 | 🟢 | 🔴 | 🔴 | 🔴 | 🔴 | 🔴 | 🔴 | 🔴 | 🟢 | 🟢 | 🔴 | 🔴 | 🔴 |
| Midway (688) | 🔴 | 🔴 | 🔴 | 🔴 | 🟢 | 🔴 | 🔴 | 🔴 | 🔴 | 🔴 | 🔴 | 🔴 | 🔴 | 🔴 | 🔴 | 🔴 | 🔴 |
| Santander Corretora (812) | 🔴 | 🔴 | 🔴 | 🔴 | 🔴 | 🔴 | 🔴 | 🔴 | 🔴 | 🔴 | 🟢 | 🔴 | 🔴 | 🔴 | 🔴 | 🔴 | 🔴 |
| Banco Sofisa Empresas (715) | 🔴 | 🔴 | 🔴 | 🔴 | 🟢 | 🔴 | 🔴 | 🔴 | 🔴 | 🔴 | 🔴 | 🔴 | 🔴 | 🔴 | 🔴 | 🔴 | 🔴 |
| Mercado Pago Empresas (665) | 🔴 | 🔴 | 🔴 | 🔴 | 🟢 | 🔴 | 🔴 | 🔴 | 🔴 | 🔴 | 🔴 | 🔴 | 🔴 | 🔴 | 🔴 | 🔴 | 🔴 |
| Banco BRB Empresas (818) | 🔴 | 🔴 | 🔴 | 🔴 | 🟢 | 🔴 | 🔴 | 🔴 | 🔴 | 🟢 | 🔴 | 🔴 | 🟢 | 🟢 | 🔴 | 🔴 | 🔴 |
| Banco Mercantil (742) | 🔴 | 🔴 | 🔴 | 🔴 | 🟢 | 🔴 | 🔴 | 🔴 | 🔴 | 🔴 | 🔴 | 🔴 | 🔴 | 🔴 | 🔴 | 🔴 | 🔴 |
| Toro Investimentos Empresas (797) | 🟢 | 🔴 | 🔴 | 🔴 | 🟢 | 🔴 | 🔴 | 🔴 | 🔴 | 🔴 | 🔴 | 🔴 | 🔴 | 🔴 | 🔴 | 🔴 | 🔴 |
> **Have in mind**
>
> Some banks such as NuBank and PicPay have investment options called "Cofrinhos" and "Caixinhas", which configure as CDBs. Thus, they are covered by the connection and should show on the investments section as well.
## Operational Rate Limits
Source: https://docs.pluggy.ai/en/docs/open-finance/rate-limits.md
## Open Finance Rate Limits
There are two different kinds of limits involved when Pluggy retrieves data: Pluggy API rate limits and Open Finance operational limits imposed by financial institutions.
The Brazilian Open Finance Network imposes **operational limits** on the number of times **per month** that anyone using Open Finance can fetch each **product**. These limits do not come from Pluggy; they constrain how often Pluggy can synchronize data. They apply per combination of CPF/CNPJ, institution, and product (i.e., card, account, investment, or loan).
> **Pluggy manages rate limits, so you don't have to worry about it.**
>
> Under normal usage of Open Finance Connectors (one CPF and institution **on only one item**), you **won't have to worry about Rate Limits**, since you would never reach them even if you had automatic updates enabled on all your items updating up to 4 times per day.
> **Creating multiple items for the same CPF/CNPJ + Institution**
>
> However, keep in mind that if you connect the same CPF/CNPJ to the same institution by creating multiple items, you will reach the limitation of Open Finance faster, meaning that some products won't be updating/returning their data until the limit is renewed on the next month. When not using an item, **trigger the deletion** of it to avoid syncing automatically.
### Accounts (Checking and Savings)
| Product | Monthly requests allowed | Moments we fetch this product |
| --- | --- | --- |
| Account list & details | 4 | Item creation and every 7 days |
| Account balance | 420 | Every update * |
| Recent transactions (1 to 6 days ago) | 240 | Every update * |
| Non-recent transactions (7 to 365 days ago) | 4 | Item creation and every 7 days |
\* Every Update means that each execution the item does.
**Considerations**
- After 240 requests, new transactions won't appear until the next month.
- After 420 requests, the account's balance won't be updated until the next month.
- On every update, both requests are consumed, and currently, it's not supported to just recover the balance. If needed, create a connection that would only recover the **ACCOUNTS** product, sending in the `products` array the desired product.
### Credit Cards
| Product | Monthly requests allowed | Moments we fetch this product |
| --- | --- | --- |
| Credit card list & details | 4 | Item creation and every 7 days |
| Credit card bills & bill transactions | 30 | Item creation and once per day |
| Credit card limits | 240 | Every update * |
| Recent transactions (1 to 6 days ago) | 240 | Every update * |
| Non-recent transactions (7 to 365 days ago) | 4 | Item creation and every 7 days |
\* Every Update means that each execution the item does.
**Considerations**
- If a new credit card appeared as authorized, it could take up to 7 days to appear in the responses.
- Credit card bill transactions (closed and past bills) will be updated daily.
- Credit card limits and new transactions will be synced on every update.
- After 240 updates, this has an average of 8 updates per day. It will hit the rate limits and won't update transactions until the next month.
### Investments
| Product | Monthly requests allowed | Moments we fetch this product |
| --- | --- | --- |
| Investment list | 30 | Item creation and once per day |
| Investment detail | 4 | Item creation and every 7 days |
| Investment balance | 120 | Every update * |
| Investment Transactions (Recent - 1 to 6 days ago) | 120 | Every update * |
| Investment Transactions (History - 7 to 365 days ago) | 4 | Item creation and on demand. |
\* Every Update means that each execution the item does.
**Considerations**
- If an item it's updated 120 times before the end of the month, new transactions nor balances won't be synced until the 1st of the next month.
- Details recover the asset's rate, rateType, fixedAnnualRate, etc. This information shouldn't change, and it's recovered on creation. If there is a change for some reason, it will be reflected after 7 days from that update.
- If a new investment was acquired, but the rate limit was already achieved, it won't appear until the next month.
### Other products
| Product | Monthly requests allowed | Moments we fetch this product |
| --- | --- | --- |
| Identity | 4 | Item creation and every 7 days |
| Loans List & Detail | 4 | Item creation and every 7 days |
| Loans Instalments | 30 | Item creation and once per day |
| Loans Payments | 30 | Item creation and once per day |
- Loans will be updated daily, if an item is updated more than once per day, it won't sync loan's data.
- Identity information is recovered on item creation and will sync updates every 7 days. If there is any personal data updated, won't reflect changes until it executes a sync after 7 days from the initial sync.
## Understanding an item that reached the rate limit
### How is the rate limit returned as a warning?
When a rate limit is reached, you will see the Item in status **PARTIAL_SUCCESS** and inside the status detail, a warning about the failing product:
```json
{
"id": "44534b0e-717e-497d-890f-08c2faa468c1",
"status": "PARTIAL_SUCCESS",
"statusDetail": {
"accounts": {
"warnings": [
{
"code": "423",
"message": "Open Finance monthly rate limit reached on product 'accounts' for this CPF/CNPJ and institution. The product could not be updated."
}
],
"isUpdated": false,
"lastUpdatedAt": "2023-10-19T19:19:58.188Z"
}
}
}
```
## Response time and timeout
Monthly operational limits are not the only non-functional requirement the Brazilian Open Finance Network imposes on institutions. Two others matter when a sync fails because the institution was slow to answer, and they are frequently confused with each other:
| Requirement | Limit | What it measures |
| --- | --- | --- |
| **Timeout** | **15 seconds** | How long the client waits for a single request before giving up. The institution is expected to answer `504 Gateway Timeout` when it hits its own timeout. |
| **Performance** | P95 under **1,500 ms** (high and medium-high frequency endpoints), **2,000 ms** (medium frequency), **4,000 ms** (low frequency) | The 95th percentile of the institution's response time, measured across its full daily traffic on that endpoint. |
Pluggy applies the network's **15-second timeout to every Open Finance request to the institution, on every connector** — there is no per-institution or per-product value. When an institution does not answer within that window, we abort the request; the affected product is not updated and a warning is added to the Item's `statusDetail`, exactly as shown above for rate limits.
> **A slow response is not a timeout.**
>
> The 1,500 ms figure is a *performance* target measured over an institution's aggregate traffic — it is not a deadline for any individual request. A request answered in 1,600 ms, or in 9 seconds, is well inside the 15-second limit and Pluggy will wait for it and use the response. Only requests that go past **15 seconds** are aborted.
This distinction is worth keeping in mind when raising a case with an institution: exceeding the P95 target and exceeding the timeout are two different breaches, with different evidence behind them.
## SCR — Credit Information System
Source: https://docs.pluggy.ai/en/docs/open-finance/scr.md
The **SCR** (_Sistema de Informações de Crédito_) is the Banco Central do Brasil's official registry of credit operations. Every financial institution in the country reports to it: loans, financing, limits, guarantees and co-obligations above R$200. It is the source itself, not a score inferred from it.
Pluggy exposes the SCR behind a connected Open Finance item. The item supplies the CPF or CNPJ and stands as the evidence of the account holder's consent.
The SCR is available on request. Talk to us to have it enabled on your
subscription — without it the endpoint returns `SCR_FEATURE_NOT_ENABLED`.
Any SCR consultation depends on prior authorization from the credit operations
holder. Your institution is responsible for requesting that authorization, and
for meeting the consultation prerequisites, clarification messages, and the
registration and storage of authorizations set out in current regulation — see
[Resolução CMN n°
5.037](https://www.bcb.gov.br/estabilidadefinanceira/exibenormativo?tipo=RESOLU%C3%87%C3%83O%20CMN&numero=5037).
## Requirements
Before the first call:
1. The **SCR feature** enabled on your subscription.
2. A connected **Open Finance** item. Direct connectors are not eligible.
3. That item's **CPF or CNPJ** known to us — it is what we query Bacen with.
An item that fails either of the last two returns `SCR_ITEM_NOT_SUPPORTED`.
## Consult the SCR
```
GET /items/{id}/scr
```
| Parameter | In | Description |
| --------- | ----- | ------------------------------------------------- |
| `id` | path | The item whose account holder you want to consult |
| `from` | query | First base date, as `YYYYMM`. Optional |
| `to` | query | Last base date, as `YYYYMM`. Optional |
```bash
curl --request GET \
--url 'https://api.pluggy.ai/items/d0e8448e-0156-4b4a-ae6c-3e2a6d9bff5c/scr?from=202604&to=202607' \
--header 'X-API-KEY: YOUR_API_KEY'
```
Full parameter and schema detail lives in the [API reference](/reference/scr/items-retrieve-scr).
## Base dates are months, and they lag
The SCR does not work in days. Bacen consolidates one **base date** (_data-base_) per month, and each one only becomes complete a few months later — institutions are still delivering their reports in the meantime.
Two consequences worth designing around:
- **Asking for the current month returns nothing.** Bacen has not closed it yet.
- **When you omit `from` and `to`**, Pluggy consults the last 4 base dates, ending 2 months back from today. In September 2026 that is `202604` to `202607`.
If you send only one bound, the window anchors on it: `?to=202501` returns `202410` through `202501`.
Each base date carries `docProc` and `volProc` — the percentage of expected documents and volume already incorporated. A recent base date with low coverage is a partial picture, not an empty one.
## Response
The response is Bacen's own payload, forwarded unchanged. Field names, codes and structure are the SCR's, so a value you read here is the same value an institution reads at the source.
```json
{
"dtbConsult": "202604 a 202607",
"cdCli": "11222333",
"tpCli": "2",
"lsDtb": [
{
"dtb": 202607,
"docProc": "99.8",
"volProc": "99.9",
"qtdIfs": 4,
"qtdCongFinc": 3,
"dtbIniRel": "201803",
"coobAss": 0,
"coobRec": 0,
"lsOp": [
{
"mod": "0203",
"oriRec": "0101",
"indx": "01",
"varCamb": "00",
"resVenc": { "v20": 12500.0, "v40": 12500.0, "v110": 37500.0 },
"lsGar": [{ "tp": "0501", "qtd": 1 }]
}
]
}
]
}
```
### Top level
| Field | Type | Description |
| ----------------------------- | ------ | --------------------------------------------------------------------------------------------- |
| `dtbConsult` | string | The base dates consulted |
| `cdCli` | string | The consulted document: the CPF for an individual, or the **8-digit CNPJ root** for a company |
| `tpCli` | string | `"1"` for an individual, `"2"` for a legal entity |
| `lsDtb` | array | One entry per consulted base date. A base date with no data is still listed |
| `listaDeMensagensDeValidacao` | array | Validation messages raised by Bacen for the request |
### Inside a base date (`lsDtb[]`)
| Field | Type | Description |
| ------------- | ------ | ------------------------------------------------------------------------------------------------------------------- |
| `dtb` | number | The base date, as `YYYYMM`. Numeric, not a string |
| `msg` | string | Bacen's message for this base date, when it has one |
| `docProc` | string | Percentage of the expected 3040 documents already incorporated by Bacen, excluding exempted institutions |
| `volProc` | string | Percentage of the expected operation volume already accepted for the base date |
| `qtdIfs` | number | Number of financial institutions where the holder has operations |
| `qtdCongFinc` | number | Number of financial conglomerates. Compare against `qtdIfs` to tell real counterparty diversification from apparent |
| `dtbIniRel` | string | Start of the holder's relationship with the national financial system |
| `coobAss` | number | Co-obligation assumed by the holder in credit assignments, in BRL |
| `coobRec` | number | Co-obligation received in credit assignments, in BRL |
| `lsOp` | array | Operation groups |
### Inside an operation group (`lsOp[]`)
The SCR does not return contracts one by one. Operations are **aggregated** by the combination of modality, source of funds, index and exchange variation, so one entry can represent several contracts of the same nature.
| Field | Type | Description |
| ---------- | ------ | ---------------------------------------------------------------------------------------------- |
| `mod` | string | Modality code — what kind of credit it is |
| `oriRec` | string | Source-of-funds code |
| `indx` | string | Reference rate or index code |
| `varCamb` | string | Exchange rate variation code |
| `subJDisc` | string | Present when the operation is under dispute: `"D"` disagreement, `"J"` sub judice, `"JD"` both |
| `resVenc` | object | Balances split by maturity vertex — see below |
| `lsGar` | array | Guarantees backing the group, by type (`tp`) and count (`qtd`) |
| `lsInfAd` | array | Complementary information reported for the group |
The codes behind `mod`, `oriRec`, `indx`, `varCamb` and `tp` are Bacen's own. Their meaning is published in the **DOC3040** reference — read them there rather than inferring them.
### Maturity vertices (`resVenc`)
`resVenc` distributes the group's balance across 30 vertices, in BRL. Only the vertices that carry a value are present. They fall into three families:
| Family | What it means |
| ---------------------- | --------------------------------------------------------------------------------------------------------------------------------------------------------------------------------------------------------------------------------------------------------------------------------------------------- |
| **Not yet due** | Payments whose date has not arrived. The boundary is generous — a payment up to **14 days** late still counts here, so short operational delays are not read as default. Measures commitment, not trouble: what matters is the shape of the curve over time |
| **Overdue** | Payments more than 14 days late, graded into progressively older buckets. Two debts of the same value, one 20 days late and one 200, are opposite situations. Read the **migration between buckets** month over month: value moving down the ladder is recovery, moving up is a default in progress |
| **Special categories** | A few vertices are not time windows at all; they represent states or commitments that do not fit the maturity ruler |
The exact window behind each individual vertex code is defined by the DOC3040 reference.
## Errors
| Status | Code | What it means |
| ------ | ------------------------- | ----------------------------------------------------------------------------------------------------------- |
| 400 | `SCR_INVALID_REQUEST` | The base date range was rejected. Check that `from` and `to` are `YYYYMM` and that `from` is not after `to` |
| 403 | `SCR_FEATURE_NOT_ENABLED` | The SCR is not enabled on your subscription |
| 404 | `ITEM_NOT_FOUND` | No such item, or its authorization has been revoked |
| 422 | `SCR_ITEM_NOT_SUPPORTED` | The item is not an Open Finance connection, or its CPF/CNPJ is missing or malformed |
| 500 | `SCR_FETCH_ERROR` | We could not complete the consultation |
| 502 | `SCR_SERVICE_UNAVAILABLE` | Bacen's SCR service is unavailable. Retry later |
A `502` carries a `correlationId` under `data`. Quote it when you report the failure to us — it is what lets us trace the exact consultation.
```json
{
"code": 502,
"codeDescription": "SCR_SERVICE_UNAVAILABLE",
"message": "Bacen's SCR service is temporarily unavailable. Please try again later.",
"data": { "correlationId": "8047f6e9-bb9e-4b04-8515-e2210dc4c544" }
}
```
Bacen's SCR service has extended outages. Design for `502` — retry with
backoff, and do not treat an unavailable consultation as an absence of credit
history.
## Account
Source: https://docs.pluggy.ai/en/docs/products/accounts.md
The **account** product is the list of bank accounts such as Checking or Savings Account and Credit Card, that were available in the selected connector.
The response will vary depending on the Accounts Type, providing a `data` object related to its type `bankData` or `creditData`.
```json title="Bank"
{
"id": "a658c848-e475-457b-8565-d1fffba127c4",
"type": "BANK",
"subtype": "CHECKING_ACCOUNT",
"number": "0001/12345-0",
"name": "Conta Corrente",
"marketingName": "GOLD Conta Corrente",
"balance": 120950,
"itemId": "a0922d6f-2007-4169-a181-b961500608db",
"taxNumber": "416.799.495-00",
"owner": "John Doe",
"currencyCode": "BRL",
"bankData": {
"transferNumber": "123/0001/12345-0",
"closingBalance": 120950,
"automaticallyInvestedBalance": 100,
"overdraftContractedLimit": 0,
"overdraftUsedLimit": 0,
"unarrangedOverdraftAmount": 0
}
}
```
```json title="Credit"
{
"id": "4f61bd6d-e6fc-44b2-9c4b-5609058de7ab",
"type": "CREDIT",
"subtype": "CREDIT_CARD",
"name": "Itau Uniclass 2.0 Mastercard Platinum",
"marketingName": "Itau Uniclass 2.0 Mastercard Platinum",
"taxNumber": "***.***.123-22",
"owner": "FEDERICO MIRAS",
"number": "1234",
"balance": 142.41,
"itemId": "fc214524-4725-4974-9f7a-0f1b50ea39e0",
"currencyCode": "BRL",
"creditData": {
"level": "PLATINUM",
"brand": "MASTERCARD",
"brandAdditionalInfo": null,
"balanceCloseDate": "2020-07-08",
"balanceDueDate": "2020-07-17",
"availableCreditLimit": 51300,
"creditLimit": 51800,
"isLimitFlexible": false,
"balanceForeignCurrency": 500,
"minimumPayment": 100,
"status": "ACTIVE",
"holderType": "MAIN"
}
}
```
| Property | Description | Required |
|----------|-------------|----------|
| id | Unique identifier of the Account model, used to recover related transactions | Yes |
| type | Type of account (BANK / CREDIT). | Yes |
| subtype | The subtype of account (`CHECKING_ACCOUNT` / `SAVINGS_ACCOUNT` / `CREDIT_CARD`). | Yes |
| number | For **BANK** type, this field returns the number of the account. Ie: 12345-6 (or 12345-6/500 in some saving accounts). For **CREDIT** type, this field returns the last four digits of the credit card. Ie: 1234. For connectors with type **PAYMENT_ACCOUNT**, number represents the fund destination account number. | Yes |
| balance | For **BANK** type, this field returns the current available balance of the account. For **CREDIT** type, this field returns the value of the current balance of the open invoice not yet paid. For connectors with type **PAYMENT_ACCOUNT**, balance can only be returned in digital accounts, not in external accounts. More details [here](#balance). | Yes |
| currencyCode | Currency ISO code of the account, ie USD or EUR | Yes |
| name | Name of the account, ie. Saving Account 1234 or Mastercard Gold. | Yes |
| marketingName | The extra name provided for some accounts that are related to the level of the account. Not always provided. | |
| owner | Name of the owner of the account. | |
| taxNumber | Formatted tax number of the owner of the account (CPF or CNPJ). For connectors with type **PAYMENT_ACCOUNT**, taxNumber represents the CNPJ of the connected company. Availability varies by connector. For some business connectors (e.g. Bradesco PJ, Caixa PJ), accounts under the same itemId may return different `taxNumber` values, since the value comes from the selected company or directly from the institution's API. | |
| bankData | Specific data for bank account types. | |
| creditData | Specific data for credit account types. | |
### Balance
Bank Accounts (Checking & Savings) balances represent the amount the holder currently holds as available to spend. If this value is negative, it represents a debt the holder has with the financial institution, an example of this would be an overdraft.
Credit Cards balances are the amount due to the institution, this would mean the open balance of the user's current month. If the previous invoice was paid with an exceeded amount, the balance would return a negative value.
For Open Finance connectors, Credit Card balance is the used limit for that credit card.
> **Calculating credit card balances**
>
> Credit-type account can leverage the `availableCreditLimit` to consolidate a 360 view of credit cards.
>
> `creditLimit` = `availableCreditLimit` (yet to spend) + `balance` (open balance) + debt from previous balance.
## Bank data
| Property | Description |
|----------|-------------|
| transferNumber | This field returns the most important account information: COMPE / Agency / Account. Ie.: 123 / 1234 / 12345-6 |
| closingBalance | Current balance of the account. For Open Finance connectors, it represents the available balance + the blocked balance |
| automaticallyInvestedBalance | Balance of the account that its automatically invested by the institution. |
| overdraftContractedLimit | Amount of the contracted overdraft limit. |
| overdraftUsedLimit | Total amount used of the special check limit and the advance to the depositor. |
| unarrangedOverdraftAmount | Value of operation contracted on an emergency basis to cover outstanding balance in demand deposit account and excess over the agreed overdraft limit. |
## Credit Data
| Property | Description |
|----------|-------------|
| minimumPayment | Balance minimum payment for the current period. |
| balanceForeignCurrency | Balance in foreign currency for the current period. |
| availableCreditLimit | The available credit limit for the account yet to spend. |
| creditLimit | The credit limit for the account. |
| isLimitFlexible | Whether the credit card is unlimited. |
| balanceDueDate | Balance's Due Date for the card account. (yyyy-mm-dd) |
| balanceCloseDate | Close date when the balance was calculated. (yyyy-mm-dd) |
| level | Card type level (Black, Signature, etc). |
| brand | Card Brand (Mastercard, Visa, Elo, etc). |
| brandAdditionalInfo | Free text specifying the brand category when `brand` is `OTHER`. *Only available on Open Finance connectors.* |
| status | Card status (ACTIVE, BLOCKED, CANCELLED). For *regulated connectors* we only return **ACTIVE**, meaning the status of that the card is still being recovered from the FI. |
| holderType | Card holder type (MAIN or ADDITIONAL) |
## Disaggregated Credit Limits
Some credit cards may have multiple credit lines or different operation modalities. The `disaggregatedCreditLimits` field provides detailed information about each credit line to help you correctly identify the main card and calculate precise balances.
### When to Use Disaggregated Limits
Use this feature when you encounter:
- Incorrect credit card balances
- Multiple credit lines on the same card
- Different operation modalities with separate limits
### Structure
`disaggregatedCreditLimits` lives inside `creditData` and is an array of objects, one per credit line:
```json
{
"creditData": {
"disaggregatedCreditLimits": [
{
"creditLineLimitType": "LIMITE_CREDITO_TOTAL",
"consolidationType": "INDIVIDUAL",
"identificationNumber": "1000",
"isLimitFlexible": false,
"usedAmount": 149.84,
"usedAmountCurrencyCode": "BRL",
"lineName": "CREDITO_A_VISTA",
"limitAmount": 1000.0,
"limitAmountCurrencyCode": "BRL",
"customizedLimitAmount": 2000.0,
"customizedLimitAmountCurrencyCode": "BRL",
"availableAmount": 850.16,
"availableAmountCurrencyCode": "BRL"
}
]
}
}
```
### Key Fields
| Field | Type | Description | Example |
|-------|------|-------------|---------|
| `creditLineLimitType` | string | Credit limit type | `"LIMITE_CREDITO_TOTAL"` or `"LIMITE_CREDITO_MODALIDADE_OPERACAO"` |
| `consolidationType` | string | Indicates if the limit is consolidated or individual | `"INDIVIDUAL"` or `"CONSOLIDATED"` |
| `identificationNumber` | string | Additional credit card identification number | `"1000"` |
| `isLimitFlexible` | boolean | Indicates if the limit is flexible | `false` |
| `usedAmount` | number | Used amount of the additional credit card | `149.84` |
| `usedAmountCurrencyCode` | string | Used amount currency code | `"BRL"` |
| `lineName` | string | Name of the credit limit line. One of `CREDITO_A_VISTA`, `CREDITO_PARCELADO`, `SAQUE_CREDITO_BRASIL`, `SAQUE_CREDITO_EXTERIOR`, `EMPRESTIMO_CARTAO_CONSIGNADO`, `OUTROS` | `"CREDITO_A_VISTA"` |
| `lineNameAdditionalInfo` | string | Free text describing the line when `lineName` is `OUTROS` | `"SAQUE_CREDITO"` |
| `limitAmount` | number | Additional credit card limit amount | `1000.00` |
| `limitAmountCurrencyCode` | string | Limit currency code | `"BRL"` |
| `limitAmountReason` | string | Reason why the reported total limit amount is zero | `"Limite zerado após análise"` |
| `customizedLimitAmount` | number | Total limit amount customized by the customer through the institution's electronic channels | `2000.00` |
| `customizedLimitAmountCurrencyCode` | string | Customized limit amount currency code | `"BRL"` |
| `availableAmount` | number | Available amount of the additional credit card | `850.16` |
| `availableAmountCurrencyCode` | string | Available amount currency code | `"BRL"` |
> See [Accounts](/reference/account) in our API reference for more information.
## Real Time Balance
Source: https://docs.pluggy.ai/en/docs/products/real-time-balance.md
The real-time balance endpoint fetches the account balance directly from the financial institution without triggering a full item sync. This is useful when you need up-to-date balance information between regular sync cycles.
```
GET /accounts/{id}/balance
```
```json
{
"balance": 1500.50,
"blockedBalance": 0,
"automaticallyInvestedBalance": 200,
"currencyCode": "BRL",
"updateDateTime": "2024-01-15T10:30:00Z"
}
```
The `balance` value returned by this endpoint is calculated using the same logic as a full item execution -- there is no difference in how the balance is derived.
When you call this endpoint, the account resource is also updated with the new balance. Any subsequent `GET /accounts/{id}` request will reflect the value fetched by the real-time balance call.
> **Warning:** This endpoint is only available for **Open Finance connectors**. Calling it on non-Open Finance accounts will return an error.
**Rate limiting:** The rate limit for this endpoint is **shared with the full item execution**. Requests to the real-time balance endpoint and item syncs both count toward the same rate limit quota imposed by the financial institution. If the institution rate-limits the request, you will receive a `429` response.
| Response Code | Description |
|---------------|-------------|
| `200` | Balance fetched and account updated |
| `404` | Account not found for the given ID |
| `429` | Rate limited by the financial institution -- retry later |
| `500` | Error fetching the balance from the connector |
> See [Get real-time balance](/reference/account-balance-get) in the API reference for more details.
## Credit Card Bills
Source: https://docs.pluggy.ai/en/docs/products/credit-card-bills.md
The **Bill** entity is recovered from institutions that support this product. It represents a bill (fatura) associated with an account of type "Credit", specifically the subtype `CREDIT_CARD`. The bill represents each invoice the card provider sends to the user by the end of the month with the details of the debt, the taxes involved in the period, and when it's due.
> **Only supported on Regulado connections**
>
> This entity is returned mandatory for all FI institutions on Open Finance Regulado connections. For Open Finance Direct connections, it is only returned in Inter PF & Itau Cartoes.
```json
{
"id": "76edd0fa-57b4-4391-be8d-e8b6249d04b1",
"dueDate": "2023-09-15T00:00:00.000Z",
"totalAmount": 10000.76,
"totalAmountCurrencyCode": "BRL",
"minimumPaymentAmount": 3000,
"allowsInstallments": true,
"payments": [
{
"id": "a1b2c3d4-e5f6-7890-abcd-ef1234567890",
"valueType": "FULL_PAYMENT",
"paymentDate": "2023-09-15T00:00:00.000Z",
"paymentMode": "PIX",
"amount": 10000.76,
"currencyCode": "BRL"
}
],
"financeCharges": [
{
"id": "6119c3e0-706c-4a7a-a734-0fc7a0a94bdb",
"type": "IOF",
"amount": 7.01,
"currencyCode": "BRL",
"additionalInfo": "NA"
},
{
"id": "3cd450a1-79d1-43fd-a5ea-f77b3fca960d",
"type": "OTHER",
"amount": 0,
"currencyCode": "BRL",
"additionalInfo": "NA"
}
]
}
```
| Property | Type | Optional | Description |
|----------|------|----------|-------------|
| id | string | No | Primary identifier |
| dueDate | string | No | Due date of the bill, displayed for payment by the customer |
| totalAmount | number | No | Total bill amount |
| totalAmountCurrencyCode | string | No | Code referencing the currency of the bill |
| minimumPaymentAmount | number | Yes | Minimum payment amount of the bill |
| allowsInstallments | boolean | Yes | Indicates whether the bill allows installment payments (true) or not (false) |
| financeCharges | array | No | List of charges associated with the bill ([CreditCardBillFinanceCharge](#credit-card-bill-finance-charge)) |
| payments | array | No | List of payments associated with the bill ([CreditCardBillPayment](#credit-card-bill-payment)) |
## Credit Card Bill Finance Charge
| Property | Type | Optional | Description |
|----------|------|----------|-------------|
| id | string | No | Primary identifier |
| type | string | No | Denomination of the charges that apply to the postpaid payment account bill: LATE_PAYMENT_REMUNERATIVE_INTEREST, LATE_PAYMENT_FEE, LATE_PAYMENT_INTEREST, IOF, OTHER |
| amount | number | No | Amount charged for the charge/fee |
| currencyCode | string | No | Code referencing the currency of the charge |
| additionalInfo | string | Yes | Free field, mandatory to fill if 'OTHER' type of charge is selected |
## Credit Card Bill Payment
| Property | Type | Optional | Description |
|----------|------|----------|-------------|
| id | string | No | Primary identifier |
| valueType | string | No | Type of payment made against the bill (e.g. FULL_PAYMENT, MINIMUM_PAYMENT, OTHER) |
| paymentDate | string | No | Date the payment was made |
| paymentMode | string | No | Mode used to make the payment (e.g. PIX, account debit, bank slip) |
| amount | number | No | Amount paid |
| currencyCode | string | No | Code referencing the currency of the payment |
### How to verify a previous bill is settled
A bill's balance is considered settled when the payments recorded in the **next** billing cycle cover the previous bill's total amount plus any finance charges (interest, fees, etc.) that accrued during that next cycle:
```
totalAmount(Bill N) + sum(financeCharges(Bill N+1)) = sum(payments(Bill N+1))
```
Where **N** is the bill you want to verify and **N+1** is the immediately following bill.
#### Example: verifying January bill settlement
Suppose a customer has two consecutive bills: **January** (Bill N) and **February** (Bill N+1).
To confirm the January balance was fully paid, the following condition must hold:
```
totalAmount(January) + sum(financeCharges(February)) = sum(payments(February))
```
| Field | Source | Value |
|-------|--------|-------|
| `totalAmount` | January bill | R$ 500.00 |
| `sum(financeCharges)` | February bill | R$ 12.50 |
| `sum(payments)` | February bill | R$ 512.50 |
Since **500.00 + 12.50 = 512.50**, the January bill is considered **settled**.
## Transaction
Source: https://docs.pluggy.ai/en/docs/products/transactions.md
Retrieve up to 12 months of transaction data.
Transactions data of the accounts provide insights into the user's financial behavior. These transactions are recovered for the product **Account** when syncing the **item** for the first time and can be listed for all account types `CREDIT` (credit cards & loans) or `BANK` (checking & savings account).
You can review more about how to recover the transactions on the [Transactions endpoint](/reference/transactions-list-by-cursor). Transactions are always retrieved in pages of 500, using a cursor-based pagination mechanism.
For transactions that are available in "Open" invoices or are future installments, the `status` will return them as `PENDING`, since the transaction has not yet impacted the due balance.
| Property | Type | Description | Required |
|----------|------|-------------|----------|
| date | date | Posted date of the transaction, formatted in ISO8601 (UTC time). If it is necessary to interpret it as Brazilian time, you will need to convert it to GMT-3. | Yes |
| description | string | Description of the transaction, text recovered from the financial institution. | Yes |
| descriptionRaw | string | If available, raw description provided by the financial institution. | |
| amount | number | Amount of the transaction. *Note*: For credit cards, it will be positive (debit) when its an expense (adds to the balance), while it will be negative (credit) when the person pays the bill. | Yes |
| amountInAccountCurrency | number | Amount of the transaction in Account's Currency, if the transaction is an international transaction. | |
| balance | number | Balance after the transaction was made. *Only returned for supported financial institutions.* | |
| currencyCode | string | Currency ISO code of the transaction, ie BRL, USD. | Yes |
| category | string | null | Category of the transactions, provided by our Enrichment Categorizer. *Note*: requires **Pro** subscription level. | |
| providerCode | string | If available, provider's transaction code. | |
| status | string | Status of the transaction. *PENDING* or **POSTED**. | Yes |
| type | string | Type of the transaction. *DEBIT* (outflow) or **CREDIT** (inflow) | Yes |
| paymentData | object | Data related to the payment/transfer. | |
| creditCardMetadata | object | Data related to a credit card transaction. | |
| merchant | object | null | Data related to the merchant associated with the transaction. *Note*: requires feature enabled and **Pro** subscription level. | |
| operationType | string | null | Type of operation classified by the institution. In Open Finance, the value could be one of the following: `TED` `DOC` `PIX` `TRANSFERENCIA_MESMA_INSTITUICAO` `BOLETO` `CONVENIO_ARRECADACAO` `PACOTE_TARIFA_SERVICOS` `TARIFA_SERVICOS_AVULSOS` `FOLHA_PAGAMENTO` `DEPOSITO` `SAQUE` `CARTAO` `ENCARGOS_JUROS_CHEQUE_ESPECIAL` `RENDIMENTO_APLIC_FINANCEIRA` `PORTABILIDADE_SALARIO` `RESGATE_APLIC_FINANCEIRA` `OPERACAO_CREDITO` `OUTROS` | |
| providerId | string | null | Provider's identifier for the transaction. **Only returned for Open Finance connectors.** | |
```json
{
"total": 1,
"totalPages": 1,
"page": 1,
"results": [
{
"id": "6ec156fe-e8ac-4d9a-a4b3-7770529ab01c",
"description": "TED Example",
"descriptionRaw": null,
"currencyCode": "BRL",
"amount": 1500,
"date": "2021-04-12T00:00:00.000Z",
"balance": 3500,
"category": "Transfer",
"categoryId": "05000000",
"accountId": "03cc0eff-4ec5-495c-adb3-1ef9611624fc",
"providerCode": "123456",
"type": "CREDIT",
"status": "POSTED",
"paymentData": null,
"creditCardMetadata": {
"installmentNumber": 1,
"totalInstallments": 6,
"totalAmount": 9000
},
"merchant": null,
"providerId": null
}
]
}
```
### Sign Convention for Credit Card Transactions
Credit card transactions use the following sign convention to reflect changes to the card balance:
- Positive amounts (+X) indicate debits -- i.e., new charges that increase the outstanding balance (you owe more).
- Negative amounts (-X) indicate credits/payments -- i.e., funds that reduce the outstanding balance.
```json
// GET /transactions?from=2025-06-01&to=2025-06-30
[
{
"id": "txn_001",
"date": "2025-06-05",
"description": "Grocery Store",
"amount": 75.00
},
{
"id": "txn_002",
"date": "2025-06-10",
"description": "Statement Payment",
"amount": -150.00
}
]
```
## Transaction Payment Data Schema
Some transactions that are *Payments* or *Transfers* may contain related data to understand from whom and to whom the operation was made, reference numbers like PIX Identifier, the user's defined reason or the method used to make the movement.
| Property | Description |
|----------|-------------|
| payer | The identity of the sender of the transfer. |
| receiver | The identity of the receiver of the transfer. |
| referenceNumber | The identifier for the transaction that is provided by the institution. |
| receiverReferenceId | The identifier provided by the receiver to track the payment. |
| paymentMethod | The type of transfer used "PIX", "TED", "DOC". |
| reason | The payer description/motive of the transfer. |
| boletoMetadata | Information of the boleto associated with the payment. |
```json
{
"payer": {
"name": "Tiago Rodrigues Santos",
"branchNumber": "090",
"accountNumber": "1234-5",
"routingNumber": "001",
"routingNumberISPB": "00000000",
"documentNumber": {
"type": "CPF",
"value": "123.456.789-00"
}
},
"reason": "Taxa de servico",
"receiver": {
"name": "Pluggy",
"branchNumber": "999",
"accountNumber": "9876-1",
"routingNumber": "002",
"routingNumberISPB": "27652684",
"documentNumber": {
"type": "CNPJ",
"value": "08.050.608/0001-32"
}
},
"paymentMethod": "TED",
"referenceNumber": "123456789",
"receiverReferenceId": "company-reference-id"
}
```
Each participant of the "PaymentData" will have references to the account in which the transfer was originated or received.
| Property | Description |
|----------|-------------|
| name | Name of the participant (Payer or Receiver) |
| branchNumber | Agency number |
| accountNumber | Account number, with verification digit. |
| routingNumber | Bank COMPE identification number. Full list can be found [here](https://www.bcb.gov.br/pom/spb/estatistica/port/ASTR003.pdf). |
| routingNumberISPB | Bank ISPB identification number. Full list can be found [here](https://www.bcb.gov.br/pom/spb/estatistica/port/ASTR003.pdf). |
| documentNumber | Formatted CPF or CNPJ of the participant. |
## Boleto Metadata
If the transaction is related to a Boleto, the following information will be returned in the `boletoMetadata` object (see [supported institutions](/docs/paymentdata-coverage)).
| Property | Description |
|----------|-------------|
| digitableLine | Boleto identifier |
| barcode | Boleto barcode number |
| baseAmount | Boleto original amount without considering penalties / interests / discounts |
| interestAmount | Boleto interest amount |
| penaltyAmount | Boleto penalty amount |
| discountAmount | Boleto discount amount |
```json
{
"payer": {
"name": "Francisco Souza",
"branchNumber": "1111",
"accountNumber": "11111-7",
"routingNumber": "341",
"documentNumber": {
"type": "CPF",
"value": "111.111.111-11"
},
"routingNumberISPB": "60701190"
},
"receiver": {
"name": "Pluggy Brasil Instituicao de Pagamento LTDA",
"documentNumber": {
"type": "CNPJ",
"value": "37.943.755/0001-30"
}
},
"paymentMethod": "BOLETO",
"boletoMetadata": {
"baseAmount": 1520,
"digitableLine": "11190000111001113911100000021110600000000111000",
"discountAmount": 0,
"interestAmount": 10
},
"referenceNumber": "173631925"
}
```
> **Payment Data & Boleto Payment Data** are available for our direct connectors, refer to [Coverage Page](/docs/paymentdata-coverage) for more information.
## Transaction Credit Card Metadata Schema
Transactions associated with credit cards may contain additional data, such as the total of installments, the installment number, and the total amount (the sum of all installments).
```json
{
"installmentNumber": 1,
"totalInstallments": 6,
"totalAmount": 9000,
"payeeMCC": 1234,
"cardNumber": "1234",
"billId": "03cc0eff-4ec5-495c-adb3-1ef9611624fc"
}
```
| Property | Description |
|----------|-------------|
| installmentNumber | The installment number associated with the transaction. |
| totalInstallments | The total of installments associated with the transaction. |
| totalAmount | The total amount (sum of all installments). *Only available when the purchase was made in installments.* |
| payeeMCC | Merchant category code of the payee |
| purchaseDate | Original date of the purchase, for transactions made with installments. |
| cardNumber | The credit Card Number associated with the transaction can be different from the account if it's done by an additional or virtual card. |
| billId | Id of the bill associated with the transaction. *Only available on Open Finance connectors* |
## Transaction Merchant Schema
Transactions retrieved may contain extra information regarding the merchant/company associated with the transaction. Such information is the legal name of the company, CNPJ number, and the merchants associated category.
```json
{
"name": "Netflix",
"businessName": "NETFLIX ENTRETENIMENTO BRASIL LTDA.",
"cnpj": "00.000.000/0000-00",
"cnae": "5911100",
"category": "Video Streaming"
}
```
| Property | Description |
|----------|-------------|
| name | Merchant simple name. |
| businessName | Merchant legal registered name. |
| cnpj | CNPJ number associated to the merchant. |
| cnae | CNAE number associated to the merchant. |
| category | Category of the merchant. Provided by our Enrichment Categorizer. |
> See [Transaction](/reference/transaction) in our API reference for more information.
## How to synchronize and merge transactions
*Prerequisites*:
- Configure webhooks for `transactions/updated`, `transactions/deleted` and `transactions/created`.
**There are a few things to do:**
- Receive the `transactions/created` webhook event, and using the `createdTransactionsLink` page all the transactions available and insert them in your data source.
```json
{
"itemId": "de7bbf5a-abf2-47e4-94b1-586b36758423",
"event": "transactions/created",
"id": "de7bbf5a-abf2-47e4-94b1-586b36758423",
"eventId": "4e69d62d-b7c8-4f01-b591-a1d8a94710b9",
"accountId": "0d5a0de2-9c82-4ea2-af50-31643a632a33",
"transactionsCreatedAtFrom": "2025-02-13T17:21:53.719Z",
"createdTransactionsLink": "https://api.pluggy.ai/transactions?accountId=0d5a0de2-9c82-4ea2-af50-31643a632a33&createdAtFrom=2025-02-13T17:21:53.719Z"
}
```
- Receive the `transactions/updated` webhook event, and using the list of IDs received, you should page the [/transactions](/reference/transaction/transactions-list) endpoint by an `ids` list, updating your data with it.
```json
{
"event": "transactions/updated",
"eventId": "d876fd7c-e9bd-4c4c-bd46-cc96c62aac29",
"itemId": "a5c763cb-0952-457b-9936-630f79c5b016",
"accountId": "8a6e2c17-2817-40bb-b03d-546febc6a60a",
"transactionIds": [
"5a14feae-eaa7-423a-820c-6b83837c35b7",
"786c7d98-6085-4879-9c7f-2255260e2436"
]
}
```
- Receive the `transactions/deleted` webhook and then delete all transactions matching the specified IDs. The payload carries **only the transaction IDs** (not the deleted amount, date or description). Handle deletions idempotently: a transaction can occasionally disappear from a sync and **reappear** in a later one, so a `deleted` event is not necessarily permanent.
```json
{
"event": "transactions/deleted",
"eventId": "d876fd7c-e9bd-4c4c-bd46-cc96c62aac29",
"itemId": "a5c763cb-0952-457b-9936-630f79c5b016",
"accountId": "8a6e2c17-2817-40bb-b03d-546febc6a60a",
"transactionIds": [
"5a14feae-eaa7-423a-820c-6b83837c35b7",
"786c7d98-6085-4879-9c7f-2255260e2436"
]
}
```
> **Transaction Id can change — how to reconcile**
>
> When Pluggy syncs transactions with the financial institution, we compute a hash that lets us **keep the same transaction `id` across syncs**. Most changes — including the `PENDING` → `POSTED` transition — arrive as an in-place **update** (`transactions/updated`) that **preserves the `id`**.
>
> Only when the data changes too much to confirm it is the same transaction — typically `date`, `description` or `amount` — do we **delete the existing transaction and create a new one** with a new `id`. The payload does **not** include a field linking the deleted transaction to its replacement.
>
> To reconcile across a delete/recreate, anchor on a provider-side identifier: **`providerId`** (the provider's transaction id, **only returned for Open Finance connectors**) or **`providerCode`** (an institution code such as an NSU; format varies per institution). For direct (non-Open-Finance) connectors there is no guaranteed stable identifier, so match on attributes (`date` + `amount` + `description`).
>
> **Reconnecting an account** creates a **new item**, whose transactions receive **new `id`s**; Pluggy does not automatically de-duplicate transactions across items. Reconcile on your side using `providerId` (Open Finance) plus transaction attributes.
> **Recommendations**
>
> - Use a page size of 500 transactions. (Since 01/12/2025, this will be the default page size when recovering transactions).
> - **500 is a hard maximum, not a cap that gets applied silently.** A `pageSize` above 500 fails validation and the API responds `400 Bad Request` -- it is *not* clamped down to 500. To retrieve more than 500 transactions, keep `pageSize` at 500 or below and iterate the `page` parameter until you have covered `totalPages`.
> - The same ceiling applies when filtering by the `ids` parameter: a single response never returns more than 500 records, so sending more than 500 ids in one request will not bring the extra ones back. Batch them in groups of 500.
## End-of-Day Balance
Sometimes for conciliation use cases, you want to obtain the balance of an account at the end of a certain day (normally it's yesterday). The account's usual **balance** field will not solve this need, as it could have been already affected by today's transactions.
In these cases, you can obtain an end-of-day balance by looking at the **`balance` of the latest transaction** within that day. In our Transactions endpoint, it is the **first** one shown for that day:
```json
{
"total": 1,
"totalPages": 1,
"page": 1,
"results": [
{
"description": "Example transaction 4",
"amount": -100,
"date": "2024-10-04T18:00:00.000Z",
"balance": 800
},
{
"description": "Example transaction 3",
"amount": -100,
"date": "2024-10-04T10:00:00.000Z",
"balance": 900
},
{
"description": "Example transaction 2",
"amount": -100,
"date": "2024-10-03T18:00:00.000Z",
"balance": 1000
},
{
"description": "Example transaction 1",
"amount": -100,
"date": "2024-10-03T10:00:00.000Z",
"balance": 1100
}
]
}
```
This is only supported by Pluggy's Direct connectors (Itau PJ, Sicredi PF & PJ, Bradesco PJ).
### Santander PJ case
For this institution, whenever possible, we should rely on the transaction types provided by Contamax to identify and interpret account movements.
These transactions do not appear every day in the statement. In general, they are recorded only on business days. Even so, there may be business days in which no transactions are shown, for example if there is not activity during the day.
At the end of each day, only one of the two operations can occur, depending on the account balance before the daily closing:
- Positive ending balance (above zero): An automatic investment application is executed with the available balance.
- Negative ending balance (below zero): An automatic redemption is executed to cover the negative balance.
Both operations will never appear on the same day -- only an application or a redemption, according to the account's final balance at the end of the day.
In the cases where these transactions appear in the statement, they can be interpreted as the end-of-day balance result:
- An application indicates that the final balance for the day was positive.
- A redemption indicates that the final balance for the day was negative.
## Itau PJ aggregable transactions
Within the institution Itau PJ, there are certain *aggregable* transactions (`SISPAG` and `PIX TRANSF` types). These aggregable transactions can come in one of two forms:
- Consolidated form: many operations of the same type within the same day are represented as a single Transaction
- Detailed form: each operation is represented as a separate Transaction
For our Itau PJ regulated connector, they will always come in Detailed form.
For our Itau PJ direct connector, it will depend on the Item's connected company's configuration. To force Detailed view, the user needs to access Internet Banking and go to `Contas a pagar > Manutencao > Alteracao de servico` and turn all extratos to Detalhado. This requires an access token to change, and a user with enough permissions.
If the Item has the Payment Data product enabled, our Direct Connector will attempt to disaggregate SISPAG and PIX transactions as much as possible, even if the company doesn't have detailed transactions enabled. However, if you need guaranteed disaggregation, it is recommended to use the Regulated connector.
# Itau PJ SISPAG Supported
When retrieving payment data for SISPAG transfers, there are certain specific subtypes that our API handles. These cases are:
- SISPAG FORNECEDORES (Suppliers)
- SISPAG PIX
- SISPAG CONCESSIONARIA (Utility Company)
- SISPAG MISMA TITULARIDADE (Same Ownership)
# Santander PJ coverage limitation
In Santander Business accounts, when the account is connected through an account operator, the available transaction history is limited to the past 3 months.
Additionally, if a single day contains more than 400 transactions, only the first 400 will be retrieved -- any transactions beyond that limit will not be returned.
In these cases, our general recommendation is to use the institution's regulated connector to avoid this limitation.
## Transaction Categorization
Source: https://docs.pluggy.ai/en/docs/products/transaction-categorization.md
Transaction categorization is a feature where we classify your Transactions into useful categories (Restaurants, Gas Stations, Income, etc.) using our categorizer AI engine. This allows you to quickly summarize, group, and extract valuable insights from your items' transactions right out of the box.
For example, you could understand how much a user spent last month on eating, how much in services, and so on, and with this show them a summary of their expenses (like in our [Creating a use case from scratch](/docs/integration-checklist/use-case) guide), or you can use it to create any kind of solutions, from client profiling to income analysis.
## Using categorization
We return the result of our categorization in the `category` field of a transaction, this is the main category matched by our model.
```json
{
"id": "6ec156fe-e8ac-4d9a-a4b3-7770529ab01c",
"description": "TED Example",
"amount": 1500,
"date": "2021-04-12T00:00:00.000Z",
// Category's name is provided
"category": "Transfer - TED",
"categoryId": "05080000",
...
}
```
The category will be a string if there was a category found, or `null` if we could not interpret any known category.
> **Trial/Premium feature**
>
> Categorization is enabled by default during trial period. After that, it is an opt-in premium feature.
>
> If you do not have the transaction categorization feature enabled, `category` will be `null` for all transactions.
## How categories are organized
View all possible categories in our [GET /categories](/reference/categories-list) endpoint. We can find the transaction's category in this list with its `categoryId`:
```json
[
{
"id": "05080000",
"description": "Transfer - TED",
"descriptionTranslated": "Transferencia - TED",
"parentId": "05000000",
"parentDescription": "Transfers"
},
...
]
```
We can see its translation to Portuguese in the `descriptionTranslated` field.
You might notice that it has a parentDescription `Transfers`. This means that it is under a more general category called Transfers:
```json
[
...
{
"id": "05000000",
"description": "Transfers"
},
...
]
```
Categories are organized in a **tree**. This allows you to use more general or specific categories, depending on your particular needs. The Category Tree is detailed at the bottom of this guide.
## Category accuracy
As much as we constantly train our categorizer model, categorization is never perfect. In case you encounter a wrong category in a transaction, you can correct it by using our [Transaction Update](/reference/transactions-update) endpoint, or from Demo by clicking on its *Category* field.
After you submit a category correction, you will get corrected `category` field on the transaction, and also provide feedback on the correct annotation into our model, further improving the quality of categorization.
### Category Rules
Pluggy works on continuous improvement of categorization accuracy, to provide the best labels in the market, but sometimes we may return labels that are not aligned to customer expectations. Category rules allow customers to add their own rules before our labeling solution & provide instant feedback to our model, which could later be established as a data point on our ML model.
The Category Rules will be used at the beginning of the process, to label the transactions with your desired category. These rules have an insensitive exact match with the information provided to categorize. Category Rules are client specific, and are only valid for a specific `client_id`.
Transactions that are recategorized will automatically create a **Category Rule** for the transaction's client.
For more information visit our [API Reference](/reference/category/client-category-rules-list).
## Category Tree
| Level 1 | Level 2 | Level 3 |
|---------|---------|---------|
| Income | Salary, Retirement, Entrepreneurial activities, Government aid, Non-recurring income | |
| Loans and Financing | Late payment and overdraft costs, Interests charged, Loans | |
| | Financing | Real estate financing, Vehicle Financing, Student loan |
| Investments | Automatic investment, Fixed income, Mutual funds, Variable income, Margin, Proceeds interests and dividends, Pension | |
| Same person transfer | Same person transfer - Cash, Same person transfer - PIX, Same person transfer - TED | |
| Transfers | Transfer - Bank slip (Boleto), Transfer - Cash, Transfer - Check, Transfer - DOC, Transfer - Foreign exchange, Transfer - Internal, Transfer - PIX, Transfer - TED, Credit card payment | |
| | Third-party transfers | Bank slip, Debt card, DOC, PIX, TED |
| Legal obligations | Blocked balances, Alimony | |
| Services | Telecommunications | Internet, Mobile, TV |
| | Education | Online Courses, University, School, Kindergarten |
| | Wellness and fitness | Gyms and fitness centers, Sports practice, Wellness |
| | Tickets | Stadiums and arenas, Landmarks and museums, Cinema, theater and concerts |
| Shopping | Online shopping, Electronics, Pet supplies and vet, Clothing, Kids and toys, Bookstore, Sports goods, Office Supplies, Cashback | |
| Digital services | Gaming, Video streaming, Music streaming | |
| Groceries | N/A | |
| Food and drinks | Eating out, Food delivery | |
| Travel | Airport and airlines, Accommodation, Mileage programs, Bus tickets | |
| Donations | | |
| Gambling | Lottery, Online bet | |
| Taxes | Income taxes, Taxes on investments, Tax on financial operations | |
| Bank fees | Account fees, Wire transfer fees and ATM fees, Credit card fees | |
| Housing | Rent, Houseware, Urban land and building tax | |
| | Utilities | Water, Electricity, Gas |
| Healthcare | Dentist, Pharmacy, Optometry, Hospital clinics and labs | |
| Transportation | Taxi and ride-hailing, Public transportation, Car rental, Bicycle | |
| | Automotive | Gas stations, Parking, Tolls and in-vehicle payment, Vehicle ownership taxes and fees, Vehicle maintenance, Traffic tickets |
| Insurance | Life insurance, Home Insurance, Health insurance, Vehicle insurance | |
| Leisure | | |
## Investment
Source: https://docs.pluggy.ai/en/docs/products/investments.md
The **Investment** entity is recovered from not only Brokers (XP, Clear) but also from retail and business Bank institutions.
The list of investments from an institution can be differentiated based on the `type` of the investment. Each type of investment has a set of fields that relate to the specific investment type.
| Property | Type | Optional | Description |
|----------|------|----------|-------------|
| name | string | No | Name on the provider. |
| code | string | Yes | Investment associated code. In the case of Mutual Funds it's the CNPJ of the Fund. |
| isin | string | Yes | 12-character ISIN, a globally unique identifier. |
| number | string | Yes | Investment number, not always provided. |
| owner | string | Yes | Owner/beneficiary associated with the investment. |
| currencyCode | CurrencyCode | Yes | Currency ISO code of the transaction, ie *USD*. |
| type | [InvestmentType](#investments-types--subtypes) | No | Investment type. |
| subtype | [InvestmentSubType](#investments-types--subtypes) | Yes | Investment's subtype. |
| lastMonthRate | number | Yes | The performance rate for the last month. *This value is returned for funds*. |
| lastTwelveMonthsRate | number | Yes | The performance rate last 12 months. *This value is returned for funds*. |
| annualRate | number | Yes | Performance rate for the last year. *This value is returned for funds*. |
| date | Date | Yes | Asset value's reference date. ie. When recovering assets over the weekend, the date will probably be the last business day. |
| value | number | Yes | Quota's current value at `date`. |
| quantity | number | Yes | Quantity of quota at disposal. |
| amount | number | No | Gross amount of the investment (tax included). |
| taxes | number | Yes | Income taxes applied to the investment. |
| taxes2 | number | Yes | Financial taxes applied to the investment. |
| balance | number | No | The current net balance amount of the investment. After fees & taxes were applied. |
| dueDate | Date | Yes | Expiration Date. |
| rate | number | Yes | Fixed rate percentage applied to the investment. |
| rateType | [string](#rate-types-for-fixed-income-assets) | Yes | Type of fixed-rate. (one of `CDI` \| `SELIC` \| `DOLAR` \| `EURO` \| `IGPM` \| `IPCA` \| null) |
| fixedAnnualRate | number | Yes | Fixed income annual rate (Example: 10.50). |
| issuer | string | Yes | The entity that issued the investment. |
| issueDate | Date | Yes | The date that the entity issued the investment. |
| amountProfit | number | Yes | Net profit to date over the investment. If negative, is loss. |
| amountWithdrawal | number | Yes | The amount available to withdraw. |
| amountOriginal | number | Yes | Amount originally invested. |
| status | [InvestmentStatus](#investments-status) | Yes | Current status of the investment. ACTIVE, PENDING & TOTAL_WITHDRAWAL |
| institution | [InvestmentInstitution](#investments-institution) | Yes | Broker or Financial Institution holder of the investment. This is only returned in CEI B3 Connector. |
| *transactions* **(deprecated)** | [InvestmentsTransaction](/docs/products/investment-transactions) | Yes | List of Investments Transactions associated with Applications or Withdrawals, that affect the amount invested. This field will not be present on Applications created after March 21st, 2023. Use the [paginated Investment Transactions endpoint](/reference/investment-transactions-list) instead. |
| metadata | [InvestmentMetadata](#investments-metadata) \| null | Yes | The metadata object contains "Securities's Data" for portability of Private Pensions. **Note:** requires feature enabled and **Pro** subscription. |
| gracePeriodDate | Date | Yes | Date when the grace period ends. Populated for fixed-income investments (CDB, LCI, LCA, CRI, CRA, Debenture). null for all other investment types. |
## Investment's Status
| Value | Description |
|-------|-------------|
| ACTIVE | Purchased and verified |
| PENDING | Validating purchase |
| TOTAL_WITHDRAWAL | Sold or transferred |
## Investment's Institution
| Property | Type | Optional | Description |
|----------|------|----------|-------------|
| name | string | Yes | Full name of the institution. |
| number | string | Yes | Number identifier for the institution CNPJ / Other. |
## Investment's Types & Subtypes
To understand the nature of an investment you can rely on the investment `type` & `subtype` fields that have accurate relation with the types of investments available in Pluggy.
| Type | Subtype | Description |
|------|---------|-------------|
| FIXED_INCOME | CRI | Real Estate Receivables Certificate |
| FIXED_INCOME | CRA | Agricultural Receivables Certificate |
| FIXED_INCOME | LCI | Real State Credit Bill |
| FIXED_INCOME | LCA | Agricultural Credit Bill |
| FIXED_INCOME | LC | Bill of Exchange |
| FIXED_INCOME | TREASURY | National Treasury |
| FIXED_INCOME | DEBENTURES | Corporate Debt |
| FIXED_INCOME | CDB | Certificate of Deposit |
| FIXED_INCOME | LIG | Guaranteed Real Estate Letter |
| FIXED_INCOME | LF | Financial Bill |
| SECURITY | RETIREMENT | Previdencia Privada |
| SECURITY | PGBL | Previdencia Privada |
| SECURITY | VGBL | Previdencia Privada |
| MUTUAL_FUND | INVESTMENT_FUND | Investment Fund |
| MUTUAL_FUND | STOCK_FUND | Stock Fund |
| MUTUAL_FUND | MULTIMARKET_FUND | Multimarket Fund |
| MUTUAL_FUND | EXCHANGE_FUND | Exchange Fund (Cambial) |
| MUTUAL_FUND | FIXED_INCOME_FUND | Fixed Income Fund |
| MUTUAL_FUND | FIP_FUND | FIP Fund |
| MUTUAL_FUND | OFFSHORE_FUND | Offshore Fund |
| MUTUAL_FUND | ETF_FUND | ETF Fund |
| EQUITY | STOCK | Shares, Stocks |
| EQUITY | BDR | Brazilian Depositary Receipt |
| EQUITY | REAL_ESTATE_FUND | Real State Funds |
| EQUITY | DERIVATIVES | Derivatives |
| EQUITY | OPTION | Option |
| ETF | ETF | Exchange-Traded Funds |
| COE | STRUCTURED_NOTE | Structured Note |
> **Have in mind**
> Some banks such as NuBank and PicPay have investment options called "Cofrinhos" and "Caixinhas", which configure as CDBs. Thus, they are covered by the connection and should show on the investments section as well.
## Investment's Metadata
The metadata object holds the Investment Portability information related to Security assets like Private Pension. These fields are used to provide for example "Previdencia Portability".
| Property | Type | Optional | Description |
|----------|------|----------|-------------|
| taxRegime | string | Yes | Regime of the tax used for the asset. |
| proposalNumber | string | Yes | Asset proposal number identification. |
| processNumber | string | Yes | Process identification number from the institution (`susep`). |
| fundName | string | Yes | Name of the fund associated to the Security investment (can be different to the investment `name` property). |
| insurer | Company | Yes | The insurer company of the Security Fund, when the process number is identified, the insurer will always be returned. |
> **Retirement Portability Product**
> This dataset is part of the Retirement Portability service, and won't be returned on the response of the investment until enabled. Please contact [support@pluggy.ai](mailto:support@pluggy.ai) or chat with us to test this feature.
## Rate Types for Fixed Income Assets
When the assets type is `FIXED_INCOME` we recover 3 fields associated with the expected investment return. These are `rate`, `rateType` & `fixedAnnualRate`. Below there are some examples of how the rate types are parsed.
| Example | Rate | RateType | FixedAnnualRate |
|---------|------|----------|-----------------|
| 100% CDI + 5% | 100 | CDI | 5 |
| IPC-A + 10% | 100 | IPCA | 10 |
| Pré-Fixado 16,76% | | | 16.76 |
| 12% A.A | | | 12 |
## Example responses
```json title="Previdencia"
{
"id": "ded7d2f1-6b90-44a8-9ace-de747b9f5bfe",
"number": "123456-2",
"name": "Pluggy PREVIDENCIA",
"balance": 1359.39,
"currencyCode": "BRL",
"type": "SECURITY",
"subtype": "RETIREMENT",
"annualRate": 3.24,
"itemId": "207f5bcd-312a-439c-abbe-166b6632c980",
"code": null,
"value": 500,
"quantity": 3,
"amount": 1500,
"taxes": 0,
"taxes2": 0,
"date": "2020-07-19T18:27:41.802Z",
"owner": "John Doe",
"amountProfit": 359.39,
"amountWithdrawal": 1310.5,
"status": "ACTIVE",
"metadata": {
"taxRegime": "Progressivo",
"proposalNumber": "000091322061",
"processNumber": "15414900845201686",
"insurer": {
"cnpj": "51.990.695/0001-37",
"name": "BRADESCO VIDA E PREVIDÊNCIA S.A."
}
},
"institution": {
"name": "BANCO BTG PACTUAL S/A",
"number": "30306294000145"
}
}
```
```json title="Mutual Fund"
{
"id": "f77eccf4-7714-498e-92a9-1bebe70335d9",
"number": null,
"name": "Bahia AM Advisory FIC de FIM",
"balance": 1359.39,
"currencyCode": "BRL",
"type": "MUTUAL_FUND",
"subtype": "INVESTMENT_FUND",
"lastMonthRate": 0.24,
"annualRate": 3.24,
"lastTwelveMonthsRate": 3,
"itemId": "207f5bcd-312a-439c-abbe-166b6632c980",
"code": "12.345.678/0001-00",
"value": 500,
"quantity": 3,
"amount": 1500,
"taxes": 40.61,
"taxes2": 100,
"date": "2020-07-19T18:27:41.802Z",
"owner": "John Doe",
"amountProfit": null,
"amountWithdrawal": 1310.5,
"amountOriginal": 1000,
"status": "ACTIVE",
"transactions": [
{
"tradeDate": "2020-10-01T00:00:00.000Z",
"date": "2020-10-01T00:00:00.000Z",
"description": "Aplicação Fundo de Investimento Premium",
"quantity": 1.25,
"value": 2,
"amount": 5,
"type": "BUY"
}
]
}
```
```json title="CDB"
{
"id": "2a96b873-53bb-4d16-a3d8-385a57e78d7e",
"number": null,
"name": "CDB1194KL0Z - BANCO MAXIMA S/A",
"balance": 2000,
"currencyCode": "BRL",
"type": "FIXED_INCOME",
"subtype": "CDB",
"itemId": "207f5bcd-312a-439c-abbe-166b6632c980",
"code": "0001-02",
"amount": 2500,
"taxes": null,
"taxes2": null,
"date": "2020-07-19T18:27:41.802Z",
"owner": "John Doe",
"rate": 30,
"rateType": "CDI",
"fixedAnnualRate": 10.5,
"amountProfit": null,
"amountWithdrawal": 2000,
"amountOriginal": 1000,
"dueDate": "2030-07-19T18:27:41.802Z",
"issuer": "Pluggy",
"issueDate": "2020-07-19T18:27:41.802Z",
"status": "ACTIVE"
}
```
```json title="Real Estate Fund"
{
"id": "5d80be62-d3a3-44e5-aaf7-85d33c7e9a7a",
"number": null,
"name": "GGRC11",
"balance": 118.4,
"currencyCode": "BRL",
"type": "EQUITY",
"subtype": "REAL_ESTATE_FUND",
"lastMonthRate": null,
"lastTwelveMonthsRate": null,
"annualRate": null,
"itemId": "80c05d1e-0ef7-4939-976d-f1509efd663a",
"code": "GGRC11",
"isin": "BRGGRCCTF002",
"metadata": null,
"value": 118.4,
"quantity": 1,
"amount": 118.4,
"taxes": null,
"taxes2": null,
"date": "2022-06-20T14:43:58.799Z",
"owner": null,
"amountProfit": null,
"amountWithdrawal": 118.4,
"amountOriginal": 119,
"transactions": [
{
"id": "76689151-2aff-4f32-8308-d9ecffb42254",
"amount": 134.99,
"description": null,
"value": 134.99,
"quantity": 1,
"tradeDate": "2021-08-15T00:00:00.000Z",
"date": "2021-08-15T00:00:00.000Z",
"type": "BUY",
"netAmount": null,
"brokerageNumber": "123456-1",
"expenses": {
"serviceTax": 0.1,
"brokerageFee": 0.04,
"incomeTax": 0.08,
"other": 0.04,
"tradingAssetsNoticeFee": 0.11,
"maintenanceFee": 0.12,
"settlementFee": 0.02,
"clearingFee": 0.1,
"stockExchangeFee": 0.1,
"custodyFee": 0.05,
"operatingFee": 0.03
}
}
],
"dueDate": null,
"issuer": "GGR COVEPI RENDA FDO INV IMOB",
"issueDate": null,
"rate": null,
"rateType": null,
"fixedAnnualRate": null,
"status": "ACTIVE",
"institution": null
}
```
```json title="ETF"
{
"id": "5af0bd99-b74f-440a-bab3-6ed9155283ee",
"number": null,
"name": "ISUS11 STOCK",
"balance": 2000,
"currencyCode": "BRL",
"type": "ETF",
"subtype": "ETF",
"lastMonthRate": 0.2,
"lastTwelveMonthsRate": null,
"annualRate": null,
"itemId": "80c05d1e-0ef7-4939-976d-f1509efd663b",
"code": "ISUS11",
"isin": "BRISUSCTF003",
"metadata": null,
"value": null,
"quantity": 1,
"amount": 2000,
"taxes": null,
"taxes2": null,
"date": "2022-06-20T14:43:58.799Z",
"owner": "John Doe",
"amountProfit": 0,
"amountWithdrawal": 2000,
"amountOriginal": 2000,
"transactions": [
{
"id": "7a102141-b04a-490e-83db-42f09d39c421",
"amount": 1499.99,
"description": null,
"value": 1499.99,
"quantity": 1,
"tradeDate": "2021-08-15T00:00:00.000Z",
"date": "2021-08-15T00:00:00.000Z",
"type": "BUY",
"netAmount": null,
"brokerageNumber": null,
"expenses": {}
}
],
"dueDate": null,
"issuer": "IT NOW ISE FUNDO DE ÍNDICE",
"issueDate": null,
"rate": null,
"rateType": null,
"fixedAnnualRate": null,
"status": "ACTIVE",
"institution": null
}
```
```json title="COE"
{
"id": "be7d7a0d-b411-4b88-b0a8-ede1a05aedbb",
"number": null,
"name": "SP 500 Ganho Garanti",
"balance": 5021.2,
"currencyCode": "BRL",
"type": "COE",
"subtype": "STRUCTURED_NOTE",
"lastMonthRate": null,
"lastTwelveMonthsRate": null,
"annualRate": null,
"itemId": "ed10736c-5330-4242-8a85-204397edb0cc",
"code": null,
"isin": null,
"metadata": null,
"value": 5027.35,
"quantity": 1,
"amount": 5027.35,
"taxes": null,
"taxes2": null,
"date": null,
"owner": "John Doe",
"amountProfit": null,
"amountWithdrawal": null,
"amountOriginal": 5000,
"transactions": [
{
"id": "b266fcda-b5ee-4181-80b5-273ecb4ff721",
"amount": 5000,
"description": null,
"value": 5000,
"quantity": 1,
"tradeDate": "2022-01-21T00:00:00.000Z",
"date": "2022-01-21T00:00:00.000Z",
"type": "BUY",
"netAmount": null,
"brokerageNumber": null,
"expenses": {}
}
],
"dueDate": "2027-01-27T00:00:00.000Z",
"issuer": null,
"issueDate": "2022-01-21T00:00:00.000Z",
"rate": null,
"rateType": null,
"fixedAnnualRate": null,
"status": "ACTIVE",
"institution": null
}
```
> See [Investment](/reference/investment) in our API reference for more information.
## Investment's Transactions
Source: https://docs.pluggy.ai/en/docs/products/investment-transactions.md
Each investment contains a list of transactions corresponding to Applications or Withdrawals.
The transaction schema contains a set of details of that operation.
## Investment Transaction
| Property | Type | Optional | Description |
|----------|------|----------|-------------|
| tradeDate | Date | No | The date when the transaction was settled. |
| date | Date | No | The date when the transaction was made. |
| quantity | number | No | Quantity of invested quotas. |
| value | number | No | Value at which it was acquired. |
| amount | number | No | The gross value of the operation. |
| type | InvestmentTransactionType | No | Type of movement of the transaction. |
| description | string | Yes | Description of the transaction. |
| brokerageNumber | string | Yes | Number of the corresponding brokerage note. |
| netAmount | number | Yes | Value including expenses. |
| agreedRate | number | Yes | Agreed rate only available for TREASURY applications. |
| expenses | Expenses | Yes | Taxes and charges described in the brokerage notes. |
## Investment Transaction Type
| Value | Description |
|-------|-------------|
| BUY | Application. |
| SELL | Withdrawal. |
| TAX | Taxes that decrease the investment size. |
| TRANSFER | Transfer between investments. |
| INTEREST | Income distributions: dividends, rental income (FIIs), interest on capital (JCP), coupon payments. |
| AMORTIZATION | Partial return of principal (amortização de cotas, bond amortization). |
## Expenses
When we buy an asset traded on a stock exchange, usually through a brokerage firm, the brokerage firm issues a commercial note called a **brokerage note**. The note contains the total value of the transaction, the assets bought and sold, the fees related to the stock exchange, the amount charged by the broker (brokerage fee), and the total sum. The brokerage note represents the daily status of an investor's operations in the financial market. All taxes charged in each operation are grouped in the **Expenses** object.
| Property | Type | Optional | Description |
|----------|------|----------|-------------|
| serviceTax | number | Yes | Service tax varies according to state (ISS). |
| brokerageFee | number | Yes | Commission charged by the brokerage for carrying out transactions on the stock market. |
| incomeTax | number | Yes | Income Tax Withholding is the amount paid to the Internal Revenue Service (IRRF). |
| other | number | Yes | Sum of other not defined expenses. |
| tradingAssetsNoticeFee | number | Yes | A fee of Notice of Trading in Assets (ANA). |
| maintenanceFee | number | Yes | Fees charged by BM&F Bovespa in negotiations. |
| settlementFee | number | Yes | Liquidation fee for the settlement of a position on the expiration date or the financial settlement of physical delivery. |
| clearingFee | number | Yes | Clearing fee charged by the clearing house. |
| stockExchangeFee | number | Yes | Fees charged by BM&F Bovespa as a source of operating income. |
| custodyFee | number | Yes | Fee charged by brokers to keep records in their home broker systems or on the trading desk. |
| operatingFee | number | Yes | Amount paid to the Operator for the intermediation service. |
Example of a Transaction:
```json
{
"total": 1,
"totalPages": 1,
"page": 1,
"results": [
{
"type": "BUY",
"description": "Aplicação Fundo de Investimento Premium",
"quantity": 1.25,
"value": 2,
"amount": 5,
"date": "2022-03-24T03:00:00.000Z",
"tradeDate": "2022-03-24T03:00:00.000Z",
"brokerageNumber": "47078992",
"expenses": {
"serviceTax": 0.05,
"brokerageFee": 0.1,
"incomeTax": 0.01,
"other": 0.01,
"tradingAssetsNoticeFee": 0,
"maintenanceFee": 0,
"settlementFee": 0.09,
"clearingFee": 0,
"stockExchangeFee": 0.05
}
}
]
}
```
> See [Investment Transactions](/reference/investment-transactions-list) in our API reference for more information.
## Loan
Source: https://docs.pluggy.ai/en/docs/products/loans.md
The **Loan** entity is recovered from institutions that support this product. It represents a loan contracted by the user, including data like contract number, taxes, interest rates, warranties, installments, etc.
```json
{
"id": "658f07f1-8349-44cc-9590-e10fe9337060",
"itemId": "a9e42ebd-bddc-4d59-8895-140d8a809799",
"contractNumber": "000000721792794",
"ipocCode": "92792126019929279212650822221989319252576",
"productName": "Credito Pessoal Consignado",
"type": "CREDITO_PESSOAL_COM_CONSIGNACAO",
"kind": "LOAN",
"date": "2023-07-20T00:00:00.000Z",
"contractDate": "2022-08-01T00:00:00.000Z",
"disbursementDates": ["2018-01-15T00:00:00.000Z"],
"settlementDate": "2018-01-15T00:00:00.000Z",
"contractAmount": 50000,
"currencyCode": "BRL",
"dueDate": "2028-01-15T00:00:00.000Z",
"installmentPeriodicity": "MONTHLY",
"installmentPeriodicityAdditionalInfo": "",
"firstInstallmentDueDate": "2018-02-15T00:00:00.000Z",
"CET": 0.29,
"amortizationScheduled": "SAC",
"amortizationScheduledAdditionalInfo": "",
"cnpjConsignee": "60.500.998/0001-35",
"interestRates": [
{
"taxType": "EFFECTIVE",
"interestRateType": "SIMPLE",
"taxPeriodicity": "YEARLY",
"calculation": "21/252",
"referentialRateIndexerType": "PRE_FIXADO",
"referentialRateIndexerSubType": "TJLP",
"referentialRateIndexerAdditionalInfo": "",
"preFixedRate": 0.6,
"postFixedRate": 0.55,
"additionalInfo": ""
}
],
"contractedFees": [
{
"name": "Administracao de Operacoes",
"code": "ADM_OP",
"chargeType": "UNIQUE",
"charge": "MINIMUM",
"amount": 5,
"rate": 0
}
],
"contractedFinanceCharges": [
{
"type": "IOF_POR_ATRASO",
"additionalInfo": "",
"rate": 0.03
}
],
"warranties": [
{
"currencyCode": "BRL",
"type": "SEM_TIPO_GARANTIA",
"subtype": "ALIENACAO_FIDUCIARIA",
"amount": 500
}
],
"installments": {
"typeNumberOfInstallments": "MONTH",
"totalNumberOfInstallments": 120,
"typeContractRemaining": "MONTH",
"contractRemainingNumber": 55,
"paidInstallments": 65,
"dueInstallments": 55,
"pastDueInstallments": 0,
"balloonPayments": []
},
"payments": {
"contractOutstandingBalance": 25000,
"releases": [
{
"isOverParcelPayment": false,
"installmentId": "b1f0a5b4-1234-5678-9abc-def012345678",
"paidDate": "2023-07-15T00:00:00.000Z",
"currencyCode": "BRL",
"paidAmount": 680.5,
"overParcel": {
"fees": [],
"charges": []
}
}
]
}
}
```
| Property | Type | Optional | Description |
|----------|------|----------|-------------|
| `id` | `string` | No | Primary identifier |
| `itemId` | `string` | No | Identifier of the item linked to the loan |
| `contractNumber` | `string` | Yes | Contract number given by the contracting institution |
| `ipocCode` | `string` | Yes | Standard contract number - IPOC (Identificação Padronizada da Operação de Crédito) |
| `productName` | `string` | No | Denomination/Identification of the name of the credit operation disclosed to the customer |
| `type` | `string` | Yes | Loan type ([Open Finance definition](https://openbanking-brasil.github.io/openapi/swagger-apis/loans/?urls.primaryName=2.0.1#model-EnumContractProductSubTypeLoans)) |
| `kind` | `string` | No | Credit-operation family this contract belongs to. One of `LOAN`, `FINANCING`, `INVOICE_FINANCING`, `UNARRANGED_ACCOUNT_OVERDRAFT`. |
| `date` | `string` | No | Date when the loan data was collected |
| `contractDate` | `string` | Yes | Date when the loan was contracted |
| `disbursementDates` | `string[]` | Yes | Disbursement date of the contracted amount |
| `settlementDate` | `string` | Yes | Loan settlement date |
| `contractAmount` | `number` | Yes | Loan contracted value |
| `currencyCode` | `string` | No | Code referencing the currency of the loan |
| `dueDate` | `string` | Yes | Loan due date |
| `installmentPeriodicity` | `string` | Yes | Installments regular frequency. One of the [installment periodicity](#loan-installment-periodicity) values. |
| `installmentPeriodicityAdditionalInfo` | `string` | Yes | Mandatory field to complement the information regarding the regular payment frequency when installmentPeriodicity has value 'OTHERS' |
| `firstInstallmentDueDate` | `string` | Yes | First installment due date |
| `CET` | `number` | Yes | CET - Custo Efetivo Total must be expressed as an annual percentage rate and incorporates all charges and expenses incurred in credit operations (interest rate, but also tariffs, taxes, insurance and other expenses charged) |
| `amortizationScheduled` | `string` | Yes | Amortization system ([Open Finance definition](https://openbanking-brasil.github.io/openapi/swagger-apis/loans/?urls.primaryName=2.0.1#model-EnumContractAmortizationScheduled)). One of the [amortization system](#loan-amortization-system) values. |
| `amortizationScheduledAdditionalInfo` | `string` | Yes | Mandatory field to complement the information regarding the scheduled amortization when it has value 'OTHERS' |
| `cnpjConsignee` | `string` | Yes | Consignor CNPJ |
| `interestRates` | array of [LoanInterestRate](#loan-interest-rate) | Yes | Interest rates applied to the contract. |
| `contractedFees` | array of [LoanContractedFee](#loan-contracted-fee) | Yes | List that brings the information of the tariffs agreed in the contract. |
| `contractedFinanceCharges` | array of [LoanContractedFinanceCharge](#loan-contracted-finance-charge) | Yes | List that brings the charges agreed in the contract |
| `warranties` | array of [LoanWarranty](#loan-warranty) | Yes | Warranties that guarantee the credit operation. |
| `installments` | [LoanInstallments](#loan-installments) | Yes | Remaining term and installments of the operation. |
| `payments` | [LoanPayments](#loan-payments) | Yes | Loan contract payment data |
> See [Loan](/reference/loan) in our API reference for more information.
## Loan installment periodicity
Installments regular frequency
- `WITHOUT_REGULAR_PERIODICITY`
- `WEEKLY`
- `FORTNIGHTLY`
- `MONTHLY`
- `BIMONTHLY`
- `QUARTERLY`
- `SEMESTERLY`
- `YEARLY`
- `OTHERS`
## Loan amortization system
Amortization system ([Open Finance definition](https://openbanking-brasil.github.io/openapi/swagger-apis/loans/?urls.primaryName=2.0.1#model-EnumContractAmortizationScheduled))
- `SAC`
- `PRICE`
- `SAM`
- `WITHOUT_AMORTIZATION_SYSTEM`
- `OTHERS`
## Loan interest rate
| Property | Type | Optional | Description |
|----------|------|----------|-------------|
| `taxType` | `string` | Yes | Tax type. One of the [tax type](#loan-tax-type) values. |
| `interestRateType` | `string` | Yes | Interest rate type. One of the [interest rate type](#loan-interest-rate-type) values. |
| `taxPeriodicity` | `string` | Yes | Tax periodicity. One of the [tax periodicity](#loan-tax-periodicity) values. |
| `calculation` | `string` | Yes | Calculation basis |
| `referentialRateIndexerType` | `string` | Yes | Types of benchmark rates or indexers ([Open Finance definition](https://openbanking-brasil.github.io/openapi/swagger-apis/loans/?urls.primaryName=2.0.1#model-EnumContractReferentialRateIndexerType)) |
| `referentialRateIndexerSubType` | `string` | Yes | Subtypes of benchmark rates or indexers ([Open Finance definition](https://openbanking-brasil.github.io/openapi/swagger-apis/loans/?urls.primaryName=2.0.1#model-EnumContractReferentialRateIndexerSubType)) |
| `referentialRateIndexerAdditionalInfo` | `string` | Yes | Free field to complement the information regarding the Type of reference rate or indexer |
| `preFixedRate` | `number` | Yes | Pre-fixed rate applied under the credit modality contract. 1 = 100% |
| `postFixedRate` | `number` | Yes | Post-fixed rate applied under the credit modality contract. 1 = 100% |
| `additionalInfo` | `string` | Yes | Text with additional information on the composition of agreed interest rates |
## Loan tax type
- `NOMINAL`
- `EFFECTIVE`
## Loan interest rate type
- `SIMPLE`
- `COMPOUND`
## Loan tax periodicity
- `MONTHLY`
- `YEARLY`
## Loan contracted fee
| Property | Type | Optional | Description |
|----------|------|----------|-------------|
| `name` | `string` | Yes | Agreed rate denomination |
| `code` | `string` | Yes | Acronym identifying the agreed rate |
| `chargeType` | `string` | Yes | Charge type for the rate agreed in the contract. One of the [charge type](#contracted-fee-charge-type) values. |
| `charge` | `string` | Yes | Billing method related to the tariff agreed in the contract. One of the [charge](#contracted-fee-charge) values. |
| `amount` | `number` | Yes | Monetary value of the tariff agreed in the contract |
| `rate` | `number` | Yes | Rate value in percentage agreed in the contract |
## Contracted fee charge type
Charge type for the rate agreed in the contract
- `UNIQUE`
- `BY_INSTALLMENT`
## Contracted fee charge
Billing method related to the tariff agreed in the contract
- `MINIMUM`
- `MAXIMUM`
- `FIXED`
- `PERCENTAGE`
## Loan contracted finance charge
| Property | Type | Optional | Description |
|----------|------|----------|-------------|
| `type` | `string` | Yes | Charge type agreed in the contract ([Open Finance definition](https://openbanking-brasil.github.io/openapi/swagger-apis/loans/?urls.primaryName=2.0.1#model-EnumContractFinanceChargeType)) |
| `additionalInfo` | `string` | Yes | Field for additional information |
| `rate` | `number` | Yes | Charge value in percentage agreed in the contract |
## Loan warranty
| Property | Type | Optional | Description |
|----------|------|----------|-------------|
| `currencyCode` | `string` | Yes | Code referencing the currency of the warranty |
| `type` | `string` | Yes | Denomination / Identification of the type of warranty that guarantees the Type of Credit Operation contracted ([Open Finance definition](https://openbanking-brasil.github.io/openapi/swagger-apis/loans/?urls.primaryName=2.0.1#model-EnumWarrantyType)) |
| `subtype` | `string` | Yes | Denomination / Identification of the subtype of warranty that guarantees the Type of Credit Operation contracted ([Open Finance definition](https://openbanking-brasil.github.io/openapi/swagger-apis/loans/?urls.primaryName=2.0.1#model-EnumWarrantySubType)) |
| `amount` | `number` | Yes | Warranty original value |
## Loan installments
| Property | Type | Optional | Description |
|----------|------|----------|-------------|
| `typeNumberOfInstallments` | `string` | Yes | Type of total term of the contract referring to the type of credit informed. One of the [number of installments](#number-of-installments) values. |
| `totalNumberOfInstallments` | `number` | Yes | Total term according to the type referring to the type of credit informed |
| `typeContractRemaining` | `string` | Yes | Type of remaining term of the contract referring to the type of credit informed. One of the [type contract remaining](#type-contract-remaining) values. |
| `contractRemainingNumber` | `number` | Yes | Remaining term according to the type referring to the credit type informed |
| `paidInstallments` | `number` | Yes | Number of paid installments |
| `dueInstallments` | `number` | Yes | Number of due installments |
| `pastDueInstallments` | `number` | Yes | Number of overdue installments |
| `balloonPayments` | array of [LoanInstallmentBalloonPayment](#loan-balloon-payment) | Yes | List that brings the due dates and value of the non-regular installments of the contract of the type of credit consulted |
## Number of installments
Type of total term of the contract referring to the type of credit informed
- `DAY`
- `WEEK`
- `MONTH`
- `YEAR`
- `WITHOUT_TOTAL_PERIOD`
## Type contract remaining
Type of remaining term of the contract referring to the type of credit informed
- `DAY`
- `WEEK`
- `MONTH`
- `YEAR`
- `WITHOUT_TOTAL_PERIOD`
- `WITHOUT_REMAINING_PERIOD`
## Loan balloon payment
| Property | Type | Optional | Description |
|----------|------|----------|-------------|
| `dueDate` | `string` | Yes | Expiration date of the non-regular installment to expire from the contract of the consulted credit modality |
| `amount` | [LoanInstallmentBalloonPaymentAmount](#balloon-payment-amount) | Yes | |
## Balloon payment amount
| Property | Type | Optional | Description |
|----------|------|----------|-------------|
| `value` | `number` | Yes | Monetary value of the non-regular installment due |
| `currencyCode` | `string` | Yes | Code referencing the currency of the installment |
## Loan payments
| Property | Type | Optional | Description |
|----------|------|----------|-------------|
| `contractOutstandingBalance` | `number` | Yes | Amount required for the customer to settle the debt |
| `releases` | array of [LoanPaymentRelease](#loan-payment-release) | Yes | List of payments made in the period |
## Loan payment release
| Property | Type | Optional | Description |
|----------|------|----------|-------------|
| `isOverParcelPayment` | `boolean` | Yes | Identifies whether it is an agreed payment (false) or a one-time payment (true) |
| `installmentId` | `string` | Yes | Installment identifier, responsibility of each transmitting Institution |
| `paidDate` | `string` | Yes | Effective date of payment referring to the contract of the credit modality consulted |
| `currencyCode` | `string` | Yes | Code referencing the currency of the payment |
| `paidAmount` | `number` | Yes | Payment amount referring to the contract of the credit modality consulted |
| `overParcel` | [LoanPaymentReleaseOverParcel](#loan-payment-over-parcel) | Yes | |
## Loan payment over parcel
| Property | Type | Optional | Description |
|----------|------|----------|-------------|
| `fees` | array of [LoanPaymentReleaseOverParcelFee](#over-parcel-fee) | Yes | List of fees that were paid outside the installment, only for single payment |
| `charges` | array of [LoanPaymentReleaseOverParcelCharge](#over-parcel-charge) | Yes | List of charges that were paid out of installment |
## Over parcel fee
| Property | Type | Optional | Description |
|----------|------|----------|-------------|
| `name` | `string` | Yes | Denomination of the agreed rate |
| `code` | `string` | Yes | Acronym identifying the agreed rate |
| `amount` | `number` | Yes | Monetary value of the tariff agreed in the contract |
## Over parcel charge
| Property | Type | Optional | Description |
|----------|------|----------|-------------|
| `type` | `string` | Yes | Charge type agreed in the contract ([Open Finance definition](https://openbanking-brasil.github.io/openapi/swagger-apis/loans/?urls.primaryName=2.0.1#model-EnumContractFinanceChargeType)) |
| `additionalInfo` | `string` | Yes | Free field to fill in additional information regarding the charge |
| `amount` | `number` | Yes | Payment amount of the charge paid outside the installment |
## Identity
Source: https://docs.pluggy.ai/en/docs/products/identity.md
The **Identity** entity is recovered from institutions that support this product, accessing details of personal information related to the owner of the connection's account. Recovering this product helps you verify users' identities.
> **Open Finance Fields**
> For Open Finance connectors, additional fields are available including `investorProfile`, `qualifications`, `financialRelationships`, plus a richer set of PF (natural person) and PJ (business) attributes — `socialName`, `sex`, `maritalStatus`, `nationality`, `otherDocuments`, `passport`, `incorporationDate`, `parties`, `businessOtherDocuments`, and `companiesCnpj`. These fields provide enhanced customer data for consented accounts.
```json
{
"id": "42888436-62f5-49d2-8cf9-e312c7939509",
"fullName": "Francisco Sousa",
"companyName": "Pluggy Inc.",
"document": "123.456.789-00",
"taxNumber": "38.512.121/0001-95",
"documentType": "CPF",
"jobTitle": "Comercial",
"birthDate": "1991-05-01T00:00:00.000Z",
"investorProfile": "Moderate",
"establishmentCode": "001",
"establishmentName": "Pluggy Establishment",
"addresses": [
{
"fullAddress": "Av. Lucio Costa 1234, Copacabana, Rio de Janeiro, Brasil",
"country": "Brasil",
"state": "RJ",
"city": "Rio de Janeiro",
"additionalInfo": "Casa amarela",
"postalCode": "22620-171",
"primaryAddress": "Av. Lucio Costa, 1234",
"type": "Personal"
}
],
"phoneNumbers": [
{
"type": "Personal",
"value": "+54 911 12345678"
}
],
"emails": [
{
"type": "Personal",
"value": "hello@pluggy.ai"
}
],
"relations": [
{
"type": "CONJUGE",
"name": "Maria Sousa",
"document": "098.765.432-10"
}
]
}
```
For Open Finance connectors, the Identity entity carries the extended PF/PJ field set:
```json title="Open Finance"
{
"id": "42888436-62f5-49d2-8cf9-e312c7939509",
"itemId": "9b59ab4b-2480-4dfc-9a0d-99b964ba578d",
"fullName": "Henrique Alexsander Eichstädt",
"socialName": "Henrique",
"companyName": "Tech Solutions LTDA",
"document": "12345678900",
"taxNumber": "38.512.121/0001-95",
"documentType": "CPF",
"jobTitle": "CEO",
"birthDate": "1985-03-15T00:00:00.000Z",
"sex": "MALE",
"maritalStatus": {
"code": "MARRIED"
},
"nationality": {
"hasBrazilianNationality": true
},
"otherDocuments": [
{
"type": "CNH",
"number": "12345678900",
"checkDigit": "P",
"additionalInfo": "SSP/SP",
"expirationDate": "2030-05-21T00:00:00.000Z"
}
],
"incorporationDate": "2010-01-01T00:00:00.000Z",
"parties": [
{
"type": "PARTNER",
"personType": "NATURAL_PERSON",
"documentType": "CPF",
"documentNumber": "12345678900",
"civilName": "Henrique Alexsander Eichstädt",
"startDate": "2010-01-01T00:00:00.000Z",
"shareholding": 0.51
}
],
"companiesCnpj": ["38512121000195"],
"addresses": [
{
"fullAddress": "Av. Paulista 1234, Bela Vista, 01310-100, São Paulo, Brasil",
"country": "Brasil",
"countryCode": "BRA",
"state": "SP",
"city": "São Paulo",
"district": "Bela Vista",
"ibgeTownCode": "3550308",
"postalCode": "01310-100",
"primaryAddress": "Av. Paulista, 1234",
"type": "Work",
"additionalInfo": "Sala 501",
"geographicCoordinates": {
"latitude": -23.5614,
"longitude": -46.6559
}
}
],
"phoneNumbers": [
{
"type": "Work",
"value": "+55 (11) 987654321",
"countryCallingCode": "55",
"areaCode": "11",
"extension": "501"
}
],
"emails": [
{
"type": "Work",
"value": "henrique@techsolutions.com.br"
}
],
"relations": [],
"investorProfile": "Moderate",
"qualifications": {
"companyCnpj": "38512121000195",
"occupationCode": "CBO",
"occupationDescription": "1234-5",
"informedIncome": {
"frequency": "ANUAL",
"amount": 250000,
"date": "2024-01-01T00:00:00.000Z"
},
"informedPatrimony": {
"amount": 1500000,
"year": 2024,
"date": "2024-12-31T00:00:00.000Z"
},
"economicActivities": [
{
"code": "6201501",
"isMain": true
}
],
"informedRevenue": {
"amount": 500000,
"frequency": "MONTHLY",
"year": 2024
}
},
"financialRelationships": {
"startDate": "2020-05-10T00:00:00.000Z",
"productsServicesType": [
"CONTA_DEPOSITO_A_VISTA",
"CONTA_POUPANCA",
"OPERACAO_CREDITO"
],
"procurators": [
{
"type": "PROCURADOR",
"cpfNumber": "45678912303",
"documentNumber": "45678912303",
"documentType": "CPF",
"civilName": "Roberto Carlos Mendes Silva",
"socialName": "Roberto"
}
],
"accounts": [
{
"compeCode": "237",
"branchCode": "0001",
"number": "123456",
"checkDigit": "7",
"type": "CONTA_DEPOSITO_A_VISTA",
"subtype": "INDIVIDUAL"
}
],
"portabilitiesReceived": [
{
"employerName": "Acme Inc",
"employerDocument": "60701190000104",
"paycheckBankDetainerCnpj": "60701190000204",
"paycheckBankDetainerIspb": "60701190",
"portabilityApprovalDate": "2021-03-15T00:00:00.000Z"
}
],
"paychecksBankLink": [
{
"employerName": "Acme Inc",
"employerDocument": "60701190000104",
"paycheckBankCnpj": "60701190000204",
"paycheckBankIspb": "60701190",
"accountOpeningDate": "2020-01-10T00:00:00.000Z"
}
]
},
"createdAt": "2020-09-30T14:38:12.724Z",
"updatedAt": "2024-12-12T10:30:00.000Z"
}
```
| Property | Type | Optional | Description |
|----------|------|----------|-------------|
| id | string | No | Primary identifier. |
| fullName | string | No | Full name of the account owner. |
| companyName | string | Yes | Company name (for business accounts). |
| document | string | No | Document number (CPF or CNPJ). |
| taxNumber | string | Yes | Tax identification number. |
| documentType | string | No | Type of the document (CPF, CNPJ). |
| jobTitle | string | Yes | Job title of the account owner. |
| birthDate | string | Yes | Date of birth. |
| investorProfile | string | Yes | Investor profile classification (e.g., Conservative, Moderate, Aggressive). Only available for Open Finance connectors. |
| establishmentCode | string | Yes | Establishment code. |
| establishmentName | string | Yes | Establishment name. |
| addresses | array | Yes | List of addresses associated with the identity. |
| phoneNumbers | array | Yes | List of phone numbers. |
| emails | array | Yes | List of email addresses. |
| relations | array | Yes | List of related persons (e.g., spouse). |
| socialName | string | Yes | Social name of the natural person, if any (PF-only, Open Finance). |
| sex | string | Yes | Sex of the natural person — `FEMALE`, `MALE`, or `OTHER` (PF-only, Open Finance). |
| maritalStatus | [MaritalStatus](#maritalstatus) | Yes | Marital status of the natural person (PF-only, Open Finance). |
| nationality | [Nationality](#nationality) | Yes | Nationality of the natural person (PF-only, Open Finance). |
| otherDocuments | array of [OtherDocument](#otherdocument) | Yes | List of other identification documents held by the natural person — CNH, RG, NIF, RNE, or OTHER (PF-only, Open Finance). |
| passport | [Passport](#passport) | Yes | Passport metadata — applies when the natural person is a non-resident not required to register a CPF (PF-only, Open Finance). |
| incorporationDate | Date | Yes | Date the business was incorporated (PJ-only, Open Finance). |
| parties | array of [BusinessParty](#businessparty) | Yes | Partners and administrators of the business (PJ-only, Open Finance). |
| businessOtherDocuments | array of [BusinessOtherDocument](#businessotherdocument) | Yes | Additional documents for businesses headquartered abroad and not required to register a CNPJ (PJ-only, Open Finance). |
| companiesCnpj | array of string | Yes | CNPJs of the financial institutions responsible for the customer cadastro (Open Finance, PF & PJ). |
| qualifications | [Qualifications](#qualifications) | Yes | Customer qualifications data. Only available for Open Finance connectors. |
| financialRelationships | [FinancialRelationships](#financialrelationships) | Yes | Customer relationship with the institution. Only available for Open Finance connectors. |
## Address
| Property | Type | Optional | Description |
|----------|------|----------|-------------|
| fullAddress | string | Yes | Complete address string. |
| country | string | Yes | Country name. |
| countryCode | string | Yes | Country code in alpha3 ISO-3166 format (e.g. `BRA`). Open Finance only. |
| state | string | Yes | State code. |
| city | string | Yes | City name. |
| district | string | Yes | District / neighborhood (bairro). Open Finance only. |
| ibgeTownCode | string | Yes | IBGE municipality code (7 digits). The first two digits identify the Federation Unit. Open Finance only. |
| additionalInfo | string | Yes | Additional information about the address. |
| postalCode | string | Yes | Postal/ZIP code. |
| primaryAddress | string | Yes | Primary street address. |
| type | string | Yes | Type of address (Personal, Work). |
| geographicCoordinates | object | Yes | Geographic coordinates in decimal degrees, WGS84 reference system. Object with `latitude` and `longitude`. Open Finance only. |
## Phone Number
| Property | Type | Optional | Description |
|----------|------|----------|-------------|
| type | string | Yes | Type of phone number (Personal, Work or Residencial). |
| value | string | Yes | Phone number value. |
| countryCallingCode | string | Yes | International dialing code (DDI). Populated when different from `55`. Open Finance only. |
| areaCode | string | Yes | Area code (DDD) of the phone. Open Finance only. |
| extension | string | Yes | Extension number, when part of the phone identification. Open Finance only. |
| additionalInfo | string | Yes | Additional info about the phone, e.g. when the source type doesn't fit the standard categories. Open Finance only. |
## Email
| Property | Type | Optional | Description |
|----------|------|----------|-------------|
| type | string | Yes | Type of email (Personal, Business). |
| value | string | Yes | Email address value. |
## Relation
| Property | Type | Optional | Description |
|----------|------|----------|-------------|
| type | string | Yes | Type of relation (e.g., CONJUGE, PROCURADOR). |
| name | string | Yes | Name of the related person. |
| document | string | Yes | Document number of the related person. |
## MaritalStatus
Marital status of the natural person (PF-only, Open Finance).
```json
{
"code": "MARRIED",
"additionalInfo": "Civil partnership"
}
```
| Property | Type | Optional | Description |
|----------|------|----------|-------------|
| code | string | Yes | `SINGLE`, `MARRIED`, `WIDOWED`, `JUDICIALLY_SEPARATED`, `DIVORCED`, `STABLE_UNION`, or `OTHER`. |
| additionalInfo | string | Yes | Free-text complement. Should be set when `code` is `OTHER`. |
## Nationality
Nationality of the natural person (PF-only, Open Finance).
```json
{
"hasBrazilianNationality": false,
"otherNationalities": [
{
"countryCode": "ITA",
"documents": [
{
"type": "Passport",
"number": "YA1234567",
"country": "ITA",
"issueDate": "2020-05-30T00:00:00.000Z",
"expirationDate": "2030-05-30T00:00:00.000Z"
}
]
}
]
}
```
| Property | Type | Optional | Description |
|----------|------|----------|-------------|
| hasBrazilianNationality | boolean | Yes | Whether the client has Brazilian nationality. |
| otherNationalities | array | Yes | Other nationalities held by the client, if any. |
Each `otherNationalities[]` entry:
| Property | Type | Optional | Description |
|----------|------|----------|-------------|
| countryCode | string | Yes | Country code in alpha3 ISO-3166 format. |
| documents | array | Yes | Supporting documents for this nationality. See `NationalityDocument` below. |
Each `documents[]` entry (`NationalityDocument`):
| Property | Type | Optional | Description |
|----------|------|----------|-------------|
| type | string | Yes | Document type (free text). Required when the nationality is not Brazilian. |
| number | string | Yes | Document number. Required when the nationality is not Brazilian. |
| country | string | Yes | Country name. |
| issueDate | Date | Yes | Issue date of the document. |
| expirationDate | Date | Yes | Expiration date of the document. |
| additionalInfo | string | Yes | Free-text complement. |
## OtherDocument
Other identification documents the natural person holds (PF-only, Open Finance). Brazilian acronyms are kept verbatim; `OTHER` covers any other type.
```json
{
"type": "CNH",
"number": "12345678900",
"checkDigit": "P",
"additionalInfo": "SSP/SP",
"expirationDate": "2030-05-21T00:00:00.000Z"
}
```
| Property | Type | Optional | Description |
|----------|------|----------|-------------|
| type | string | Yes | `CNH`, `RG`, `NIF`, `RNE`, or `OTHER`. |
| typeAdditionalInfo | string | Yes | Free-text complement. Should be set when `type` is `OTHER`. |
| number | string | Yes | Document number. |
| checkDigit | string | Yes | Check digit of the document, if it has one. |
| additionalInfo | string | Yes | Free-text complement, used to record the issuing authority (e.g. `SSP/SP`) when relevant. |
| expirationDate | Date | Yes | Expiration date of the document. |
## Passport
Passport metadata for the natural person (PF-only, Open Finance). Applies when the client is a non-resident not required to register a CPF.
```json
{
"number": "YA1234567",
"country": "ITA",
"issueDate": "2020-05-30T00:00:00.000Z",
"expirationDate": "2030-05-30T00:00:00.000Z"
}
```
| Property | Type | Optional | Description |
|----------|------|----------|-------------|
| number | string | Yes | Passport number. |
| country | string | Yes | Issuing country in alpha3 ISO-3166 format. |
| issueDate | Date | Yes | Issue date of the passport. |
| expirationDate | Date | Yes | Expiration date of the passport. |
## BusinessParty
Partner or administrator of a business (PJ-only, Open Finance). Partners with less than 25% shareholding may be omitted by the institution.
```json
{
"type": "PARTNER",
"personType": "NATURAL_PERSON",
"documentType": "CPF",
"documentNumber": "12345678900",
"civilName": "Henrique Alexsander Eichstädt",
"startDate": "2010-01-01T00:00:00.000Z",
"shareholding": 0.51
}
```
| Property | Type | Optional | Description |
|----------|------|----------|-------------|
| type | string | Yes | `PARTNER` (sócio) or `ADMINISTRATOR` (administrador). |
| personType | string | Yes | `NATURAL_PERSON` or `LEGAL_ENTITY`. |
| documentType | string | Yes | `CPF`, `CNPJ`, `PASSPORT`, or `OTHER_TRAVEL_DOCUMENT`. |
| documentNumber | string | Yes | Number of the identification document (digits and check digit, if any). |
| documentCountry | string | Yes | Issuing country of the document, alpha3 ISO-3166. |
| documentExpirationDate | Date | Yes | Expiration date of the document. |
| documentIssueDate | Date | Yes | Issue date of the document. |
| documentAdditionalInfo | string | Yes | Free-text complement when the document carries identification info that doesn't fit the other fields. |
| civilName | string | Yes | Civil name of the party. Required when `personType` is `NATURAL_PERSON`. |
| socialName | string | Yes | Social name of the natural-person party, if any. |
| companyName | string | Yes | Company name of the party. Required when `personType` is `LEGAL_ENTITY`. |
| tradeName | string | Yes | Trade name of the legal-entity party, if any. |
| startDate | Date | Yes | Date the party's participation started. |
| shareholding | number | Yes | Shareholding fraction between 0 and 1 (e.g. `0.51` represents 51%, `1` represents 100%). Required when `type` is `PARTNER` and the shareholding is 25% or higher. |
## BusinessOtherDocument
Additional document for businesses headquartered abroad and not required to register a CNPJ (PJ-only, Open Finance).
```json
{
"type": "EIN",
"number": "128328453",
"country": "USA",
"expirationDate": "2030-05-21T00:00:00.000Z"
}
```
| Property | Type | Optional | Description |
|----------|------|----------|-------------|
| type | string | Yes | Type of the document (e.g. `EIN`). |
| number | string | Yes | Document number. |
| country | string | Yes | Issuing country in alpha3 ISO-3166 format. |
| expirationDate | Date | Yes | Expiration date of the document. |
## Qualifications
Customer qualifications data (Open Finance).
```json
{
"companyCnpj": "38512121000195",
"occupationCode": "CBO",
"occupationDescription": "1234-5",
"informedIncome": {
"frequency": "ANUAL",
"amount": 250000,
"date": "2024-01-01T00:00:00.000Z"
},
"informedPatrimony": {
"amount": 1500000,
"year": 2024,
"date": "2024-12-31T00:00:00.000Z"
},
"economicActivities": [
{
"code": "6201501",
"isMain": true
}
],
"informedRevenue": {
"amount": 500000,
"frequency": "MONTHLY",
"year": 2024
}
}
```
| Property | Type | Optional | Description |
|----------|------|----------|-------------|
| companyCnpj | string | Yes | CNPJ of the company associated with the qualifications. |
| occupationCode | string | Yes | `RECEITA_FEDERAL`, `CBO`, or `OUTRO`. |
| occupationDescription | string | Yes | Free-text occupation description. Holds the standardized list code when `occupationCode` is `RECEITA_FEDERAL` or `CBO`; the custom description when `OUTRO`. |
| informedIncome | object | Yes | Informed income. Object with `frequency` (`DIARIA`, `SEMANAL`, `QUINZENAL`, `MENSAL`, `BIMESTRAL`, `TRIMESTRAL`, `SEMESTRAL`, `ANUAL`, `OUTROS`), `amount`, and `date`. |
| informedPatrimony | object | Yes | Informed patrimony. Object with `amount`, `year`, and optionally `date` (returned on the PJ business path). |
| economicActivities | array | Yes | CNAE codes describing the economic activities of the business (PJ-only). Each entry has `code` (7-digit CNAE) and `isMain` boolean. |
| informedRevenue | object | Yes | Revenue (faturamento) informed by the business — the business equivalent of `informedIncome` (PJ-only). Object with `amount`, optional `frequency` (`DAILY`, `WEEKLY`, `BIWEEKLY`, `MONTHLY`, `BIMONTHLY`, `QUARTERLY`, `SEMIANNUAL`, `ANNUAL`, `OTHER`), `frequencyAdditionalInfo`, and `year`. |
## FinancialRelationships
Customer relationship with the institution (Open Finance).
```json
{
"startDate": "2020-05-10T00:00:00.000Z",
"productsServicesType": ["CONTA_DEPOSITO_A_VISTA", "OPERACAO_CREDITO"],
"procurators": [
{
"type": "PROCURADOR",
"cpfNumber": "45678912303",
"documentNumber": "45678912303",
"documentType": "CPF",
"civilName": "Roberto Carlos Mendes Silva",
"socialName": "Roberto"
}
],
"accounts": [
{
"compeCode": "237",
"branchCode": "0001",
"number": "123456",
"checkDigit": "7",
"type": "CONTA_DEPOSITO_A_VISTA",
"subtype": "INDIVIDUAL"
}
],
"portabilitiesReceived": [
{
"employerName": "Acme Inc",
"employerDocument": "60701190000104",
"paycheckBankDetainerCnpj": "60701190000204",
"paycheckBankDetainerIspb": "60701190",
"portabilityApprovalDate": "2021-03-15T00:00:00.000Z"
}
],
"paychecksBankLink": [
{
"employerName": "Acme Inc",
"employerDocument": "60701190000104",
"paycheckBankCnpj": "60701190000204",
"paycheckBankIspb": "60701190",
"accountOpeningDate": "2020-01-10T00:00:00.000Z"
}
]
}
```
| Property | Type | Optional | Description |
|----------|------|----------|-------------|
| startDate | Date | Yes | Date when the relationship with the institution started. |
| productsServicesType | array of string | Yes | List of products and services that the client consumes (e.g. `CONTA_DEPOSITO_A_VISTA`, `CARTAO_CREDITO`, `OPERACAO_CREDITO`). |
| productsServicesTypeAdditionalInfo | string | Yes | Additional info about the products and services. Populated when `productsServicesType` includes `OUTROS`. |
| procurators | array | Yes | List of procurators. Each entry has `type` (`REPRESENTANTE_LEGAL` or `PROCURADOR`), `cpfNumber` (legacy — may carry a CNPJ on PJ), the canonical `documentNumber` + `documentType` (`CPF` / `CNPJ`) pair, `civilName`, and optional `socialName`. |
| accounts | array | Yes | List of consented accounts. Each entry has `compeCode`, `branchCode`, `number`, `checkDigit`, `type` (`CONTA_DEPOSITO_A_VISTA`, `CONTA_POUPANCA`, `CONTA_PAGAMENTO_PRE_PAGA`), and `subtype` (`INDIVIDUAL`, `CONJUNTA_SIMPLES`, `CONJUNTA_SOLIDARIA`). |
| portabilitiesReceived | array | Yes | Salary portabilities received by the institution from the client's previous paycheck banks (banco-folha). PF-only. See entry schema below. |
| paychecksBankLink | array | Yes | Paycheck-bank (banco-folha) links to employers, active or formerly active. PF-only. See entry schema below. |
Each `portabilitiesReceived[]` entry:
| Property | Type | Optional | Description |
|----------|------|----------|-------------|
| employerName | string | Yes | Employer name as received in the portability message. |
| employerDocument | string | Yes | Employer document (CPF or CNPJ) as received in the portability message. |
| paycheckBankDetainerCnpj | string | Yes | CNPJ of the bank that holds the paycheck account (banco-folha). |
| paycheckBankDetainerIspb | string | Yes | ISPB of the bank that holds the paycheck account. |
| portabilityApprovalDate | Date | Yes | Date the portability was approved. |
Each `paychecksBankLink[]` entry:
| Property | Type | Optional | Description |
|----------|------|----------|-------------|
| employerName | string | Yes | Employer name as registered when the paycheck account was opened. |
| employerDocument | string | Yes | Employer document (CPF or CNPJ) as registered when the paycheck account was opened. |
| paycheckBankCnpj | string | Yes | CNPJ of the institution contracted to provide the paycheck service (banco-folha). |
| paycheckBankIspb | string | Yes | ISPB of the institution contracted to provide the paycheck service. |
| accountOpeningDate | Date | Yes | Date the paycheck account was opened. |
> See [Identity](/reference/identity) in our API reference for more information.
## Credit Card Installments
Source: https://docs.pluggy.ai/en/docs/products/credit-card-installments.md
How installment purchases are captured, synchronized, and delivered through the Pluggy API.
## Overview
This page describes how Pluggy captures, processes, and delivers credit card installment purchase transactions (compras parceladas). The goal is to help product and development teams understand the expected API behavior, the limitations of the Open Finance ecosystem, and the best practices for handling this type of data.
> **Why is this topic complex?**
>
> The Open Finance regulation (Central Bank of Brazil) requires institutions to make installment purchase data available, but it does not specify how that data must be formatted or structured. This leads to different behaviors across banks: some post all installments at once, others create them month by month, and others return only the current installment.
>
> Pluggy is actively mapping the behavior of each institution and working together with the Open Finance ecosystem to push for greater standardization.
## Fundamentals: Bills and Transactions
### How credit card transactions arrive via API
When a user connects a credit card account, Pluggy fetches 12 months of transactions. In the subsequent daily updates, the last 7 days of recent transactions are fetched. For credit cards, there is also a third mechanism: fetching transactions by bill, explained below.
### Recent Transactions endpoint vs. Bill endpoint in the Open Finance API
Pluggy uses the Open Finance API, which has two distinct flows for capturing credit card transactions:
| Flow | Description |
|------|-------------|
| Recent Transactions (`transactions-current`) | Fetches the last 7 days of transactions. All transactions returned here appear with status `PENDING` and without an associated `billId`. |
| Transactions by Bill (`/bills/:billId/transactions`) | Fetches all transactions linked to a specific bill, passing the bill ID as a filter. This endpoint is called once a day, and consequently, when a new bill becomes due and starts being returned, it is called again. |
### The lifecycle of a card transaction
Every credit card transaction goes through the following cycle:
1. The transaction appears in the recent transactions with status `PENDING` and without a `billId`.
2. When the bill becomes due, Pluggy identifies the new bill and calls the transactions endpoint with that bill's ID.
3. The transactions of that bill start returning with an associated `billId` and the status changes to `POSTED`.
4. Pluggy fires a webhook with the updated transactions (status and `billId` filled in).
> **PENDING vs POSTED**
>
> - **`PENDING`**: the transaction belongs to a bill that is still open. It has no `billId`.
> - **`POSTED`**: the transaction belongs to a bill that is already due. It has an associated `billId`.
>
> Warning: when fetching only the last 7 days of updates, an older transaction that moved from `PENDING` to `POSTED` may not appear. To capture these changes, it is essential to consume the updated transactions webhook (`transaction/updated`). See [Webhooks](/docs/developer-tools/webhooks-ref).
## Installment Behavior by Institution
The lack of standardization in Open Finance means that each bank returns installments in different ways. Pluggy is mapping the behavior of each institution. Below are the general patterns identified so far.
### Pattern A: All installments posted at once
Some institutions post all installments immediately after the purchase, already in the recent transactions. Each installment appears as a separate transaction.
> **How Pluggy handles this pattern**
>
> - **1st installment:** returned with the original transaction date (purchase date).
> - **Remaining installments:** returned with the bill posting date (`billPostDate`) — which corresponds to the due month of each installment.
> - **When the bill becomes due:** the corresponding installment is updated and receives a `billId`. Pluggy fires the updated transactions webhook with the new `billId`.
### Pattern B: Installments posted month by month
Other institutions create installments gradually — a new installment appears each time a bill is closed or becomes due. This is the most common behavior among the major banks.
> **How Pluggy handles this pattern**
>
> Pluggy fetches the transactions of each newly due bill. The installments appear at that moment, already with a `billId`.
>
> Warning: when querying only the transactions endpoint with a date filter, these older installments may not appear. Use the created transactions webhook (`transaction/created`) to make sure no installment is missed.
### Special behavior: Window between closing and due date
In some banks, there is a period between the closing of the bill and its due date (typically 7 to 10 days). During this window, new installments may appear — that is, when the bill closes, the bank already generates the next installment for the bill that is not yet due.
*This means Pluggy may return, via the created transactions webhook, an installment associated with a bill that exists in the bills endpoint but may not yet be due, only closed. This behavior was identified in at least one bank and may occur in others.*
## Available Installment Fields
Each installment purchase transaction may contain the following fields (when returned by the institution):
| Field | Description |
|-------|-------------|
| `installmentNumber` | Number of the current installment (e.g. 1, 2, 3...) |
| `totalInstallments` | Total number of installments of the purchase |
| `totalAmount` | Total amount of the purchase (all installments combined) |
| `amount` | Amount of that specific installment |
| `date` | Transaction date (varies by bank — it can be the purchase date or the bill posting date) |
| `billId` | ID of the bill the transaction is linked to (absent if the bill is not yet due) |
In addition to the fields above, the Open Finance API returns the `billPostDate` field (the date the transaction was posted to the bill), which Pluggy uses internally to compose the `date` field of the installments after the first one. This field is not directly exposed in the Pluggy API response JSON.
> **Important: absence of a group ID**
>
> Currently, Open Finance does not return a unique identifier that groups all installments of the same purchase. This means that, to identify that two transactions belong to the same installment plan, you need to use heuristics based on the available fields (`installmentNumber`, `totalInstallments`, `totalAmount`, merchant name, etc.).
>
> Pluggy is evaluating opening an improvement request with the Open Finance ecosystem to ask for this grouping field.
## Operational Limits and Their Impact on Installments
Open Finance defines call limits per CPF/CNPJ per institution, per month. These limits directly affect the ability to synchronize credit card data, including installments.
### Limits relevant for credit cards
| Operation | Limit |
|-----------|-------|
| Recent transactions (last 7 days) | 240 calls per month |
| Historical transactions (beyond 7 days up to 12 months) | 4 calls per month |
| Bills listing | 30 calls per month (approx. 1 per day) |
| Accounts and cards listing | 4 calls per month |
> **How do these limits affect installments?**
>
> The limit of 4 calls/month for historical transactions is the most critical. If a user tries to connect the same account several times (for example, because the connection partially failed), this limit can be reached quickly.
>
> When the limit is reached, the call returns an operational limit error and no new 12-month fetch is possible until the next month.
>
> Warning: the limit is per CPF/CNPJ per institution — not per item or per Pluggy client. If the user has already shared data with another platform in the same month, the limit may already have been partially consumed.
### Best practices to avoid exhausting the limit
- Avoid creating multiple connections with the same CPF/CNPJ for the same bank.
- Implement retry control in the frontend: if the connection failed, guide the user to wait before trying again.
- Use the item status check endpoint (`GET /items/{id}`) after the connection to verify that all products were successfully retrieved, before requesting a new synchronization.
## Webhooks and Installment Updates
To guarantee that no installment update is missed, it is essential to consume Pluggy's [webhooks](/docs/developer-tools/webhooks-ref). Installments can appear or be updated at asynchronous moments, outside the 7-day window of recent transactions.
### Relevant events for installment plans
| Event | When it occurs |
|-------|----------------|
| `transaction/created` | A new installment appeared (e.g. the bank posted next month's installment after the bill closed). |
| `transaction/updated` | An existing transaction was updated — for example, an installment that was `PENDING` became `POSTED` and received a `billId`. |
| `transaction/deleted` | A transaction was removed. It can occur in occasional cases where the bank stops returning a transaction for a few days and later returns it again with a new ID. |
> **Warning: deleted and recreated transactions**
>
> In rare cases, a bank may stop returning a transaction for 1 to 3 days and then return it again. When this happens, Pluggy removes the transaction and fires `transaction/deleted`. When it comes back, Pluggy fires `transaction/created` with a new ID.
>
> This can happen, for example, with weekend transactions or during occasional instabilities at the institution. It is not alarming behavior, but it must be handled on the client side.
## Recommendations for Development Teams
### To guarantee installment completeness
- Always consume the `transaction/created` and `transaction/updated` webhooks to capture installments that appear outside the 7-day window.
- Do not rely exclusively on the recent transactions endpoint to build the installment history.
- When identifying a due bill, check whether the transactions of that bill (via the transactions endpoint filtered by `billId`) match the total amount of the [bill](/docs/products/credit-card-bills) — this helps detect missing installments.
### To identify installments of the same purchase
- Use the `installmentNumber` and `totalInstallments` fields as the first grouping criterion.
- Complement with `totalAmount` and merchant name when available.
- Keep in mind that behavior varies by bank: the same set of heuristics may not work for all institutions.
- Follow the per-institution mapping that Pluggy is developing.
### To report installment problems
- Open a ticket with Pluggy support informing: bank, item ID, affected period, and a description of the observed behavior.
- If possible, include evidence from the user (statement or bill) showing the discrepancy — this is required to escalate the case to the financial institution.
- For structural cases (affecting multiple users), flag it directly via Slack with the Pluggy support team for prioritization.
## Glossary
| Term | Definition |
|------|------------|
| `billId` | Unique identifier of a credit card bill in the Open Finance ecosystem. |
| `billPostDate` *(Open Finance API)* | Date a transaction was posted to a bill. Used by Pluggy to determine the date of the subsequent installments. |
| `PENDING` | Status of a transaction that belongs to a bill that is still open (not yet due). |
| `POSTED` | Status of a transaction linked to a bill that is already due, with `billId` filled in. |
| Operational Limit | Limit of calls to the Open Finance API per CPF/CNPJ per institution, defined by the Central Bank. |
| Recent Transactions | Endpoint that returns the last 7 days of transactions of an account or card. |
| Historical Transactions | Fetch of transactions beyond 7 days (up to 12 months). Limited to 4 calls per month per CPF/CNPJ per bank. |
| Webhook | Notification sent by Pluggy to the client's system when an event occurs (e.g. transaction created, updated, or deleted). |
*For questions, contact the Support team via Slack.*
## Connection Insights
Source: https://docs.pluggy.ai/en/docs/intelligence/connection-insights.md
Based on connected accounts you can recover user's insights, book of variables, income analysis & recurring patterns.
In addition to the useful insights of [transaction categorization](/docs/transaction-categories), Pluggy offers an **Insights API** to help you gather insights about your Items' data to quickly group, filter or cluster your items according to their **financial KPIs** or their **income indicators**.
## Item financial KPIs
A handy feature to quickly build intelligence over your Items is to look at their financial KPIs, which correspond to important financial statistics like cash flow, distribution of debit/credit transactions, etc.
We offer an HTTP API for calculating those KPIs. Here is an example of how to use it:
1. First, [authenticate](/docs/authentication) in Pluggy API to obtain an API key
2. Execute the following request
```curl
curl --location --request POST 'https://insights-api.pluggy.ai/book?itemIds={your-item-id}' \
--header 'X-API-KEY: {YOUR-API-KEY}'
```
3. Here is an example response:
```json
{
"id": "b3b60afc-6a76-43ae-9c94-3457ce8952b2",
"status": "COMPLETED",
"book": {
"bankAccount": {
"percentage_transactions_debit_dates_1-5_M1": null,
"percentage_transactions_credit_dates_1-5_M1": null,
"count_transactions_debit_dates_1-5_M1": 0,
"count_transactions_credit_dates_1-5_M1": 0,
"amount_transactions_debit_dates_1-5_M1": 0,
"amount_transactions_credit_dates_1-5_M1": 0,
"percentage_transactions_debit_dates_6-10_M1": null,
"percentage_transactions_credit_dates_6-10_M1": null,
"count_transactions_debit_dates_6-10_M1": 0,
"count_transactions_credit_dates_6-10_M1": 0,
"amount_transactions_debit_dates_6-10_M1": 0,
"amount_transactions_credit_dates_6-10_M1": 0,
"diff_transactions_net_amount_M1": 0,
"count_transactions_credit_M1": 0,
"count_transactions_debit_M1": 0,
"min_transactions_balance_M1": null,
"max_transactions_balance_M1": null,
"sum_transactions_credit_M1": 0,
"sum_transactions_debit_M1": 0,
"ratio_transactions_creditdebit_M1": null,
"ratio_inflow_commitment_M1": null,
"avg_transactions_credit_M1": null,
"avg_transactions_debit_M1": null,
"avg_transactions_credit_balance_M1": null,
"avg_transactions_debit_balance_M1": null,
"max_transactions_debit_period_M1": "",
"max_transactions_credit_period_M1": "",
"diff_transactions_net_amount_alltime": 394,
"count_transactions_credit_alltime": 7,
"count_transactions_debit_alltime": 1,
"min_transactions_balance_alltime": null,
"max_transactions_balance_alltime": null,
"sum_transactions_credit_alltime": 520,
"sum_transactions_debit_alltime": 126,
"ratio_transactions_creditdebit_alltime": 4.13,
"ratio_inflow_commitment_alltime": 169.62,
"avg_transactions_credit_alltime": 74.29,
"avg_transactions_debit_alltime": 126,
"avg_transactions_credit_balance_alltime": 0,
"avg_transactions_debit_balance_alltime": 0,
"max_transactions_debit_period_alltime": "26-31",
"max_transactions_credit_period_alltime": "26-31",
"ratio_inflow_commitment_trend": null
},
"categories": [
{
"category": "Transfers",
"transactionType": "CREDIT",
"accountSubtype": "SAVINGS_ACCOUNT",
"M1": { "avg": null, "total": 0 },
"M2": { "avg": null, "total": 0 },
"M3": { "avg": null, "total": 0 },
"M6": { "avg": 68.5, "total": 137, "min": 59, "max": 78 },
"M12": { "avg": 68.5, "total": 137, "min": 59, "max": 78 }
},
{
"category": "Third party transfers",
"transactionType": "CREDIT",
"accountSubtype": "SAVINGS_ACCOUNT",
"M1": { "avg": null, "total": 0 },
"M2": { "avg": null, "total": 0 },
"M3": { "avg": null, "total": 0 },
"M6": { "avg": 96.5, "total": 193, "min": 57, "max": 136 },
"M12": { "avg": 96.5, "total": 193, "min": 57, "max": 136 }
}
],
"creditCard": {
"percentage_transactions_debit_dates_1-5_M1": null,
"percentage_transactions_credit_dates_1-5_M1": null,
"count_transactions_debit_dates_1-5_M1": 0,
"count_transactions_credit_dates_1-5_M1": 0,
"diff_transactions_net_amount_alltime": 0,
"count_transactions_credit_alltime": 0,
"count_transactions_debit_alltime": 0,
"ratio_transactions_creditdebit_alltime": null,
"ratio_inflow_commitment_alltime": null,
"ratio_inflow_commitment_trend": null,
"limit_commitment_trend": null
}
},
"metadata": {
"itemsIds": [
"786583d9-ab31-44d9-86d4-a468e1a41168"
]
}
}
```
**Notes:**
- `M1` represents the last month, `M2` last two months, and `M12` twelve months.
- `dates_1-5` represents that it's filtered between dates in the first days of the month. `dates_16-20` represents between the day 16th and 20 both included.
- `amount_200-500` represents transactions with amounts having values between 200 and 500.
The book response also includes income analysis data:
```json
{
"status": "COMPLETED",
"itemId": "b3b60afc-6a76-43ae-9c94-3457ce8952b2",
"result": {
"totalIncomeStatistics": {
"daysCoveredWithIncome": 180,
"firstIncomeDate": "2021-11-01T00:00:00",
"lastIncomeDate": "2022-04-29T00:00:00",
"numIncomeTransactions": 17,
"averageMonthlyIncomeLast30Days": 821.51,
"averageMonthlyIncomeLast90Days": 3638.51,
"averageMonthlyIncomeLast180Days": 3727.7134,
"averageMonthlyIncomeLast360Days": 1863.8567
},
"irregularIncomeStatistics": {
"daysCoveredWithIncome": 5,
"firstIncomeDate": "2021-11-01T00:00:00",
"lastIncomeDate": "2022-02-01T00:00:00",
"numIncomeTransactions": 2,
"averageMonthlyIncomeLast30Days": 100.1,
"averageMonthlyIncomeLast90Days": 0,
"averageMonthlyIncomeLast180Days": 0,
"averageMonthlyIncomeLast360Days": 0
},
"incomeSources": [
{
"transactionDescription": "recebimento de proventos municipio de santa ines",
"incomeStatistics": {
"daysCoveredWithIncome": 151,
"firstIncomeDate": "2021-11-30T00:00:00",
"lastIncomeDate": "2022-04-29T00:00:00",
"numIncomeTransactions": 7,
"averageMonthlyIncomeLast30Days": 821.51,
"averageMonthlyIncomeLast90Days": 821.51,
"averageMonthlyIncomeLast180Days": 1017.5467,
"averageMonthlyIncomeLast360Days": 508.77335
},
"aggregatedIncomeStatistics": {
"averageMonthlyIncome": 941.23114,
"longevity": 45,
"regularity": 69,
"consistency": 66
}
},
{
"transactionDescription": "transferencia recebida #/# # #-# pref mun santa",
"incomeStatistics": {
"daysCoveredWithIncome": 101,
"firstIncomeDate": "2021-11-23T00:00:00",
"lastIncomeDate": "2022-03-03T00:00:00",
"numIncomeTransactions": 4,
"averageMonthlyIncomeLast30Days": 0,
"averageMonthlyIncomeLast90Days": 2733.6667,
"averageMonthlyIncomeLast180Days": 2518.5,
"averageMonthlyIncomeLast360Days": 1259.25
},
"aggregatedIncomeStatistics": {
"averageMonthlyIncome": 2473.4756,
"longevity": 27,
"regularity": 47,
"consistency": 42
}
},
{
"transactionDescription": "pix - recebido #/# #:# # rocleane pe",
"incomeStatistics": {
"daysCoveredWithIncome": 134,
"firstIncomeDate": "2021-11-01T00:00:00",
"lastIncomeDate": "2022-03-14T00:00:00",
"numIncomeTransactions": 6,
"averageMonthlyIncomeLast30Days": null,
"averageMonthlyIncomeLast90Days": 83.333336,
"averageMonthlyIncomeLast180Days": 191.66666,
"averageMonthlyIncomeLast360Days": 95.83333
},
"aggregatedIncomeStatistics": {
"averageMonthlyIncome": 101.36883,
"longevity": 36,
"regularity": 25,
"consistency": 0
}
}
],
"totalAggregatedIncomeStatistics": {
"averageMonthlyIncome": 3516.0754,
"longevity": 33,
"regularity": 52,
"consistency": 47
}
},
"createdAt": "2023-02-02T19:18:26.552Z"
}
```
## Recurrent pattern detection (BETA)
We also provide a service to analyze recurrent patterns in an Item's transactions (for example, payment of services or salary deposits). Here's an example of its usage:
1. Authenticate in Pluggy API to obtain an API key
2. Execute the following request
```curl
curl --location --request GET 'https://insights-api.pluggy.ai/transactions/recurrency?itemId={itemId}' \
--header 'X-API-KEY: {YOUR-API-KEY}'
```
3. Here is an example response
```json
{
"itemId": "b3b60afc-6a76-43ae-9c94-3457ce8952b2",
"recurrentTransactions": [
{
"description": "Pagamento da fatura",
"type": "DEBIT",
"averageAmount": -831.4033333333333,
"frequency": "MONTHLY"
},
{
"description": "Pb*Badoo",
"type": "DEBIT",
"averageAmount": 5.8999999999999995,
"frequency": "WEEKLY"
},
{
"description": "Pagamento efetuado - TIM",
"type": "DEBIT",
"averageAmount": -68.04785714285715,
"frequency": "MONTHLY"
}
]
}
```
## Transaction Enrichment
Source: https://docs.pluggy.ai/en/docs/intelligence/transaction-enrichment.md
The Enrichment API is a separate service that, using the same authentication as main Pluggy services, enables customers that have already collected Open Finance data or have existing data from their customer base to enrich the transactional data by providing categorization and merchant information.
> **Premium feature**
>
> To enable enrichment api, you must request this to the sales team to enable it for your team.
## How to use
1. Obtain an API key from our [Auth](/reference/auth-create) endpoint.
2. Use the categorization flow described in [Transaction Categorization](/docs/products/transaction-categorization) with the obtained API key, and send the transactions to categorize:
**Checking account example:**
```json
{
"transactions": [
{
"id": "76a87d4d-89f2-4544-a431-b5d8a45146c7",
"amount": -100,
"date": "2024-09-06T00:00:00-03:00",
"description": "MC DONALDS"
}
],
"clientUserId": "06199323-763c-4b15-9f65-3871d8b4d430",
"accountType": "CHECKING",
"isBusiness": false
}
```
**Checking account with payment data:**
```json
{
"transactions": [
{
"id": "76a87d4d-89f2-4544-a431-b5d8a45146c7",
"amount": -100,
"date": "2024-09-06T00:00:00-03:00",
"description": "MC DONALDS",
"paymentData": {
"payer": {
"name": "John Doe",
"documentNumber": { "value": "123.456.789-00", "type": "CPF" }
},
"receiver": {
"name": "MC DONALDS",
"documentNumber": { "value": "42.591.651/0001-43", "type": "CNPJ" }
}
}
}
],
"clientUserId": "06199323-763c-4b15-9f65-3871d8b4d430",
"accountType": "CHECKING",
"isBusiness": false
}
```
**Credit card example:**
```json
{
"transactions": [
{
"id": "76a87d4d-89f2-4544-a431-b5d8a45146c7",
"amount": -100,
"date": "2024-09-06T00:00:00-03:00",
"description": "MC DONALDS",
"creditCardMetadata": {
"payeeMCC": 1234
}
}
],
"clientUserId": "06199323-763c-4b15-9f65-3871d8b4d430",
"accountType": "CREDIT_CARD",
"isBusiness": false
}
```
The `creditCardMetadata` field is optional and greatly improves categorization accuracy.
You can send up to 5000 transactions per request.
The `accountType` field is optional and accepts `CHECKING` or `CREDIT_CARD`. The `isBusiness` field is also optional and indicates whether this is a PJ or PF account.
3. The response will look something like this:
```json
{
"results": [
{
"id": "76a87d4d-89f2-4544-a431-b5d8a45146c7",
"amount": -100,
"date": "2024-09-06T00:00:00-03:00",
"description": "MC DONALDS",
"type": "DEBIT",
"merchant": {
"name": "mc donalds",
"businessName": "ARCOS DOURADOS COMERCIO DE ALIMENTOS LTDA",
"cnpj": "42.591.651/0001-43"
},
"category": "Eating out"
}
]
}
```
The `merchant` field can be `null` if the merchant is unknown. See possible category values on our [Transaction Categorization](/docs/transaction-categories) page.
## Recurring Payments Analysis
Source: https://docs.pluggy.ai/en/docs/intelligence/recurring-payments.md
We offer a Recurring Payments API that allows you to identify a user's repeating expenses (like rent, service bills) and repeating incomes (like salary), useful for financial profiling. You can analyze an item's transactions and find out which ones repeat, how regular that repetition is, and the average amount of the repeating transaction.
> **Categorization Feature required**
>
> To use this API you will need the Categorization feature enabled for your client. It is enabled by default during trial period. After that, it is an opt-in premium feature.
>
> Please contact our Sales team if you want to enable it!
## Using the Recurring Payments API
1. Obtain an API key from our [Auth](/reference/auth-create) endpoint.
2. Use the recurring Payments endpoint with the obtained API key (as the `X-API-Key` header), and specify an Item ID in the request body:
```
POST https://enrichment-api.pluggy.ai/recurring-payments
```
```json
{
"itemId": "aaaaaaa1-aaaa-aaaa-aaaa-aaaaaaaaaaaa"
}
```
3. The response will look something like this:
```json
{
"recurringPayments": [
{
"description": "debito aut conta agua e esgoto sabesp",
"averageAmount": -76.78,
"occurrences": [
"77777777-8888-9999-0000-111111111111",
"88888888-9999-0000-1111-222222222222",
"99999999-0000-1111-2222-333333333333"
],
"regularityScore": 0.997773784382727
},
{
"description": "ebn spotify",
"averageAmount": -21.9,
"occurrences": [
"aaaaaaa1-aaaa-aaaa-aaaa-aaaaaaaaaaaa",
"bbbbbbb1-bbbb-bbbb-bbbb-bbbbbbbbbbbb",
"ccccccc1-cccc-cccc-cccc-cccccccccccc",
"ddddddd1-dddd-dddd-dddd-dddddddddddd",
"eeeeeee1-eeee-eeee-eeee-eeeeeeeeeeee",
"fffffff1-ffff-ffff-ffff-ffffffffffff",
"11111111-aaaa-aaaa-aaaa-aaaaaaaaaaaa",
"22222222-bbbb-bbbb-bbbb-bbbbbbbbbbbb",
"33333333-cccc-cccc-cccc-cccccccccccc",
"44444444-dddd-dddd-dddd-dddddddddddd",
"55555555-eeee-eeee-eeee-eeeeeeeeeeee",
"66666666-ffff-ffff-ffff-ffffffffffff"
],
"regularityScore": 0.9344445222642911
},
{
"description": "mp camisetadepre",
"averageAmount": -8.57,
"occurrences": [
"99999999-cccc-cccc-cccc-cccccccccccc",
"00000000-dddd-dddd-dddd-dddddddddddd",
"aaaaaaa3-aaaa-aaaa-aaaa-aaaaaaaaaaaa",
"bbbbbbb3-bbbb-bbbb-bbbb-bbbbbbbbbbbb",
"ccccccc3-cccc-cccc-cccc-cccccccccccc",
"ddddddd3-dddd-dddd-dddd-dddddddddddd"
],
"regularityScore": 0.9199999999999999
},
{
"description": "niazi chohfi textil",
"averageAmount": -20.12,
"occurrences": [
"eeeeeee3-eeee-eeee-eeee-eeeeeeeeeeee",
"fffffff3-ffff-ffff-ffff-ffffffffffff",
"11111113-aaaa-aaaa-aaaa-aaaaaaaaaaaa",
"22222222-bbbb-bbbb-bbbb-bbbbbbbbbbbb"
],
"regularityScore": 0.9528595479208968
}
]
}
```
`regularityScore` is a value between 0 and 1, indicating how consistent the payments are in terms of timing and amount. A higher score means more regular payments.
## Considerations
- **Amount Significance:** Negative amounts represent debits (expenses), and positive amounts represent credits (income). This holds for **every account type**: amounts are normalized before the analysis, so a recurring credit-card charge is returned as a negative `averageAmount` even though the raw transaction amount on a credit-card account is positive. You do not need to invert anything based on the account the payment came from.
- **Normalization:** Transaction descriptions are normalized by converting to lowercase and removing special characters and extra whitespace.
- **Minimum Occurrences:** A payment must occur at least three times to be considered recurring.
- **Interval Consistency:** Payments must occur at consistent intervals (approximately monthly, within a 30 +/-5 day range).
- **Amount Variance:** The variance in transaction amounts must be less than or equal to 10% to be considered consistent.
> **Customized analysis**
>
> If you are interested in a more custom user analysis, please contact our Sales team so we can work on it together!
## Payments Overview
Source: https://docs.pluggy.ai/en/docs/payments/overview.md
With Pluggy Payments, you can easily create payment links to bill your customers and automatically track their payments, leveraging secure OAuth integrations with institutions using the Open Finance Payment Initiation infrastructure.
You can also perform [Scheduled Payments](/docs/scheduled-payments), which can be used for things like pre-agreed monthly billing.
Our Payments solution handles three main concepts:
- **Payment Recipient**: a bank account that receives payments
- **Payment Request**: a request to pay a certain amount to a recipient. It has a payment link that you can send to your customer to pay.
- **Payment Intent**: an attempt to pay a Payment Request. It is created when your customer clicks "Pay" in our payment website.
> **Feature only by invite**
>
> This feature is in beta and must be enabled specifically for your client. If you're interested in trying it out, please get in touch with our Sales team!
## Example flow
1. We first create a Payment Recipient to indicate what bank account will receive the payment (you'll only need to do this once per account).
```json title="POST /payments/recipients (request)"
{
"taxNumber": "11111111111", // CPF or CNPJ
"name": "John Doe",
"paymentInstitutionId": "37f43fff-30cb-4cb5-8213-6662ac08a8c6",
"account": {
"branch": "0001",
"number": "123456",
"type": "CHECKING_ACCOUNT"
}
}
```
**Response**
```json title="POST /payments/recipients (response)"
{
"type": "BANK_ACCOUNT",
"id": "36fcb10f-825c-1111-b67c-93d0e47f4e77",
"name": "John Doe",
"taxNumber": "11111111111",
"isDefault": false,
"paymentInstitution": {
"id": "37f43fff-30cb-4cb5-8213-6662ac08a8c6",
"name": "SWAP MEIOS DE PAGAMENTOS INSTITUICAO DE PAGAMENTO S.A.",
"tradeName": "SWAP MP IP SA",
"ispb": "31680151",
"compe": null,
"createdAt": "2023-12-08T17:52:21.001Z",
"updatedAt": "2023-12-08T17:52:21.001Z"
},
"account": {
"type": "*******",
"number": "****56",
"branch": "0001"
},
"pixKey": null,
"createdAt": "2025-06-25T14:09:44.717Z",
"updatedAt": "2025-06-25T14:09:44.717Z"
}
```
Note: you can get the institution ids from [this endpoint](/reference/payment-recipient/payment-recipients-institution-list).
2. Create a Payment Request with the amount you wish to charge your customer, along with the recipient ID from the previous step.
```json title="POST /payments/requests (request)"
{
"amount": 0.01,
"description": "My payment request",
"recipientId": "ab276a3d-17ba-47eb-97bf-688475037ffe"
}
```
**Response**
```json title="POST /payments/requests (response)"
{
"id": "bb236f8d-caa5-47eb-97bf-688475037f3e",
"amount": 0.01,
"description": "My payment request",
"status": "CREATED",
"createdAt": "2023-11-14T16:57:17.511Z",
"updatedAt": "2023-11-14T16:57:17.511Z",
"callbackUrls": null,
"paymentUrl": "https://pay.pluggy.ai/bb236f8d-caa5-47eb-97bf-688475037f3e"
}
```
3. Send the response's `paymentUrl` to your customer.
4. The customer will visit our Pluggy Pagamentos website.
> **Payment URL vs. consent URL**
>
> The `paymentUrl` opens the Pluggy payment page. It does not have a fixed five-minute
> expiration; whether it can be used depends on the Payment Request's status and configuration.
> After the customer chooses an institution and clicks **Pay**, Pluggy creates a Payment Intent
> and returns a `consentUrl`. The `consentUrl` is the bank authorization URL and expires after
> five minutes. These are different URLs with different lifecycles.
## Reacting to a payment
You can indicate where to redirect the user after they complete a payment by using the `callbackUrls` field:
```json title="POST /payments/requests"
{
"amount": 0.01,
"description": "Transferência",
"callbackUrls": {
"success": "https://my-success-url.com",
"error": "https://my-error-url.com",
"pending": "https://my-pending-url.com"
}
}
```
It is also possible to react to a completed payment to create useful automations, using [webhooks](/docs/webhooks).
## Pre-filling the CPF/CNPJ
The payer CPF/CNPJ is required by Open Finance to start a payment. For PF, it requires CPF, and for PJ, it is both CPF and CNPJ. To improve the payment experience and reduce user mistakes, you can pre-fill it by creating a Payment Customer:
**Request — PF**
```json title="POST /payments/customers (PF)"
{
"type": "INDIVIDUAL",
"cpf": "123.456.789-12"
}
```
**Request — PJ**
```json title="POST /payments/customers (PJ)"
{
"type": "BUSINESS",
"cpf": "123.456.789-12",
"cnpj": "12.345.678/9012-34"
}
```
Now, when creating the Payment Request, include the field `customerId` pointing to the previously created Payment Customer.
## Pre-selecting the payer's institution
You can set a pre-selected institution for the payer when starting the payment initiation flow. This can be useful if you want to guide the user to use a specific institution to make the payment. To do this, you can create the payment customer by providing a `connectorId`:
```json title="POST /payments/customers"
{
"type": "INDIVIDUAL",
"cpf": "123.456.789-12",
"connectorId": 612
}
```
## Wrapping an existing PIX QR
If you want to use Pluggy to pay a PIX QR to allow tracking its payment, you can create a Recipient from PIX QR:
```json title="POST /payments/recipients/pix-qr"
{
"pixQrCode": "00020126490014br.gov.bcb.pix0108dict-key0215additional-info52040000530398654031005802BR5912example-name6006Cidade62090505tx-id63045E20"
}
```
## Creating a custom payment experience
If you don't want to use our `pay.pluggy.ai` flow, you can implement your custom payment experience using our API.
First of all, you need to create a **Payment Request**. There, you will specify how much money you want to receive. Also, you can configure a description (to be shown to the final user at the moment they authorize the payment), and a set of callback URLs where the user will be redirected after the payment authorization was completed. Fields `description`, `callbackUrl` and `isSandbox` are optional.
```json title="Request"
{
"amount": 100.50,
"description": "Transferência",
"callbackUrls": {
"success": "https://my-success-url.com",
"error": "https://my-error-url.com",
"pending": "https://my-pending-url.com"
},
"isSandbox": true
}
```
**Response**
```json title="Response"
{
"id": "05c693bf-c196-47ea-a28c-8251d6bb8a06",
"amount": 100.50,
"description": "Transferência",
"status": "CREATED",
"createdAt": "2023-11-06T13:03:45.689Z",
"updatedAt": "2023-11-06T13:03:45.689Z",
"callbackUrls": {
"success": "https://my-success-url.com",
"error": "https://my-error-url.com"
},
"isSandbox": true
}
```
You can find the endpoint details [here](/reference/payment-request-create).
### Creating a Payment Intent
After creating a payment request, you need to create a **Payment Intent**. This represents an intent of a person to make that payment. For example, if you want to charge a customer R$10, first you need to create a **Payment Request** for that amount, and then a **Payment Intent** when the user wants to pay.
To create a **Payment Intent**, you need to send the ID of the institution (`connectorId`) that the user will use to make the payment. You can find the connector list using our [connector's endpoint](/reference/connectors-list) and filter the ones with `supportsPaymentInitiation` property with value `true`. Also, you need to send the institution's required credentials in the `parameters` field. Those credentials also can be found in the [connector's endpoint](/reference/connectors-list).
This is the request to create a **Payment Intent**.
**Request — Personal Connector**
```json title="Request Personal Connector"
{
"paymentRequestId": "05c693bf-c196-47ea-a28c-8251d6bb8a06",
"connectorId": 601,
"parameters": {
"cpf": "76109277673"
}
}
```
**Request — Business Connector**
```json title="Request Business Connector"
{
"paymentRequestId": "05c693bf-c196-47ea-a28c-8251d6bb8a06",
"connectorId": 618,
"parameters": {
"cpf": "76109277673",
"cnpj": "11111111111111"
}
}
```
**Response**
```json title="Response"
{
"id": "4316602b-8fb5-4bfd-92dc-32921b7414f1",
"status": "CONSENT_AWAITING_AUTHORIZATION",
"createdAt": "2023-11-09T20:10:42.706Z",
"updatedAt": "2023-11-09T20:10:42.706Z",
"paymentRequest": {
"id": "f6696d02-3583-47ae-b195-148d71b8ae9b",
"amount": 100.50,
"description": null,
"status": "IN_PROGRESS",
"createdAt": "2023-11-09T20:10:25.084Z",
"updatedAt": "2023-11-09T20:10:42.706Z",
"callbackUrls": {
"success": "https://my-success-url.com",
"error": "https://my-error-url.com"
}
},
"connector": {
"id": 601,
"name": "Itaú",
"primaryColor": "48be9d",
"institutionUrl": "https://cdn.raidiam.io/directory-ui/brand/obbrazil/0.2.0.112/favicon.svg",
"country": "BR",
"type": "PERSONAL_BANK",
"credentials": [
{
"validation": "^\\d{3}\\.?\\d{3}\\.?\\d{3}-?\\d{2}$",
"validationMessage": "CPF deve ter 11 números.",
"label": "CPF",
"name": "cpf",
"type": "number",
"placeholder": "",
"optional": false
}
],
"imageUrl": "https://cdn.pluggy.ai/assets/connector-icons/itau.svg",
"hasMFA": false,
"oauth": true,
"health": {
"status": "ONLINE",
"stage": null
},
"products": [
"ACCOUNTS",
"TRANSACTIONS",
"IDENTITY",
"CREDIT_CARDS",
"PAYMENT_DATA",
"LOANS",
"INVESTMENTS"
],
"createdAt": "2023-07-24T14:29:32.140Z",
"isSandbox": true,
"isOpenFinance": true,
"updatedAt": "2023-11-09T19:17:08.495Z",
"supportsPaymentInitiation": true
},
"consentUrl": "https://consent-url.com"
}
```
There are important properties in the response object:
- **status**: At this point, it will have `CONSENT_AWAITING_AUTHORIZATION` as value. It means the user needs to authorize it in the institution. You can check the other possible values [here](/docs/payment-intent-statuses).
- **consentUrl**: It is the URL where you need to redirect the user in order to authorize the payment. This bank authorization URL expires after 5 minutes. This expiration applies to the `consentUrl` only; it does not mean that the `paymentUrl` has a five-minute expiration. After the payment is completed, the user will be redirected to the URLs specified in the `callbackUrls` defined before, or to a default URL provided by Pluggy if it wasn't specified.
You can find the endpoint details [here](/reference/payment-intent-create).
## Testing payments with Sandbox bank
You can use our testing app [playground](https://playground.pluggy.ai) to test the flow without any setup!
> **Using sandbox without playground**
>
> To test Sandbox payments in our App, simply create your **Payment Request** with `isSandbox: true`. Then, access:
>
> `https://pay.pluggy.ai/`
>
> The page will automatically detect the sandbox environment and only list sandbox connectors for you to complete the flow. Use Sandbox connector with the following credentials:
```json
{
"cpf": "76109277673",
"user": "ralph.bragg@gmail.com",
"password": "P@ssword01"
}
```
Use the CPF credential in the first input. Use **user** and **password** to log in to Mock Bank, and it will redirect to the Success or Error Page depending on the result of the Payment.
## Payment Intent Lifecycle and Errors
Source: https://docs.pluggy.ai/en/docs/payments/intent-lifecycle.md
Here you can find the possible statuses of a **Payment Intent**.
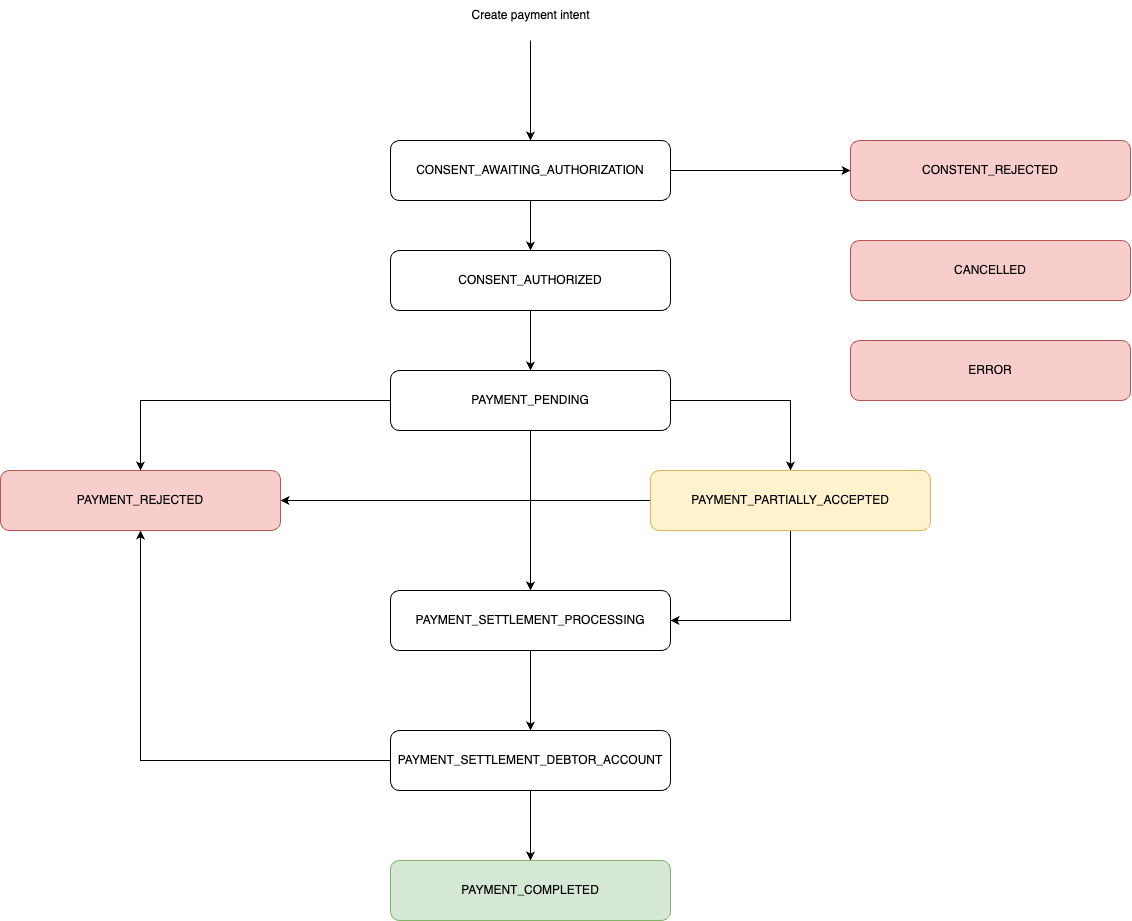
The possible final statuses are:
- **PAYMENT_COMPLETED**: Credit made at the destination account.
- **CONSENT_REJECTED**: Payment rejected by the user or institution.
- **PAYMENT_REJECTED**: Payment instruction rejected.
- **ERROR**: Validation failure or process error.
- **CANCELED**: Canceled by any other means.
- **EXPIRED**: The consent reached its expiration date.
- **PAYMENT_TIMEOUT**: The authorization attempt exceeded its timeout. Regular payment attempts time out after 30 minutes; Automatic PIX attempts time out after 60 minutes. The Payment Request returns to `CREATED` and Pluggy sends a `payment_intent/error` webhook.
If the status is **PAYMENT_PARTIALLY_ACCEPTED**, it means the payment requires an additional authorization (for example, if you do the payment using an operator account, it may require the authorization of a master user).
## Possible Errors When Creating a Payment Intent
A summary of error codes and their descriptions that may occur when attempting to process a payment intent through our API.
| Code | Provider Code | Provider Details |
|------|--------------|-----------------|
| VALUE_ABOVE_LIMIT | VALOR_ACIMA_LIMITE | O valor (ou quantidade de transações) ultrapassa a faixa de limite parametrizada na detentora para permitir a realização de transações pelo cliente. |
| INVALID_VALUE | VALOR_INVALIDO | O valor enviado não é válido para o QR Code informado. |
| INVALID_CHARGE | COBRANCA_INVALIDA | Validação de expiração, validação de vencimento, Status Válido. |
| INVALID_CONSENT | CONSENTIMENTO_INVALIDO | Consentimento inválido (status não é "authorised" ou está expirado). |
| PARAMETER_NOT_INFORMED | PARAMETRO_NAO_INFORMADO | Parâmetro não informado. |
| INVALID_PARAMETER | PARAMETRO_INVALIDO | Parâmetro inválido. |
| NOT_INFORMED | NAO_INFORMADO | Não informada pela detentora de conta. (possivelmente foi barrado pelo anti-fraude da instituição) |
| PAYMENT_DIVERGENT_FROM_CONSENT | PAGAMENTO_DIVERGENTE_DO_CONSENTIMENTO | Dados do pagamento divergentes dos dados do consentimento. |
| INVALID_PAYMENT_DETAIL | DETALHE_PAGAMENTO_INVALIDO | Detalhe do pagamento inválido. |
| PAYMENT_REFUSED_BY_HOLDER | PAGAMENTO_RECUSADO_DETENTORA | Pagamento recusado pela detentora de conta. |
| PAYMENT_REFUSED_BY_SPI | PAGAMENTO_RECUSADO_SPI | Pagamento recusado no Sistema de Pagamentos Instantâneos (SPI). |
| IDEMPOTENCY_ERROR | ERRO_IDEMPOTENCIA | Erro idempotência. |
| CONSENT_PENDING_AUTHORIZATION | CONSENTIMENTO_PENDENTE_AUTORIZACAO | Consentimento pendente autorização de múltiplas alçadas (status "PARTIALLY_ACCEPTED") |
| INFRASTRUCTURE_FAILURE | FALHA_INFRAESTRUTURA | Descrição de qual falha na infraestrutura inviabilizou o processamento. |
| SPI_INFRASTRUCTURE_FAILURE | FALHA_INFRAESTRUTURA_SPI | Indica uma falha no Sistema de Pagamentos Instantâneos (SPI). |
| DICT_INFRASTRUCTURE_FAILURE | FALHA_INFRAESTRUTURA_DICT | Indica uma falha no Diretório de Identificadores de Contas Transacionais (DICT). |
| ICP_INFRASTRUCTURE_FAILURE | FALHA_INFRAESTRUTURA_ICP | Indica uma falha na Infraestrutura de Chaves Públicas (ICP). |
| RECEIVER_PSP_INFRASTRUCTURE_FAILURE | FALHA_INFRAESTRUTURA_PSP_RECEBEDOR | Indica uma falha na infraestrutura do Prestador de Serviço de Pagamento (PSP) que recebe o pagamento. |
| HOLDER_INFRASTRUCTURE_FAILURE | FALHA_INFRAESTRUTURA_DETENTORA | Indica uma falha na infraestrutura da instituição detentora das informações ou recursos. |
| SAME_ORIGIN_DESTINATION_ACCOUNTS | CONTAS_ORIGEM_DESTINO_IGUAIS | Indica uma tentativa de pagamento onde a conta origem e a conta de destino são iguais. |
| PAYMENT_SCHEDULING_FAILURE | FALHA_AGENDAMENTO_PAGAMENTOS | Falha ao agendar pagamentos. |
| UNKNOWN_ERROR | ERRO_DESCONHECIDO | Ocorreu um erro não identificado na instituição financeira ou detentora de conta. |
| PAYMENT_REQUEST_SANDBOX_CONNECTOR_ERROR | CONECTOR_INVALIDO_PARA_PAGAMENTO_SANDBOX | O pagamento está em sandbox, mas o conector não suporta sandbox, ou há incompatibilidade de ambientes. |
| PAYMENT_REQUEST_PRODUCTION_CONNECTOR_ERROR | CONECTOR_INVALIDO_PARA_PAGAMENTO_EM_PRODUCAO | O pagamento está em produção, mas o conector é sandbox, ou há incompatibilidade de ambientes. |
## Scheduled Payments (Pix Agendado)
Source: https://docs.pluggy.ai/en/docs/payments/scheduled-payments.md
With our payment initiation functionality, you can schedule payments to occur in the future (also called PIX RECORRENTE) using any of the following modes:
- **SINGLE**: Schedule a payment to occur at a specific moment in the future.
- **DAILY**: Schedule several payments to occur every day, starting from a specific date.
- **WEEKLY**: Schedule several payments to occur every week, starting from a specific date.
- **MONTHLY**: Schedule several payments to occur every month, starting from a specific date.
- **CUSTOM**: Schedule several payments to occur on specific dates in the future.
## Scheduling a payment
1. Create a [Payment Request](/reference/payment-request-create) including a `schedule` object:
```json title="POST /payments/requests"
{
"amount": 1333.33, // The amount to be paid every day/week/month/custom schedule
"description": "My payment request 2",
"schedule": {
"type": "DAILY",
"startDate": "2024-06-26", // Date of the first payment
"occurrences": 2 // How many times to repeat it
},
"recipientId": "376af75c-05fa-4a50-9347-d790a2d19940"
}
```
2. Authorize the Payment Request with our Payments App (by visiting the `paymentUrl` in the response).
3. After the user chooses the institution to pay with, enters their CPF/CNPJ and clicks Pay, a Payment Intent with status CONSENT_AWAITING_AUTHORIZATION is created. This triggers the `payment_intent/created` webhook. The user is now redirected to their institution to authorize the scheduled payment.
4. Once authorized, the Payment Intent will change status to `PAYMENT_COMPLETED`. This triggers the `payment_intent/completed` webhook. Now, one or more Scheduled Payments (payments to occur in the future) will be created. Each creation will trigger the `scheduled_payment/created` webhook.
5. You can now obtain the list of [Scheduled Payments](/reference/payment-schedules-list):
```json title="GET /payment-requests/{id}/schedules"
{
"total": 2,
"totalPages": 1,
"page": 1,
"results": [
{
"id": "9f12b911-a064-4310-89f2-8d411e10b160",
"status": "SCHEDULED",
"scheduledDate": "2024-06-26",
"description": "My payment request 1/2"
},
{
"id": "1f1f04e8-0bcf-4baf-bbbd-8bedf8478503",
"status": "SCHEDULED",
"scheduledDate": "2024-06-27",
"description": "My payment request 2/2"
}
]
}
```
6. On each of the scheduled dates, a payment will be triggered in the institution. This will result in the Scheduled Payment changing status to COMPLETED or ERROR in the case of failure. This triggers the `scheduled_payment/completed` or `scheduled_payment/error` webhook.
7. If the user cancels a Scheduled Payment from the institution, it will change status to CANCELED and trigger the `scheduled_payment/canceled` webhook.
8. After all Scheduled Payments are COMPLETED, the Payment Request will change status to COMPLETED.
## Modifying or cancelling scheduled payments
If the user has not authorized a scheduled payment yet, you can modify it using the `PATCH /payment-requests/{id}` endpoint, or delete it using the `DELETE /payment-requests/{id}` endpoint.
After the user has authorized a Scheduled Payment, you can not add or edit the resulting Schedules. However, you can delete a particular schedule or cancel the entire payment altogether.
The authorizing user can also cancel all schedules from their bank directly. You can react to this change with a webhook.
## Schedule Modes
Here are examples of how to set up all the different schedule modes:
```json title="SINGLE"
{
"amount": 1333.33,
"description": "Test",
"schedule": {
"type": "SINGLE",
"date": "2024-06-26"
},
"recipientId": "376af75c-05fa-4a50-9347-d790a2d19940"
}
```
```json title="DAILY"
{
"amount": 1333.33,
"description": "Test",
"schedule": {
"type": "DAILY",
"startDate": "2024-06-26",
"occurrences": 2
},
"recipientId": "376af75c-05fa-4a50-9347-d790a2d19940"
}
```
```json title="WEEKLY"
{
"amount": 1333.33,
"description": "Test",
"schedule": {
"type": "WEEKLY",
"startDate": "2024-06-26",
"dayOfWeek": "MONDAY",
"occurrences": 2
},
"recipientId": "376af75c-05fa-4a50-9347-d790a2d19940"
}
```
```json title="MONTHLY"
{
"amount": 1333.33,
"description": "Test",
"schedule": {
"type": "MONTHLY",
"startDate": "2024-06-26",
"dayOfMonth": 1,
"occurrences": 2
},
"recipientId": "376af75c-05fa-4a50-9347-d790a2d19940"
}
```
```json title="CUSTOM"
{
"amount": 1333.33,
"description": "Test",
"schedule": {
"type": "CUSTOM",
"dates": ["2024-06-26", "2024-06-28"]
},
"recipientId": "376af75c-05fa-4a50-9347-d790a2d19940"
}
```
## Using a custom UI
If you want to use your own UI to implement the Scheduled Payment flow instead of our Payments App:
1. Create the payment request, including a `callbackUrl` to your website:
```json title="POST /payments/requests"
{
"amount": 1333.33,
"description": "My payment request 2",
"schedule": {
"type": "DAILY",
"startDate": "2024-06-26", // Date of the first payment
"occurrences": 2 // How many times to repeat it
},
"recipientId": "376af75c-05fa-4a50-9347-d790a2d19940",
"callbackUrls": {
"success": "/success",
"error": "/error"
}
}
```
2. Create a [Payment Intent](/reference/payment-intent-create) for that Payment Request:
```json title="POST /payments/intents"
{
"paymentRequestId": "4f05247c-d9ee-4d5b-a0ea-c1c52cc30f69",
"connectorId": 600, // this is sandbox
"parameters": {
"cpf": "76109277673"
}
}
```
3. Redirect the user to the `consentUrl` in the response, which will take them to the institution's Open Finance Payment Initiation screen to authorize the payment.
4. You will be redirected back to the corresponding `callbackUrl` (success or error).
## Scheduled Payment Webhooks
Source: https://docs.pluggy.ai/en/docs/payments/scheduled-webhooks.md
This section will discuss how each webhook is triggered after each step is completed, affecting the `PaymentRequest`, `PaymentIntent` & `SchedulePayment` entities.
## Schedule Webhooks Flow
The overall flow works as follows: when the payer authorizes the consent, a `payment_intent/created` webhook is triggered, followed by `payment_intent/completed` once the intent is confirmed. Then, one `scheduled_payment/created` webhook is triggered for each scheduled payment, and a `scheduled_payment/all_created` webhook once every schedule has been registered. As each scheduled payment is executed on its date, a `scheduled_payment/completed` webhook is triggered (or `scheduled_payment/error` if it fails), and finally `scheduled_payment/all_completed` when all schedules have finished.
## Example webhook payloads
Here are examples of webhook payloads in a case with two scheduled payments, and both becoming COMPLETED:
**payment_intent/created**
```json title="payment_intent/created"
{
"paymentRequestId": "a0ed730e-5a44-491f-9a32-aa295c399fdf",
"paymentIntentId": "056b8046-2f7c-4d97-b5d5-f5f54005db51",
"event": "payment_intent/created",
"eventId": "aa8f7239-101c-4553-afdd-9689a4ac46cd"
}
```
**payment_intent/completed**
```json title="payment_intent/completed"
{
"paymentRequestId": "a0ed730e-5a44-491f-9a32-aa295c399fdf",
"paymentIntentId": "056b8046-2f7c-4d97-b5d5-f5f54005db51",
"event": "payment_intent/completed",
"eventId": "1ecfb159-e506-48a3-895e-aed5241db4d9"
}
```
**scheduled_payment/created (1)**
```json title="scheduled_payment/created (1)"
{
"paymentRequestId": "a0ed730e-5a44-491f-9a32-aa295c399fdf",
"event": "scheduled_payment/created",
"eventId": "5f519a62-87e1-45ce-be36-d2b185994c21",
"scheduledPaymentId": "65c6f9cd-e69f-46cd-8103-80b42dd61bfd"
}
```
**scheduled_payment/created (2)**
```json title="scheduled_payment/created (2)"
{
"paymentRequestId": "a0ed730e-5a44-491f-9a32-aa295c399fdf",
"event": "scheduled_payment/created",
"eventId": "c8e0dd66-5939-425d-bfd2-900ffa6921ae",
"scheduledPaymentId": "502b68b5-f82a-4d1c-bcb3-e1e61fadc48a"
}
```
**scheduled_payment/all_created**
```json title="scheduled_payment/all_created"
{
"paymentRequestId": "a0ed730e-5a44-491f-9a32-aa295c399fdf",
"event": "scheduled_payment/all_created",
"eventId": "4f45ca0a-3286-47b4-b8b3-195cd35cac01"
}
```
**scheduled_payment/completed (1)**
```json title="scheduled_payment/completed (1)"
{
"paymentRequestId": "a0ed730e-5a44-491f-9a32-aa295c399fdf",
"event": "scheduled_payment/completed",
"eventId": "1d5d1aab-fc1a-40d4-aeae-15e7b9c11a10",
"endToEndId": "E44471172202505211500U0d9ffa12345",
"scheduledPaymentId": "65c6f9cd-e69f-46cd-8103-80b42dd61bfd"
}
```
**scheduled_payment/completed (2)**
```json title="scheduled_payment/completed (2)"
{
"paymentRequestId": "a0ed730e-5a44-491f-9a32-aa295c399fdf",
"event": "scheduled_payment/completed",
"eventId": "9ebc222b-a94d-41e1-ad52-c0cf26f0357e",
"endToEndId": "E44471172202505211500U0d9ffa12345",
"scheduledPaymentId": "502b68b5-f82a-4d1c-bcb3-e1e61fadc48a"
}
```
**scheduled_payment/all_completed**
```json title="scheduled_payment/all_completed"
{
"paymentRequestId": "a0ed730e-5a44-491f-9a32-aa295c399fdf",
"event": "scheduled_payment/all_completed",
"eventId": "7a9426aa-2ac3-4d8e-a5a4-fe780f116c6b"
}
```
> **Example**
>
> If you have configured all webhooks, following the example above of flow, this will trigger all those webhooks in that order.
>
> You will receive:
>
> - Two `payment_intent` webhooks (created & completed).
> - Five `scheduled_payment` webhooks.
> - Since in this example we scheduled **two payments**, we will receive **two for each payment** that was scheduled (created & completed).
> - One webhook when **all schedules** have finished.
### Webhook Errors
When you receive a `scheduled_payment/error` webhook, you can have one of the following error codes.
| Error Code | Meaning | Description |
|-----------|---------|-------------|
| `INSUFFICIENT_BALANCE` | Insufficient Balance | The account doesn't have enough balance to perform the payment. |
| `EXCEEDED_LIMIT` | Exceeded Limit | The payment amount exceeds the allowed limit. |
| `INVALID_AMOUNT` | Invalid Amount | The payment amount provided is invalid. |
| `INVALID_INVOICE` | Invalid Invoice | The provided invoice is invalid. |
| `INVALID_CONSENT` | Invalid Consent | The consent provided is invalid. |
| `PARAMETER_NOT_PROVIDED` | Parameter Not Provided | A required parameter was not provided. |
| `INVALID_PARAMETER` | Invalid Parameter | A parameter provided is invalid. |
| `NOT_PROVIDED` | Parameter Not Provided | A required parameter was not provided. |
| `PAYMENT_DIFFERENT_FROM_CONSENT` | Payment Different from Consent | The payment differs from the authorized consent. |
| `INVALID_PAYMENT_DETAIL` | Invalid Payment Detail | The payment details provided are invalid. |
| `PAYMENT_REJECTED_BY_HOLDER` | Payment Rejected by Holder | The account holder rejected the payment. |
| `IDEMPOTENCY_ERROR` | Idempotency Error | An idempotency error occurred, possibly due to duplicate requests. |
| `CONSENT_PENDING_AUTHORIZATION` | Consent Pending Authorization | The consent is pending authorization. |
| `INFRASTRUCTURE_FAILURE` | Infrastructure Failure | There was a failure in the infrastructure. |
| `SAME_ACCOUNT_ORIGIN_DESTINATION` | Same Account Origin and Destination | The origin and destination accounts are the same, which is not allowed. |
| `PAYMENT_SCHEDULING_FAILURE` | Payment Scheduling Failure | There was a failure in scheduling the payment. |
| `UNKNOWN_ERROR` | Unknown Error | An unknown error occurred either at the Open Finance institution or account holder side. |
## FAQ
Source: https://docs.pluggy.ai/en/docs/payments/scheduled-faq.md
The purpose of this page is to answer common questions about Scheduled Payments.
### 1. What happens if one of the payments fails due to insufficient funds in the user's account?
- You will receive the error via **webhook** with the reason (event: `scheduled_payment/error`). The payment status will change to **ERROR**, and subsequent payments **will continue normally**. Failed payments cannot be retried due to **Central Bank Regulations**.
## PIX Automatico
Source: https://docs.pluggy.ai/en/docs/payments/pix-automatico.md
Welcome to Pluggy's Pix Automático API—your gateway to seamless, automated recurring payments in Brazil.
Pix Automático, launched by the Central Bank of Brazil, brings the power of automation to the Pix instant payment system. With Pluggy, you can integrate Pix Automático into your product in minutes, enabling your users to schedule, authorize, and manage recurring payments with the same speed, reliability, and developer experience you expect from modern APIs.
---
## What is Pix Automático?
Pix Automático is the recurring payments layer of Pix. It lets you programmatically create mandates so your users can authorize automated, scheduled payments—perfect for subscriptions, utility bills, loan repayments, and more.
**Key features:**
- **Automated Recurrence:** Set up payment schedules and let Pluggy handle the rest—no manual intervention required.
- **User Authorization:** Every recurring payment is authorized by the payer, ensuring trust and transparency.
- **Instant Settlement:** Funds move instantly, 24/7, just like any Pix transaction.
- **Universal Reach:** Works across all Pix-enabled financial institutions.
---
## Why Build with Pix Automático?
Pix Automático unlocks new possibilities for your product:
- **Automate Everything:** Eliminate manual billing and collections with a few lines of code.
- **Boost Reliability:** Ensure on-time payments and retryable schedules.
- **Delight Users:** Give your customers a frictionless, secure way to manage recurring payments.
- **Save on Costs:** Leverage Pix's low fees and real-time infrastructure.
---
## Integration Options
Pluggy offers two flexible ways to integrate Pix Automático into your application:
- **Pluggy Payment Gateway:** The fastest way to get started. Use Pluggy's hosted payment interface, which works seamlessly, just like PIS or PIS Agendado. This option lets you offer Pix Automático with minimal development effort and a great user experience out of the box.
- **Direct APIs:** For customers who want full control over the user experience, Pluggy provides direct API endpoints. Build your interface and manage the entire Pix Automático flow programmatically.
Select the integration path that best suits your product and development requirements.
## Getting Started
Source: https://docs.pluggy.ai/en/docs/payments/pix-getting-started.md
This guide will walk you through the basics of creating your first Pix Automático payment request using Pluggy's Payment Gateway. You'll learn how to set up both fixed and variable amount requests, understand the available methods, and use the payment URL to deliver a seamless experience to your users.
> **Prerequisites**
>
> - **Create** a `PaymentRecipient` — same as other payment methods, the destinatary account is configured as a PaymentRecipient.
> - Prepare a callbackUrl to return to your application after payment has been successful / errored.
> - Setup **webhooks** to receive notifications from PaymentRequests, PaymentIntents or PixAutomaticPayments.
> - **Understand** how Pluggy manages **payment requests**, to share with end-users *Payment Authorization Links*.
## 1. Creating a Payment Request
To initiate a Pix Automático payment, you'll need to create a payment request (mandate) via Pluggy's API. This request defines the payer, the recurrence, and the payment details.
### Example: Creating a Payment Request
```http title="HTTP"
POST /payments/requests/automatic-pix
Content-Type: application/json
{
"description": "Pix Automatico",
"recipientId": "df3ed44b-f085-4b9e-b81e-7d1d4ed1476f",
"interval": "WEEKLY",
"startDate": "2025-06-10",
"minimumVariableAmount": 0.01,
"maximumVariableAmount": 0.02,
"firstPayment": {
"date": "2025-06-08",
"amount": 0.03,
"description": "First month"
}
}
```
---
## 2. Fixed and Variable Amounts
Pluggy supports both **fixed** and **variable** amount payment requests:
- **Fixed Amount:** The same amount is charged on every recurrence (e.g., a subscription).
- **Variable Amount:** The amount can change for each payment (e.g., utility bills).
**Fixed Amount Payload**
```json title="Fixed Amount Payload"
{
"description": "Your rent",
"recipientId": "df3ed44b-f085-4b9e-b81e-7d1d4ed1476f",
"interval": "MONTHLY",
"startDate": "2025-06-10",
"fixedAmount": 0.01,
"firstPayment": {
"date": "2025-06-08",
"amount": 100,
"description": "Rent"
}
}
```
**Variable Amount Payload**
```json title="Variable Amount"
{
"description": "Pix Automatico",
"recipientId": "df3ed44b-f085-4b9e-b81e-7d1d4ed1476f",
"interval": "WEEKLY",
"startDate": "2025-06-10",
"minimumVariableAmount": 100,
"maximumVariableAmount": 200,
"firstPayment": {
"date": "2025-06-08",
"amount": 300,
"description": "First month"
}
}
```
> **Extra considerations**
>
> When submitting payments you will be able to send an amount between **minimumVariableAmount** and **maximumVariableAmount**. You won't be able to send a value outside that range without creating another authentication.
>
> The fixed payments won't be able submit a **different value** than the one configured.
>
> First payment amounts **can be different and bigger than the authorization** that was requested. It doesn't affect the limits for that interval either.
---
## 3. Redirecting the user to Authorize
Once a payment request is created, Pluggy generates a **payment URL**. This URL is where your user (payer) will review and authorize the Pix Automático mandate.
- **How it works:** Redirect or send the payment URL to your user. They'll be guided through the authorization process, which is fully compliant with Central Bank of Brazil requirements.
- **Example response:**
```json
{
"id": "req_abc123",
"paymentUrl": "https://pay.pluggy.ai/pix-automatico/req_abc123",
"status": "CREATED"
}
```
- **Best practices:**
- Display the payment URL in your app or send it via email/SMS.
- Monitor the status of the payment request via webhooks or polling the API.
### Direct API
To create a Pix Automático payment intent via the API, you need to send a POST request to `/payments/intents` with a payload that includes the paymentRequestId, the payer's CPF/CNPJ, and name.
```json
// https://api.pluggy.ai/payments/intents
{
"paymentRequestId": "req_abc123", // The ID of the previously created payment request
"connectorId": 123, // The ID of the connector (bank/institution)
"parameters": {
"cpf": "12345678900", // CPF numbers
"name": "Maria Silva" // Full name of the payer
}
}
```
## 4. What Happens After Authorization?
- Once the user authorizes the payment request via the `paymentUrl`, Pluggy will generate a **Payment Intent** for the specific `connectorId` (the financial institution or bank selected by the user).
- The Payment Intent represents the actual scheduled payment and can be tracked via Pluggy's API and webhooks.
- You will receive real-time updates about the status of the Payment Intent, Payment Request and Automatic PIX.
- Including successful authorizations (`PAYMENT_COMPLETED`), rejections (`CONSENT_REJECTED`), and consent expiration (`EXPIRED`)
- Authorization timeouts are reported as `PAYMENT_TIMEOUT`
- Includes first payment notifications and future payments that are being scheduled
- Payment request status changes are notified via `payment_request/updated` webhook
> **Authorization timeout**
>
> If the Automatic PIX authorization process is not completed within 60 minutes, the Payment Intent is marked as `PAYMENT_TIMEOUT` and Pluggy sends a `payment_intent/error` webhook. This timeout is separate from the `consentUrl` expiration: the bank authorization URL expires after 5 minutes. The `paymentUrl` is not a five-minute link; its availability depends on the Payment Request's status and configuration.
## 5. First Payment
Automatically, after the authorization has been granted, if the first payment is scheduled for the same day (immediate payments), you will receive notifications that the payment has been scheduled and is being processed, and you will receive a second notification that the payment has been completed.
**automatic_pix_payment/created**
```json title="automatic_pix_payment/created"
{
"paymentRequestId": "624cb41e-2b76-42ac-8021-ce6b6b4ace6b",
"automaticPixPaymentId": "8429f45a-f541-4fc3-8439-cbc8d9dc9952",
"endToEndId": "E37943755202506111319U0da92d1b7e",
"eventId": "71e0b4db-4e8c-401d-8ad8-5ab3ecd1f3d0",
"event": "automatic_pix_payment/created"
}
```
**automatic_pix_payment/completed**
```json title="automatic_pix_payment/completed"
{
"paymentRequestId": "624cb41e-2b76-42ac-8021-ce6b6b4ace6b",
"automaticPixPaymentId": "8429f45a-f541-4fc3-8439-cbc8d9dc9952",
"endToEndId": "E37943755202506111319U0da92d1b7e",
"eventId": "71e0b4db-4e8c-401d-8ad8-5ab3ecd1f3d0",
"event": "automatic_pix_payment/completed"
}
```
## 6. Charging your customer
Once the payment request is authorized (Payment Request status is `AUTHORIZED`), you can schedule new payments for your customer using the Pluggy API.
> **Recommended: Use the Automatic PIX Scheduler**
>
> Instead of manually scheduling each payment via API, you can enable the **Automatic PIX Scheduler** when creating your payment request. With `schedulerConfiguration.enabled: true`, the system automatically schedules payments at each recurrence cycle within the allowed D+2 to D+10 window — no API calls or cron jobs needed on your side.
>
> This is the recommended approach, as it removes the complexity of tracking payment dates and respecting scheduling windows yourself.
>
> For full details, see the [Automatic PIX Scheduler documentation](/docs/payments/pix-scheduler).
### Manual Scheduling
If you prefer to control when each payment is scheduled, you can do so manually via the API.
#### Scheduling a New Payment
To schedule a new Pix Automático payment, make a `POST` request to: `POST /payments/requests/{id}/automatic-pix/schedule`
Where `{id}` is the ID of the authorized payment request.
**Example request**
```json title="Example request"
// POST /payments/requests/req_abc123/automatic-pix/schedule
// Content-Type: application/json
{
"amount": 150.00,
"date": "2025-07-10",
"description": "July utility bill"
}
```
**Example response**
```json title="Example response"
{
"id": "66d503f1-0cfa-4d64-9f87-0782d959eba7",
"status": "SCHEDULED",
"amount": 150.00,
"description": "July utility bill",
"date": "2025-07-10",
"endToEndId": null,
"errorDetail": null
}
```
> **Important Considerations**
>
> - The payment request **must** be in the `AUTHORIZED` status.
> - The scheduled date must respect the interval and limits defined in the original authorization (e.g., monthly, weekly).
> - Only **one payment can be made in the interval**. If you have configured the PaymentRequest to be monthly, you will be able to generate only one monthly payment (same day of month).
> - For variable amount mandates, the amount must be within the authorized min/max range.
> - All payment validations will return a HTTP 400 error explaining why the payment won't be scheduled.
> - You can change the receiver account sending another "recipientId" in the request body. That recipient must have the same taxNumber as the original recipient (otherwise it will fail).
> - Payments must be scheduled between 2 and 10 days before the payment date. For example, if you want to charge your customer on the 15th of each month, you need to schedule the payment between the 5th and the 8th of that month.
### Reviewing payments
- You can list all payments for a request using:
```
GET /payments/requests/{id}/automatic-pix/schedules
```
This will include the first payment as well.
- Once you schedule an Automatic PIX, we will return it on the list and will send webhooks (`automatic_pix_payment/created`) when it is created.
- On the date the payment was scheduled, it will try the payment and change to `COMPLETED`. You will be able to list it and receive webhook notifications as well.
## 7. How to Retry a Payment
Sometimes, a scheduled automatic pix payment may fail due to insufficient funds, network issues, or other temporary problems. To ensure your payment workflow is robust, you need a retry mechanism for failed payments.
First of all, the institution will do the following:
- First attempt: Between 00:00 and 08:00 on the scheduled day.
- Second attempt: If the first attempt fails (e.g., due to insufficient funds), a second attempt is made between 18:00 and 21:00 on the same day.
If both attempts fail, you have two options:
### Recommended: Automatic Retries
We recommend using **[Automatic Retries](/docs/automatic-pix-automatic-retries)**. When you create your Payment Request, you configure which days after a failure Pluggy should automatically retry (e.g., 1, 3, and 5 days later). Pluggy then handles retries for you—no extra API calls, no cron jobs, and no risk of missing the retry window. You only need to listen to the same webhooks you already use.
### Alternative: Manual Retries
If you prefer to control retries yourself, you can call the retry API when you receive an error webhook:
1. **Identify the Failed Payment** — Monitor the status of your scheduled payments using the Pluggy API. You will receive webhook notifications for each payment status that changes.
In order to retry a payment, it must have been successfully scheduled and then failed on the settlement date. To verify whether a payment has been scheduled correctly, it needs to have an end_to_end_id defined. Also, the payment needs to be in `ERROR` status.
2. **Initiate a Retry** — To retry a payment, use the API endpoint for creating a new payment, referencing the original payment's details. You may need to provide the original payment ID and update any necessary fields (such as the scheduled date).
```http title="HTTP"
POST /payments/requests/{id}/automatic-pix/schedules/{scheduleId}/retry
Content-Type: application/json
{
"date": "2024-07-01"
}
```
3. **Track the Retry Attempt** — Each retry will generate a new payment record. Use the response to track the new payment's status.
See [Automatic PIX FAQ - Retries](/docs/automatic-pix-faq#/retries) for more details.
#### Example Workflow
- The payment scheduled for July 1st failed due to insufficient funds.
- Institutions may retry during that day after 18hs.
- If the second attempt fails, you schedule a retry for the next day.
- After 3 failed manual retries, payment can be considered as unsuccessful.
### Retriable errors
Not all errors are eligible for retries. Only the following error codes from the financial institution trigger automatic retries:
- `UNKNOWN_ERROR` — An unknown error occurred in the Open Finance institution or account holder (for example, insufficient funds)
- `PAGAMENTO_RECUSADO_DETENTORA` — Payment rejected by the account holder's institution
- `PAGAMENTO_RECUSADO_SPI` — Payment rejected by SPI
- `FALHA_INFRAESTRUTURA_SPI` — SPI infrastructure failure
- `FALHA_INFRAESTRUTURA_ICP` — ICP infrastructure failure
- `FALHA_INFRAESTRUTURA_PSP_RECEBEDOR` — Receiver PSP infrastructure failure
- `FALHA_INFRAESTRUTURA_DETENTORA` — Account holder's institution infrastructure failure
- `NAO_INFORMADO` — Not informed (for example, fraud detection)
- `LIMITE_VALOR_TRANSACAO_CONSENTIMENTO_EXCEDIDO` — Consent transaction value limit exceeded
## 8. Monitoring retries
You can track all attempts (original and retries) for a given schedule using the **Get schedule by ID** endpoint. This returns the payment schedule plus an `attempts` array with the full history of attempts — one entry per try (initial schedule plus each retry), ordered from most recent to oldest.
**Endpoint:**
```http
GET /payments/requests/{requestId}/automatic-pix/schedules/{paymentId}
```
The response includes the schedule's current `status`, `date`, `errorDetail`, and an `attempts` array. Each attempt has:
| Field | Description |
|-------|-------------|
| `id` | Unique identifier of the attempt |
| `status` | Status of that attempt (`SCHEDULED`, `COMPLETED`, `ERROR`, `CANCELED`, `IN_PROGRESS`) |
| `endToEndId` | End-to-end ID from the institution (when available) |
| `date` | Date of the attempt (YYYY-MM-DD) |
| `errorDetail` | Error details if the attempt failed (e.g. `code`, `title`, `detail`) |
Use this to:
- **Support:** Show users the full history of what happened (e.g. "Failed on Jul 10 (insufficient funds), retried on Jul 11, completed on Jul 12").
- **Dashboards:** Count retries, success rate after retries, or most common error codes.
- **Audit:** Keep a clear record of every attempt for a given payment.
**Example response (schedule with one failed attempt and one successful retry):**
```json
{
"id": "66d503f1-0cfa-4d64-9f87-0782d959eba7",
"status": "COMPLETED",
"amount": 150.00,
"description": "July utility bill",
"date": "2025-07-10",
"endToEndId": "E37943755202507101324U4bbaa85088",
"errorDetail": null,
"attempts": [
{
"id": "a1b2c3d4-...",
"status": "COMPLETED",
"endToEndId": "E37943755202507101324U4bbaa85088",
"date": "2025-07-11",
"errorDetail": null
},
{
"id": "e5f6g7h8-...",
"status": "ERROR",
"endToEndId": null,
"date": "2025-07-10",
"errorDetail": {
"code": "UNKNOWN_ERROR",
"title": "An unknown error occurred in the Open Finance institution or account holder.",
"detail": "An unknown error occurred."
}
}
]
}
```
The schedule's top-level `status` and `date` reflect the **current** state (e.g. `COMPLETED` and the retry date). The `attempts` array gives you the full timeline.
## 9. Canceling Authorizations or Payments
### Canceling an Authorization
Authorizations allow scheduled payments to be processed automatically. If a user wishes to stop future payments, they can cancel the authorization at any time.
#### How to Cancel an Authorization
1. **Send a Cancel Request** — Use the API endpoint to cancel the authorization. This will prevent any future payments from being processed under this authorization.
```http
POST /payments/requests/{id}/automatic-pix/cancel
Content-Type: application/json
```
2. **Check Payment Request Status** — The API will return a 204 that the cancellation request has been accepted and that the bank will proceed to process the cancellation.
3. **Listen to Webhooks**: The updated payment request status will be sent as a notification via the `payment_request/updated` webhook. Confirm that the status is now `CANCELED` or equivalent.
**Webhook Payload Example:**
```json
{
"eventId": "71e0b4db-4e8c-401d-8ad8-5ab3ecd1f3d0",
"event": "payment_request/updated",
"paymentRequestId": "624cb41e-2b76-42ac-8021-ce6b6b4ace6b",
"clientId": "client-123",
"status": "CANCELED"
}
```
> **Important**
>
> - Payment scheduled for the next day or first payments won't be cancelled.
> - Once the payment request is canceled, it's not possible to authorize it again. In that case, you need to create a new payment request.
---
### Canceling a Payment
If a payment is scheduled but has not yet been processed, you may cancel it to prevent the transfer of funds.
#### How to Cancel a Payment
1. **Send a Cancel Request** — Use the API endpoint to cancel the payment.
```http
POST /payments/requests/{paymentId}/automatic-pix/schedules/{scheduleId}/cancel
Content-Type: application/json
```
Replace `{paymentId}` with the actual ID of the payment you want to cancel.
2. **Check Pix Automatico Payment Scheduled Status** — The API will return a 204 that the cancellation request has been accepted and that the bank will proceed to process the cancellation.
3. **Listen to Webhooks**: The updated payment schedule status will be sent as a notification. Confirm that the status is now `CANCELED` or equivalent.
> **Important:**
>
> Payments that are already processed or in a terminal state (e.g., `COMPLETED`, `ERROR`) cannot be canceled.
>
> For cancellations done after the previous day time window (22hs BRT), may not be cancelled.
For more details, see the [Pluggy API Reference: Schedule Automatic PIX payment](/reference/payment-request-create-automatic-pix-schedule).
## Automatic PIX Scheduler (Beta)
Source: https://docs.pluggy.ai/en/docs/payments/pix-scheduler.md
## Overview
The **Automatic PIX Scheduler** is an extension of Pluggy's [Automatic PIX](/docs/getting-started-with-pix-automático) feature that lets you automate the scheduling of recurring payments without manual intervention.
Instead of calling the schedule endpoint yourself for each payment cycle, you can enable the scheduler when creating the payment request. Once the payer authorizes the consent, payments will be automatically scheduled at each recurrence cycle, always respecting the allowed scheduling window (D+2 to D+10).
## How it works
When you create an Automatic PIX payment request with `schedulerConfiguration.enabled: true`, the system takes care of scheduling payments for you. After the payer authorizes the consent, payments are periodically scheduled according to the configured `interval` and `startDate`, within the allowed D+2 to D+10 window. This continues automatically until the consent expires or is cancelled.
## Configuration
You configure the scheduler at the time of creating the Automatic PIX payment request, via the `schedulerConfiguration` object:
```json
{
"schedulerConfiguration": {
"enabled": true,
"description": "Monthly subscription payment"
}
}
```
### Parameters
| Parameter | Type | Required | Description |
|-----------|------|----------|-------------|
| `enabled` | `boolean` | Yes | Enables automatic scheduling of payments. |
| `description` | `string` | No | Description for the scheduled payments (max 140 characters). If set, overrides the payment request's `description`. |
| `valueForVariableAmount` | `number` | Conditional | **Required** when the consent uses variable amounts (`minimumVariableAmount` / `maximumVariableAmount`). This is the default amount that will be used for each automatically scheduled payment. Must be within the allowed range. **Not allowed** when the consent uses a `fixedAmount`. |
## Creating a payment request with automatic scheduling
### Fixed amount example
```bash
curl -X POST https://api.pluggy.ai/payments-requests/automatic-pix \
-H "X-API-KEY: {your-api-key}" \
-H "Content-Type: application/json" \
-d '{
"description": "Monthly subscription",
"fixedAmount": 99.90,
"interval": "MONTHLY",
"startDate": "2025-07-01",
"recipientId": "{recipient-id}",
"schedulerConfiguration": {
"enabled": true,
"description": "Subscription - July 2025"
}
}'
```
### Variable amount example
```bash
curl -X POST https://api.pluggy.ai/payments-requests/automatic-pix \
-H "X-API-KEY: {your-api-key}" \
-H "Content-Type: application/json" \
-d '{
"description": "Utility bill",
"minimumVariableAmount": 50.00,
"maximumVariableAmount": 500.00,
"interval": "MONTHLY",
"startDate": "2025-07-01",
"recipientId": "{recipient-id}",
"schedulerConfiguration": {
"enabled": true,
"valueForVariableAmount": 150.00
}
}'
```
## Scheduling logic
### Payment date calculation
Each payment is scheduled at the start of its recurrence cycle. For example, a `MONTHLY` consent starting on July 1st will have payments scheduled for July 1st, August 1st, September 1st, etc.
Per Central Bank regulations, payments must be scheduled between **D+2 and D+10**. If the next payment date has already passed D+2, the scheduler adjusts it to the earliest allowed date.
The scheduler automatically stops when the consent expires (`expiresAt`) or is cancelled. In both cases, a `payment_request/updated` webhook is sent with the payment request status set to `EXPIRED` or `CANCELED` respectively.
## Validation rules
| Scenario | Error |
|----------|-------|
| Variable amount consent without `valueForVariableAmount` in scheduler config | `AUTOMATIC_PIX_SCHEDULER_MISSING_VALUE_FOR_VARIABLE_AMOUNT` |
| `valueForVariableAmount` is outside the `minimumVariableAmount` / `maximumVariableAmount` range | `AUTOMATIC_PIX_SCHEDULER_VALUE_FOR_VARIABLE_AMOUNT_NOT_IN_RANGE` |
| `valueForVariableAmount` is provided but the consent uses a `fixedAmount` | `AUTOMATIC_PIX_SCHEDULER_VALUE_FOR_VARIABLE_AMOUNT_NOT_ALLOWED` |
## Supported intervals
The scheduler supports all PIX Automático intervals:
- `WEEKLY` — 7-day cycles
- `MONTHLY` — Calendar month cycles
- `QUARTERLY` — 3-month cycles
- `SEMESTER` — 6-month cycles
- `ANNUAL` — 12-month cycles
## Automatic retries (Beta)
Source: https://docs.pluggy.ai/en/docs/payments/pix-retries.md
When a Automatic Pix Payment fails (e.g., due to insufficient funds), it needs to be retried within a specific time window. With **Automatic Retries**, Pluggy handles this for you — no extra API calls, no polling, no cron jobs on your side.
## How it works
When you create a Payment Request, you can include an `automaticRetriesConfiguration` object with a `retryDays` array. Each value represents the number of days **after the original payment date** when Pluggy should automatically retry the payment if it fails.
When a payment enters `ERROR` status with a retriable error, Pluggy will automatically schedule the next retry on the first available future date from your `retryDays` configuration. You will receive the usual `automatic_pix_payment/created` webhook when the retry is scheduled, and `automatic_pix_payment/completed` or `automatic_pix_payment/error` when it settles.
> **Note:** Automatic retries only apply to payments that were successfully scheduled and then failed on the settlement date. Payments that fail before being scheduled are not eligible for automatic retries.
## Setting up Automatic Retries
Add the `automaticRetriesConfiguration` field when creating your Payment Request:
```json
POST /payments/requests/automatic-pix
{
"description": "Monthly subscription",
"recipientId": "df3ed44b-f085-4b9e-b81e-7d1d4ed1476f",
"interval": "MONTHLY",
"startDate": "2025-07-01",
"fixedAmount": 49.90,
"isRetryAccepted": true,
"automaticRetriesConfiguration": {
"retryDays": [1, 3, 5]
}
}
```
In this example, if a payment scheduled for July 10th fails:
| Attempt | Date | What happens |
|---------|------|-------------|
| Original | July 10 | Payment fails due insufficient funds |
| Retry 1 | July 11 | Pluggy automatically retries (original date + 1 day) |
| Retry 2 | July 13 | If retry 1 fails, Pluggy retries again (original date + 3 days) |
| Retry 3 | July 15 | If retry 2 fails, Pluggy retries again (original date + 5 days) |
You will receive webhook notifications for each attempt, so you can keep your users informed.
## Configuration rules
### `retryDays`
An array of integers (from 1 to 7) representing the days after the original payment date when retries should be attempted.
- Each value must be between **1** and **7**.
- A maximum of **3 retries** will be attempted per payment.
- For `WEEKLY` interval, retry days must be **5 or less** (to stay within the recurrence cycle).
### `isRetryAccepted`
Must be set to `true` when using `automaticRetriesConfiguration`. This field is part of the Open Finance consent and signals that the payer has authorized retries.
## Examples
### Fixed monthly subscription with aggressive retries
Retry every day for 3 consecutive days after a failure:
```json
{
"description": "Gym membership",
"recipientId": "df3ed44b-f085-4b9e-b81e-7d1d4ed1476f",
"interval": "MONTHLY",
"startDate": "2025-07-01",
"fixedAmount": 99.90,
"isRetryAccepted": true,
"automaticRetriesConfiguration": {
"retryDays": [1, 2, 3]
}
}
```
### Variable amount with spaced-out retries
Give the user more time between retries:
```json
{
"description": "Utility bill",
"recipientId": "df3ed44b-f085-4b9e-b81e-7d1d4ed1476f",
"interval": "MONTHLY",
"startDate": "2025-07-01",
"minimumVariableAmount": 50.00,
"maximumVariableAmount": 500.00,
"isRetryAccepted": true,
"automaticRetriesConfiguration": {
"retryDays": [1, 4, 7]
}
}
```
### Weekly interval
For weekly intervals, retries must be within 5 days:
```json
{
"description": "Weekly delivery fee",
"recipientId": "df3ed44b-f085-4b9e-b81e-7d1d4ed1476f",
"interval": "WEEKLY",
"startDate": "2025-07-07",
"fixedAmount": 25.00,
"isRetryAccepted": true,
"automaticRetriesConfiguration": {
"retryDays": [1, 3, 5]
}
}
```
## Why use Automatic Retries instead of implementing retries yourself
### Timing and compliance
The Open Finance regulation defines specific rules about when and how Pix Automatico payments can be retried. Retry windows depend on the recurrence interval, cycle boundaries, and the type of error. Pluggy's automatic retries are built to comply with these rules out of the box, so you don't need to track cycle dates or validate retry windows yourself.
### Handling delayed error notifications
Financial institutions sometimes delay reporting a payment's final status. If a payment fails on Monday but the institution only notifies the error on Wednesday, a retry scheduled for Tuesday would have already been missed. Pluggy handles this gracefully — when the error notification arrives, it automatically picks the **next available future retry date** from your configuration, skipping any dates that are already in the past.
### Reduced complexity
Without automatic retries, you would need to:
- Listen for `automatic_pix_payment/error` webhooks
- Determine if the error is retriable
- Calculate the correct retry date within the allowed window
- Call `POST /payments/requests/{id}/automatic-pix/schedules/{scheduleId}/retry` with the right date
- Handle edge cases like delayed notifications, cycle boundaries, and max retry limits
With automatic retries, all of this is handled by Pluggy. You only need to configure `retryDays` once when creating the Payment Request.
### Reliability
Automatic retries are triggered server-side immediately when the error is received. There's no dependency on your infrastructure being available, no risk of missed webhooks, and no need to implement idempotency logic for retry calls.
## Webhook notifications
You will continue to receive the same webhook events as with manual retries:
| Event | When |
|-------|------|
| `automatic_pix_payment/error` | The payment (or a retry) has failed |
| `automatic_pix_payment/created` | A retry has been scheduled |
| `automatic_pix_payment/completed` | A retry was successful |
## Retriable errors
See [Retriable errors](/docs/getting-started-with-pix-automático#retriable-errors) for the full list of error codes that trigger automatic retries.
Errors outside this list indicate a non-transient problem and will **not** trigger automatic retries.
## Monitoring retries
See [Monitoring retries](/docs/getting-started-with-pix-automático#8-monitoring-retries) for details on how to track all attempts for a given payment.
## FAQ
Source: https://docs.pluggy.ai/en/docs/payments/pix-faq.md
Common questions related to how Pix Automatico works.
### Creating an automatic PIX payment request
- **Does the authorization expire?**
The recurring consent does not have an expiration date by default. If needed, you can define one by including the `expiresAt` field when creating the payment request. The initial Automatic PIX authorization attempt times out after 60 minutes if the payer does not complete it, and the `consentUrl` used for bank authorization expires after 5 minutes.
- **What are the fields `fixedAmount`, `minimumVariableAmount` and `maximumVariableAmount`?**
*Note: The following applies only to scheduled payments and not to the first payment. For details on the first payment, see the next section "First Payment."*
- If `fixedAmount` is provided, all scheduled payments associated with this payment request must have exactly that amount.
- If `minimumVariableAmount` and `maximumVariableAmount` are provided instead, each scheduled payment must have an amount within that range. Once the consent is authorized, these values cannot be modified. **Important**: Some institutions (for example, Nubank) allows to modify the `maximumVariableAmount` when the user authorizes the consent.
- **What is the `interval`?**
This defines the payment frequency. For example, if the interval is set to `MONTHLY`, only one payment per month is allowed (excluding the first payment). The interval cannot be changed after the consent has been authorized.
- **What happens if the `description` is not sent?**
The institution sets a default description.
- **What types of recipients can be configured in the payment request?**
Only businesses (CNPJ) can be configured as recipients for automatic Pix payments. The payer can be either an individual (CPF) or a business (CNPJ).
- **Can I change the receiver account?**
Yes, you can do that in two ways:
- Editing the existing recipient: [Update Payment Recipient](/reference/payment-recipient-update#/)
- Creating and sending a new one when scheduling a payment: [Schedule Automatic PIX](/reference/payment-request-create-automatic-pix-schedule#/). The only restriction is that the new recipient must have the same CNPJ as the original recipient, otherwise, the payment will fail.
### First payment
- **Can the amount exceed or differ from the authorized limit?**
Yes. The first payment amount is independent of the authorized payment limits. For example, if the user authorized payments between R$100 and R$500, the first payment can still be R$2,000.
- **When is this payment settled?**
The first payment can be settled at the moment or can be scheduled for another date.
- **Is it considered part of the interval limits of the authorization?**
No. For example, if the user authorized one payment per month, the first payment doesn't affect that limit.
- **Is it mandatory to configure a first payment?**
No, it is completely optional.
### Scheduling a payment
- **When can a payment be scheduled?**
After the payment request is authorized, payments can be scheduled between D+2 and D+10 from today, and only if the payment periodicity allows it. For example, if the periodicity is `WEEKLY` and a payment is scheduled for Thursday, a new payment can be scheduled starting from next Thursday (one payment per week). The same applies for other interval types (`MONTHLY`: same day every month, yearly).
- **How are the payment cycles calculated?**
Depending on the selected interval type, the payment cycles are calculated differently, using the configured `startDate` as reference. Payments can be scheduled on any day between the start and end dates of each cycle (taking into account the previously mentioned D+2 and D+10 restrictions). For example:
Consent start date: 20/12/2025
- *WEEKLY*: A new cycle starts every 7 days
- First cycle: 20/12/2025 - 26/12/2025
- Second cycle: 27/12/2025 - 02/01/2026
- Etc.
- *MONTHLY*: A new cycle starts on the same day of each month. If the day does not exist in a specific month (for example, 31/04), the cycle starts on the last available day of that month (in this case, 30/04)
- First cycle: 20/12/2025 - 19/01/2026
- Second cycle: 20/01/2026 - 19/02/2026
- Etc.
- *QUARTERLY*: Same rules as *MONTHLY*, but every 3 months:
- First cycle: 20/12/2025 - 19/03/2026
- Second cycle: 20/03/2026 - 19/06/2026
- Etc.
- *SEMESTER*: Same rules as *MONTHLY*, but every 6 months:
- First cycle: 20/12/2025 - 19/06/2026
- Second cycle: 20/06/2026 - 19/12/2026
- Etc.
- *YEARLY*: Same rules as *MONTHLY*, but every 1 year:
- First cycle: 20/12/2025 - 19/12/2026
- Second cycle: 20/12/2026 - 19/12/2027
- Etc.
- **What happens if the payment fails?**
See the "Retries" section.
- **Can a scheduled payment be modified?**
No, once a payment is scheduled, it cannot be modified. If you need to change the date, amount or description, you must cancel it and schedule a new one.
### Canceling payments and revoking consents
- **Which payments can be cancelled?**
Only payments with the status `SCHEDULED` can be canceled. Once the payment is completed, it can only be refunded manually by the recipient. See: [Cancel Automatic PIX Schedule](/reference/cancel-automatic-pix-schedule)
- **Can an automatic PIX consent be revoked?**
Yes. See: [Cancel Automatic PIX Consent](/reference/payment-request-cancel-automatic-pix-consent). After revoking consent, no new payments can be scheduled under that payment request. This process is asynchronous, so after receiving a response from that endpoint, a few seconds may pass until the consent is cancelled. All scheduled payments (except those to be settled on the same day as the cancellation) will also be cancelled.
### Retries
- **How to implement retries?**
There are two ways to implement retries:
- Using the Pluggy's automatic retry system (recommended)
- Implementing a custom retry flow. More info here: [How to Retry a Payment](/docs/getting-started-with-pix-automático#7-how-to-retry-a-payment)
- **How many times does the bank try to execute the payment?**
The bank attempts to execute the payment twice:
- First attempt: Between 00:00 and 08:00 on the scheduled day.
- Second attempt: If the first attempt fails (e.g., due to insufficient funds), a second attempt is made between 18:00 and 21:00 on the same day.
After that, if the automatic PIX consent is configured to allow retries, up to three additional retry attempts can be made within a 7-day window (5 for weekly payments). These retries must be submitted by 22:00 on the day before the new scheduled payment date. If the payment request does not allow retries or the maximum number of attempts is reached, the payment will receive an `ERROR` status and cannot be retried anymore.
In order to retry a payment, it must have been successfully scheduled and then failed on the settlement date.
> **Important: if you miss the 7-day window to schedule a retry, that payment can no longer be retried and you will not be allowed to schedule new payments during that period. Also, the 7 days window can be shorter if the payment cycle ends before that day.**
## Coverage
Source: https://docs.pluggy.ai/en/docs/payments/coverage.md
Using our self-documented API, you can keep track of which institutions support each payment method. You can recover the list of institutions using the [List Connectors](/reference/connectors-list) endpoint.
Once you recover an institution, you will get a JSON similar to this one:
```json title="Response"
{
"id": 601,
"name": "Itaú",
"primaryColor": "EC7000",
"institutionUrl": "https://www.itau.com.br/assets/dam/publisher/07_itau_empresas/13_open_banking/logos_regulatorio_bacen/opb_log_reg_bac_itau_img_01.svg",
"country": "BR",
"type": "PERSONAL_BANK",
"credentials": [
{
"validation": "^\\d{3}\\.?\\d{3}\\.?\\d{3}-?\\d{2}$",
"validationMessage": "CPF deve ter 11 números.",
"label": "CPF",
"name": "cpf",
"type": "number",
"placeholder": "",
"optional": false
}
],
"imageUrl": "https://cdn.pluggy.ai/assets/connector-icons/201.svg",
"hasMFA": false,
"oauth": true,
"health": {
"status": "ONLINE",
"stage": null
},
"products": [
"ACCOUNTS",
"TRANSACTIONS",
"IDENTITY",
"CREDIT_CARDS",
"PAYMENT_DATA",
"LOANS",
"INVESTMENTS"
],
"createdAt": "2023-09-01T18:05:09.145Z",
"isSandbox": false,
"isOpenFinance": true,
"updatedAt": "2024-07-16T15:34:08.028Z",
"supportsPaymentInitiation": true,
"supportsScheduledPayments": true,
"supportsSmartTransfers": true
}
```
**supportsPaymentInitiation**: Informs if the institution supports using the Open Finance Payment Initiation infrastructure.
**supportsScheduledPayments**: Informs if the institution has implemented Open Finance Payment Schedule through Pix (*Pix Recorrente*).
**supportsSmartTransfers**: Informs if the institution has implemented Open Finance Smart Transfers (*Transferencias Inteligentes*).
> **New connectors (institutions) are added every month!**
>
> To know about new institutions that have been added you can checkout our changelog or use the endpoint to bring the most up to date list of institutions.
## Introduction
Source: https://docs.pluggy.ai/en/docs/smart-transfers/introduction.md
Pluggy's Smart Transfers API makes payments instant, easy, and secure. Here we describe in a simple way how you can implement it.
> **Recommendation**
>
> You should see our [Payment Initiation docs](/docs/payments/overview) first to understand the payments flow.
The main differences between this API and [Payment Initiation](/docs/payments/overview) are:
- The user only needs to give the consent one time (from now on, **Smart Transfer Preauthorization**) per debtor account: After the consent is given, you can use the Smart Transfers API to send money from this account to the authorized recipients (until the consent expires or it's revoked). This allows you to automatize your payment process without user interaction.
- All accounts (debtor and recipients) **must belong to the same owner (same CPF for PF accounts and same CNPJ for PJ accounts)**.
See the [next section](/docs/smart-transfers/preauthorization) to know how to generate a **Smart Transfer Preauthorization**.
## Creating a preauthorization
Source: https://docs.pluggy.ai/en/docs/smart-transfers/preauthorization.md
In this section, you will learn how to create a preauthorization to do payments without user interaction.
## Create a payment recipient
First, you need to create **Payment Recipients**. Those will be the allowed destinations to send transfers. All of recipients must belong to the same owner.
```shell
curl --location 'https://api.pluggy.ai/payments/recipients' \
--header 'Content-Type: application/json' \
--header 'X-API-KEY: ••••••' \
--data '{
"account": {
"type": "CHECKING_ACCOUNT",
"number": "1111111",
"branch": "0001"
},
"paymentInstitutionId": "abfd2a88-bc7b-407f-9fcc-395548ee6840",
"name": "John Doe",
"taxNumber": "11111111111"
}'
```
Check the [API docs](/reference/payment-recipient/payment-recipient-create) to know how to use this endpoint. To know the `paymentInstitutionId`, you need to use this [endpoint](/reference/payment-recipient/payment-recipients-institution-list).
This will return the following response:
```json
{
"type": "BANK_ACCOUNT",
"id": "ded2e966-bd40-4e82-b467-d32fe4b4f40e",
"name": "John Doe",
"taxNumber": "11111111111",
"isDefault": false,
"paymentInstitution": {
"id": "abfd2a88-bc7b-407f-9fcc-395548ee6840",
"name": "Banco XP S.A.",
"tradeName": "BCO XP S.A.",
"ispb": "33264668",
"compe": "348",
"createdAt": "2023-12-08T17:52:21.001Z",
"updatedAt": "2023-12-08T17:52:21.001Z"
},
"account": {
"type": "CHECKING_ACCOUNT",
"number": "1111111",
"branch": "0001"
},
"pixKey": null,
"createdAt": "2024-08-01T16:32:29.276Z",
"updatedAt": "2024-08-01T16:32:29.276Z"
}
```
## Create the Smart Transfer Preauthorization
Now, you are ready to create a smart transfer preauthorization. To do that, you need to do the following request:
```shell
curl --location 'https://api.pluggy.ai/smart-transfers/preauthorizations' \
--header 'Content-Type: application/json' \
--header 'X-API-KEY: ••••••' \
--data '{
"connectorId": 612,
"parameters": {
"cpf": "11111111111"
},
"recipientIds": [
"ded2e966-bd40-4e82-b467-d32fe4b4f40e"
],
"callbackUrls": {
"success": "https://my-success-page.com",
"error": "https://my-error-page.com"
},
"configuration": {
"transactionLimit": 100
}
}'
```
- The `connectorId` will be the one associated with the institution of your debtor account (for example, if you want to create the preauthorization in Nubank, you need to send the id `612`).
- You can configure the transaction limits sending the `configuration` field (see [Configuring transaction limits section](#configuring-transaction-limits)).
For more details about this endpoint, check our [API docs](/reference/smart-transfer/smart-transfer-preauthorization-create).
> **Important: For PF accounts you can only configure one recipient per authorization. Only PJ accounts can configure multiple recipients for the same authorization.**
This will return the following response:
```json
{
"id": "7e3e1dbb-8009-4966-9254-1eaab05ad18b",
"status": "CREATED",
"consentUrl": "https://this-is-the-consent-url.com",
"clientPreauthorizationId": null,
"callbackUrls": null,
"recipients": [
{
"type": "BANK_ACCOUNT",
"id": "ded2e966-bd40-4e82-b467-d32fe4b4f40e",
"name": "John Doe",
"taxNumber": "11111111111",
"isDefault": false,
"paymentInstitution": {
"id": "abfd2a88-bc7b-407f-9fcc-395548ee6840",
"name": "Banco XP S.A.",
"tradeName": "BCO XP S.A.",
"ispb": "33264668",
"compe": "348",
"createdAt": "2023-12-08T17:52:21.001Z",
"updatedAt": "2023-12-08T17:52:21.001Z"
},
"account": {
"type": "CHECKING_ACCOUNT",
"number": "1111111",
"branch": "0001"
},
"pixKey": null,
"createdAt": "2024-07-31T15:56:03.938Z",
"updatedAt": "2024-07-31T15:56:23.123Z"
}
],
"connector": {
"id": 612,
"name": "Nubank",
"primaryColor": "8a0fbe",
"institutionUrl": "https://nuapp.nubank.com.br/open-banking/logo.svg",
"country": "BR",
"type": "PERSONAL_BANK",
"credentials": [
{
"validation": "^\\d{3}\\.?\\d{3}\\.?\\d{3}-?\\d{2}$",
"validationMessage": "CPF deve ter 11 numeros.",
"label": "CPF",
"name": "cpf",
"type": "number",
"placeholder": "",
"optional": false
}
],
"imageUrl": "https://cdn.pluggy.ai/assets/connector-icons/212.svg",
"hasMFA": false,
"oauth": true,
"health": {
"status": "ONLINE",
"stage": null
},
"products": [
"ACCOUNTS",
"TRANSACTIONS",
"IDENTITY",
"CREDIT_CARDS",
"PAYMENT_DATA",
"LOANS",
"INVESTMENTS"
],
"createdAt": "2023-09-01T18:05:09.145Z",
"isSandbox": false,
"isOpenFinance": true,
"updatedAt": "2024-08-01T16:33:57.978Z",
"supportsPaymentInitiation": true,
"supportsScheduledPayments": true,
"supportsSmartTransfers": true
},
"createdAt": "2024-08-01T16:39:27.946Z",
"updatedAt": "2024-08-01T16:39:32.448Z"
}
```
After the preauthorization is created, you need to redirect your user to the `consentUrl` returned in the response. There, the user needs to approve the preauthorization in their payment institution. After the consent is given, the user will be redirected to the `success` callback url if everything is ok, or to the `error` callback url if the consent was rejected or if an error happens in the process.
Note: if you don't define a set of `callbackUrls`, the user will be redirected to a Pluggy's default page.
Now, if you check the preauthorization status using [this endpoint](/reference/smart-transfer/smart-transfer-preauthorization-retrieve), you will see it with one of the following statuses:
- **COMPLETED**: The preauthorization was completed and you are ready to create payments.
- **REJECTED**: The user rejected the preauthorization in the institution consent flow.
- **ERROR**: There was an error in the institution consent flow.
In the [next section](/docs/smart-transfers/creating-payment), you will see how to create a payment without user interaction.
## Configuring transaction limits
You can configure the transaction limits sending the `configuration` object.
| Field | Type | Optional | Description |
|-------|------|----------|-------------|
| totalAllowedAmount | number | true | Maximum amount to be reached by the sum of all transactions that use the consent authorized by the customer. |
| transactionLimit | number | true | Maximum amount for each payment transaction associated with this consent. |
| periodicLimits | object | true | Transactional limits per period as determined by the paying user. |
In the `periodicLimits` object, you can configure the limits per period. The available periods are `day`, `week`, `month` and `year`, and for each one you can configure:
| Field | Type | Optional | Description |
|-------|------|----------|-------------|
| quantityLimit | number | true | Maximum number of transactions allowed to occur in the period. |
| transactionLimit | number | true | Maximum amount to be transacted in the period. |
Example:
```json
{
"configuration": {
"totalAllowedAmount": 100.5,
"transactionLimit": 10,
"periodicLimits": {
"day": {
"quantityLimit": 2,
"transactionLimit": 5
},
"week": {
// week limits
},
"month": {
// month limits
},
"year": {
// year limits
}
}
}
}
```
In the case that some limit is reached, you will receive an appropriate error from the API.
## Creating a payment
Source: https://docs.pluggy.ai/en/docs/smart-transfers/creating-payment.md
In this section, you will learn how to create a payment associated with a Smart Transfer Preauthorization.
To create a payment, you need to do the following request:
```shell
curl --location 'https://api.pluggy.ai/smart-transfers/payments' \
--header 'Content-Type: application/json' \
--header 'X-API-KEY: ••••••' \
--data '{
"preauthorizationId": "7e3e1dbb-8009-4966-9254-1eaab05ad18b",
"recipientId": "ded2e966-bd40-4e82-b467-d32fe4b4f40e",
"amount": 100,
"description": "My automatic payment"
}'
```
Let's analyze the fields we need to send:
- `preauthorizationId`: It is the id of the preauthorization we created in the [previous section](/docs/smart-transfers/preauthorization).
- `recipientId`: It is one of the recipients we authorized for the given preauthorization. Other recipients will be rejected.
- `amount`: The amount you want to send.
- `description`: An optional description to send with the transfer.
For more details about this endpoint, check the [API docs](/reference/smart-transfer/smart-transfer-payment-create).
This will return the following:
```json
{
"id": "b2b132f7-4c17-4707-bd5d-197d71d01385",
"preauthorizationId": "7e3e1dbb-8009-4966-9254-1eaab05ad18b",
"status": "CONSENT_AUTHORIZED",
"amount": 100,
"description": "My automatic payment",
"recipient": {
"type": "BANK_ACCOUNT",
"id": "ded2e966-bd40-4e82-b467-d32fe4b4f40e",
"name": "John Doe",
"taxNumber": "11111111111",
"isDefault": false,
"paymentInstitution": {
"id": "abfd2a88-bc7b-407f-9fcc-395548ee6840",
"name": "Banco XP S.A.",
"tradeName": "BCO XP S.A.",
"ispb": "33264668",
"compe": "348",
"createdAt": "2023-12-08T17:52:21.001Z",
"updatedAt": "2023-12-08T17:52:21.001Z"
},
"account": {
"type": "CHECKING_ACCOUNT",
"number": "1111111",
"branch": "0001"
},
"pixKey": null,
"createdAt": "2024-07-31T15:56:03.938Z",
"updatedAt": "2024-07-31T15:56:23.123Z"
},
"createdAt": "2024-08-01T17:03:12.278Z",
"updatedAt": "2024-08-01T17:03:15.419Z",
"clientPaymentId": null
}
```
You can use [this endpoint](/reference/smart-transfer/smart-transfer-paymentretrieve) to know when the payment is completed (it generally takes a few seconds). If everything is ok, the payment status will be `PAYMENT_COMPLETED`.
> **About transfer limits**
>
> Smart Transfers are categorized as an Immediate Pix between different accounts of the same holder. Therefore, the limits defined in the consent for this product should be treated the same way the institution applies the limits of the Pix arrangement.
>
> The calculation of the periodic limit available to the customer should follow the guidelines below, considering different scenarios and examples:
>
> **Daily Limit (e.g., R$ 100.00)**: This limit controls transfers made within a single day, considering the period from 00:00 to 23:59. For example, if a user transfers R$ 50.00 at 10:00, they will still have R$ 50.00 available for transfers until midnight of the same day;
>
> **Weekly Limit (e.g., R$ 1,000.00)**: The weekly limit covers the period of an entire week, starting at 00:00 on Sunday and ending at 23:59 on Saturday. For example, if a user transfers R$ 200.00 on Tuesday and R$ 500.00 on Thursday, they will still have R$ 300.00 available for transfers until the end of Saturday;
>
> **Monthly Limit (e.g., R$ 10,000.00)**: This monthly limit is calculated from the first to the last day of each month. For example, in a month, if the user transfers R$ 2,000.00 in the first week and R$ 3,000.00 in the second week, they will still have R$ 5,000.00 available for transfers for the rest of the month;
>
> **Annual Limit (e.g., R$ 50,000.00)**: The annual limit counts from the first day of January to the last day of December. For example, if a user transfers R$ 10,000.00 by March, another R$ 15,000.00 by June, and another R$ 20,000.00 by September, they will only be able to transfer another R$ 5,000.00 until the end of the year.
>
> These limits help manage fund transfers, ensuring they do not exceed the amounts set for each period. Each limit is independent and is recalculated as its respective time window resets.
## Smart Transfers Sandbox
Source: https://docs.pluggy.ai/en/docs/smart-transfers/sandbox.md
The easiest way to try this product is by using the sandbox connector. To do that, you need to create a Smart Transfer preauthorization using the following payload:
```shell
curl --location 'https://api.pluggy.ai/smart-transfers/preauthorizations' \
--header 'Content-Type: application/json' \
--header 'X-API-KEY: YOUR TOKEN' \
--data '{
"connectorId": 600,
"parameters": {
"cpf": "xxxxxxxx" // put a valid CPF here
},
"recipientIds": [
"xxxxxxxxxx" // put a valid recipient id here
]
}'
```
To log in to the mock bank, you can use any username and password -- any combination will work. Once the authorization is complete, you can schedule all the payments you need.
## Basic concepts
Source: https://docs.pluggy.ai/en/docs/developer-tools/basic-concepts.md
## Security protocols
Pluggy's API enforces the use of HTTPS TLSv1.2 or upper versions for security reasons. Other TLS version requests will be rejected. All communication requires to be in HTTPS.
## API verbs and Protocols
Pluggy's API is a RESTful API based on JSON requests and responses, so all requests must have set the header `Content-Type` of `application/json`.
We follow the RESTful standards and all verbs match their specific action for the resource you will be communicating.
> **API response fields**
>
> We evolve our API in a non-breaking way, by adding new fields to our endpoint responses. This makes it simpler since there are no complicated versioning mechanisms, but it also means that your HTTP client must support receiving unknown fields in a response and ignore them. In most libraries this is supported by default, but please review your particular case to check that this is configured correctly.
## Environment
Our production environment is accepting requests in the following host:
```
https://api.pluggy.ai
```
## Request IDs
Every response from the Pluggy API carries an `x-request-id` header — a UUID
identifying that single request:
```
x-request-id: 079482e5-8aa4-4708-9aaa-43c2f2792b4a
```
It is on every response, successful or not, and it is the one value that lets us
find your exact request in our logs. Reading it costs nothing:
```bash
curl -i https://api.pluggy.ai/connectors \
-H 'X-API-KEY: YOUR_API_KEY' | grep -i x-request-id
```
**Log it alongside your own errors.** When something fails — a 4xx you did not
expect, a request that timed out, a response whose contents look wrong — send us
the `x-request-id` with your report. Without it we search by item, by time
window and by endpoint and often find several candidates; with it we go straight
to the request you saw, which is usually the difference between an answer the
same day and a conversation over several.
## Pagination
Some Pluggy's responses can yield a large amount of data, in which cases the size of the response is limited and divided in pages.
For example, if you make a request to `/transaction?accountId={ACCOUNT_ID}`, you will receive an object like:
```json
{
"total": 200,
"totalPages": 15,
"results": [],
"page": 1
}
```
- **total**: the size of the data of the request
- **totalPages**: the total number of pages encompassing all available records
- **results**: the content of the current page
- **page**: the number of the current page
For example, `/transaction?accountId={ACCOUNT_ID}&page=2` is the second page of transactions results.
By retrieving `/transaction?accountId={ACCOUNT_ID}`, then `/transaction?accountId={ACCOUNT_ID}&page=2`, and so on, you may access to all the data available, one page at a time.
To sum up, to obtain all the data from a paginated endpoint, after your first request you should iterate as many times as `totalPages`, making a new request and changing the `page` query param.
## Run in Postman
Source: https://docs.pluggy.ai/en/docs/developer-tools/postman.md
## Run in Postman
You can access our Postman Collection from the link below to test all of our endpoints. You just need to set the `CLIENT_ID` and `CLIENT_SECRET` environment variables in Postman's Environments tab.
**[Run in Postman](https://pluggy-official.postman.co/workspace/Pluggy---Public~c1b2c838-e81f-4544-9d4b-a06d80c58a39/collection/10111094-2ba022d3-1898-4d61-ac3d-221d59bac871?action=share&creator=16855841)**
Both `CLIENT_ID` and `CLIENT_SECRET` can be copied to your application from [Pluggy Dashboard](https://dashboard.pluggy.ai).
This way you will find `CLIENT_ID` and `CLIENT_SECRET` in Pluggy Dashboard. You can also see them from the page of the application.
### Initial Setup
1. Select the **"Open Postman"** option and the collection will already be imported into the application.
2. Before starting, let's prepare the environment to perform the requests. In the Postman app, in the left corner, select the **"Environments"** menu.
3. Then click the button **+ "create new environment"**.
4. Then name your environment and add the following variables:
- `host` -- Application server address: `https://api.pluggy.ai`
- `CLIENT_ID` -- Your login access
- `CLIENT_SECRET` -- Your access password
5. Click **"Save"** to save the changes.
All ready to start making API Pluggy calls!
## Connect an account
Source: https://docs.pluggy.ai/en/docs/developer-tools/connect-account.md
In this section, we will learn how to connect the Pluggy API with a financial institution.
Each financial entity will have a connector and specific payloads necessary for the connection that must be completed in the body of the request in Postman.
These required payloads are found in the List Connectors (`GET /connectors`) response, in the `credentials` field inside each Connector object. Each of these credentials represents the structure definition for each parameter that needs to be sent, to solve the login step.
There are connectors that also require an additional Multi-factor Authentication (MFA) parameter. We have two possible scenarios here:
1. The MFA parameter can be solved by the user alone without a prompt from the financial institution, for example with Google Authenticator. In this scenario, the parameter will be found inside the `credentials` payload, it will have the field `"mfa": true` set. It has to be sent in the initial login step.
2. The MFA parameter can only be solved by the user by completing a challenge generated by the financial institution, such as a token sent by email or SMS, scanning a QR code, or answering some other prompt. The details to solve this parameter will be found after successfully logging in, in the Retrieve Item (`GET /items/:id`) response, in the `parameter` payload. Then, the parameter value has to be sent with the Send Item MFA (`POST /items/:id/mfa`) endpoint.
Connectors with this scenario can be distinguished with the field `"mfa": true` at the base of the connector payload definition.
Therefore, we will divide the connectors to facilitate understanding:
- Connectors without verification code
- Connectors with one-step verification code ("MFA 1-step")
- Connectors with two-step verification code ("MFA 2-step")
## Connectors without verification code
To connect an account that does not need an extra validation code, simply access the Postman Collection, expand the "Items" folder and select the "Create Item" request.
On the "Body" tab, enter your credentials in the elements presented in the "Create Item" request.
We list each of the institutions and their specificities below:
### Itau PF
```json
{
"connectorId": 201,
"parameters": {
"agency": "",
"account": "",
"password": ""
},
"clientUserId": ""
}
```
> For Itau PF to recover Payment Data, it's necessary to update the item at least once.
> For Itau PF with joint account (conta conjunta) please see below (Exception Flows).
### Caixa PF
```json
{
"connectorId": 219,
"parameters": {
"user": "",
"password": ""
},
"clientUserId": ""
}
```
> For Caixa PF please see below (Exception Flows).
### Caixa PJ
```json
{
"connectorId": 216,
"parameters": {
"user": "",
"password": ""
},
"clientUserId": ""
}
```
### Santander PF
```json
{
"connectorId": 208,
"parameters": {
"user": "",
"password": ""
},
"clientUserId": ""
}
```
### Agora
```json
{
"connectorId": 220,
"parameters": {
"cpf": "",
"password": "",
"signature": ""
},
"clientUserId": ""
}
```
### Genial
```json
{
"connectorId": 213,
"parameters": {
"email": "",
"password": ""
},
"clientUserId": ""
}
```
### Sicredi PJ
```json
{
"connectorId": 227,
"parameters": {
"cnpj": "",
"user": "",
"password": ""
},
"clientUserId": ""
}
```
### Clear
```json
{
"connectorId": 223,
"parameters": {
"user": "",
"password": ""
},
"clientUserId": ""
}
```
### Sicoob PJ / Sicoob PF
```json
{
"connectorId": 228,
"parameters": {
"cooperativa": "",
"chaveAcesso": "",
"password": ""
},
"clientUserId": ""
}
```
## Connectors with one-step verification code ("MFA 1-step")
To connect an account that requests an extra validation code in a single login step, simply access the Postman Collection, expand the "Items" folder and select the "Create Item with MFA" request.
In the "Body" tab, your credentials to access the institution must be inserted together with the verification code (token, SMS, etc), as presented in the elements of the "Create Item with MFA" request.
> **Connector "MFA 1-step"**
>
> You can detect which institutions are included in this scenario, by finding the `"mfa": true` value, in one of the `credentials` objects, inside the connectors in the List Connectors response.
### Inter
```json
{
"connectorId": 215,
"parameters": {},
"clientUserId": ""
}
```
### Modal Mais
```json
{
"connectorId": 204,
"parameters": {
"user": "",
"password": "",
"token": ""
},
"clientUserId": ""
}
```
### XP
```json
{
"connectorId": 202,
"parameters": {
"account": "",
"password": "",
"token": ""
},
"clientUserId": ""
}
```
### Rico
```json
{
"connectorId": 205,
"parameters": {
"user": "",
"password": "",
"token": ""
},
"clientUserId": ""
}
```
### Conta Simples
```json
{
"connectorId": 283,
"parameters": {
"email": "",
"password": "",
"token": ""
},
"clientUserId": ""
}
```
## Connectors with two-step verification code ("MFA 2-step")
In this flow, the parameter for inserting verifier code will be requested after the user's credentials are validated. Thus, it is necessary to send the credentials and wait for validation so that the verification code can be sent.
> **Connector "MFA 2-step"**
>
> You can detect which institutions are included in this scenario, by finding the `"mfa": true` value, at the base definitions of a Connector, found in the List Connectors response.
To check if the credentials have been validated and the verification code must already be sent, just access the Postman Collection, expand the "Items" folder, select the "Specific Item" request and insert the `item_id` as a parameter of the URL. In the service response, the token must be sent when the `status` and `executionStatus` elements have the value `WAITING_USER_INPUT`.
At this point, the verification code must be sent in order for the connection to be established. To send the code, simply access the Postman Collection, expand the "Items" folder and select the "Send MFA Parameter user-triggered" request.
In the "Body" tab, the verification code must be inserted as shown in the elements of the "Send MFA Parameter user-triggered" request (token, sms, etc).
### Bradesco PJ
```json
{
"connectorId": 209,
"parameters": {
"user": "",
"password": ""
},
"clientUserId": ""
}
```
Send MFA Parameter user-triggered:
```json
{
"token": ""
}
```
### B3 CEI
```json
{
"connectorId": 222,
"parameters": {
"user": "",
"password": ""
},
"clientUserId": ""
}
```
Send MFA Parameter user-triggered:
```json
{
"code": ""
}
```
### BTG Pactual
```json
{
"connectorId": 214,
"parameters": {
"cpf": "",
"password": ""
},
"clientUserId": ""
}
```
Send MFA Parameter user-triggered:
```json
{
"token": ""
}
```
### Safra
```json
{
"connectorId": 214,
"parameters": {
"agency": "",
"account": "",
"password": ""
},
"clientUserId": ""
}
```
Send MFA Parameter user-triggered:
```json
{
"value": ""
}
```
> Safra: the MFA will be asked twice in the item's first execution. Then, for item updates, it will be requested only once. Please see below "Safra" in Exception Flows.
### Avenue
```json
{
"connectorId": 230,
"parameters": {
"email": "",
"password": ""
},
"clientUserId": ""
}
```
Send MFA Parameter user-triggered:
```json
{
"token": ""
}
```
### Genial
```json
{
"connectorId": 213,
"parameters": {
"email": "",
"password": ""
},
"clientUserId": ""
}
```
Send MFA Parameter user-triggered:
```json
{
"mfa": ""
}
```
### Empiricus Investimentos
```json
{
"connectorId": 233,
"parameters": {
"cpf": "",
"password": ""
},
"clientUserId": ""
}
```
Send MFA Parameter user-triggered:
```json
{
"value": ""
}
```
## Connectors with Company Selection
The business connectors may require you to select which company you want to connect with, depending on if the user that is accessing has access to more than one single company.
In those cases, after initializing the item with the initial parameters you will be prompted with an additional parameter.
This parameter can be recovered from "Specific Item" endpoint, sending the id created, and will be of type `select` -- this means that one of the list values must be sent back to us for selection.
### Sicoob PJ
```json
{
"id": "a9481a68-38cc-4433-bfcc-dafc05022c60",
"status": "WAITING_USER_INPUT",
"executionStatus": "WAITING_USER_INPUT",
"lastUpdatedAt": null,
"error": null,
"paramater": {
"type": "select",
"name": "selectedCompany",
"label": "Qual e a sua empresa?",
"instructions": "Selecione a conta que deseja conectar",
"options": [
{
"value": "9025000",
"label": "902.500-0 One Company ltda"
},
{
"value": "9025001",
"label": "902.500-1 Second Company ltda"
}
],
"expiresAt": "2023-03-28T18:17:59.532Z"
}
}
```
Once the user has selected the company, send it back using the Send MFA Endpoint:
```json
{
"selectedCompany": "9025000"
}
```
## Exception flows
### Bradesco PF Conta Conjunta
The connector "Bradesco PF" is mapped to both simple (individual) and joint accounts (Conta Conjunta).
To connect to the joint account, you can just send any random "token" value in the endpoint "Create Item with MFA", for example `"000000"`, it won't matter because the Account selection step, if applies, will take precedence and is going to be resolved first.
```json
{
"connectorId": 203,
"parameters": {
"agency": "",
"account": "",
"password": "",
"token": "000000"
},
"clientUserId": ""
}
```
Make calls on the "Specific Item" endpoint passing the ItemId to check the status of the connection until you get the `parameter` element in the response with the `options` element which contains the list of accounts registered at the institution.
Then call the "Send MFA Parameter user-triggered" endpoint with the selected account value. After that, the token MFA parameter will need to be provided with the correct user-provided value.
Resume making calls on the "Specific Item" endpoint until the `executionStatus` attribute is set to `SUCCESS` (or `PARTIAL_SUCCESS`), meaning your connection has been created/updated successfully.
> **Data recovered:** As this is a joint account, keep in mind that Pluggy will only collect the data from the account selected by the user on the first step.
### Banco do Brasil PJ
In the case of Banco do Brasil Empresas, in order for the connection to be established, it will be necessary to use a computer that is the same as the one already authorized in internet banking. The account used for the connection must have a cell phone registered with Banco do Brasil, as this will receive a confirmation link to be inserted at the time of connection.
First, make a call on the "Create Item" endpoint:
```json
{
"connectorId": 217,
"parameters": {
"userJ": "",
"passwordJ": "",
"password": ""
},
"clientUserId": ""
}
```
Call the "Specific Item" endpoint until you get `executionStatus` as `WAITING_USER_INPUT` and the `parameter` attribute with a list of cell phones registered at the institution. Select a phone, then provide the SMS token URL received on that phone.
### Itau PF (Conta Conjunta)
First, make a call on the "Create Item" endpoint:
```json
{
"connectorId": 201,
"parameters": {
"agency": "",
"account": "",
"password": ""
},
"clientUserId": ""
}
```
Then, call the "Specific Item" endpoint until you get the `executionStatus` as `WAITING_USER_INPUT`. The `parameter` element will include a list of accounts (operators). Select one and send it via the "Send MFA Parameter user-triggered" endpoint.
> This parameter `operatorNumber` is asked only for the first time the Item is created, then it is stored and reutilized for any subsequent updates of the same Item instance.
### Itau PF (with MFA)
Some accounts from Itau PF require MFA. Create the item with the standard credentials, then poll the "Specific Item" endpoint until `WAITING_USER_INPUT` with `"name": "mfa"` in the parameter. Send the MFA token via the "Send MFA Parameter user-triggered" endpoint.
### Itau PJ
The "Itau" connector is mapped to both simple (individual) and joint accounts. To connect to the joint account, send the name of the account holder via the "Send MFA Parameter user-triggered" endpoint.
```json
{
"connectorId": 218,
"parameters": {
"agency": "",
"account": "",
"password": "",
"cpfOrOperator": ""
},
"clientUserId": ""
}
```
### XP (CPF access - joint account)
The "XP" connector allows connecting both simple accounts (account number access) and joint accounts (with CPF access).
```json
{
"connectorId": 202,
"parameters": {
"account": "",
"password": "",
"token": ""
},
"clientUserId": ""
}
```
Poll the "Specific Item" endpoint until `WAITING_USER_INPUT` with a `selectedAccount` parameter, then send the selected account value.
### Santander PJ
For Santander PJ, the connection requires scanning a QR code and sending an extra validation code.
```json
{
"connectorId": 221,
"parameters": {
"agency": "",
"account": "",
"user": "",
"password": ""
},
"clientUserId": ""
}
```
Poll the "Specific Item" endpoint until `WAITING_USER_INPUT`. The `parameter` will contain a base64 encoded QR code image in the `data` attribute. Display the QR code, scan it with a phone, and send the resulting token via the "Send MFA Parameter user-triggered" endpoint.
### Inter PJ
This connector uses the bank's OAuth 2 API. You need to first generate and obtain `clientId`, `clientSecret`, the files `API_Chave.key` and `API_Certificado.crt` from the client's home banking account.
The private key and certificate should be provided as base64 without line breaks between each file's header and footer.
```json
{
"connectorId": 225,
"parameters": {
"clientId": "",
"clientSecret": "",
"privateKey": "",
"certificate": ""
},
"clientUserId": ""
}
```
### BTG Pactual, Empiricus and EQI
The "BTG" (Empiricus and EQI) connector is mapped to both simple and joint accounts. To connect to the joint account, send the name of the account holder via the "Send MFA Parameter user-triggered" endpoint.
### Caixa PF and PJ
Using this connector requires the user to authorize a new device (Pluggy) within their mobile Caixa app.
Keep in mind that from the moment the user enters their credentials, it can take up to 30 minutes to complete the login process.
First, use the "Create Item" endpoint and send the necessary parameters for connection:
Caixa PF:
```json
{
"connectorId": 219,
"parameters": {
"user": "",
"password": ""
},
"clientUserId": ""
}
```
Caixa PJ:
```json
{
"connectorId": 216,
"parameters": {
"user": "",
"password": ""
},
"clientUserId": ""
}
```
If everything is ok, the connector will return the status `USER_AUTHORIZATION_PENDING` and a device name.
Use the "Specific Item" endpoint (`GET /items/:id`) to check the connection status. Call the endpoint until the response attribute `executionStatus` has the value `USER_AUTHORIZATION_PENDING`, just like in the example below:
```json
{
"createdAt": "2022-12-29T17:42:43.926Z",
"updatedAt": "2022-12-29T17:42:46.836Z",
"status": "OUTDATED",
"executionStatus": "USER_AUTHORIZATION_PENDING",
"lastUpdatedAt": null,
"webhookUrl": null,
"error": {
"code": "USER_AUTHORIZATION_PENDING",
"message": "The user needs to grant necessary permissions for their account.",
"providerMessage": "No Internet Banking, clique em > Senhas e Configurações > Computadores e Dispositivos > Gerenciar \n Você precisa ativar o seguinte dispositivo:",
"attributes": {
"deviceNickname": "nick-name",
"qrCodes": "cHJ1ZWJh,cHJ1ZWJhMg==,cHJ1ZWJhJJ=="
}
}
}
```
**Now the user should authorize the new device from their Caixa mobile app**, by following the steps below:
1. Access the "Passwords and Settings" menu.
2. Select "Manage Devices" then "Registered Devices". A list will be returned with the devices registered in that account. Search the list for the device with the same name that was returned in the `deviceNickname` field of the previous call, and select it.
3. Click on the "Activate device" button.
4. The "Activate Device" screen will be displayed; click on the "Continue" button.
5. Scan the QRs received in the `qrCodes` attribute in the previous payload. It contains three comma-separated QRs that will rotate every 5 seconds.
As soon as the step above is finished, wait 30 minutes for Caixa to authorize the device, then make a call to the "Update Item" endpoint (`PATCH /items/:id`).
Inform the ItemId that you want to update in the endpoint parameter and make the call with an empty body (no need to re-enter the credentials). The expected outcome is `executionStatus: UPDATING`.
> **Note:** Keep in mind that the execution status can quickly change, and you can also find a `CREATED` or even `LOGIN_IN_PROGRESS` status.
Return to the "Specific Item" endpoint so you can check the connection status. The expected result is `executionStatus: SUCCESS`.
```json
{
"createdAt": "2022-12-29T17:42:43.926Z",
"updatedAt": "2022-12-29T17:42:44.011Z",
"status": "UPDATED",
"executionStatus": "SUCCESS",
"lastUpdatedAt": null,
"webhookUrl": null,
"error": null,
"clientUserId": "client-usr-id",
"statusDetail": null,
"parameter": null
}
```
At this point, you'll be able to retrieve the products data for this Item.
Maybe you are wondering if Pluggy can automatically update the Items that have the device authorized — here is a little explanation of how we do it. Feel free to reach out to us if it is not clear enough.
Once the user authorizes the new device, it's necessary to wait 30 minutes until Caixa approves it. Then we can have two different situations:
1. The user triggers an update, and if everything is ok we will return `SUCCESS`.
2. Our automatic update system will run every 6 hours (after the 30 minutes necessary to authorize the device) in order to get `status: SUCCESS` on the Items that did get the device authorized, but didn't have the data collected (were not updated after the 30 minutes). This flow runs for 48 hours until receiving the `SUCCESS` status, then it does not continue updating automatically.
If the user did not update at any time, they will receive `USER_AUTHORIZATION_NOT_GRANTED`.
### Safra
To connect an account, this connector requires the user to authorize a new device (`Pluggy - yyyy-mm-dd hh-mm`) through the Safra mobile app.
First, use the "Create Item" endpoint and send the necessary parameters for connection:
```json
{
"connectorId": 229,
"parameters": {
"agency": "",
"account": "",
"password": ""
}
}
```
If everything is ok, after entering the token provided by the Safra app, the connector will return the `executionStatus` `WAITING_USER_ACTION`. Use the "Specific Item" endpoint (`GET /items/:id`) to check the connection status. Call the endpoint until the response attribute `executionStatus` has the value `WAITING_USER_ACTION`, just like in the example below:
```json
{
"id": "c33872c7-85dc-4d67-b262-6490d85ea2d3",
"connector": {
"id": 229,
"name": "Safra",
"primaryColor": "#00003C",
"institutionUrl": "https://www.safra.com.br/",
"country": "BR",
"type": "PERSONAL_BANK",
"credentials": [
{
"validation": "^\\d{3,3}\\d$",
"validationMessage": "O agência deve ter 4 números.",
"label": "Agência",
"name": "agency",
"type": "number",
"placeholder": "Exemplo: 1234",
"optional": false
},
{
"validation": "^\\d{6,6}-?\\d$",
"validationMessage": "A conta deve ter 7 números.",
"label": "Conta",
"name": "account",
"type": "number",
"placeholder": "Exemplo: 12345-6",
"optional": false
},
{
"validation": "^\\d{1,6}$",
"validationMessage": "A senha deve ter menos de 6 números.",
"label": "Senha",
"name": "password",
"type": "password",
"placeholder": "",
"optional": false
}
],
"imageUrl": "https://cdn.pluggy.ai/assets/connector-icons/229.svg",
"hasMFA": true,
"health": {
"status": "ONLINE",
"stage": null
},
"products": [
"ACCOUNTS",
"TRANSACTIONS",
"INVESTMENTS"
],
"createdAt": "2022-11-04T21:12:51.716Z"
},
"createdAt": "2023-02-27T17:42:40.521Z",
"updatedAt": "2023-02-27T17:43:47.114Z",
"status": "WAITING_USER_ACTION",
"executionStatus": "WAITING_USER_ACTION",
"lastUpdatedAt": null,
"webhookUrl": null,
"error": null,
"clientUserId": null,
"statusDetail": null,
"parameter": null,
"userAction": {
"instructions": "User needs to authorize the device in their Safra App",
"attributes": {
"deviceNickname": "Pluggy - 2023-02-27 17:42"
},
"expiresAt": "2023-02-27T17:45:46.237Z"
},
"nextAutoSyncAt": null
}
```
The Item will remain in that state until:
- The user authorizes the device in the Safra app: in this case, the Item status will change automatically and a new token will be requested from the user.
or
- The user doesn't authorize the device in the Safra app: the Item will return the execution status `USER_AUTHORIZATION_NOT_GRANTED`.
or
- The current date is after the `expiresAt` date returned in the `userAction` property: the Item will return the status `USER_AUTHORIZATION_PENDING`. In this scenario, the user can authorize the device later, and after that the Item can be updated.
This flow will happen only on Item creation. If the device was authorized and the Item is updated, it will only request a token from the user.
### Banco Inter PF
Using this connector for an Item in the first execution requires the user to authorize the login with Inter by scanning a QR code with their Inter mobile app.
To do so, the user must be prepared to scan the QR code by logging in to the mobile app and going to Options → iSafe e Internet Banking → QR Code.
First, use the "Create Item" endpoint — no parameters necessary, since the entire login flow will be by QR:
```json
{
"connectorId": 215,
"parameters": {}
}
```
Then, return to the "Specific Item" endpoint so you can check the connection status. Soon after creation, the Item will reach a `WAITING_USER_ACTION` status. At this point, the `userAction.attributes.data` field of the Item will contain a QR code in base64 to be scanned:
```json
{
"createdAt": "2023-02-27T12:46:25.707Z",
"updatedAt": "2023-02-27T12:46:33.365Z",
"status": "WAITING_USER_ACTION",
"executionStatus": "WAITING_USER_ACTION",
"lastUpdatedAt": null,
"webhookUrl": null,
"error": null,
"clientUserId": null,
"statusDetail": null,
"parameter": null,
"userAction": {
"instructions": "SCAN QR",
"expiresAt": 123456789,
"attributes": {
"name": "qr",
"data": "data:image/png;base64,iVBORw0KGgoAAAANSUhEUgAAALkAAAC5CAAAAABRxsGAAAAByElEQVR42u3cUW6DMBAFQO5/6fYCwXnPtiKBx1+JEmCKxHq96/T6e+q4yMnJycnJycnJycnJyd8iv76P28NuX30689LVyMmPlt8/1B8+DYDpsemn5OTk97Fgoze9Gjk5+YT8Vjmey8nJyX8XW8YzeBp5yMnJd+bnqXflK+Tk5LM1ro2vflydIyd/sjxu1QyjzO2Fx6KfdLjIyZ8sT1fBafKdrsODiEJOTv7lb6hasv2NSWMQOfmx8mBN29ee0yZumhaQkx8rr2b15SLZuDNMTk4+MecnZeLm2Ikcgpz8aPk4mKw0i8ar6vjGkJOfKq9y8bTi3O+G2pS3kJO/TR7k4tXepjSFrxpI5OTHytOqcYXpfz5ATk4ex5Zqyq7CSrBjg5ycPD512kWaLDFvz8/Jyd8rD7YwVUvr4ARxgk9OTh489+mGqaAU3ZW2yclPlaejbxul+5LX+0Tk5O+VV79kC95WTeH4JpCTHy2vitKTqUK6cicnJ48bQ1UsCHY+VRVscnLyTfJ008RkKZqcnHz2vxRObmTcmZ+Tk58gX87ex4FjsrxFTk5+VQ9/uqE/neSX8nNy8pfLHzHIycnJycnJycnJycnJnzj+ATnf0jtEQEXdAAAAAElFTkSuQmCC"
}
},
"nextAutoSyncAt": null
}
```
Since we return the image in base64, you'll need to render it so the client can scan it. Once the user successfully scans the login QR with their mobile app, the login flow will continue normally.
> **Important info and recommendation**
>
> Take in mind that the QR code expires in 5 seconds, and the Item info will be updated with a new QR code. As such, you'll need to poll the "Specific Item" endpoint to check for updates to the code. Given the very short expiration time, it's easy to render an expired QR code. So, we recommend polling every 1 second until the status of the Item changes.
### XP Wealth
This connector also allows you to specify which customers you want to collect financial data from. To do that, you need to send a credential `selectedCustomers` with all customer codes you want to connect, separated by commas.
```json
{
"connectorId": 248,
"parameters": {
"clientId": "clientId",
"clientSecret": "clientSecret",
"selectedCustomers": "409185,551175,176189"
},
"webhookUrl": "https://www.myapi.com/notifications"
}
```
> **Important**
>
> This customization is not available in our widget; you need to create the Item using the Pluggy API.
### Mercado Bitcoin
This connector requires creating an API Key (chave de API) in the institution account. To do that, follow [this tutorial](https://suporte.mercadobitcoin.com.br/hc/pt-br/articles/360040781391-Como-gerar-uma-chave-de-API). After that, use the client id and client secret to create an Item.
## Connectors with OAuth
OAuth connections require the user to provide authorization directly inside the Financial Institution's application, so there is a redirect flow that needs to happen between Pluggy and the FI, back and forth.
### OAuth v1
The first implementation Pluggy provided returns an `oauthUrl` on the [List Connectors](/reference/connectors-list) endpoint that is necessary to redirect the user to provide consent.
```json
{
"id": 206,
"name": "Mercado Pago",
"oauthUrl": "https://auth.mercadopago.com.br/authorization?client_id=3960514748228649&redirect_uri=https://api.pluggy.ai/connectors/206/oauth/callback&response_type=code&platform_id=mp&scopes=read,offline_access&state=27364b4a-354e-479d-89bd-05cef476e1f4"
}
```
If the connector provides the `oauthUrl`, you will be required to redirect the user to that page, and after they authorize Pluggy, we will redirect them back to your application.
This affects the connectors: "MercadoPago".
### OAuth v2
After improving the flow from the previous version, we launched the integration directly through the Item, to provide better tracking of the connection attempts for our customers. Now connectors don't return the URL; instead, they don't require any credential to start the execution, and have an `oauth` flag to indicate that these connectors authenticate through OAuth.
```json
{
"id": 240,
"name": "Splitwise",
"credentials": [],
"oauth": true
}
```
Once the execution has started, we will provide the `oauthUrl` as a parameter for the user to be redirected:
```json
{
"id": "54a8d5e2-583a-40fd-a716-c9cee38a73dc",
"parameter": {
"label": "Oauth Code",
"name": "oauthCode",
"type": "oauth",
"instructions": "Log into Splitwise page to continue",
"data": "https://secure.splitwise.com/oauth/authorize?response_type=code&client_id=I351UBINPK5b5psYXToACr90XVD5g5GuBdvg4SG4&redirect_uri=https://api.pluggy.ai/items/oauth/callback&scope=&state=4eb2909b-c4c5-4f68-ba2b-84f2772fb15a",
"expiresAt": "2023-03-09T11:02:54.796Z"
}
}
```
The parameter's type `oauth` makes it easy to understand that an OAuth flow is required, and the `data` attribute returns the URL to redirect the user to. After the callback, the Item will be created.
On updates, the flow will be the same.
## Tutorials
Source: https://docs.pluggy.ai/en/docs/developer-tools/tutorials.md
Get step-by-step guides on how to successfully connect your account with specific financial institutions.
### Caixa
- [Caixa PF Tutorial (Mobile)](/docs/developer-tools/tutorials/caixa-pf-mobile)
- [Caixa PF Tutorial (Web)](/docs/developer-tools/tutorials/caixa-pf-web)
- [Caixa PJ Tutorial](/docs/developer-tools/tutorials/caixa-pj)
### Inter
- [Banco Inter MEI Tutorial](/docs/developer-tools/tutorials/inter-mei)
- [Banco Inter Empresas Tutorial](/docs/developer-tools/tutorials/inter-pj)
### Sicredi
- [Sicredi Tutorial](/docs/developer-tools/tutorials/sicredi)
### Sicoob
- [Sicoob PJ Tutorial](/docs/developer-tools/tutorials/sicoob-pj)
### Santander
- [How to create a secondary user to connect a Santander PJ account](/docs/developer-tools/tutorials/santander-pj-secondary-user)
- [Santander PJ Tutorial](/docs/developer-tools/tutorials/santander-pj)
### Itaú
- [Itaú PJ Tutorial](/docs/developer-tools/tutorials/itau-pj)
- [How to create a user without a token in Itaú Empresas](/docs/developer-tools/tutorials/itau-pj-user-without-token)
### Banco do Brasil
- [Banco do Brasil PJ Tutorial — device authorization](/docs/developer-tools/tutorials/bb-pj-device-authorization)
- [Banco do Brasil PJ Tutorial](/docs/developer-tools/tutorials/bb-pj)
### Bradesco
- [Bradesco Empresas Tutorial — how to enable mobile app access](/docs/developer-tools/tutorials/bradesco-pj-mobile-access)
- [Bradesco Empresas Tutorial](/docs/developer-tools/tutorials/bradesco-pj)
- [Bradesco PF Open Finance Integration Tutorial](/docs/developer-tools/tutorials/bradesco-pf-of)
### Efí Bank
- [Efí Bank Tutorial](/docs/developer-tools/tutorials/efi-pj)
## Server-Side SDKs
Source: https://docs.pluggy.ai/en/docs/developer-tools/server-sdks.md
## Server-Side SDKs
Currently, we have client libraries available for the following languages:
- [Node.js](https://github.com/pluggyai/pluggy-node)
- [.NET](https://github.com/pluggyai/pluggy-net)
- [Java](https://github.com/pluggyai/pluggy-java)
### Installation
To install the client library, use the following command:
**Node.js (npm):**
```bash
npm install --save pluggy-sdk
```
**C# (.NET):**
```powershell
Install-Package Pluggy.SDK
```
**Java (Maven):**
To install in Java, using Maven, add a dependency to your `pom.xml`:
```xml
ai.pluggypluggy-java1.5.0
```
Currently, the package is available in GitHub Packages, so make sure to have the GH Packages server config with your Personal GH Access Token in your `.m2/settings.xml` file. Navigate to [this guide](https://docs.github.com/en/packages/working-with-a-github-packages-registry/working-with-the-apache-maven-registry) for more details.
You can also do an integration yourself, by sending HTTP requests directly to our API.
> **Interested in contributing?** Let us know if you require or if you are interested in contributing a library for a language not represented here! Write us to hello@pluggy.ai
### You can also build your own one!
Using our `oas.json` which is up-to-date with all the latest endpoint definitions you can create your own integration. You can check out our OAS (Open API Specification) [here](https://api.pluggy.ai/oas3.json).
Some examples are driven by the community:
- [Python](https://github.com/diraol/pluggy-python)
## No-Code integrations
Source: https://docs.pluggy.ai/en/docs/developer-tools/no-code.md
## No-Code integrations
Here is a list of integrations that don't require any development to start running Pluggy.
- [Integrate with Bubble no-code services](/docs/en/developer-tools/bubble)
## Bubble
Source: https://docs.pluggy.ai/en/docs/developer-tools/bubble.md
## Step-by-Step Guide to Integrating Pluggy Connect in a Bubble Application
### Prerequisites
- **Bubble Application:** Ensure you have a Bubble application set up.
- **Pluggy API Access:** You should have access to the Pluggy API with necessary credentials.
### Step 1: Include the Pluggy Connect Script
First, you need to include the Pluggy Connect JavaScript library in your Bubble application.
```html
```
Specify the necessary values in the window object. Add the following script to your HTML header or in an HTML element on your Bubble page:
```html
```
- **Buttons List:** The `buttons` array should contain an entry for each button in your application that triggers Pluggy Connect. If an `updateItem` value is provided, the widget will open in "update mode" to update the specified item. Otherwise, it will open the standard connection flow.
- **POST Endpoint for Token:** The `connectTokenUrl` should be a POST endpoint that returns the access token in the following format:
> The response must be an object like the following:
>
> ```json
> {
> "accessToken": "eyJhbGciOiJIUzI1NiIsInR5cCI6IkpXVCJ9..."
> }
> ```
### Step 2: Create the Connect Token Endpoint
Your application should have a POST endpoint to generate the connect token. Here is an example of how you can set up this endpoint using Express.js:
```javascript
import express from 'express'
import cors from 'cors'
const app = express()
// Enable CORS for all routes and all origins
app.use(
cors({
origin: '*',
})
)
app.use(express.json()) // to parse JSON bodies
// create a route for the token endpoint
app.post('/my-connect-token-endpoint', async (req, res) => {
console.log('Received request to /my-connect-token-endpoint endpoint')
const { itemId, clientUserId } = req.body
console.log('itemId:', itemId)
console.log('clientUserId:', clientUserId)
try {
const apiKeyResponse = await fetch('https://api.pluggy.ai/auth', {
method: 'POST',
headers: {
'Content-Type': 'application/json',
},
body: JSON.stringify({
clientId: process.env.PLUGGY_CLIENT_ID,
clientSecret: process.env.PLUGGY_CLIENT_SECRET,
}),
}).then((res) => res.json())
console.log('PluggyClient initialized', apiKeyResponse)
const data = await fetch('https://api.pluggy.ai/connect_token', {
method: 'POST',
headers: {
'Content-Type': 'application/json',
'X-API-KEY': apiKeyResponse.apiKey,
},
body: JSON.stringify({
itemId,
...(clientUserId ? { options: { clientUserId } } : {}),
}),
}).then((res) => res.json())
console.log('Connect token created successfully:', data)
res.json({
accessToken: data.accessToken,
})
} catch (error) {
console.error('Error in /my-connect-token-endpoint:', error)
res.status(500).json({ error: 'Internal server error' })
}
})
// start the server
app.listen(3000, () => {
console.log('Server is running on port 3000')
})
```
**Explanation:**
- This code sets up an Express server with a POST endpoint at `/my-connect-token-endpoint`.
- The server receives `itemId` and `clientUserId` from the request body and uses them to request a connect token from Pluggy's API.
- If `itemId` is provided, it will update the existing item. If `clientUserId` is provided, it will associate the token with the specified user.
### Step 3: Inject the Main JavaScript
Include the main JavaScript provided to manage the Pluggy Connect widget:
```html
```
### Step 4: Add a Button to Your Bubble Page
Create a button in your Bubble application and assign it the class name specified in `window.pluggy.buttonClassName`.
```html
```
### Customization Options
- **Sandbox Mode:** If you want to include sandbox mode for testing, set `includeSandbox` to `true` in the `window.pluggy` object.
- **Theme:** You can customize the theme of the Pluggy Connect widget by setting the `theme` property.
- **Products and Connector IDs:** You can specify which products and connectors to include by setting the `products` and `connectorIds` properties.
### Error Handling
The `openPluggyConnect` function includes an `onError` callback where you can implement your logic for handling errors during the connection process.
### Testing
Ensure that your `connectTokenUrl` endpoint is correctly set up to return the access token and that the `clientUserId` is correctly passed.
This guide provides a structured way to integrate and customize the Pluggy Connect widget within your Bubble application. Adjust the values as per your application's requirements and test thoroughly to ensure proper integration.
## Errors Codes
Source: https://docs.pluggy.ai/en/docs/developer-tools/error-codes.md
## Errors Codes
> The following errors describe in general what you will get for the different endpoints available in Pluggy API.
| Error Code | Meaning |
|------------|---------|
| 400 | Bad Request -- Your request is invalid. |
| 401 | Unauthorized -- Your API key is wrong. |
| 403 | Forbidden -- The resource you are trying to access, you don't have permissions. |
| 404 | Not Found -- The specified resource could not be found. |
| 405 | Method Not Allowed -- The specific endpoint doesn't support that method. |
| 406 | Not Acceptable -- You requested a format that isn't JSON. |
| 409 | Conflict -- The request could not be completed due to a conflict with the current state of the target resource. |
| 429 | Too Many Requests -- You've exceeded your quota limit. |
| 500 | Internal Server Error -- We had a problem with our server. Try again later. |
| 503 | Service Unavailable -- We're temporarily offline for maintenance. Please try again later. |
## Rate limits
Source: https://docs.pluggy.ai/en/docs/developer-tools/rate-limits.md
## Rate limits
Pluggy's API implements a rate limiter to maximize its stability when dealing with large bursts of incoming requests. The rate limiter keeps a counter of the amount of requests you've made to a particular endpoint in one minute from the same IP, and if it exceeds the maximum allowed amount it returns a 429 error.
### Rate limits per endpoint
The following rate limits apply in Pluggy API:
| Endpoint | Max requests per minute per IP |
|----------|-------------------------------|
| `POST /auth` | 360 |
| `GET /transactions` or `GET /transactions/{id}` | 360 |
| `GET /investments` or `GET /investments/{id}` | 360 |
| `GET /investments/{id}/transactions` | 360 |
| `PATCH /items` | 20 |
> `PATCH /items` is limited to 20 requests per minute. This is meant for user-triggered updates. If you need item updates on a daily basis, you must use our auto-sync feature.
Each limit is applied independently from the others, e.g. you can reach the limit in `POST /auth` but still be able to use `GET /transactions`. If a limit spans more than one endpoint, requests to either endpoint count towards the limit.
### Handling rate limiting errors
When you exceed the max requests per minute for an endpoint, you will get a `429 Too Many Requests` error:
```json
{
"message": "Too many requests. Please try again later (see Retry-After header in seconds)",
"code": 429
}
```
Any subsequent requests will fail with the same error until the rate limiter counter resets, after one minute passes.
More precise information is given in the response headers:
```json
{
"RateLimit-Limit": "360",
"RateLimit-Reset": "45",
"Retry-After": "60"
}
```
- **RateLimit-Limit:** The max requests per minute for this endpoint.
- **RateLimit-Reset:** How many seconds remain until the limit is reset and you can request the endpoint again.
- **Retry-After:** Standard field for HTTP client retry behaviour. Always returns 60.
By reading these headers you can handle this scenario by waiting `RateLimit-Reset` seconds and retrying the request.
Some HTTP clients like [got](https://github.com/sindresorhus/got) come with standard retry behavior that reads the `Retry-After` header when they receive a 429 response and waits that many seconds to try again, which also works.
### I keep hitting the limit!
If you are repeatedly hitting the rate limit for an endpoint, make sure to check the following:
- If you are doing some sort of batch process, make sure that you don't have too many parallel invocations of the same endpoint, and try adding waits between each call to avoid flooding the API too fast.
- If you reach the limit during normal operation of your application, make sure you are not duplicating requests by mistake and that you are properly reusing API Keys between calls (to avoid hitting the `/auth` limit).
- If you still require a higher rate of invocation than what we allow for your application to work, please contact our support team to solve your particular use case.
## Status Page API
Source: https://docs.pluggy.ai/en/docs/developer-tools/status-page-api.md
## Overview
Pluggy's status page at [status.pluggy.ai](https://status.pluggy.ai) shows the live health of every connector, payment product and infrastructure component, plus incident history. Everything the page renders is public JSON you can consume directly — no authentication required, no API key.
Three endpoints, from largest to smallest:
| Endpoint | Use it when |
| --- | --- |
| [`/api/status`](#the-snapshot-endpoint) | You want everything: connectors, 90 days of history, every incident with its timeline |
| [`/api/connectors-incidents`](#active-incidents-by-connector) | You only want what is broken right now, keyed by connector id |
| [`/api/summary`](#embeddable-widget) | You only want one overall status, for a badge or a health check |
If you already call `GET /connectors`, you may not need any of them — see [On the connector object](#on-the-connector-object).
If you just want notifications, you don't need this API: subscribe by email on the status page, add the **Pluggy Status** Slack app to a channel, or use the [RSS feed](https://status.pluggy.ai/rss).
## The snapshot endpoint
```
GET https://status.pluggy.ai/api/status
```
- **No authentication.** CORS is open, so you can call it from a browser app.
- **Cached for ~30 seconds.** Poll at 60 seconds or slower — faster polling only re-reads the cache.
The response contains four collections:
| Field | What it holds |
| --- | --- |
| `institutions` | Every connector with its current status, 90-day history and product support flags |
| `incidents` | Open incidents and everything resolved in the last 90 days, with their update timelines |
| `components` | Infrastructure components (API, Webhooks, Connect Widget, …) and their current status |
| `productStatus` | Manual per-institution status overrides for payment products |
## Institutions
```json
{
"pluggy_id": "601",
"name": "Itaú",
"type": "PERSONAL_BANK",
"logo_url": "https://cdn.pluggy.ai/assets/connector-icons/201.svg",
"status": "online",
"bars": "ooooooo…dxo",
"uptime": 99.51,
"supports_data": true,
"supports_pis": true,
"supports_pis_scheduled": true,
"supports_pix_auto": true,
"supports_smart_transfer": true
}
```
- `pluggy_id` is the same connector `id` you use everywhere else in the Pluggy API — match on it directly.
- `status` is one of `online`, `degraded`, `offline`, `maintenance`.
- `bars` encodes the last 90 days as one character per day, oldest first: `o` online, `d` degraded, `p` partial outage, `x` offline, `m` maintenance.
- `uptime` is a weighted 90-day percentage (degraded days count 25% downtime, partial 50%, offline 100%).
- The `supports_*` flags tell you which products the institution offers (data, payment initiation, scheduled payments, automatic PIX, smart transfers).
**Example — check one connector's health:**
```bash
curl -s https://status.pluggy.ai/api/status \
| jq '.institutions[] | select(.pluggy_id == "601") | {name, status, uptime}'
```
## Incidents
```json
{
"id": "4a8f1e80-…",
"kind": "incident",
"product": "pis",
"pluggy_id": "612",
"institution_name": "PagBank",
"severity": "degraded",
"state": "identified",
"apis": ["Criação de pagamento"],
"started_at": "2026-07-07T14:28:21Z",
"resolved_at": null,
"postmortem": null,
"updates": [{ "state": "identified", "body": "…", "created_at": "…" }]
}
```
- An incident is **open** while `state != "resolved"`.
- `product` is one of `dados`, `pis`, `pis-agendado`, `pixauto`, `smart`, `infra` (legacy incidents may carry `pagamentos`, which maps to `pis`).
- `kind` is `incident` or `maintenance`; maintenances carry `window_starts_at` / `window_ends_at`.
- Connector-scoped incidents include `pluggy_id`, so you can join them against your own connector list.
- Every incident has a shareable page at `https://status.pluggy.ai/incident/`.
**Example — open incidents affecting a connector you use:**
```bash
curl -s https://status.pluggy.ai/api/status \
| jq '.incidents[] | select(.state != "resolved" and .pluggy_id == "612") | {title, state, severity}'
```
## Active incidents by connector
The snapshot carries everything, which makes it large. If all you want is "what is wrong with each connector right now" — to flag an affected bank on your own connector-selection screen before a user picks it — poll this instead. It is a few kilobytes rather than a few hundred, because it carries no history, no resolved incidents and no timelines.
```
GET https://status.pluggy.ai/api/connectors-incidents
```
```json
{
"generatedAt": "2026-09-05T10:11:25.059Z",
"connectors": {
"602": [
{
"id": "78624c2c-bf55-466a-ba99-6b57e9bd9223",
"title": "XP Banking - Compras parceladas não sendo retornadas",
"description": null,
"type": "TRANSACTIONS_INSTALLMENTS_ISSUE",
"product": "dados",
"kind": "INCIDENT",
"severity": "DEGRADED",
"state": "IDENTIFIED",
"startedAt": "2026-07-23T13:40:41Z",
"updatedAt": "2026-08-18T16:30:09Z",
"url": "https://status.pluggy.ai/incident/78624c2c-bf55-466a-ba99-6b57e9bd9223"
}
]
}
}
```
Keys are the same connector `id` you get from `GET https://api.pluggy.ai/connectors`, so joining is a lookup. Only connectors with at least one active incident appear, and each list is ordered worst-first.
**Only incidents affecting a connector *at this moment* are listed.** A scheduled maintenance is published days ahead but appears here only once its window opens, and disappears when it closes. An incident affecting several institutions appears under each of their connector ids. Infrastructure-wide incidents belong to no connector and are not listed here — use the snapshot for those.
### The `type` field
`severity` says how bad it is and `state` says how far along we are. `type` says **what is broken**, which is the part you cannot infer from anything else:
| Group | Values |
| --- | --- |
| Availability | `CONNECTOR_UNAVAILABLE`, `CONNECTOR_DEGRADED`, `INSTITUTION_OUTAGE`, `SCHEDULED_MAINTENANCE` |
| Connection lifecycle | `CONSENT_ERROR`, `CONNECTION_NOT_UPDATING`, `PARTIAL_SUCCESS` |
| Data quality | `ACCOUNTS_MISSING`, `BALANCE_INCORRECT`, `TRANSACTIONS_MISSING`, `TRANSACTIONS_INCORRECT`, `TRANSACTIONS_INSTALLMENTS_ISSUE`, `INVESTMENTS_MISSING`, `INVESTMENTS_INCORRECT`, `IDENTITY_MISSING`, `HISTORICAL_DATA_MISSING` |
| Pluggy platform | `WEBHOOK_DELAY`, `PAYMENT_FAILURE` |
| Unclassified | `OTHER` |
Use it to group the same problem across institutions, and to decide which incidents are worth putting in front of a user: a `SCHEDULED_MAINTENANCE` and a `TRANSACTIONS_MISSING` both read as "degraded" otherwise. `OTHER` means Pluggy has not classified the incident, not that nothing is wrong.
## On the connector object
You do not have to call the status API at all. The same incidents ride on the `health` object of every connector returned by [`GET /connectors`](/reference/connector/connectors-list), so a listing you already make carries them:
```json
{
"id": 602,
"name": "XP Banking",
"health": {
"status": "ONLINE",
"stage": null,
"incidents": [
{
"title": "XP Banking - Compras parceladas não sendo retornadas",
"type": "TRANSACTIONS_INSTALLMENTS_ISSUE",
"product": "dados",
"severity": "DEGRADED",
"state": "IDENTIFIED",
"url": "https://status.pluggy.ai/incident/78624c2c-…"
}
]
}
}
```
`health.incidents` is **absent** when the connector has no active incident, so its presence is the signal itself.
Note the `status: "ONLINE"` in that example. `health.status` answers *can I connect at all*; `health.incidents` answers *what is wrong*. A bank can be perfectly reachable and still be failing to return instalments, and only the second field can tell you that. They are different questions — read both.
`health.details` is a third, unrelated thing: request it with `?healthDetails=true` and it describes how **your own** connections to that institution have been doing, rather than the institution itself.
## Embeddable widget
Show Pluggy's live status inside your own app or internal dashboard.
**Floating badge** — one script tag, renders a small pill (status dot + label) in the corner of the page, linking to the status page. Refreshes every 60 seconds.
```html
```
- `data-lang`: `pt` (default), `es` or `en`.
- `data-position`: `bottom-right` (default) or `bottom-left`.
- `data-target`: a CSS selector — renders the badge inline inside that element instead of floating.
**Iframe panel** — a compact panel with overall status, infrastructure components and open incidents:
```html
```
**Summary endpoint** — both are backed by a tiny JSON summary you can also consume directly (CORS open, cached ~30s). `\/api\/widget` serves the same body and keeps working for embeds already pointing at it:
```
GET https://status.pluggy.ai/api/summary
```
```json
{
"status": "op",
"labels": { "pt": "…", "es": "…", "en": "All systems operational" },
"openIncidents": 0,
"updatedAt": "2026-07-10T12:00:00.000Z"
}
```
`status` is `op` (operational), `mn` (maintenance), `dg` (degraded), `pt` (partial outage) or `mj` (major outage) — the worst across connectors, payment products and infrastructure.
## Other channels
| Channel | How |
| --- | --- |
| Email | Subscribe on [the status page](https://status.pluggy.ai) — pick specific products or everything; double opt-in, one-click unsubscribe |
| Slack | Install the **Pluggy Status** app from the page's subscribe dialog, or invite `@Pluggy Status` to a channel and enable it |
| RSS | [`https://status.pluggy.ai/rss`](https://status.pluggy.ai/rss) — last 50 incidents with their timelines |
| Webhooks | For connector status changes affecting **your items**, prefer the standard [Pluggy webhooks](/docs/developer-tools/webhooks-ref) (`connector/status_updated`) |
## Webhook
Source: https://docs.pluggy.ai/en/docs/developer-tools/webhooks-ref.md
## Webhook
In this guide we will cover the webhooks that are sent by Pluggy to create a reactive integration to changes. This will cover both data and payment integrations.
A Webhook is a tool that allows you to receive a notification for a certain event. It allows you to set up an HTTPS URL in our platform for certain events, and you will receive a JSON POST event at that URL, with specific event data.
To subscribe to Webhook events, you can either:
- Create a Webhook instance directly, or
- Specify the `webhookUrl` parameter (with a valid HTTPS URL), when:
- creating an Item,
- creating a Connect Token, or
- creating a Payment Request
If you create a Webhook instance directly, you'll be subscribing to all the cases of events of the specified event type. Instead, if you do it by specifying the `webhookUrl` when creating an Item, or creating a Connect Token, you'll be notified about all the events, but only related to that specific resource. Which is, either to that Item specifically, or to the related item(s) created using that Connect Token.
## Data Events
We support registering for the following events when consuming Pluggy's data endpoints.
| Event | Description |
|-------|-------------|
| `item/created` | An item was created and finished connecting successfully. |
| `item/updated` | An item was updated and synced successfully. |
| `item/deleted` | An item was deleted successfully. |
| `item/error` | An item has encountered errors in its execution. The case of `USER_AUTHORIZATION_PENDING` will also trigger this event. |
| `item/waiting_user_input` | An item is blocked waiting for user input to continue. |
| `item/waiting_user_action` | An item is blocked waiting for the user to approve an action on their device (e.g., authorize access in the banking app or scan a QR code). |
| `item/login_succeeded` | An item has successfully logged in to the provider and it's collecting the data. |
| `connector/status_updated` | A connector has changed status (`ONLINE`/`UNSTABLE`/`OFFLINE`). This event informs the affected connector ID and updated status. Check the Connectors endpoint to see all connectors and their IDs. |
| `transactions/deleted` | IDs of deleted transactions after merge data on item update. |
| `transactions/created` | Receive this webhook event, and use the `createdTransactionsLink` page to access all the transactions available and insert them in your data source. |
| `transactions/updated` | IDs of updated transactions after merge data on item update. After receiving this webhook, it's recommended to get the full transactions data using the transactions endpoint with the `ids` parameter. |
> Transactions webhooks are only fired when there is a data change. If there aren't any transactions, it won't fire a `transactions/created` event.
## Payment Events
We support registering for the following events when consuming Pluggy's payment endpoints.
### Payment Intent
| Event | Description |
|-------|-------------|
| `payment_intent/created` | ID of payment intent created by the user, with `paymentRequestId`. |
| `payment_intent/completed` | ID of payment intent completed successfully by the user, with `paymentRequestId`. |
| `payment_intent/waiting_payer_authorization` | ID of payment intent when it needs additional authorization. |
| `payment_intent/error` | ID of payment intent when it has an error during the flow, with `paymentRequestId`. |
| `payment_request/updated` | Payment request status has changed. |
### Scheduled Payment
| Event | Description |
|-------|-------------|
| `scheduled_payment/created` | IDs of the scheduled payment authorization. |
| `scheduled_payment/completed` | A single payment of the authorization has been made. |
| `scheduled_payment/error` | Payment not completed, finished with error. |
| `scheduled_payment/canceled` | Payment canceled by the user or the client. |
### Automatic PIX Payment
| Event | Description |
|-------|-------------|
| `automatic_pix_payment/created` | A payment was scheduled for an automatic PIX payment request. |
| `automatic_pix_payment/completed` | A scheduled payment associated with an automatic PIX payment request was completed successfully. |
| `automatic_pix_payment/error` | A scheduled payment associated to an automatic PIX payment request ended with error. |
| `automatic_pix_payment/canceled` | A scheduled payment associated to an automatic PIX payment request was cancelled. |
### Smart Transfer
| Event | Description |
|-------|-------------|
| `smart_transfer_preauthorization/completed` | A smart transfer preauthorization was approved by a user. |
| `smart_transfer_preauthorization/error` | There was an error during the smart transfer preauthorization approval. For example, when the user rejects the consent. |
| `smart_transfer_payment/completed` | A smart transfer payment was completed. |
| `smart_transfer_payment/error` | There was an error settling the smart transfer payment. For example, when the account doesn't have enough balance. |
To register for a specific event, you will have to send the desired event to listen only to those webhook events.
Alternatively, you can just use the option `all` to receive all events associated.
We only accept HTTPS URLs. Localhost URLs are not allowed; you will have to provide an HTTPS URL using ngrok or other tools to provide public, secure URLs.
> **Tip:** To test this functionality, you can use [RequestCatcher](https://requestcatcher.com), which is a tool that will just receive our notification and show you the payload. You can easily create a catcher with just a name in seconds.
## Payload parameters
When doing the POST request, all webhooks will send the following parameters in JSON format:
- **event:** event's name (`item/created`, `item/updated`, `item/error`, etc.)
- **eventId:** identifier of the event itself. It should be the same for one event when it is sent to many endpoints.
- **triggeredBy:** who triggered the event (for all events except `item/deleted`, `connector/status_updated` and `transactions/deleted`). Possible values:
- `USER`: an end user triggered the event with a Connect Token (for example, from Pluggy Connect)
- `CLIENT`: a client triggered the event with an API Key (for example, by running PATCH on an Item)
- `SYNC`: Auto-sync triggered the event
- `INTERNAL`: It was triggered by someone from Pluggy's support team
Depending on the event type, the entity ID is sent. For example, for items, `itemId`. In transactions, `transactionIds`, and in connectors, `connectorId`.
### `clientUserId` is only sent on `item/*` events
`clientUserId` -- the identifier you set when [creating the Connect Token](/docs/authentication) -- is included in the payload of **every `item/*` event**: `item/created`, `item/updated`, `item/error`, `item/deleted`, `item/login_succeeded`, `item/waiting_user_input` and `item/waiting_user_action`.
It is **not** included in `transactions/*` events. Those payloads carry `itemId`, `accountId` and the transaction fields, but no `clientUserId`. To attribute a transactions event to an end user, keep your own `itemId` -> user mapping (which you already have from the `item/created` event or the widget's `onSuccess` callback) and resolve it from `itemId`.
> **If `clientUserId` arrives as `null` on `item/*` events**
>
> The usual cause is that it was sent at the **root** of the `POST /connect_token` body instead of inside `options`. The API discards unknown root properties and still returns `200`, so the value never reaches the Item. See [Configuring a Connect Token](/docs/authentication). You can backfill affected Items with [PATCH /items/{id}](/reference/items-update).
### Item examples
**item/created:**
```json
{
"event": "item/created",
"eventId": "d876fd7c-e9bd-4c4c-bd46-cc96c62aac29",
"itemId": "a5c763cb-0952-457b-9936-630f79c5b016",
"triggeredBy": "USER",
"clientUserId": "client-user-id"
}
```
**item/updated:**
```json
{
"event": "item/updated",
"eventId": "d876fd7c-e9bd-4c4c-bd46-cc96c62aac29",
"itemId": "a5c763cb-0952-457b-9936-630f79c5b016",
"triggeredBy": "USER",
"clientUserId": "client-user-id"
}
```
**item/deleted:**
```json
{
"event": "item/deleted",
"eventId": "d876fd7c-e9bd-4c4c-bd46-cc96c62aac29",
"itemId": "a5c763cb-0952-457b-9936-630f79c5b016",
"triggeredBy": "USER",
"clientUserId": "client-user-id"
}
```
**item/error:**
```json
{
"event": "item/error",
"eventId": "d876fd7c-e9bd-4c4c-bd46-cc96c62aac29",
"itemId": "d161a74a-8bc8-4093-88de-724312969b0d",
"error": {
"code": "USER_INPUT_TIMEOUT",
"message": "User requested input had expired",
"parameter": "token"
},
"triggeredBy": "USER",
"clientUserId": "client-user-id"
}
```
**item/waiting_user_input:**
```json
{
"event": "item/waiting_user_input",
"eventId": "d876fd7c-e9bd-4c4c-bd46-cc96c62aac29",
"itemId": "d038aaa6-35f2-4f06-8b8a-c464a4a61fc2",
"triggeredBy": "USER",
"clientUserId": "client-user-id"
}
```
**item/waiting_user_action:**
```json
{
"event": "item/waiting_user_action",
"eventId": "d876fd7c-e9bd-4c4c-bd46-cc96c62aac29",
"itemId": "d038aaa6-35f2-4f06-8b8a-c464a4a61fc2",
"triggeredBy": "USER",
"clientUserId": "client-user-id"
}
```
**item/login_succeeded:**
```json
{
"event": "item/login_succeeded",
"eventId": "d876fd7c-e9bd-4c4c-bd46-cc96c62aac29",
"itemId": "a5c763cb-0952-457b-9936-630f79c5b016",
"triggeredBy": "USER",
"clientUserId": "client-user-id"
}
```
### Connector examples
**connector/status_updated:**
```json
{
"id": "201",
"event": "connector/status_updated",
"eventId": "4552bee0-b87f-48b5-896b-c23113839319",
"connectorId": "201",
"data": {
"status": "UNSTABLE"
}
}
```
### Transaction examples
**transactions/deleted:**
```json
{
"event": "transactions/deleted",
"eventId": "d876fd7c-e9bd-4c4c-bd46-cc96c62aac29",
"itemId": "a5c763cb-0952-457b-9936-630f79c5b016",
"accountId": "8a6e2c17-2817-40bb-b03d-546febc6a60a",
"transactionIds": [
"5a14feae-eaa7-423a-820c-6b83837c35b7",
"786c7d98-6085-4879-9c7f-2255260e2436"
]
}
```
**transactions/updated:**
```json
{
"event": "transactions/updated",
"eventId": "d876fd7c-e9bd-4c4c-bd46-cc96c62aac29",
"itemId": "a5c763cb-0952-457b-9936-630f79c5b016",
"accountId": "8a6e2c17-2817-40bb-b03d-546febc6a60a",
"transactionIds": [
"5a14feae-eaa7-423a-820c-6b83837c35b7",
"786c7d98-6085-4879-9c7f-2255260e2436"
]
}
```
**transactions/created:**
```json
{
"itemId": "de7bbf5a-abf2-47e4-94b1-586b36758423",
"event": "transactions/created",
"id": "de7bbf5a-abf2-47e4-94b1-586b36758423",
"eventId": "4e69d62d-b7c8-4f01-b591-a1d8a94710b9",
"accountId": "0d5a0de2-9c82-4ea2-af50-31643a632a33",
"transactionsCount": 332,
"transactionsMinDate": "2025-02-12T15:00:01.000Z",
"transactionsCreatedAtFrom": "2025-02-13T17:21:53.719Z",
"createdTransactionsLink": "https://api.pluggy.ai/transactions?accountId=0d5a0de2-9c82-4ea2-af50-31643a632a33&createdAtFrom=2025-02-13T17:21:53.719Z"
}
```
### Payment Intent examples
**payment_intent/created:**
```json
{
"paymentRequestId": "624cb41e-2b76-42ac-8021-ce6b6b4ace6b",
"paymentIntentId": "8429f45a-f541-4fc3-8439-cbc8d9dc9952",
"event": "payment_intent/created",
"eventId": "71e0b4db-4e8c-401d-8ad8-5ab3ecd1f3d0"
}
```
**payment_intent/completed:**
```json
{
"paymentRequestId": "624cb41e-2b76-42ac-8021-ce6b6b4ace6b",
"paymentIntentId": "8429f45a-f541-4fc3-8439-cbc8d9dc9952",
"event": "payment_intent/completed",
"eventId": "71e0b4db-4e8c-401d-8ad8-5ab3ecd1f3d0",
"referenceId": "E33371172200009110200U70a27b2698"
}
```
**payment_intent/error:**
```json
{
"paymentRequestId": "624cb41e-2b76-42ac-8021-ce6b6b4ace6b",
"paymentIntentId": "8429f45a-f541-4fc3-8439-cbc8d9dc9952",
"event": "payment_intent/error",
"eventId": "71e0b4db-4e8c-401d-8ad8-5ab3ecd1f3d0",
"referenceId": "E33371172200009110200U70a27b2698",
"error": {
"code": "REJECTED_BY_USER",
"description": "The consent was rejected by the user.",
"detail": "O usuário rejeitou a autorização do consentimento"
}
}
```
### Payment Request examples
**payment_request/updated:**
```json
{
"event": "payment_request/updated",
"eventId": "71e0b4db-4e8c-401d-8ad8-5ab3ecd1f3d0",
"paymentRequestId": "624cb41e-2b76-42ac-8021-ce6b6b4ace6",
"clientId": "client-123",
"status": "CANCELED"
}
```
### Scheduled Payments examples
**scheduled_payment/created:**
```json
{
"paymentRequestId": "624cb41e-2b76-42ac-8021-ce6b6b4ace6b",
"scheduledPaymentId": "8429f45a-f541-4fc3-8439-cbc8d9dc9952",
"eventId": "71e0b4db-4e8c-401d-8ad8-5ab3ecd1f3d0",
"event": "scheduled_payment/created"
}
```
**scheduled_payment/completed:**
```json
{
"paymentRequestId": "624cb41e-2b76-42ac-8021-ce6b6b4ace6b",
"scheduledPaymentId": "8429f45a-f541-4fc3-8439-cbc8d9dc9952",
"eventId": "71e0b4db-4e8c-401d-8ad8-5ab3ecd1f3d0",
"event": "scheduled_payment/completed"
}
```
**scheduled_payment/error:**
```json
{
"paymentRequestId": "624cb41e-2b76-42ac-8021-ce6b6b4ace6b",
"scheduledPaymentId": "8429f45a-f541-4fc3-8439-cbc8d9dc9952",
"eventId": "71e0b4db-4e8c-401d-8ad8-5ab3ecd1f3d0",
"event": "scheduled_payment/error",
"error": {
"title": "Title of the error",
"code": "Error Code",
"description": "Error description"
}
}
```
**scheduled_payment/canceled:**
```json
{
"paymentRequestId": "624cb41e-2b76-42ac-8021-ce6b6b4ace6b",
"scheduledPaymentId": "8429f45a-f541-4fc3-8439-cbc8d9dc9952",
"eventId": "71e0b4db-4e8c-401d-8ad8-5ab3ecd1f3d0",
"event": "scheduled_payment/canceled"
}
```
### Automatic PIX Payments examples
**automatic_pix_payment/created:**
```json
{
"paymentRequestId": "624cb41e-2b76-42ac-8021-ce6b6b4ace6b",
"automaticPixPaymentId": "8429f45a-f541-4fc3-8439-cbc8d9dc9952",
"endToEndId": "E37943755202506111319U0da92d1b7e",
"eventId": "71e0b4db-4e8c-401d-8ad8-5ab3ecd1f3d0",
"event": "automatic_pix_payment/created"
}
```
**automatic_pix_payment/completed:**
```json
{
"paymentRequestId": "624cb41e-2b76-42ac-8021-ce6b6b4ace6b",
"automaticPixPaymentId": "8429f45a-f541-4fc3-8439-cbc8d9dc9952",
"endToEndId": "E37943755202506111319U0da92d1b7e",
"eventId": "71e0b4db-4e8c-401d-8ad8-5ab3ecd1f3d0",
"event": "automatic_pix_payment/completed"
}
```
**automatic_pix_payment/error:**
```json
{
"paymentRequestId": "624cb41e-2b76-42ac-8021-ce6b6b4ace6b",
"automaticPixPaymentId": "8429f45a-f541-4fc3-8439-cbc8d9dc9952",
"endToEndId": "E37943755202506111319U0da92d1b7e",
"eventId": "71e0b4db-4e8c-401d-8ad8-5ab3ecd1f3d0",
"event": "automatic_pix_payment/error",
"error": {
"title": "Title of the error",
"code": "Error Code",
"description": "Error description"
}
}
```
**automatic_pix_payment/canceled:**
```json
{
"paymentRequestId": "624cb41e-2b76-42ac-8021-ce6b6b4ace6b",
"automaticPixPaymentId": "8429f45a-f541-4fc3-8439-cbc8d9dc9952",
"endToEndId": "E37943755202506111319U0da92d1b7e",
"eventId": "71e0b4db-4e8c-401d-8ad8-5ab3ecd1f3d0",
"event": "automatic_pix_payment/canceled"
}
```
### Smart Transfers examples
**smart_transfer_preauthorization/completed:**
```json
{
"clientId": "65a8c757-ef2c-4bc3-94ed-99218f6a0ee8",
"event": "smart_transfer_preauthorization/completed",
"eventId": "8013240b-7c0a-409e-bf00-7fc586cc9196",
"smartTransferPreauthorizationId": "f84e6e06-e0f9-4ab3-89f2-da062be65e7c",
"status": "COMPLETED"
}
```
**smart_transfer_preauthorization/error:**
```json
{
"clientId": "65a8c757-ef2c-4bc3-94ed-99218f6a0ee8",
"event": "smart_transfer_preauthorization/error",
"eventId": "54ceeb25-b9f7-4b90-8124-0cff66d1b2c3",
"smartTransferPreauthorizationId": "3dd45002-52aa-44e8-a206-f6b99a293d9a",
"status": "REJECTED",
"error": {
"code": "REJECTED_BY_USER",
"description": "The consent was rejected by the user.",
"detail": "O usuário rejeitou a autorização do consentimento"
}
}
```
**smart_transfer_payment/completed:**
```json
{
"clientId": "65a8c757-ef2c-4bc3-94ed-99218f6a0ee8",
"event": "smart_transfer_payment/completed",
"eventId": "0dfa6e5d-aee4-42b6-bd3b-e27e9c591339",
"smartTransferPreauthorizationId": "f84e6e06-e0f9-4ab3-89f2-da062be65e73",
"smartTransferPaymentId": "2afc828e-0dc2-4195-a774-145f7d7fc46c",
"status": "PAYMENT_COMPLETED"
}
```
**smart_transfer_payment/error:**
```json
{
"clientId": "65a8c757-ef2c-4bc3-94ed-99218f6a0ee6",
"event": "smart_transfer_payment/error",
"eventId": "59ff7a4a-d804-499b-a31c-7865014ba0ef",
"smartTransferPreauthorizationId": "f84e6e06-e0f9-4ab3-89f2-da062be65e73",
"smartTransferPaymentId": "b546ab61-f1cd-4cd4-b5bf-0073d9a9ee3a",
"status": "PAYMENT_REJECTED",
"error": {
"code": "INSUFFICIENT_BALANCE",
"description": "The account doesn't have enough balance to perform the payment.",
"detail": "Saldo insuficiente."
}
}
```
## Handling notifications
When we send you a webhook notification, two things can happen:
1. **Your API responds 2XX in less than 5 seconds (success)**
2. **Your API responds with a different status, or it does not respond in 5 seconds (failure)**
We attempt to deliver each webhook up to three times in a row.
If delivery still fails, we retry again after 1 hour, with three more consecutive attempts. If it continues to fail, we make a final retry 2 hours later, again with three attempts.
In total, a webhook may be sent up to 9 times (initial attempt + retries).
> **Exception:** The `item/login_succeeded` webhook will be sent just three times in a row but there are no backoff retries after 1 and 2 hours.
It's mandatory that your API returns 2XX right after receiving a notification and then does its processing after responding to Pluggy. This way, if your processing takes more than 5 seconds, we will not interpret it as a failure, therefore avoiding unwanted retries of the same notification.
For all items notifications, we expect that the first thing you do when processing the event is to do a `GET /items/{id}` to recover the latest information related to the event, instead of processing from the event's payload data.
> **Whitelisting Pluggy's IPs**
>
> If you want to add extra security measures to provide IP filtering to our requests, you should whitelist the following IPs:
>
> `52.67.145.81`
## Webhook headers
When creating a webhook, you can specify a `headers` object to send specific headers in your webhook notifications. This can be useful, for instance, if your webhook URL is secured with an API Key. You can add headers to your webhook like this:
```json
{
"url": "example.com",
"event": "all",
"headers": {
"Authorization": "My API key",
"X-CLIENT-ID": "Some secret extra information"
}
}
```
> **API Only:** Webhook headers currently can only be configured via API, since they may contain sensitive data to be exposed in our dashboard.
>
> For more information see Webhook in our API reference.
## Configure & Troubleshoot
Source: https://docs.pluggy.ai/en/docs/developer-tools/webhook-troubleshoot.md
## Configure & Troubleshoot
View, create and edit webhooks from Dashboard, visualize which webhooks were sent, their payloads and retry them to sync collected data.
### View, create, and edit webhooks from Dashboard
You can also manage your application's webhooks from the Dashboard.
1. Enter into [dashboard.pluggy.ai](https://dashboard.pluggy.ai)
2. Go to the "Applications" tab
3. Enter the application settings page by clicking the pencil icon in the application where you want to manage webhooks.
Here, you'll be able to view the webhooks you've already created, edit the URL and events it's subscribed to, delete it, or even disable it.
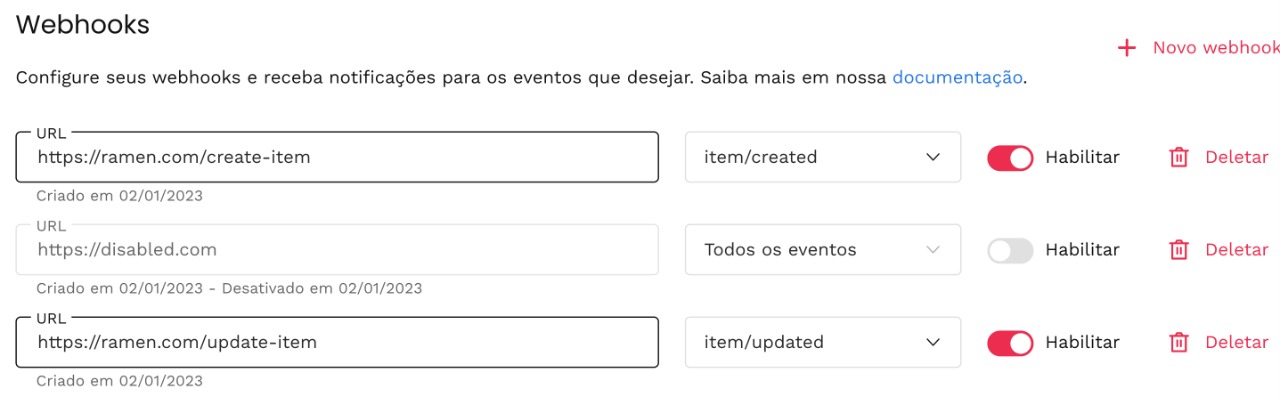
> **Note:** Only team admins or owners can edit webhooks.
> **Webhook limitations:**
>
> - You can create a maximum of 5 webhooks per event. If you need to register more, consider consolidating your endpoints or using a single webhook URL with internal routing.
> - Webhooks pointing to known testing tools (such as Request Catcher, ngrok, or similar local development URLs) are automatically deleted after 90 days.
### Monitor Webhook Events
In addition to managing webhook configurations, you can monitor webhook delivery and troubleshoot issues through the Events page.
1. Navigate to [dashboard.pluggy.ai/events](https://dashboard.pluggy.ai/events)
2. View all webhook events sent to your applications in real-time
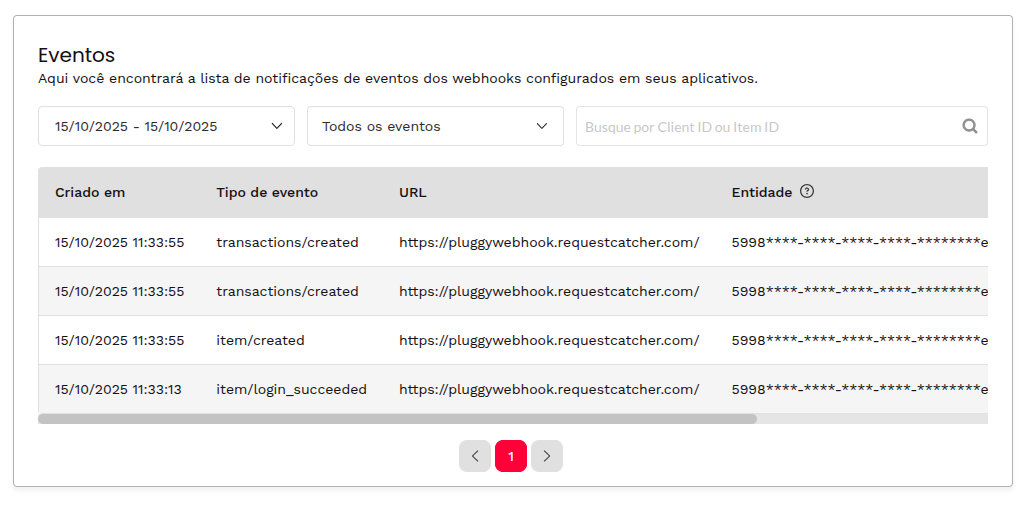
Use the available filters to narrow down webhook events:
- **Date Range:** Filter events by creation date
- **Event Type:** Select specific event types or view all events
- **Search:** Search by Application Client ID, Item ID, or any text
> **Note:** The webhook events page automatically refreshes every minute to show the latest events and their status.
### Advanced Event Details
Click on any webhook event row to view detailed information in a modal, including:
- **Basic information:** Creation and Completion timestamp, Event type, Target URL, Connector/Item ID, Number of retries and Delivery status
- **Error information** for failed events
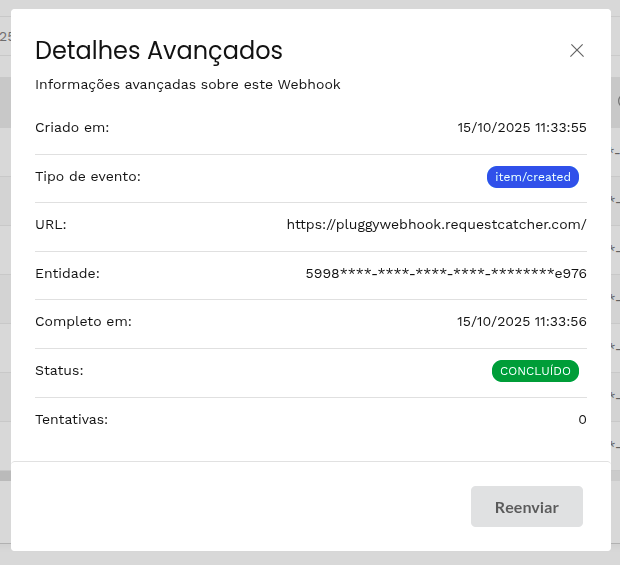
### Retry Webhook Events
The retry functionality allows you to manually resend any webhook event, regardless of its current status. This is useful for testing, debugging, or ensuring delivery of important events.
1. Click on the event row to open the details modal
2. Click the "Retry" button to manually retry the webhook delivery
3. The modal will close and the webhook will be queued for retry
> **Additional Resources:** For comprehensive information about webhook payload parameters, event types, handling notifications, and implementation details, refer to the complete [Webhook documentation](/docs/developer-tools/webhooks-ref).
## MCP Server
Source: https://docs.pluggy.ai/en/docs/developer-tools/mcp.md
The Pluggy Docs **Model Context Protocol (MCP) server** lets any AI agent read Pluggy's documentation, guides, API reference, changelog, recipes, and curated support Q&A directly at runtime. Instead of guessing from stale training data, your agent answers questions and writes integration code grounded in the **live** docs — with citations.
The server is hosted at:
```
https://mcp.pluggy.ai/mcp
```
It's a remote HTTP server: **no installation, no API key.** Point any MCP-compatible client at that URL and it works.
The server now lives on its own address, so it stays the same even if the documentation site later moves — `https://mcp.pluggy.ai/mcp` is the URL to use from here on. The previous one, `https://v2.docs.pluggy.ai/api/mcp`, keeps working, so anything you already set up is fine as it is.
**One URL, optional sign-in — the same server for everyone:**
- **Without signing in** → the public documentation tools (docs, API reference, changelog, recipes, Q&A).
- **Signed in with your Pluggy dashboard account** → the above **plus your dev-portal tools** — your teams, applications, connectors, items, and usage — scoped to your team. Sign-in is optional; use it anonymously for docs, or connect it to your data.
> **Skills vs. MCP**
>
> The MCP server gives an agent live access to Pluggy's documentation at runtime. [Agent Skills](/docs/developer-tools/ai-skills) give the agent the know-how — the patterns and best practices — for building with Pluggy. They work independently, and even better together.
## What you can do with it
Once connected, ask your agent to build with Pluggy and it will pull the exact, current answer instead of hallucinating:
- **"How do I create a connect token and open the Connect Widget?"** → grounded steps from the live guides.
- **"Show me the details of the `createItem` endpoint."** → method, path, parameters, and schemas straight from the OpenAPI spec.
- **"What changed in the last release for webhooks?"** → the actual changelog entry, not a guess.
- **"Why is my item stuck in `WAITING_USER_INPUT`?"** → the curated, human-verified support Q&A that answered it before.
- **"Write the code to list a user's transactions with pagination."** → integration code that matches the current API.
Because it reads the same content published on this site, the answers stay correct as the docs evolve — you never re-teach your agent.
## Available tools
| Tool | What it does |
| ------------------ | --------------------------------------------------------------------------------------------------------- |
| `query` | Ask a natural-language question and get a generated answer **with citations**, combining docs, changelog, recipes, and API reference |
| `search_docs` | Search the documentation guides (concepts, quickstart, integration) with relevance-ranked excerpts |
| `search_qa` | Search the curated, human-verified support Q&A — the highest-trust source for "how do I / why does X happen" questions |
| `search_changelog` | Search the changelog — release notes, breaking changes, migration notes |
| `search_recipes` | Search the recipes — cookbook, integration patterns, code examples |
| `get_guide` | Retrieve the full content of a single documentation guide by slug and locale |
| `list_guides` | List all documentation guides (slug, title, description, category) for a locale |
| `get_api_endpoint` | Get full details of an API endpoint by `operationId` — method, path, parameters, request body, responses |
| `list_endpoints` | List all Pluggy API endpoints from the OpenAPI spec, optionally filtered by tag |
## Connect it to your tool
Pick your agent below. Everywhere you see it, the server URL is the same: `https://mcp.pluggy.ai/mcp`.
### Claude Code
```bash
claude mcp add --transport http pluggy-docs https://mcp.pluggy.ai/mcp
```
Add `-s user` to make it available in every project: `claude mcp add -s user --transport http pluggy-docs https://mcp.pluggy.ai/mcp`.
### Claude Desktop
**Settings → Connectors → Add custom connector**, name it `Pluggy Docs`, and paste `https://mcp.pluggy.ai/mcp`. Or edit `claude_desktop_config.json`:
```json
{
"mcpServers": {
"pluggy-docs": {
"type": "http",
"url": "https://mcp.pluggy.ai/mcp"
}
}
}
```
### ChatGPT (OpenAI)
In **Settings → Connectors → Advanced → Developer mode**, add a connector with the URL `https://mcp.pluggy.ai/mcp`. (Custom remote MCP connectors are available on ChatGPT Plus/Pro/Business/Enterprise.) In a chat, enable the `Pluggy Docs` connector and ask away.
### OpenAI Codex CLI
Add to `~/.codex/config.toml`:
```toml
[mcp_servers.pluggy-docs]
command = "npx"
args = ["-y", "mcp-remote", "https://mcp.pluggy.ai/mcp"]
```
Codex talks to local (stdio) MCP servers, so `mcp-remote` bridges to the hosted HTTP server.
### Cursor
Add to `~/.cursor/mcp.json` (global) or `.cursor/mcp.json` (per-project):
```json
{
"mcpServers": {
"pluggy-docs": {
"url": "https://mcp.pluggy.ai/mcp"
}
}
}
```
### VS Code (GitHub Copilot agent mode)
One command:
```bash
code --add-mcp '{"name":"pluggy-docs","type":"http","url":"https://mcp.pluggy.ai/mcp"}'
```
Or create `.vscode/mcp.json` in your workspace:
```json
{
"servers": {
"pluggy-docs": {
"type": "http",
"url": "https://mcp.pluggy.ai/mcp"
}
}
}
```
### Windsurf
Add to `~/.codeium/windsurf/mcp_config.json`:
```json
{
"mcpServers": {
"pluggy-docs": {
"serverUrl": "https://mcp.pluggy.ai/mcp"
}
}
}
```
### Gemini CLI
Add to `~/.gemini/settings.json`:
```json
{
"mcpServers": {
"pluggy-docs": {
"httpUrl": "https://mcp.pluggy.ai/mcp"
}
}
}
```
### Zed
Add to your Zed `settings.json`:
```json
{
"context_servers": {
"pluggy-docs": {
"command": {
"path": "npx",
"args": ["-y", "mcp-remote", "https://mcp.pluggy.ai/mcp"]
}
}
}
}
```
### Any other MCP client
If your client only supports local (stdio) servers, bridge to the hosted one with [`mcp-remote`](https://www.npmjs.com/package/mcp-remote):
```bash
npx -y mcp-remote https://mcp.pluggy.ai/mcp
```
Clients that support remote **Streamable HTTP** servers can use the URL directly.
## Test your setup
Start a new chat with your agent and try:
```
Using the Pluggy docs MCP, how do I create a connect token and open the Connect Widget?
```
or
```
List the Pluggy API endpoints for Items and show me the details of createItem.
```
The agent should call the MCP tools and answer with citations from the live documentation. If nothing happens, restart the client after adding the server and confirm the URL is exactly `https://mcp.pluggy.ai/mcp`.
## What it exposes
The server covers everything published on this site:
- **Documentation guides** — concepts, quickstart, and integration guides (EN, PT, ES)
- **API Reference** — every endpoint from the OpenAPI spec, with parameters and schemas
- **Changelog** — release notes, breaking changes, and migration notes
- **Recipes** — step-by-step integration patterns and code examples
- **Curated Q&A** — real support questions answered and verified by the Pluggy team
**Signed in** (your Pluggy dashboard account), the same server also exposes your **dev portal**, scoped to your team: list your teams and applications, connectors, items, and usage stats. Your token is validated and used only to reach your own team's data — never another customer's, and never Pluggy-internal knowledge.
The documentation tools are read-only and public; the dev-portal tools require sign-in. To call the Pluggy product API directly, use the [API Reference](/reference) with your own credentials.
## Your own data: the dev-portal tools
Sign in and the agent can answer questions about *your* integration, not only about the
documentation — why an item is failing, what a webhook delivered, how much you ingested
last month.
| Tool | What it does |
| --- | --- |
| `list_teams` | The teams your account belongs to |
| `list_applications` | The applications of a team, with their environment |
| `select_application` | Fixes the team and application for the rest of the conversation |
| `list_connectors` | The connectors available to an application |
| `get_stats` | Dashboard stats for a team — items, executions, success rate |
| `get_item` | One item by id: current status and recent executions |
| `debug_item` | Why an item is failing, and the next step for that user — expired credentials, consent to re-authorize, MFA pending, or a provider-side incident |
| `check_incidents` | Current and recently resolved incidents from [status.pluggy.ai](https://status.pluggy.ai), optionally filtered by connector |
| `list_webhooks` | The webhooks registered for an application and the events they fire on |
| `list_webhook_events` | Events delivered, with their status |
| `get_webhook_event` | One event in full: payload, status, delivery attempts |
| `get_reports` | Transaction-ingestion reports over a date range, daily or summarised |
| `get_billing_url` | A link to the team's billing dashboard |
| `create_support_ticket` | Opens a support ticket — only for teams with the partner ticket integration enabled |
| `dev_portal_tools_introduction` | How the agent should chain the tools above |
The first call asks you to sign in with the same account you use on the
[Dashboard](https://dashboard.pluggy.ai), through your MCP client's normal
authorization flow. There is no API key to paste, and your `clientSecret` never
reaches the agent: the tools read the dev portal on behalf of your user, scoped to the
teams that user can already see.
A session usually goes: `list_teams` → `list_applications` → `select_application`, and
from there the data tools reuse that team and application. Asking the agent to "use my
sandbox application" is enough — it makes those calls itself.
Authentication is optional on this server: the documentation tools work anonymously,
so a client configured to authenticate **only when the server asks for it** never gets
asked, and the dev-portal tools answer *"Not authenticated"* instead of opening the
sign-in. Set the connector to authenticate **always** (in Claude, *Always required*)
and the flow works as expected.
### What to ask it
```
Why is item 8a7c… stuck? Use the Pluggy dev portal tools.
```
```
List the webhook events my production application delivered today, and open the last
failed one.
```
```
How many transactions did we ingest last month compared with the one before?
```
## When something does not work
- **The agent never calls the tools.** Restart the client after adding the server —
most only read their MCP configuration at startup — and check the URL is exactly
`https://mcp.pluggy.ai/mcp`.
- **"Not authenticated" on a dev-portal tool.** The client is set to sign in only on
demand; see the note above.
- **The answer looks out of date.** The tools read the published site, so anything not
yet published is not visible to them either. Check the page itself on
[v2.docs.pluggy.ai](https://v2.docs.pluggy.ai).
- **Your client only speaks stdio.** Bridge with `npx -y mcp-remote https://mcp.pluggy.ai/mcp`.
## Agent Skills
Source: https://docs.pluggy.ai/en/docs/developer-tools/ai-skills.md
**Agent Skills** are folders of instructions, best practices, and resources that AI coding agents — like Claude Code, Cursor, and GitHub Copilot — can discover and load on demand. Pluggy maintains a set of official skills so that, when you ask your agent to build or review a Pluggy integration, it follows Pluggy's documented patterns instead of guessing.
The skills follow the open [Agent Skills](https://agentskills.io/) format and are open source at [`pluggyai/agent-skills`](https://github.com/pluggyai/agent-skills).
> **Skills vs. MCP**
>
> The **[MCP Server](/docs/developer-tools/mcp)** gives an agent live access to Pluggy's documentation and API reference at runtime. **Skills** give the agent the know-how — the patterns, do's, and don'ts — for using Pluggy correctly. They're independent: skills work on their own, with no MCP required. They also work great together — Pluggy Doctor, for example, validates against the docs through the MCP when it's connected (and falls back to the public web docs when it isn't).
## Installation
Install all Pluggy skills into your project with a single command:
```shell
npx skills add pluggyai/agent-skills
```
or
```shell
pnpm dlx skills add pluggyai/agent-skills
```
Once installed, the skills are available automatically. Your agent loads the relevant one whenever it detects a matching task — you don't need to invoke them by hand. **No MCP is required** — the skills are self-contained.
> **Optional, recommended for Pluggy Doctor:** connect the [Pluggy Docs MCP](/docs/developer-tools/mcp) so the reviewer validates against the live docs. If you skip this, Pluggy Doctor falls back to the public docs over the web.
>
> ```bash
> claude mcp add --transport http pluggy-docs https://mcp.pluggy.ai/mcp
> ```
## Available skills
| Skill | What it does | Use it to… |
| --------------------------------------------- | --------------------------- | -------------------------------------------------------------- |
| [`pluggy-integration`](#pluggy-integration) | Core integration patterns | Build authentication, the Connect Widget, Items, and webhooks |
| [`pluggy-open-finance`](#pluggy-open-finance) | Open Finance data retrieval | Fetch accounts, transactions, investments, loans, and identity |
| [`pluggy-payments`](#pluggy-payments) | Payment initiation | Implement PIX, Boleto, and Smart Transfers |
| [`pluggy-doctor`](#pluggy-doctor) | Integration code review | Diagnose an existing integration before going to production |
---
## pluggy-integration
Core Pluggy integration patterns and best practices — the foundation for any implementation.
**Use when you're:**
- Setting up the Pluggy SDK and authentication
- Implementing the Connect Widget in a frontend app
- Creating, updating, or deleting Items (connections)
- Configuring webhooks for real-time data sync
- Handling MFA flows and connection errors
**Areas covered:**
| Category | Impact |
| -------------------------- | -------- |
| Authentication & API Keys | Critical |
| Connect Widget Integration | Critical |
| Webhook Configuration | Critical |
| Item Lifecycle Management | High |
| Error Handling | Medium |
**Example prompts:**
```
Help me integrate the Pluggy Connect Widget in my React app
Set up webhooks to sync transaction data
How should I handle MFA when an Item is WAITING_USER_INPUT?
```
---
## pluggy-open-finance
Best practices for retrieving and managing Open Finance data through Pluggy.
**Use when you're:**
- Selecting the right connector for a financial institution
- Retrieving account balances and details
- Fetching and processing transactions
- Accessing investment portfolios, loans, or identity data
- Designing a data synchronization strategy
**Areas covered:**
| Category | Impact |
| --------------------------------- | -------- |
| Connector Selection | Critical |
| Data Synchronization | High |
| Data Retrieval & Pagination | High |
| Transaction Handling & Enrichment | High |
| Account Management | Medium |
**Example prompts:**
```
Fetch and store transactions with pagination for an Item
Enrich transactions with categories
What's the right sync strategy after an item/updated webhook?
```
---
## pluggy-payments
Payment initiation with PIX, Boleto, and Smart Transfers.
**Use when you're:**
- Initiating PIX payments
- Creating and managing Boletos
- Setting up Smart Transfers with preauthorization
- Managing the payment intent lifecycle
- Handling scheduled payments (PIX Agendado)
**Areas covered:**
| Category | Impact |
| ------------------------ | -------- |
| PIX Integration | Critical |
| Smart Transfers | High |
| Payment Intent Lifecycle | High |
| Boleto Management | Medium |
| Scheduled Payments | Medium |
**Example prompts:**
```
Implement PIX payment initiation end to end
Set up a Smart Transfer with preauthorization
Track payment status with webhooks
```
---
## pluggy-doctor
A reviewer skill that **code-reviews an existing Pluggy integration** and tells you whether it's ready for production. Unlike the other skills (which help you *build*), Pluggy Doctor *evaluates* code you already wrote.
It diagnoses against Pluggy's **official documentation** — never from memory or a frozen checklist — and returns a structured report with a fix for each issue. It reads the docs through the [Pluggy MCP](/docs/developer-tools/mcp) when it's connected, and **falls back to reading the same public docs over the web** when it isn't — so **the skill works with or without the MCP**. If it can't confirm a criterion against the docs, it marks it "not verified" instead of guessing.
**Use when you:**
- Want to review or validate an existing integration
- Ask "is this ready for production?"
- Want to check credential security, connect tokens, or webhook handling
- Upload integration files (webhook handler, connect-token generation, config) for diagnosis
**Areas covered:**
- Credential security (`clientId`/`clientSecret` on the backend only)
- Connect Token & `clientUserId`
- Webhooks — configuration
- Webhooks — correct handling (item status, `PARTIAL_SUCCESS`, two-way sync)
- Sync strategy — rely on auto-sync, no self-driven updates
- Environment (sandbox vs. production)
**What you get back:** a per-area report classifying each item as ✅ correct, ❌ problem (with file, line, and a paste-ready fix), ⚠️ heads-up, or ➖ not applicable — closing with a clear 🟢 production-ready or 🔴 not-yet verdict.
> **Note:** the diagnostic report mirrors the dev's language.
**Example prompts:**
```
Review my Pluggy integration before I ship it
Check my webhook handler — is it correct?
Is this integration secure and production-ready?
Analisa minha integração da Pluggy
```
---
## Supported agents
The skills use Claude Code tool naming but work with any agent that supports the Agent Skills format, including:
- **Claude Code**
- **Cursor**
- **GitHub Copilot**
## Resources
- [Agent Skills repository (`pluggyai/agent-skills`)](https://github.com/pluggyai/agent-skills)
- [Pluggy MCP Server](/docs/developer-tools/mcp)
- [Pluggy Documentation](https://v2.docs.pluggy.ai)
- [API Reference](/reference)
- [pluggy-js SDK](https://github.com/pluggyai/pluggy-js)
## Creating a use case from scratch
Source: https://docs.pluggy.ai/en/docs/integration-checklist/use-case.md
## Purpose
This article is a step by step guide to build a simple example app that integrates with Pluggy. The idea of this guide is to piece together all of Pluggy's important concepts in a practical example.
## What we'll build
We'll build a simple PFM (personal financial management) application that shows you a report of your bank account movements split by categories.
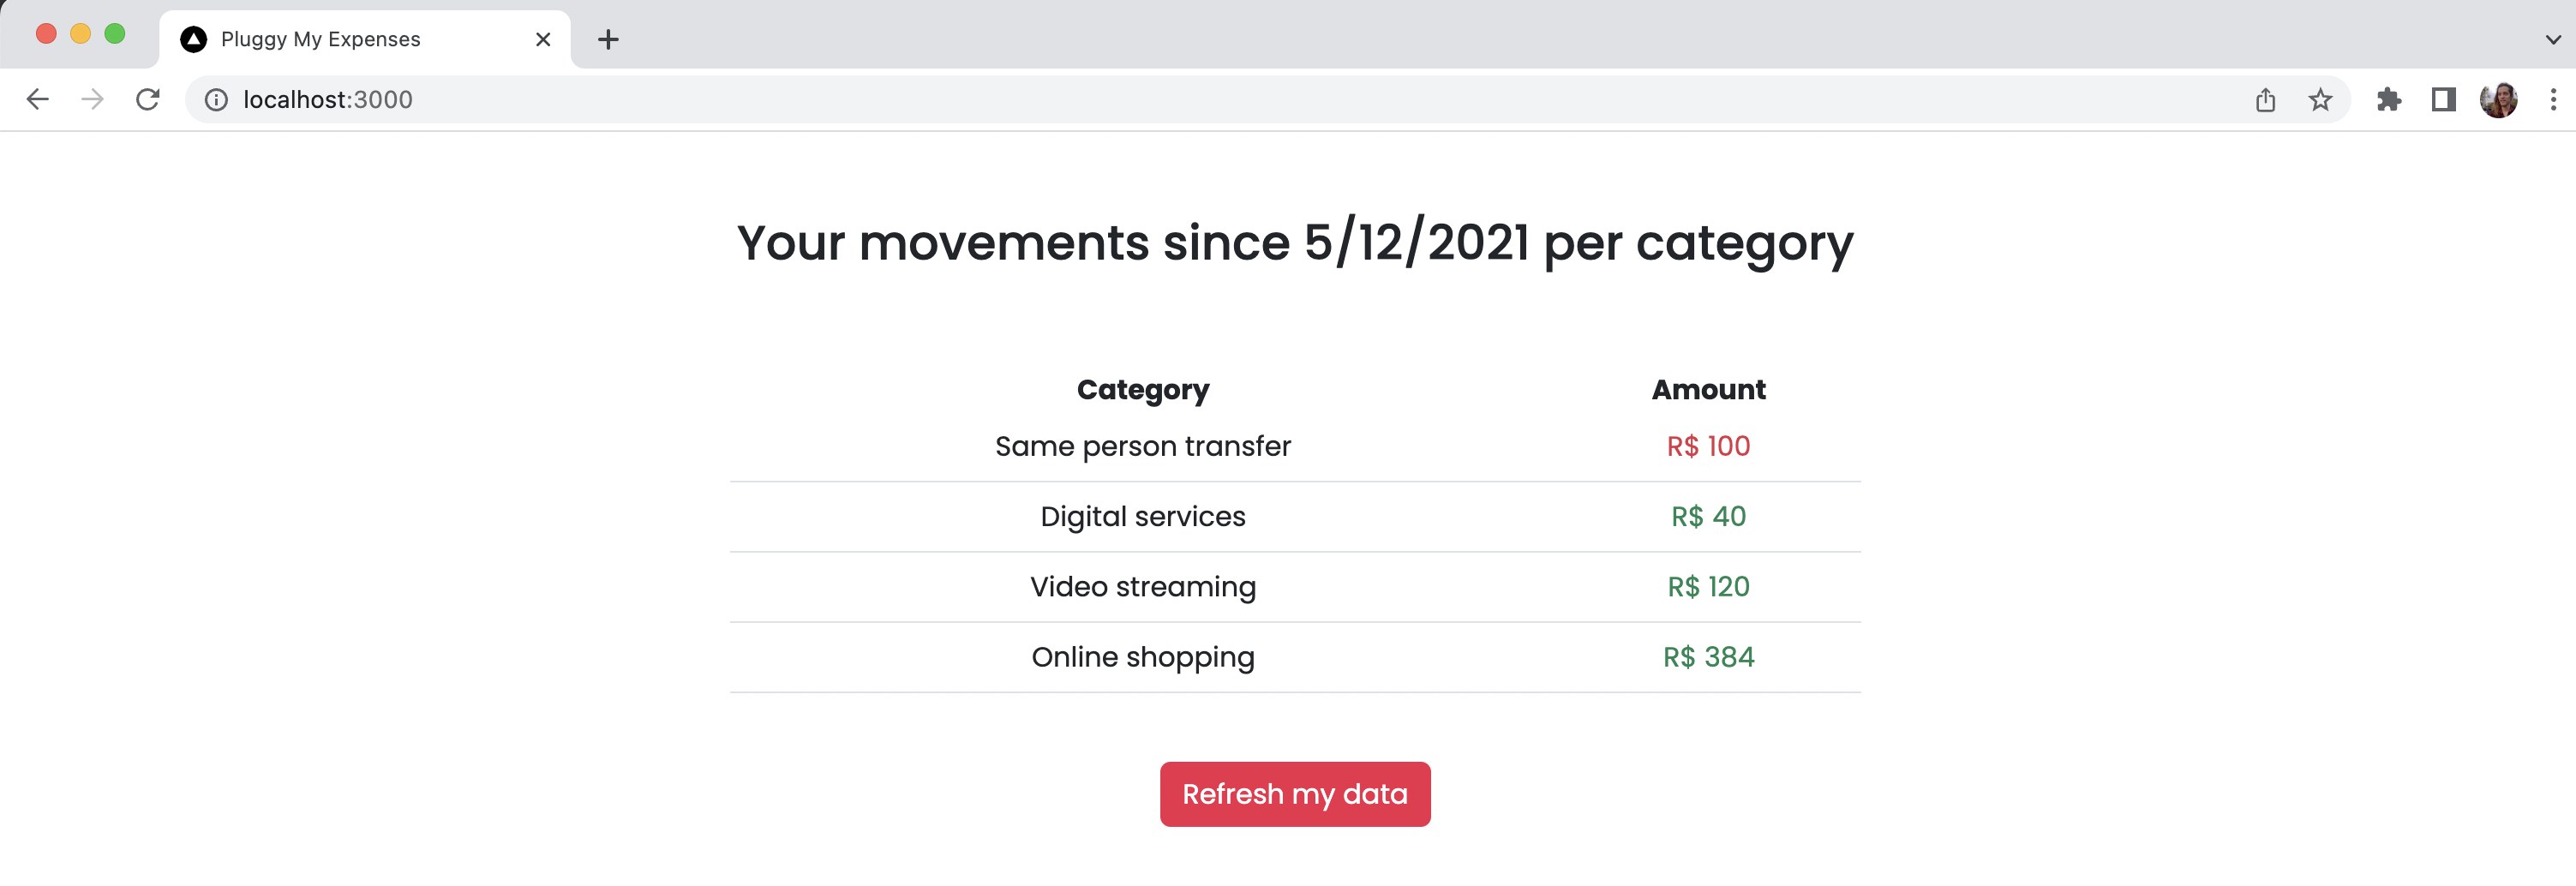
You can check out the code in the [project repository](https://github.com/pluggyai/my-expenses).
## Step 1: Creating a Pluggy account
First we'll need a Pluggy account to be able to connect bank accounts with our app and retrieve banking data with the Pluggy API. We will need to sign up into [dashboard](https://dashboard.pluggy.ai).
## Step 2: Creating an application in dashboard
Once we have our account, we will need to create an application in dashboard. An application has a set of credentials (**clientId** and **clientSecret**) that our app will use to interact with the API.
## Step 3: Testing the API
To check if we are correctly set up, let's obtain an API key to interact with the Pluggy API. This is done through the [`/auth`](/reference/auth-create) endpoint. You can download the [Postman collection](/docs/run-in-postman) and fill in your application's client id and client secret.
With this API key we can view and manage all Pluggy data for our application (PluggyMyExpenses). Let's test our API key by invoking the [`/connectors`](/reference/connectors-list) endpoint, including the key in the `X-API-KEY` header. To learn more about Authentication with the Pluggy API, check out [Authentication](/docs/authentication).
## Step 4: Creating our project
In this example application, we will use [Next.js with Typescript](https://nextjs.org/docs/basic-features/typescript), but you can use whatever technology you're most familiar with.
## Step 5: Connecting a bank account
To easily allow users to connect their accounts in our frontend, we can use the [Pluggy Connect Widget](/docs/pluggy-connect-introduction), and open it with a button in our page.
Before we can instantiate the widget, we will need to create a **Backend endpoint** that generates a Connect token for every user that visits our page. This connect token has restricted permissions and duration for security reasons. Our endpoint logic would look something like this:
```typescript
import { PluggyClient } from 'pluggy-sdk'
const PLUGGY_CLIENT_ID = process.env.PLUGGY_CLIENT_ID || ''
const PLUGGY_CLIENT_SECRET = process.env.PLUGGY_CLIENT_SECRET || ''
// ...
const client = new PluggyClient({
clientId: PLUGGY_CLIENT_ID,
clientSecret: PLUGGY_CLIENT_SECRET,
});
const connectToken = await client.createConnectToken()
// ...
res.status(200).json(connectToken)
```
To create connect tokens easily, we used the [Pluggy Node SDK](https://github.com/pluggyai/pluggy-node/).
> **Security warning**
>
> **Do not** store clientId and clientSecret in the frontend. If this information is visible in your page's code, an attacker can steal all of your user's banking data.
Now that we have our connect token endpoint, we can obtain it in our frontend and instantiate the widget when the user clicks a button, like this:
```typescript
import { PluggyConnect } from 'react-pluggy-connect';
// Fetch connect token from backend and store it in 'connectToken'...
{isWidgetOpen ? (
setIsWidgetOpen(false)}
onSuccess={onSuccess}
/>
) : (
)}
```
Here we used the [React Pluggy Connect SDK](https://www.npmjs.com/package/react-pluggy-connect).
> **Usage in Next.js**
>
> If you are trying to use the widget from a Next.js page, you will need to slightly change how the Widget loads. Check it out in the code [here](https://github.com/pluggyai/my-expenses/blob/5a1b314d07052d3ac43fae17ab2ac44760de6eb4/pages/index.tsx#L6).
Now, when our user clicks on Connect my account, a Connect token is obtained and the Connect Widget instantiates with this token and opens up a modal for the user to input their credentials.
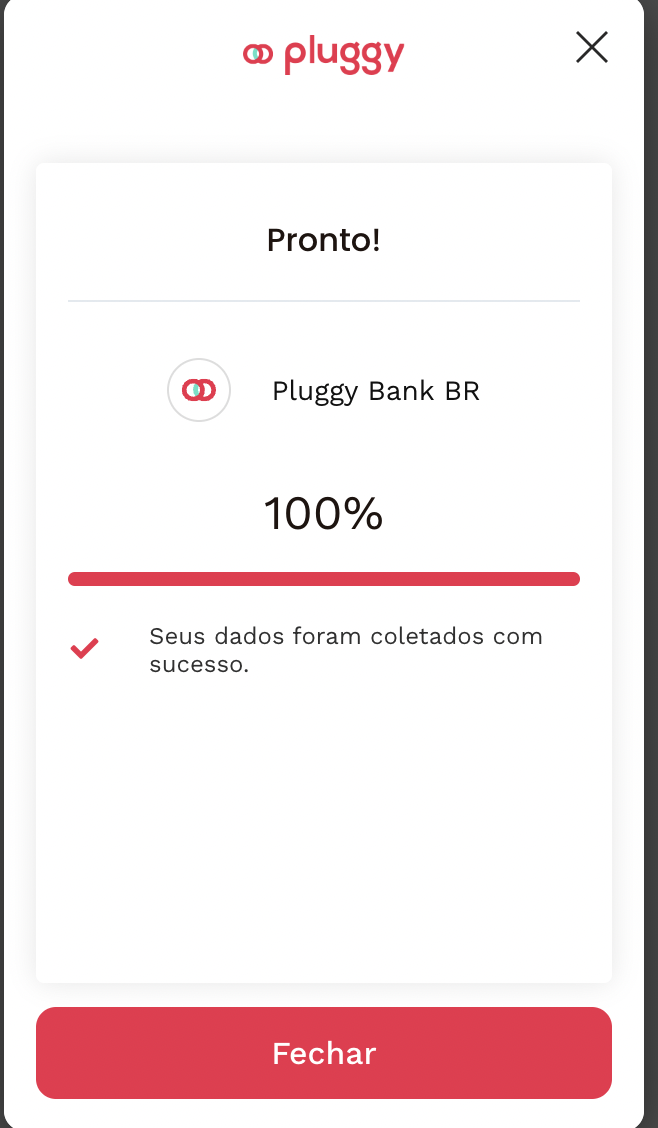
Once the bank account connects successfully, its banking data will be available in the Pluggy API for retrieval with our application's credentials.
If you want to try it out and connect a test account, you can use the [sandbox connectors](/docs/sandbox). Now, let's do something interesting with this data!
## Step 6: Using the banking data
Once the user connects their account, we can obtain its data from the API. All data retrieved from the user is associated with an [Item](/docs/item). Once the widget finishes, it emits an onSuccess event, with the id of the newly created Item.
> **Don't lose your itemId!**
>
> For any action that you want to do in the future with the connected banking data, you will need the Item's ID (this value can not be recovered later). Make sure to store it by listening to the `onSuccess` event from the widget.
We can listen to this event and tell the backend to fetch the user data and create the report for our PFM:
```typescript
const onSuccess = async (itemData: { item: any; }) => {
const reportResponse = await fetch('/api/report?itemId=' + itemData.item.id)
const {categoryBalances, startDate} = await reportResponse.json()
setIsWidgetOpen(false) // Close the widget
// ...
}
```
```typescript
import { PluggyClient } from 'pluggy-sdk';
const PLUGGY_CLIENT_ID = process.env.PLUGGY_CLIENT_ID || '';
const PLUGGY_CLIENT_SECRET = process.env.PLUGGY_CLIENT_SECRET || '';
const client = new PluggyClient({
clientId: PLUGGY_CLIENT_ID,
clientSecret: PLUGGY_CLIENT_SECRET,
});
// ...
// In this example we put all the transactions from all accounts in a list
const accounts = await client.fetchAccounts(req.query.itemId as string);
const transactions = [];
for (const account of accounts.results) {
const accountTransactions = await client.fetchAllTransactions(account.id);
transactions.push(...accountTransactions);
}
// Then we can do what we need with the data and return the response
```
From the backend report we can create a nice table and show the user their movements by category.
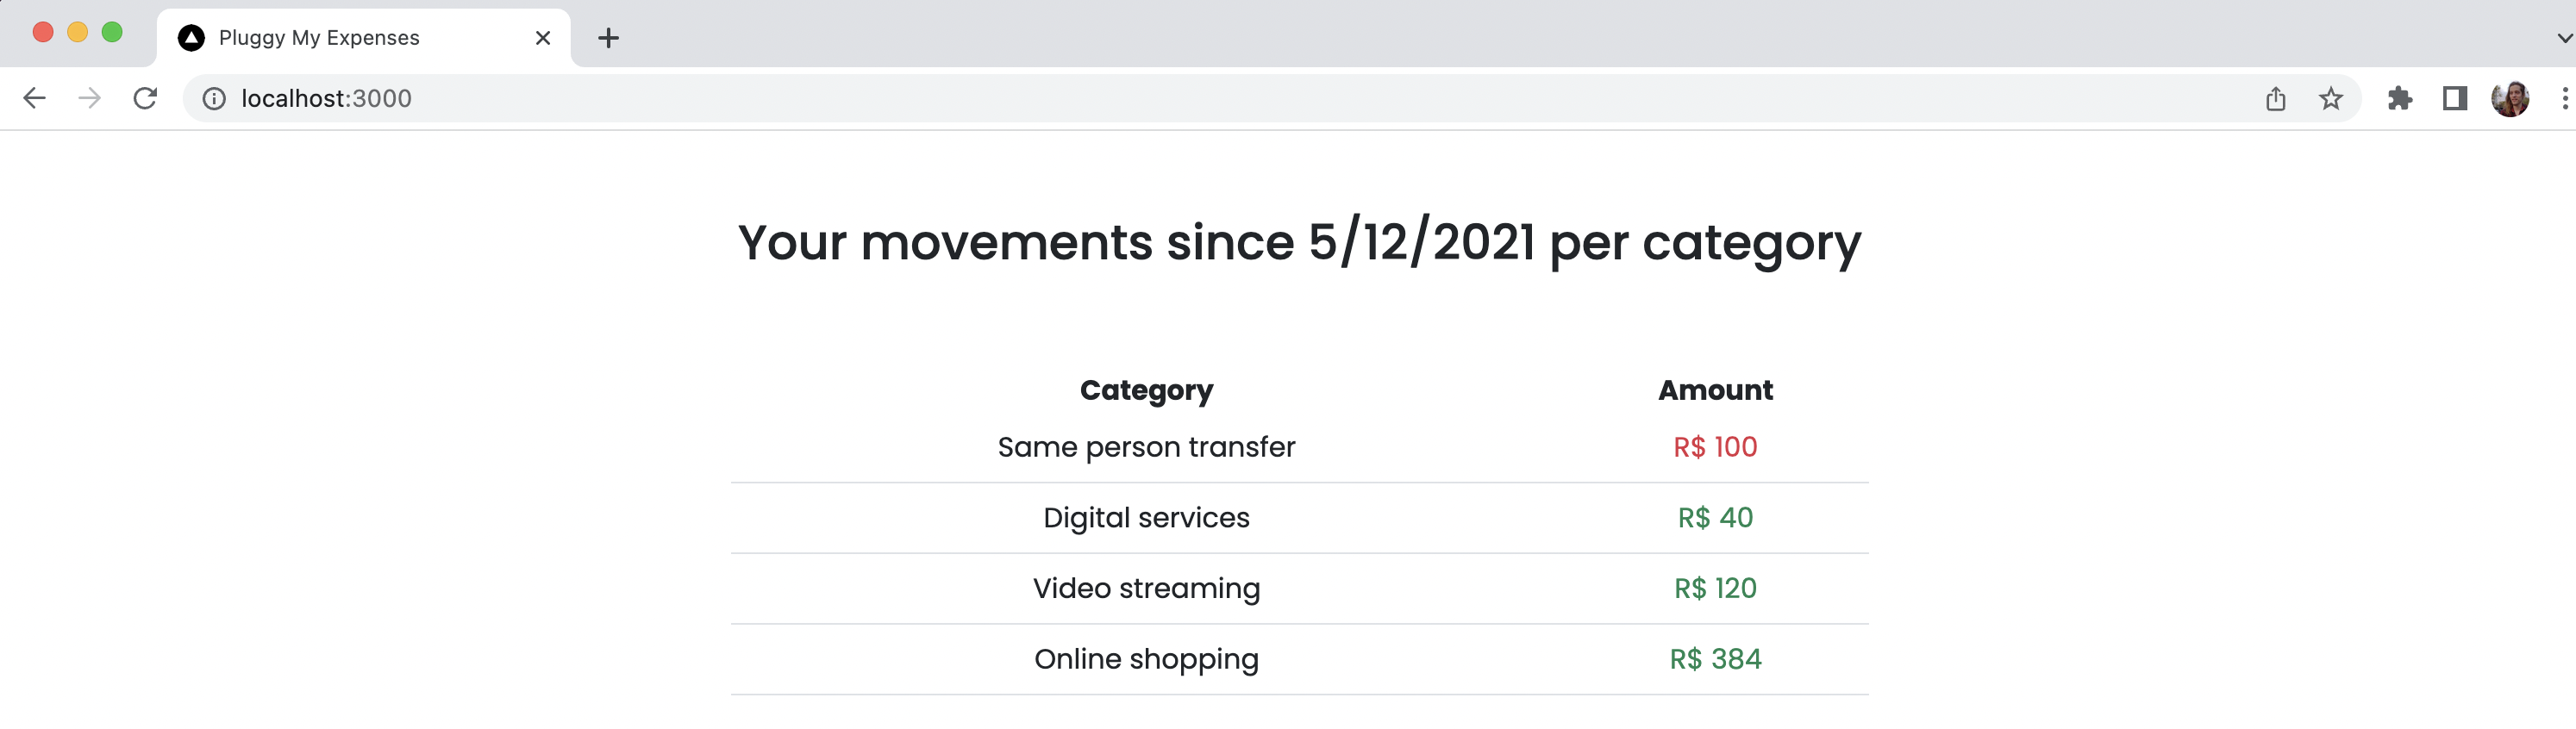
## Step 7: Updating the banking data
The first time a user connects their account using the Widget, Pluggy will attempt to retrieve banking data up to 1 year back (or as much as the institution allows). If we want to update the user's banking data without retrieving it all again, instead only retrieving new information, we can simply update the Item. We can do this easily by instancing the widget with the updateItem prop set
```typescript
setIsWidgetOpen(false)}
onSuccess={onSuccess}
updateItem={itemIdToUpdate} // Item ID we obtained when creating the connection
/>
```
Once the item was updated, the widget emits the onSuccess event and we can create our report again, with the updated item.
## Step 8: Storing banking data
If we need to analyze the banking data from all our connected users (this is ideal for Credit scoring apps), speed up loading, and back up the banking data in case of an API outage, we probably need to set up our own database. You can use whatever technology and approach your business needs. In our example code we used Supabase (PostgreSQL) and we saved the item data every time an Item creation succeeds. If you are interested in how we did it, take a look at the [project repository](https://github.com/pluggyai/my-expenses).
## Step 9: Reacting to API events
Until now, we react to the widget's onSuccess to tell our backend that an Item was created. But what if the user exits the page before the Item is created? Or what if we want to keep our items up-to-date without user interaction (for institutions that allow it)?
If we want to cover these use cases, we can use Pluggy's [webhooks](/docs/webhooks).
This way, we can set up an endpoint in our backend that Pluggy will call whenever an item is created or updated. We will receive a payload that looks like this:
```json
{
"event":"item/updated",
"id":"a5c763cb-0952-457b-9936-630f79c5b016",
"itemId":"a5c763cb-0952-457b-9936-630f79c5b016",
"triggeredBy": "USER"
}
```
And we can handle it from our `/items` endpoint.
Then we need to create the webhook using the [POST /webhooks](/reference/webhooks-create) endpoint from the Pluggy API.
```json
{
"event": "item/updated",
"url": "https://{YOUR_APP_URL}/api/items"
}
```
## Final thoughts
Congratulations! You're now up and running with your Pluggy powered application!
## Pluggy's Integration Checklist
Source: https://docs.pluggy.ai/en/docs/integration-checklist/overview.md
This guide will help you through the onboarding process to integrate Pluggy into your APP and provide a set of bullet points that you should follow for a successful integration to launch Pluggy in production.
## Get your API keys
Source: https://docs.pluggy.ai/en/docs/integration-checklist/api-keys.md
To start integrating with Pluggy, sign up for an account on [Dashboard](https://dashboard.pluggy.ai/).
When you do, you also create a **Team**, where you can invite others to collaborate too.
> On Pluggy's Dashboard, you can manage everything related to your integration with Pluggy. This includes viewing created items and their status, querying the status of our Connectors, and more.
## Creating your first Application
In the [Applications](https://dashboard.pluggy.ai/applications) tab, create your first Application.
Once created, you'll receive a pair of `CLIENT_ID` and `CLIENT_SECRET` credentials.
> These credentials will give access to users' financial data, so it's essential to take all possible measures to store them safely, and never share them publicly.
With this Application, you are ready to start Creating Items.
## Review our Docs
At this point, we recommend you review our [Glossary](/docs/glossary), where we explain the core concepts we'll be using moving forward.
## Create your first Item
Source: https://docs.pluggy.ai/en/docs/integration-checklist/first-item.md
With your recently created Application, you are ready to create your first Item.
### Demo Application
To get a quick feeling of how our API works, you can use our fully-working **Demo** application right away.
To open it, just go to [Dashboard](https://dashboard.pluggy.ai/) → [Applications](https://dashboard.pluggy.ai/applications) → find your Application, and click on "**Preview in Demo**" link.
With this application, you can get a quick grasp of how our API works, as it is an example of the potential an integration with Pluggy can achieve.
Here, you can also review how the data collected by our API in the Financial Institution looks like, in both a user-friendly way, and as JSON/CSV/XLS file formats.
### Sandbox Account
If you prefer, you may create an Item by connecting an account using our Sandbox Connector ("Pluggy Bank").
To connect an account with our Sandbox Connector, you can use our **Test Users**.
The basic set of credentials for a successful login is:
User: `user-ok`
Password: `password-ok`
MFA / 2FA Token (if applicable): `123456`
> By using a Sandbox (Pluggy Bank) Connector, you can test any of the login flows and scenarios you would also encounter when using any of the available Live Connectors.
>
> This covers different scenarios such as invalid credentials error, site not available, MFA login flows, etc. All the Sandbox login flows and credentials can be found [here](/docs/sandbox).
## Use our SDKs to Authenticate
Source: https://docs.pluggy.ai/en/docs/integration-checklist/sdk-auth.md
## Authenticate with Pluggy API
Using your Application `CLIENT_ID` and `CLIENT_SECRET` credentials, it's time to setup authentication.
Let's create an `API key`! With this, you'll be able to access the rest of the endpoints available in our API, such as retrieving Connectors data, creating a Connect Token, retrieving user's financial data collected from connected Items, and [more](/reference/auth).
Since all these credentials are very sensitive, this should be done in a Backend (Server-side) application. Always keep your keys safe!
For this step, we recommend using one of our SDKs to help make this task easier.
In our [Auth endpoint API reference](/reference/auth-create), you'll find code examples to perform this request, by using your Application credentials.
Create a script in your server that exchanges the Application credentials for a Pluggy API key.
If done correctly, you should obtain an API key (`accessToken`) response.
To validate you are effectively authenticated, try using it to retrieve our available [Connectors](/reference/connector) list, by calling our [GET /connectors endpoint](/reference/connectors-list).
## Review our SDKs
We provide SDKs for different platforms that are ready for you to use. Using them can save you a lot of time and effort! In our SDKs, we already solve for you all the details related to authentication, request/response formats, and error-handling; so you can just focus on working in your integration right away.
### Server Side
Review if one of our already developed SDKs works for your application's backend integration.
You can check those in our [docs](/docs/server-side-sdks):
- NodeJS: [GitHub](https://github.com/pluggyai/pluggy-node) | [npmjs.com](https://www.npmjs.com/package/pluggy-sdk)
- C# .NET: [GitHub](https://github.com/pluggyai/pluggy-net) | [Nuget](https://www.nuget.org/packages/Pluggy.SDK/)
- Java: [GitHub](https://github.com/pluggyai/pluggy-java)
> **Note** If you need an SDK we are not yet providing for some other language, please let us know!
Feel free to explore the documentation provided by the SDK and the examples that each project contains as a quick overview of how to implement it.
### Without an SDK
If you want to create your own integration or there isn't an SDK for your specific language, you can easily connect to our API using HTTP REST requests.
Check out our [Postman collection](https://app.getpostman.com/run-collection/e3c01977e43b12525b70) as a guide to get started, configuring your Application `CLIENT_ID` and `CLIENT_SECRET`, and start doing requests to our API.
This [detailed guide](/docs/run-in-postman) in our Docs is also available, to help you understand step-by-step how to interact with the postman collection.
### Quickstarts
To help you get started right away with one of our pre-built solutions, you can use one of our quickstarts, available in our [GitHub quickstarts](https://github.com/pluggyai/quickstart) repository.
If you are using `vercel` as your provider you can do a one-click deployment to setup a backend on the cloud.
## Setup PluggyConnect Widget on your app
Source: https://docs.pluggy.ai/en/docs/integration-checklist/setup-widget.md
The **Connect Widget** is Pluggy's plug & play frontend solution that allows users to connect their financial accounts on a step by step flow, so you will only need worry about interact with their data instead of worrying about painful login flows.
> Check out our Pluggy Connect Widget [docs](/docs/pluggy-connect-introduction) for more information!
## Create a ConnectToken endpoint
First, you'll need to set up an endpoint on your backend that will be in charge of obtaining and providing a `Connect Token`. This token will be used to grant PluggyConnect authorization to access Pluggy API on behalf of your Application.
This process must be done on your backend, since the [Create ConnectToken](/reference/connect-token-create) (`POST /connect_token`) endpoint requires authentication on Pluggy's API (by obtaining a valid API key, using your Application's `CLIENT_ID` and `CLIENT_SECRET`).
### Quickstart with Vercel
If you use **Vercel**, we provide a one-click solution you can use right away, by deploying this endpoint directly from our [example in our Quickstarts](https://github.com/pluggyai/quickstart/tree/master/examples/vercel-node-connect-token) repository.
You'll just have to configure the `PLUGGY_CLIENT_ID` and `PLUGGY_CLIENT_SECRET` environment variables.
Done! Now, you can fetch your Connect Token from `https://YOUR-APP-NAME.vercel.app/api/token`.
**Tip:** you can also specify Connect Token endpoint **options** such as specifying **clientUserId,** by calling this endpoint with `POST` instead of `GET`, like so:
```tsx
// replace YOUR-APP-NAME with your deployed URL
fetch('https://YOUR-APP-NAME.vercel.app/api/token', {
method: 'POST',
headers: { 'Content-Type': 'application/json' },
body: JSON.stringify({
options: { clientUserId: 'user-123@mail.com' }
})
})
.then(response => response.json())
.then(data => console.log(data))
// console will log:
// {"accessToken":"eyJhbGciOiJSUzI1NiIsInR5c... "}
.catch(error => console.error(error));
```
## Setup & Launch PluggyConnect
With your Connect Token endpoint deployed, you are ready to integrate PluggyConnect in your Client-side application.
### Review our Quickstart examples
We have a set of documented and fully working [Frontend examples](https://github.com/pluggyai/quickstart/tree/master/frontend) that you can clone and start using right away and launch our Pluggy Connect interface. You just need to replace the ConnectToken endpoint URL with your own.
You'll find examples with popular frameworks and platforms such as:
- React
- NextJS
- Plain HTML+JS
- Flutter
- ReactNative
- iOS
### Options and Configurations
To best customize your experience, check out the different configurations available in [our documentation](/docs/environments-and-configurations).
You will find options to filter connector types, set the widget language, and subscribe to the different event callbacks that would be fired based on different user actions and events.
## Data sync: Update an Item
Source: https://docs.pluggy.ai/en/docs/integration-checklist/data-sync.md
## Keeping Connections in Sync
When you create an Item, you'll have a reference to the user's financial data, which will initially include all the data from the Institution for up to the **last 365 days**.
To keep this information up-to-date, it's possible to **Update** an Item, that will sync your connection data stored at Pluggy with the Financial Institution up to that moment. Each Sync will recover the transactional information from the last synced date (item's `lastUpdatedAt` field), with a lookback window that varies by connector type:
- **Direct connectors:** 4 to 5 calendar days from the last sync. This wider window ensures that transactions posted on weekends or bank holidays - which may appear delayed - are captured on the following business days.
- **Open Finance (regulated) connectors:** 7 calendar days including today (today + the 6 previous days), in line with the reconciliation rules of the regulated Open Finance ecosystem.
> **Daily Syncs**
>
> To keep this information up-to-date, *Pluggy* will sync (**Update**) your data daily automatically, you won't need to care about creating a batch process or any routine around maintaining the data updated.
>
> *Batch process are prohibited due to abusive usage of the API, the sync process is owned and maintained by Pluggy. Please request us with any customization that you may require for it.*
If a user requires a real-time Update, you can trigger a manual **Update** that will start at that exact moment. This action can be performed in two ways:
## Update the Item using Pluggy's Connect Widget
To update an existing Item using Pluggy Connect, just provide the item ID via the `itemId` configuration field. This will open the widget in "Update Mode", triggering the necessary steps to start the update process.
Pluggy Connect, as a fully working solution, already covers all the potential specificities and scenarios related to all connectors' different login flows, special cases, and more. This includes scenarios such as:
- If the item doesn't require an MFA parameter, then PluggyConnect will just start the update process and the data collection will proceed.
- If it does require an MFA parameter, then PluggyConnect will be prompt it to the user. After the user resolves it, the update process will start and the data collection will proceed.
- If the Item had an invalid credentials error, then PluggyConnect will ask for the credentials first.
You can test and validate all the mentioned scenarios, and more, using our Test Accounts in our [Sandbox](/docs/sandbox) (Pluggy Bank) connectors.
## Update Item via API directly
If the item doesn't require an MFA parameter, and it doesn't have an invalid credentials error, then it's possible to update it directly via API, since there are no further actions needed from the user.
Otherwise, the Item update will result in a wait (for the user's action) state. This action should be prompted to the user in your Application UI, in the same way as PluggyConnect does, and resolve it accordingly through user actions, and then pass them back to Pluggy API.
> **Read the docs!**
>
> Check out our [Updating an Item](/docs/updating-an-item) guide, where we provide further details and insights about this process.
## Setup Two-way sync with Webhooks
Source: https://docs.pluggy.ai/en/docs/integration-checklist/webhooks-sync.md
## What are Webhooks?
Webhooks allow Pluggy to notify your application of events without requiring you to request updates, keeping you up to date with the latest changes to your created items.
## Configuring Webhooks
You can set up Webhooks in two ways:
- Using Pluggy's [Dashboard](https://dashboard.pluggy.ai/): Go to [Applications](https://dashboard.pluggy.ai/applications), then click on the "Edit" icon for your application. Scroll down to the "Webhooks" section, where you can register new webhooks and view, edit, or delete existing ones.
- Using our API directly: Set up specific notification URLs for each particular event or set up a single listening point for all events using an HTTP client such as Postman.
Please refer to our [Webhooks Guide](/docs/webhooks) for more information about setting up Webhooks, payloads, event types, and available requests.
## Receiving Notifications
Once you have configured the webhooks, validate that all event types are being received as expected. It's important to have successfully validated that each event has been received.
To test this, you can use tools like [requestcatcher.com](http://requestcatcher.com/) to confirm that notifications are correctly being sent.
### Respond with a 2xx status code quickly
To acknowledge the reception of the notification event, your endpoint must return a `2xx` HTTP code to Pluggy. If Pluggy receives any other status code, it will indicate that you did not receive the event.
If Pluggy does not receive a successful response, the event notification will be retried. After multiple failures to send the event, we will mark the notification as failed and the notification will be lost.
> Since it's very important to confirm the event reception, your endpoint should return a success response before doing any business logic that could result in an error.
## Consent management: Delete an Item
Source: https://docs.pluggy.ai/en/docs/integration-checklist/consent-management.md
Fulfilling this process is easy: from your Backend, just call Pluggy's [Delete Item endpoint](/reference/items-delete) (`DELETE /items/{itemId}`). If successful, a `204` status response will be sent. This confirms that the Item which holds all the references to the user's financial data has been deleted.
Any subsequent call to `GET /items/{itemId}` endpoint to attempt to retrieve the data of this item, or to any endpoint which would return the Item related financial products, will return a HTTP `404 Not Found` response.
> Make sure to implement this option in your integration, and have it always available for your users, to be in compliance with Open Banking regulations.
## Subscribe to our Status Page
Source: https://docs.pluggy.ai/en/docs/integration-checklist/status-page.md
Check out our public [status page](https://status.pluggy.ai/) where we post any incident and outages, so you can keep awareness on any existing issues.
Also, please subscribe using the top button to get notified about incidents as soon as they happen.
We will be posting incidents when they happen, analyzing impacts, affected connectors and how much time it will take to be normal again.
## Slack announcement channels
We also provide live updates and announcements of incidents and more via Slack.
If you haven't requested us to set up a direct collaboration in a Slack channel, we strongly encourage you to do so! It's the most efficient and direct way we have of communicating news, incidents, and providing help.
## SDKs Updates
We are always providing fixes and features to our SDKs. It's important to be up to date with these changes. We recommend you to subscribe to the respective SDK's GitHub repository, if you are using one of them.
## Boleto Management API
Source: https://docs.pluggy.ai/en/docs/boleto/management-api.md
A boleto is Brazil's bank-issued payment slip: you register a charge with a bank, the bank returns a barcode and a digitable line, and your payer settles it at any bank, ATM or app. Registering one normally means integrating with each bank separately — different authentication, different field names, different notions of what a "paid" boleto looks like.
The Boleto Management API is one uniform interface over all of them. You register a charge once, in one shape, and we translate it to whichever institution your customer banks with.
This API is in BETA. Inter Empresas is available today; see [Supported institutions](#supported-institutions) for what is live and what is coming.
## How it fits together
Two objects. A **Boleto Connection** holds the credentials that let us act at an institution on your customer's behalf, and it is created once. Every **Boleto** is then issued against that connection.
```mermaid
graph LR
subgraph Once per customer
A[Item bank account connected] --> B[Boleto Connection]
A2[Raw credentials] --> B
end
subgraph Many times
B --> C[Boleto #1]
B --> D[Boleto #2]
B --> E[Boleto #3]
end
```
You can create a connection from an existing [Item](/docs/connect-widget/introduction) — the same object you already use for data — or by [sending credentials directly](/reference/boleto-connection-create) when there is no Item to reuse.
## The lifecycle of a boleto
A boleto starts `OPEN` and moves in one direction. `PAID` and `CANCELLED` are terminal: nothing leaves them, and a boleto never returns to `OPEN`.
```mermaid
stateDiagram-v2
[*] --> OPEN: created
OPEN --> PAID: payer settles it
OPEN --> OVERDUE: due date passes
OPEN --> CANCELLED: you cancel it
OVERDUE --> PAID: paid late
OVERDUE --> PROTESTED: sent to protest
OVERDUE --> CANCELLED: you cancel it
PROTESTED --> PAID: settled after protest
PROTESTED --> CANCELLED: you cancel it
PAID --> [*]
CANCELLED --> [*]
```
| Status | What it means |
|---|---|
| `OPEN` | Registered at the bank and payable. |
| `PAID` | Settled. `amountPaid` and `paymentOrigin` are filled in. |
| `OVERDUE` | Past its due date and still payable — most banks accept late payment. |
| `CANCELLED` | Withdrawn by you. It can no longer be paid. |
| `PROTESTED` | Sent to protest after going unpaid. Still settleable. |
`amountPaid` is what the payer actually paid, and it can differ from `amount` — a payer may settle a boleto with a discount, or with a fine and interest applied after the due date. Always reconcile against `amountPaid`, never against the amount you requested.
## The end-to-end flow
Issuing a boleto is a single call. Learning that it was paid is a webhook — you do not poll.
```mermaid
sequenceDiagram
autonumber
participant You as Your system
participant Pluggy
participant Bank
actor Payer
You->>Pluggy: POST /boletos
Pluggy->>Bank: register the charge
Bank-->>Pluggy: nossoNumero, barcode, digitable line
Pluggy-->>You: 201 { id, status: OPEN, ... }
Note over You,Payer: you deliver the boleto however you like
Payer->>Bank: pays the boleto
Bank->>Pluggy: settlement notification
Pluggy->>You: webhook boleto/updated
You->>Pluggy: GET /boletos/{id}
Pluggy-->>You: { status: PAID, amountPaid, paymentOrigin }
```
The webhook tells you *that* something changed, not *what*. It carries the boleto's id, and you fetch the boleto to see its new state. That keeps the notification small and means a webhook you receive twice is harmless.
## Getting started
Call [POST /auth](/reference/auth-create) with your application's credentials.
```json
{
"clientId": "{YOUR-CLIENT-ID}",
"clientSecret": "{YOUR-CLIENT-SECRET}"
}
```
From an existing Item, with [POST /boleto-connections/from-item](/reference/boleto-connection-create-from-item):
```json
{
"itemId": "{YOUR-ITEM-ID}"
}
```
The response carries the id you will issue against:
```json
{
"id": "dc3537ad-13b4-4770-b248-e4578983899c",
"connectorId": 225,
"createdAt": "2023-01-01T00:00:00.000Z",
"updatedAt": "2023-01-01T00:00:00.000Z"
}
```
[POST /boletos](/reference/boleto-create). `amount` is in reais, `dueDate` is `YYYY-MM-DD`:
```json
{
"boletoConnectionId": "{YOUR-BOLETO-CONNECTION-ID}",
"boleto": {
"seuNumero": "1234567891",
"amount": 2.5,
"dueDate": "2025-03-01",
"payer": {
"taxNumber": "1234567890",
"name": "Example name",
"addressState": "SP",
"addressZipCode": "01239030",
"addressCity": "Não informado",
"addressStreet": "Não informado"
}
}
}
```
`seuNumero` is *your* reference for the charge — an invoice number, an order id. It comes back on every read and on the settlement notification, so use something you can reconcile against.
The response includes everything a payer needs:
```json
{
"id": "158b9f04-acf0-4a9b-8f0c-a87feb9f19b3",
"boletoConnectionId": "91d4d8d8-8477-423e-9888-0bbbde2da64a",
"amount": 2.5,
"status": "OPEN",
"seuNumero": "1234567891",
"dueDate": "2025-03-01",
"pixQr": "00020126490014br.gov.bcb.pix0108dict-key...",
"digitableLine": "01120001161117012359902128847071234570777000110",
"nossoNumero": "10000004701",
"barcode": "01120001161117012359902128847071234570",
"amountPaid": null,
"paymentOrigin": null
}
```
`digitableLine` is the 47-digit number a payer types into their banking app, `barcode` is what a scanner reads, and `pixQr` is a PIX payload for the same charge — most banks now issue boletos payable either way.
Subscribe to `boleto/updated` in [webhooks](/docs/developer-tools/webhooks-ref) and you will receive:
```json
{
"boletoId": "158b9f04-acf0-4a9b-8f0c-a87feb9f19b3",
"eventId": "71e0b4db-4e8c-401d-8ad8-5ab3ecd1f3d0",
"event": "boleto/updated"
}
```
Then [GET /boletos/{id}](/reference/boleto-get). A settled boleto reads:
```json
{
"id": "158b9f04-acf0-4a9b-8f0c-a87feb9f19b3",
"status": "PAID",
"amount": 2.5,
"amountPaid": 2.5,
"paymentOrigin": "PIX",
"seuNumero": "1234567891"
}
```
You can withdraw an unpaid boleto at any time with [POST /boletos/{id}/cancel](/reference/boleto-cancel).
## Supported institutions
Inter Empresas is available today; Bradesco and the Sandbox connector are being built. Which institutions are live, how each one authorises a connection, and the behaviours worth knowing per bank are kept in one place: [Coverage](/docs/boleto/coverage).
## Before you go live
- **Reconcile on `amountPaid`, not `amount`.** Fines, interest and discounts mean they differ.
- **Treat webhooks as at-least-once.** The same `boletoId` can arrive twice; `eventId` identifies the delivery if you want to deduplicate.
- **Store `seuNumero` on your side.** It is your only link between a boleto and whatever it is paying for.
- **Do not parse `nossoNumero` for meaning.** Its format is the bank's and differs between institutions.
## Coverage
Source: https://docs.pluggy.ai/en/docs/boleto/coverage.md
Every institution on the [Boleto Management API](/docs/boleto/management-api) speaks the same API: one request to register a charge, one response shape, one set of statuses, one `boleto/updated` webhook. What differs between banks is how a **Boleto Connection** is established — what your customer has to provide, and whether they provide it to you or to the bank.
The API is in BETA. Inter Empresas is the only institution available today; the rest of this page says what is coming and what will change when it does.
## Institutions
| Institution | Status | Authentication | Connect via |
|---|---|---|---|
| Inter Empresas | **Live** | Client ID, Client Secret, private key and certificate, created in Inter's Internet Banking — see the [Banco Inter Empresas tutorial](/docs/developer-tools/tutorials/inter-pj) | An existing Item ([POST /boleto-connections/from-item](/reference/boleto-connection-create-from-item)), or the credentials sent directly ([POST /boleto-connections](/reference/boleto-connection-create)) |
| Bradesco | In development | A Pluggy partner certificate (ours, shared) plus a one-time authorisation each company grants inside Bradesco's own environment, confirmed with a security key. Not possible through an API | A redirect to Bradesco and back; the flow is not live |
| Sandbox | Coming | None — issues boletos that look real and can be moved to any status on demand | Not yet: the Sandbox connector does not accept boleto connections today |
Connector ids, for [GET /connectors](/reference/connectors-list): Inter Empresas `225`, Bradesco `285`, Sandbox `600`.
## Inter Empresas
Inter is the reference implementation: everything below happens behind the same endpoints described in the [Boleto Management API](/docs/boleto/management-api) guide.
**Credentials.** Inter authenticates with four artifacts — a Client ID, a Client Secret, a private key and a certificate — created inside Inter's own Internet Banking. When creating the integration at Inter, enable both **Boleto** and **Extrato** scopes: a credential missing the Boleto scope connects successfully and then fails on the first issue attempt, which is a confusing place to discover the problem.
**Two ways to connect.** Going through an Item is the better default when you already collect account data for the same customer: one connection, one set of credentials, and the customer authorises once. Sending the credentials directly is for when there is no Item to reuse.
```mermaid
graph TD
A[Credentials from Inter] --> B[Connect through Pluggy Connect creates an Item]
A --> C[Send credentials directly POST /boleto-connections]
B --> D[POST /boleto-connections/from-item]
C --> E[Boleto Connection]
D --> E
```
**How Inter reports a payment.** Inter notifies us and we translate its vocabulary into the statuses the API exposes:
| Inter `situacao` | Becomes |
|---|---|
| `RECEBIDO` | `PAID` |
| `MARCADO_RECEBIDO` | `PAID` |
| `ATRASADO` | `OVERDUE` |
| `PROTESTO` | `PROTESTED` |
| `A_RECEBER` | ignored — the boleto is simply still open |
When a boleto becomes `PAID`, Inter also reports what was actually paid and how, which lands in `amountPaid` and `paymentOrigin` (typically `PIX` or `BOLETO`).
**Notifications.** Inter publishes the IP ranges its notifications originate from, and we only accept callbacks from those addresses. Nothing is required from you — what you receive is our own `boleto/updated` webhook, authenticated the same way as every other Pluggy webhook.
A boleto you cancel through [POST /boletos/{id}/cancel](/reference/boleto-cancel) is marked `CANCELLED` immediately, as part of that call. A boleto cancelled directly inside Inter's own portal will not update on our side — that path produces no status change you can observe. If your operations team cancels boletos at Inter rather than through the API, treat our status as authoritative only for boletos cancelled through the API.
**Worth knowing before you go live**
- **`nossoNumero` is Inter's, and its format is Inter's.** Do not parse it or assume a width; it will differ from what another institution returns for the same charge.
- **A late payment is normal.** Inter accepts payment after the due date, so a boleto can go `OPEN → OVERDUE → PAID`. Handlers that stop listening once a boleto is overdue miss real revenue.
- **Reconcile on `amountPaid`, not `amount`.** Discounts, fines and interest make them differ in both directions.
## Bradesco
Bradesco boleto issuing is not available yet. The model being built is described here so you can plan for it; the endpoints and the connection flow are not live, and the details may change as the integration is finished.
Every other institution on this API works the same way: your customer hands over credentials, we hold them, and we act with them. Bradesco separates **identifying the caller** from **authorising the action**:
```mermaid
graph TB
subgraph "Once per company · inside Bradesco"
A[Company's legal representative] -->|logs in at Bradesco| B[Accepts the terms]
B -->|confirms with a security key| C[Authorisation recorded Pluggy may act for this CNPJ]
end
subgraph "Every request · server to server"
D[Pluggy partner certificate] --> E[Issue a boleto for that CNPJ]
C -.->|must already exist| E
end
```
**The certificate** identifies Pluggy as the partner. It is ours, not your customer's, and it is the same certificate for every company we act for — there is no per-customer certificate to collect, install or renew.
**The authorisation** is granted once per company, by that company, inside Bradesco's own environment. Bradesco has confirmed this cannot be done through an API: the person authorising logs in at Bradesco, accepts the terms and confirms with a security key generated on their own device. We never see the password, the key, or the terms being signed. Without the authorisation, the certificate alone issues nothing; without the certificate, the authorisation is unusable.
**What this means for your onboarding.** Connecting a Bradesco account will involve a redirect: your customer leaves your interface, authorises at Bradesco, and returns. That is a different shape from the credential form used for Inter, and it introduces a state a credentials-only flow never has — a connection that exists but is not yet usable. Worth designing for now if Bradesco is on your roadmap.
**Still being settled with Bradesco:** the exact contract of the callback that confirms an authorisation; whether an authorisation expires, and whether revoking it inside Bradesco produces any notification; the onboarding path for companies that are not already Bradesco account holders; how a company with several CNPJs authorises for all of them.
## Sandbox
Testing a boleto integration against a real bank is slow and partly impossible: you need a business account, a real payer willing to pay a real charge, and for anything involving a due date you would have to wait for the date to arrive. The Sandbox connector is meant to remove all of that — boletos that look real, moved to any status on demand, firing the same webhooks a real bank would.
It is not available yet: the Sandbox connector does not accept boleto connections today. When it does, its boletos will carry a correctly shaped digitable line, barcode and PIX payload so your parsing and rendering are exercised, but they will **not** be valid payment instruments — nothing issued there can be paid at a real bank.
The request and response shapes, the status lifecycle and the webhook are the same for every institution and are documented once, in the [Boleto Management API](/docs/boleto/management-api) guide. This page only covers what differs: who is live, and how each bank lets us act for your customer.
## Caixa PF Tutorial (Mobile)
Source: https://docs.pluggy.ai/en/docs/developer-tools/tutorials/caixa-pf-mobile.md
To connect your Caixa Econômica Federal personal account with Pluggy, you must authorize the device. Here is a video tutorial showing how to do it:
1. On the Caixa connection screen, enter your account's username and password;
2. Click the "Conectar" (Connect) button;
3. The following screen will be displayed: "Cadastro de dispositivo" (Device registration). This screen appears because, as a security measure, Caixa requires the account holder to authorize the connection. To grant this authorization, follow the next steps.
Still on the "**Cadastro de dispositivo**" (Device registration) screen, note that at the bottom there is the sentence "Você precisa ativar o seguinte dispositivo" (You need to activate the following device), followed by a code — in our example, "746". Write this code down, as we will use it to grant the authorization;
4. Do not click the "**Confirmo que ativei o dispositivo**" (I confirm I have activated the device) button yet — we will click it later. Also, do not close this window/app; keep it open in the background, as we will come back to it;
5. Open the **Caixa Econômica Federal** app;
6. On the initial login screen, tap your username;
Note: if you have never used your account in the app before, you must complete your first login through the app.
7. Enter your password;
8. Tap "**Acessar sua conta**" (Access your account);
9. On your account's home screen, find the "**Menu**" option in the bottom corner and tap it;
10. In the menu that appears, tap "**Meu Perfil**" (My Profile);
11. Find the "**Meus Dispositivos**" (My Devices) option and tap it;
12. In the list that appears, look for the same code you wrote down in step 3 of this tutorial, and select it;
13. Scroll to the bottom of the menu and tap "**Ativar Dispositivo**" (Activate Device);
14. On the screen that appears, tap "**Continuar**" (Continue);
15. The following message will be displayed: "**Seu dispositivo foi ativado!**" (Your device has been activated!). This means the process inside the Caixa app is complete;
16. Now go back to the Pluggy widget window/app you left open (see step 4 of this tutorial). Click the "**Confirmo que ativei o dispositivo**" (I confirm I have activated the device) button;
17. Done! You don't need to do anything else — just wait approximately **30 minutes** and we will connect your data **automatically**.
## Caixa PF Tutorial (Web)
Source: https://docs.pluggy.ai/en/docs/developer-tools/tutorials/caixa-pf-web.md
To connect your Caixa Econômica Federal personal account with Pluggy, you must authorize the device through Internet Banking. Here is a video tutorial showing how to do it:
1. On the Caixa connection screen, enter your account's **username** and **password**;
2. Click the "**Conectar**" (Connect) button;
3. The following screen will be displayed: "**Cadastro de dispositivo**" (Device registration). This screen appears because, as a security measure, Caixa requires the account holder to authorize the connection. To grant this authorization, follow the next steps;
4. Do not click the "Confirmo que ativei o dispositivo" (I confirm I have activated the device) button yet — we will click it later. Also, do not close this browser window/tab; keep it open, as we will come back to it;
5. Open a second browser tab and go to the Caixa Econômica Federal website: [https://www.caixa.gov.br/](https://www.caixa.gov.br/);
6. On the Caixa home page, click the "**Acessar minha conta**" (Access my account) button;
7. On the screen that appears, enter your username in the indicated field;
8. Select your account type (**Pessoa Física** — individual; **Pessoa Jurídica** — business; or **Governo** — government);
9. Click "**Continuar**" (Continue);
10. On the screen that appears, check that the initials shown above the orange button match your name. If they are correct, click the orange button;
11. Use the digital keyboard that appears to type your account password;
12. Click "**Continuar**" (Continue);
13. On your account's home page, use the orange arrows to find the "**Senhas e Configurações**" (Passwords and Settings) menu;
14. Click "**Senhas e configurações**" (Passwords and settings);
15. In the menu that expands, find the "**Computadores e dispositivos**" (Computers and devices) section and click "**Gerenciar**" (Manage);
16. In the "**Alerta**" (Alert) dialog that appears, click "**SIM**" (YES);
17. On the screen that appears, look in the "**Apelido**" (Nickname) column for the same code you wrote down on the "**Cadastro de Dispositivo**" (Device registration) screen in the widget (see step 3 of this tutorial), and select it;
18. Click "**Ativar dispositivo**" (Activate device);
19. Now go back to the Pluggy widget window/tab you left open (see step 4 of this tutorial). Click the "**Confirmo que ativei o dispositivo**" (I confirm I have activated the device) button;
20. Done! You don't need to do anything else — just wait approximately **30 minutes** and we will connect your data **automatically**.
## Caixa PJ Tutorial
Source: https://docs.pluggy.ai/en/docs/developer-tools/tutorials/caixa-pj.md
The **Caixa Empresas** connector asks for your **USERNAME** ("Usuário") and **PASSWORD** ("Senha") — the same credentials used in Caixa's Internet Banking and mobile app.
---
**Username ("Usuário"):** alphanumeric
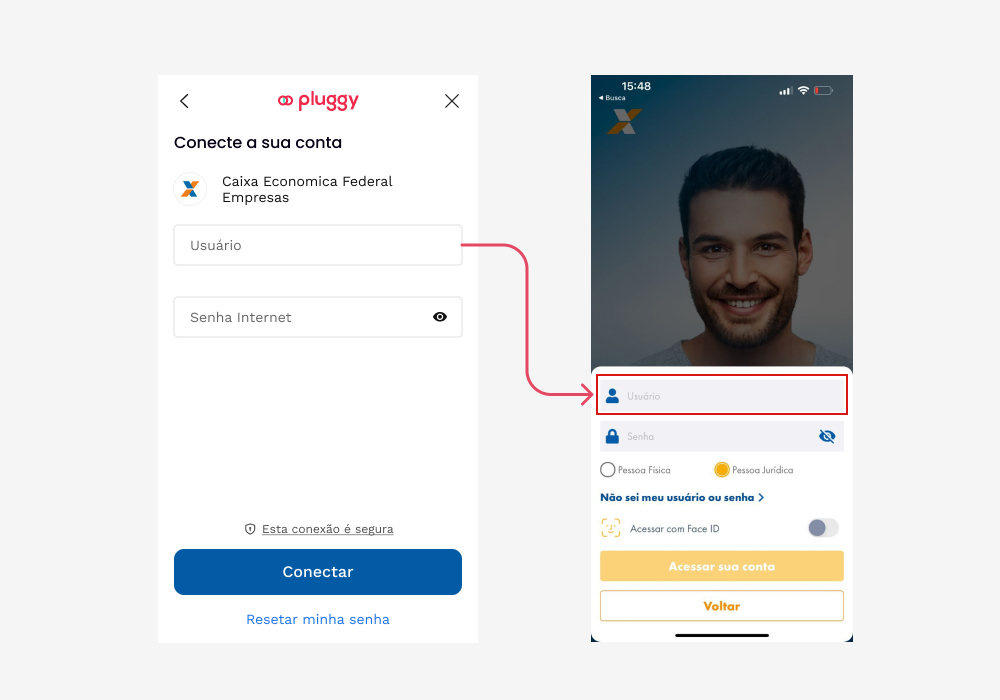
**Password ("Senha"):** alphanumeric
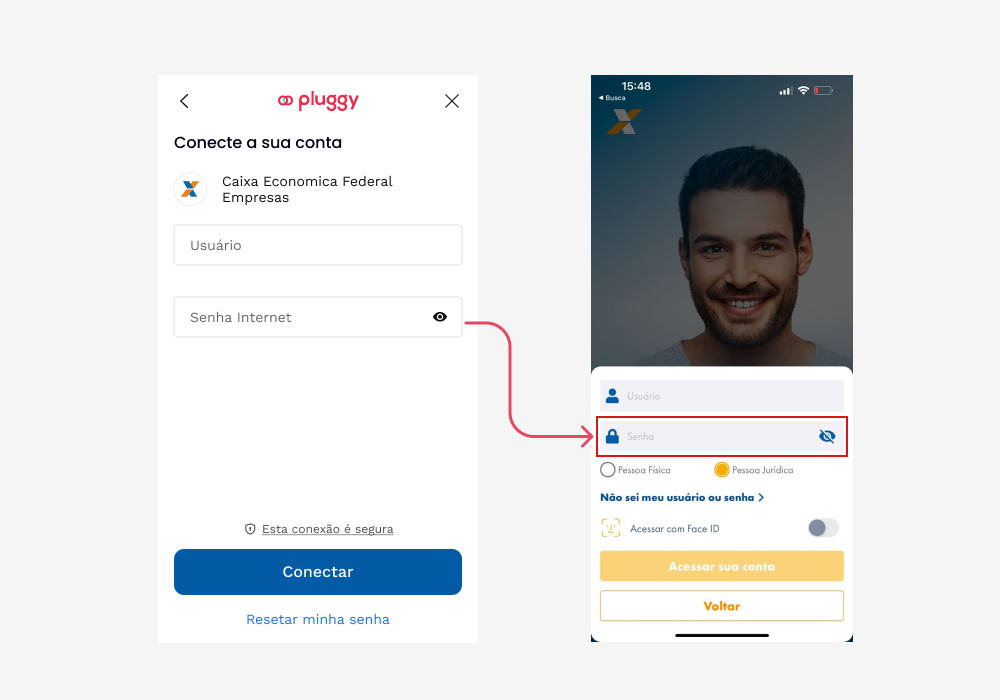
## Banco Inter MEI Tutorial
Source: https://docs.pluggy.ai/en/docs/developer-tools/tutorials/inter-mei.md
To connect your MEI account at Banco Inter, you must log in to the Inter app with your **MEI account number**.
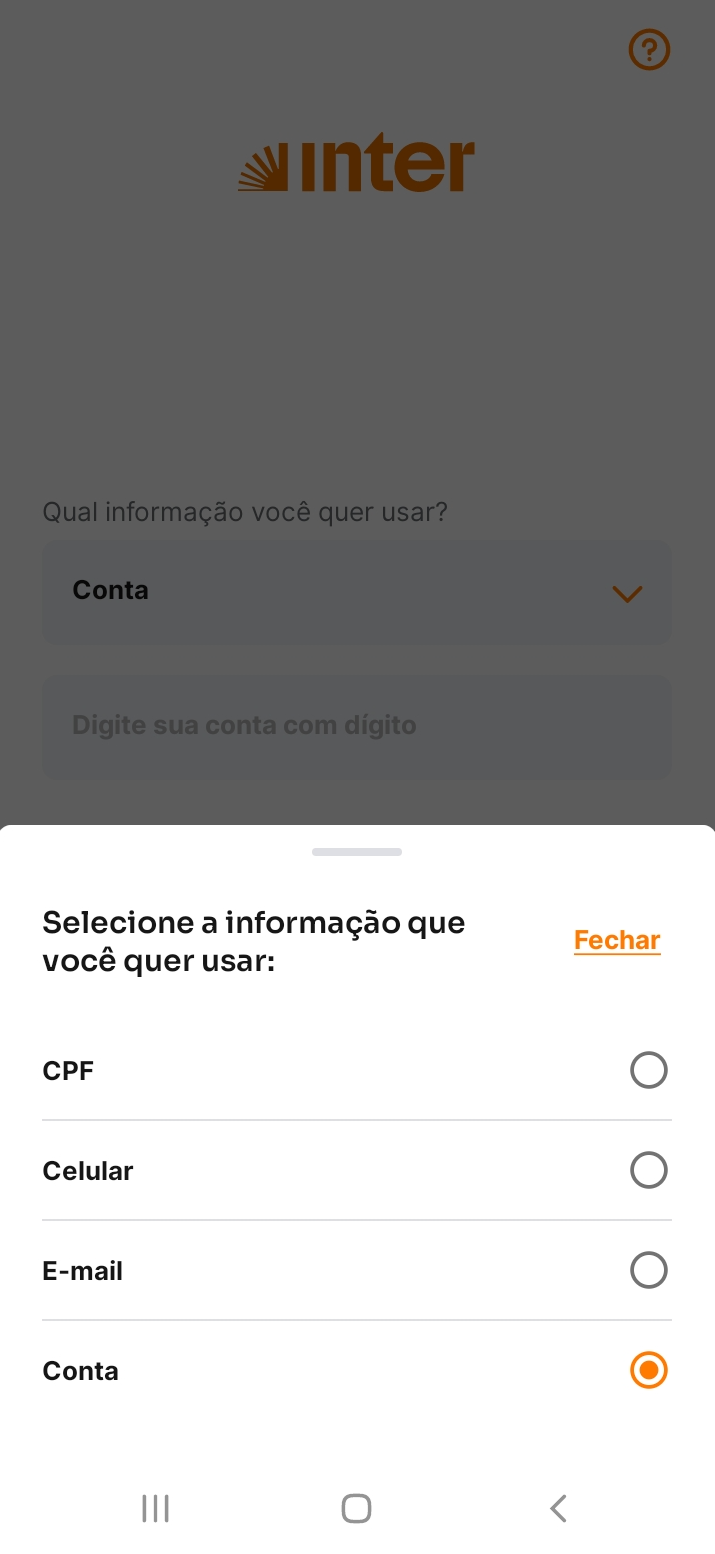
Once authenticated with your MEI account, follow the instructions in our widget to scan the access QR code and connect the account.
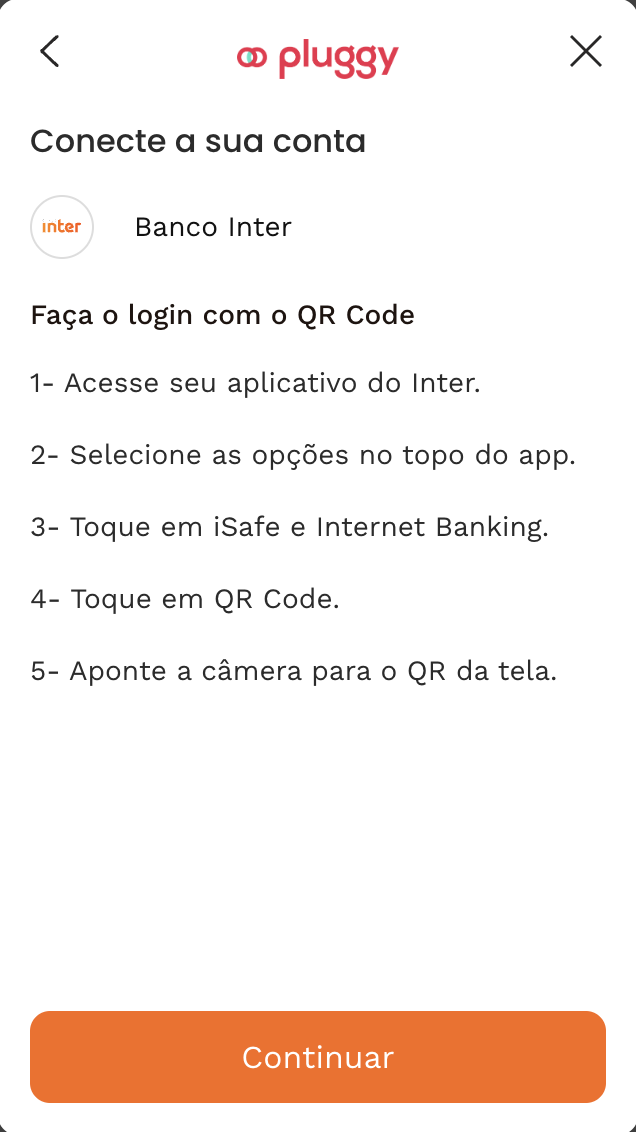
> **Important**
>
> **Be careful not to log in with your personal account (CPF) in the Inter app — otherwise, you will connect that account instead of your MEI account.**
## Banco Inter Empresas Tutorial
Source: https://docs.pluggy.ai/en/docs/developer-tools/tutorials/inter-pj.md
To connect your **Banco Inter Empresas** account to **Pluggy**, you first need to create a **data-sharing authorization** inside Inter's own Internet Banking.
This authorization is done by creating an **API integration** within your account.
After creating this integration, Banco Inter will provide:
- **Client ID**
- **Client Secret**
- **Key** file ("Chave Key")
- **Certificate** ("Certificado")
These four pieces of information will be used to connect your **Inter Empresas** account with **Pluggy**.
**Information required for the connection:**
- Client ID
- Client Secret
- **Key file (.key)**
- **Certificate file (.crt)**
(see figure):
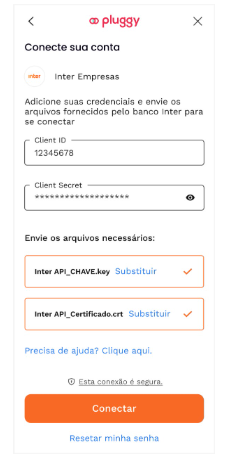
## How to create the integration in Banco Inter
To create your application and obtain your access credentials (Client ID, Client Secret, key file, and certificate), follow the instructions below:
### Step 1 — Access Internet Banking
- Log in to your Banco Inter Empresas account [here](https://contadigital.bancointer.com.br/?t=pj);
- After authenticating via QR code, you will be taken to your account's home page.
### Step 2 — Open the integrations menu
In the top menu of the home page:
1. Click **Integrar** (Integrate)
2. Select **Integrações** (Integrations)
3. Click **Nova integração** (New integration)
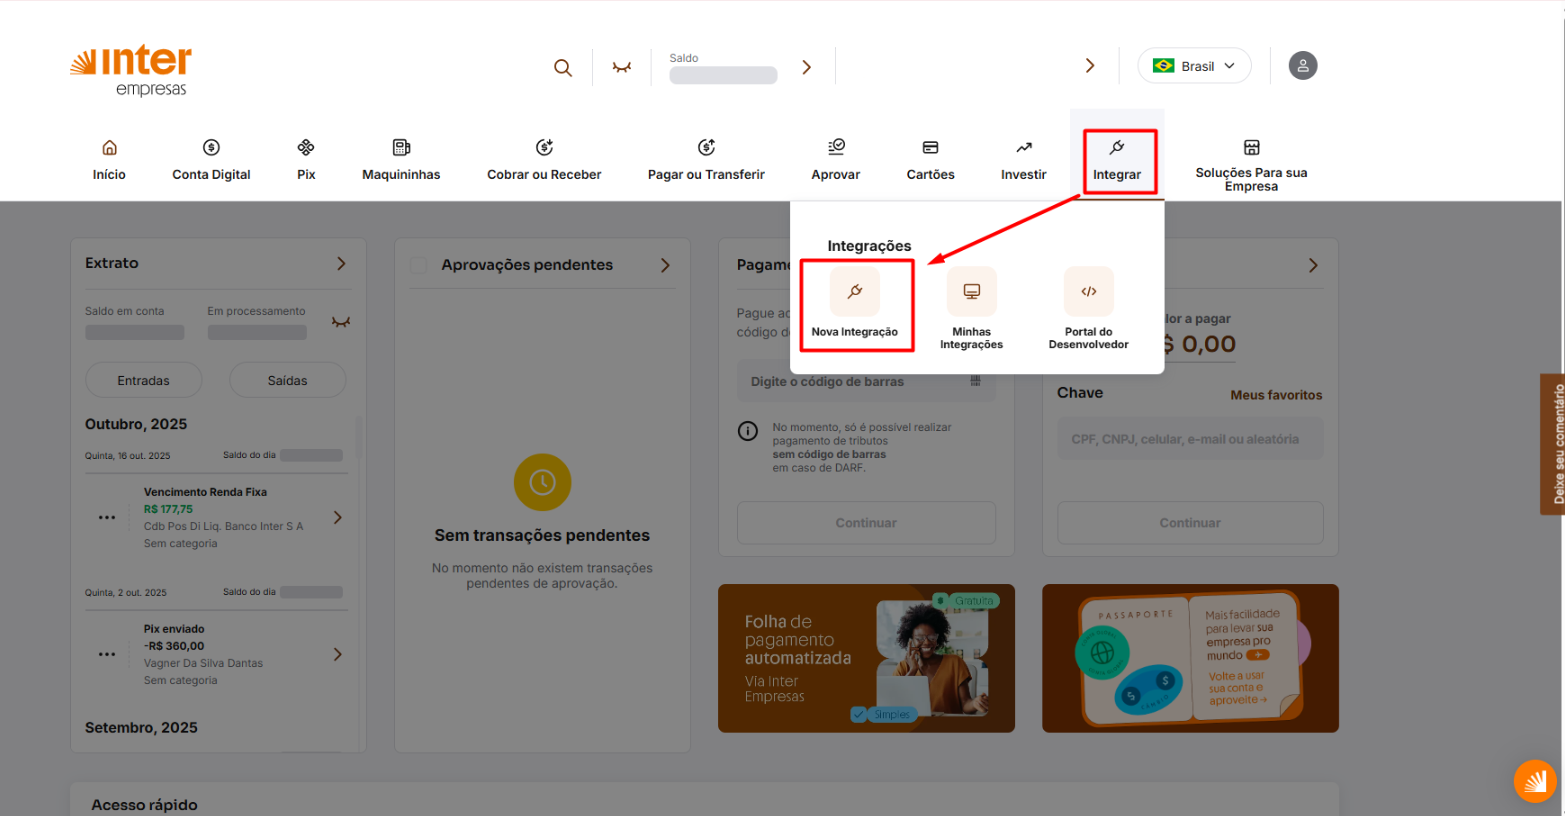
### Step 3 — Create the new integration
On the **Nova integração** (New integration) screen, fill in the fields:
- **Nome da integração** (Integration name)
Enter a name of your choice
- **Descrição** (Description)
Enter a description of your choice
Then click: **Próximo** (Next)
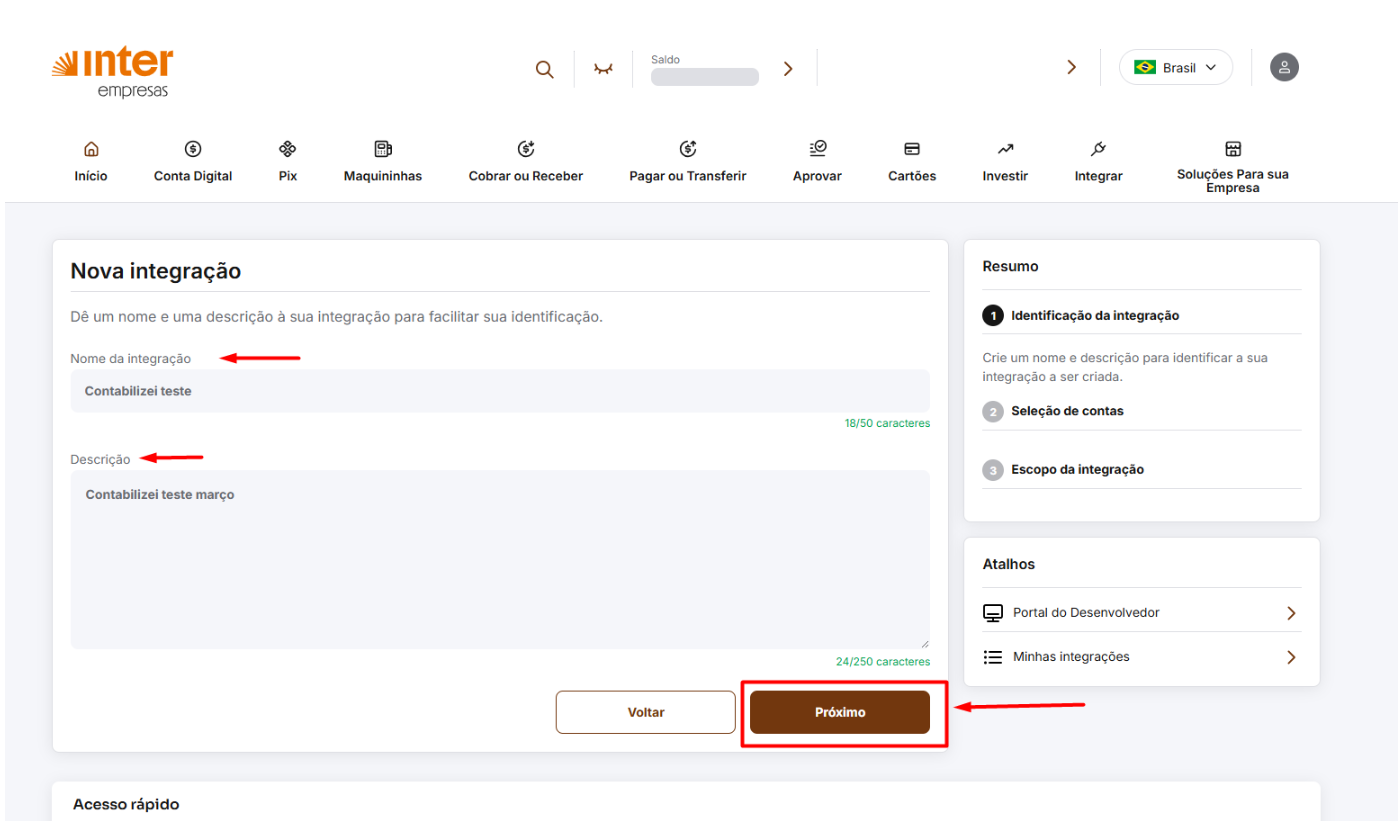
### Step 4 — Define the integration scope
On the **Nova Integração via API** (New API Integration) page, you will need to select the integration's permissions.
Expand the menu:
**API Banking**
Select the option:
- **Consultar extrato e saldo** (Query statement and balance)
Then click: **Criar Integração** (Create Integration)
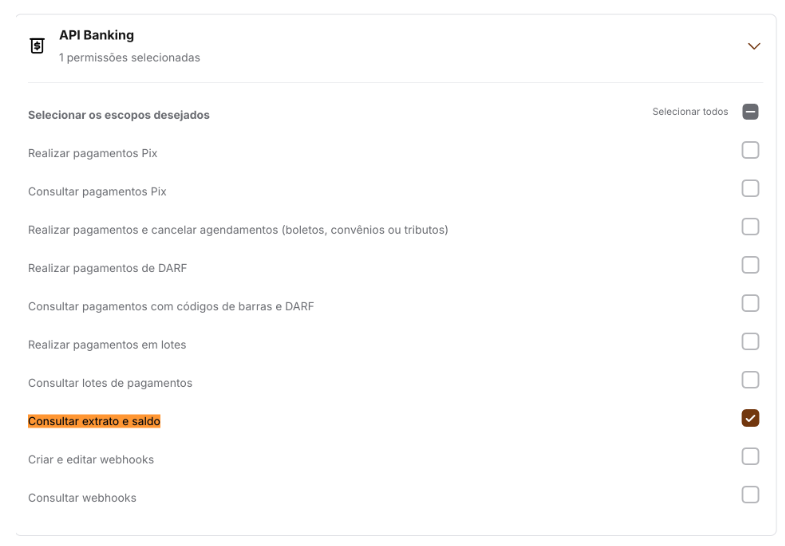
**Optional functionality**
If you also want to issue boletos through the API, select:
- **API Cobrança (Boleto + Pix)** (Billing API — Boleto + Pix)
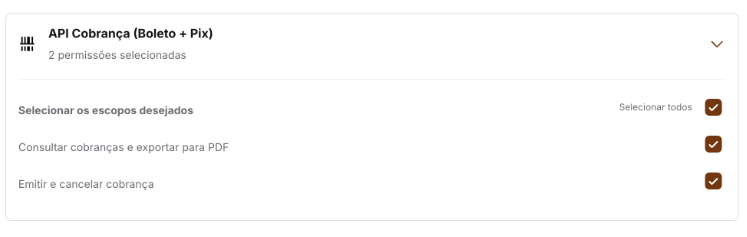
### Step 5 — Additional authentication
An **additional authentication** screen will be displayed.
Banco Inter will send a **6-digit code via SMS** to the registered mobile phone.
Enter the received code to continue.
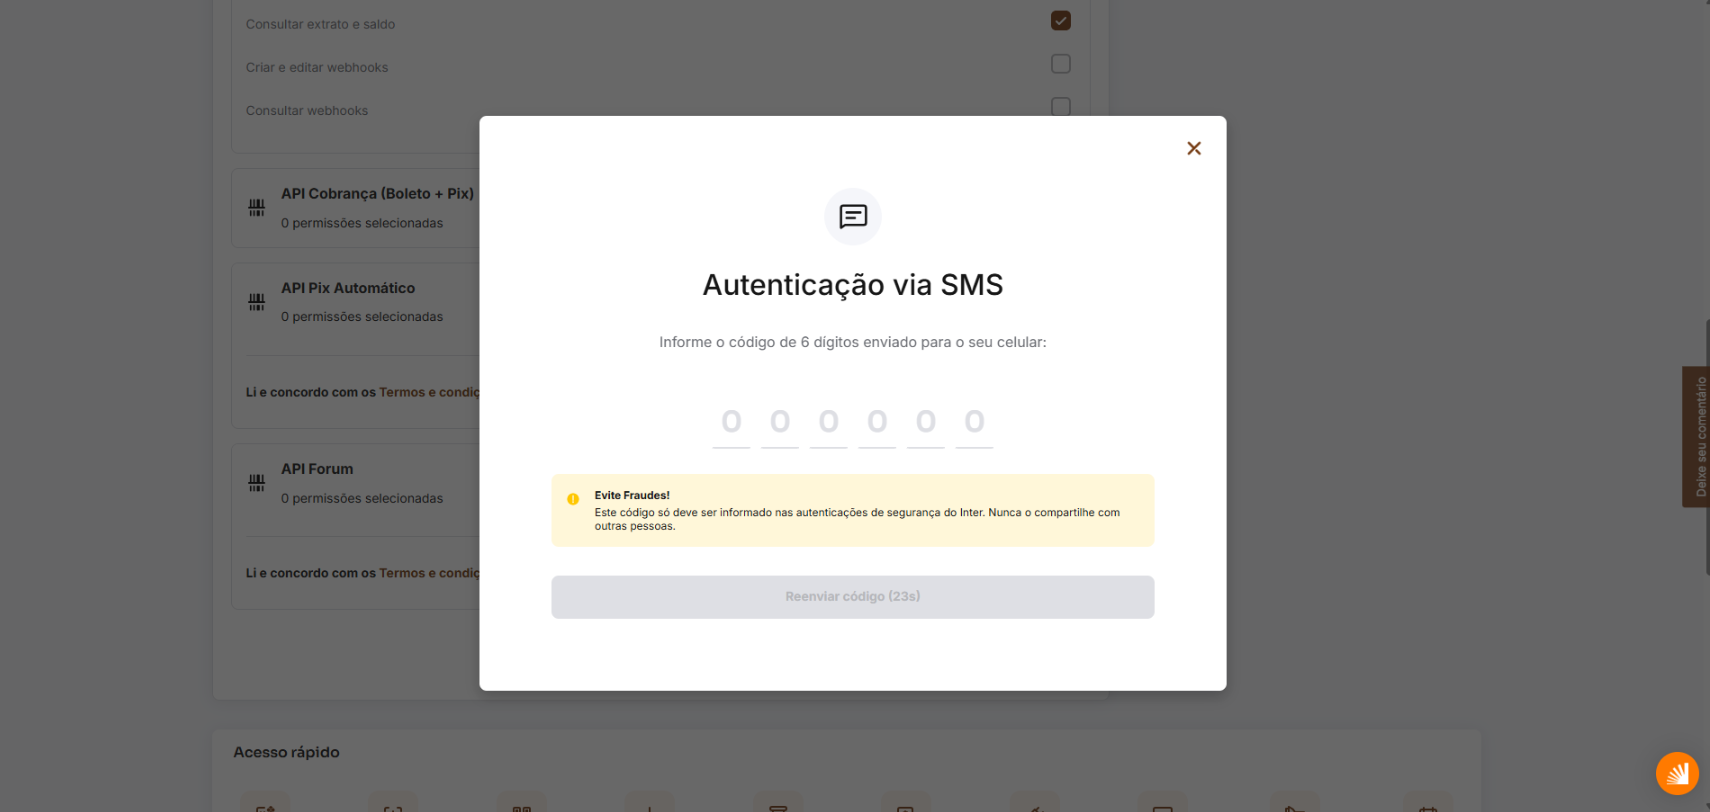
### Step 6 — Fill in the integration form
After authenticating, the following message will appear:
- **Integração criada com sucesso** (Integration created successfully)
Click: **Preencher formulário** (Fill in the form)
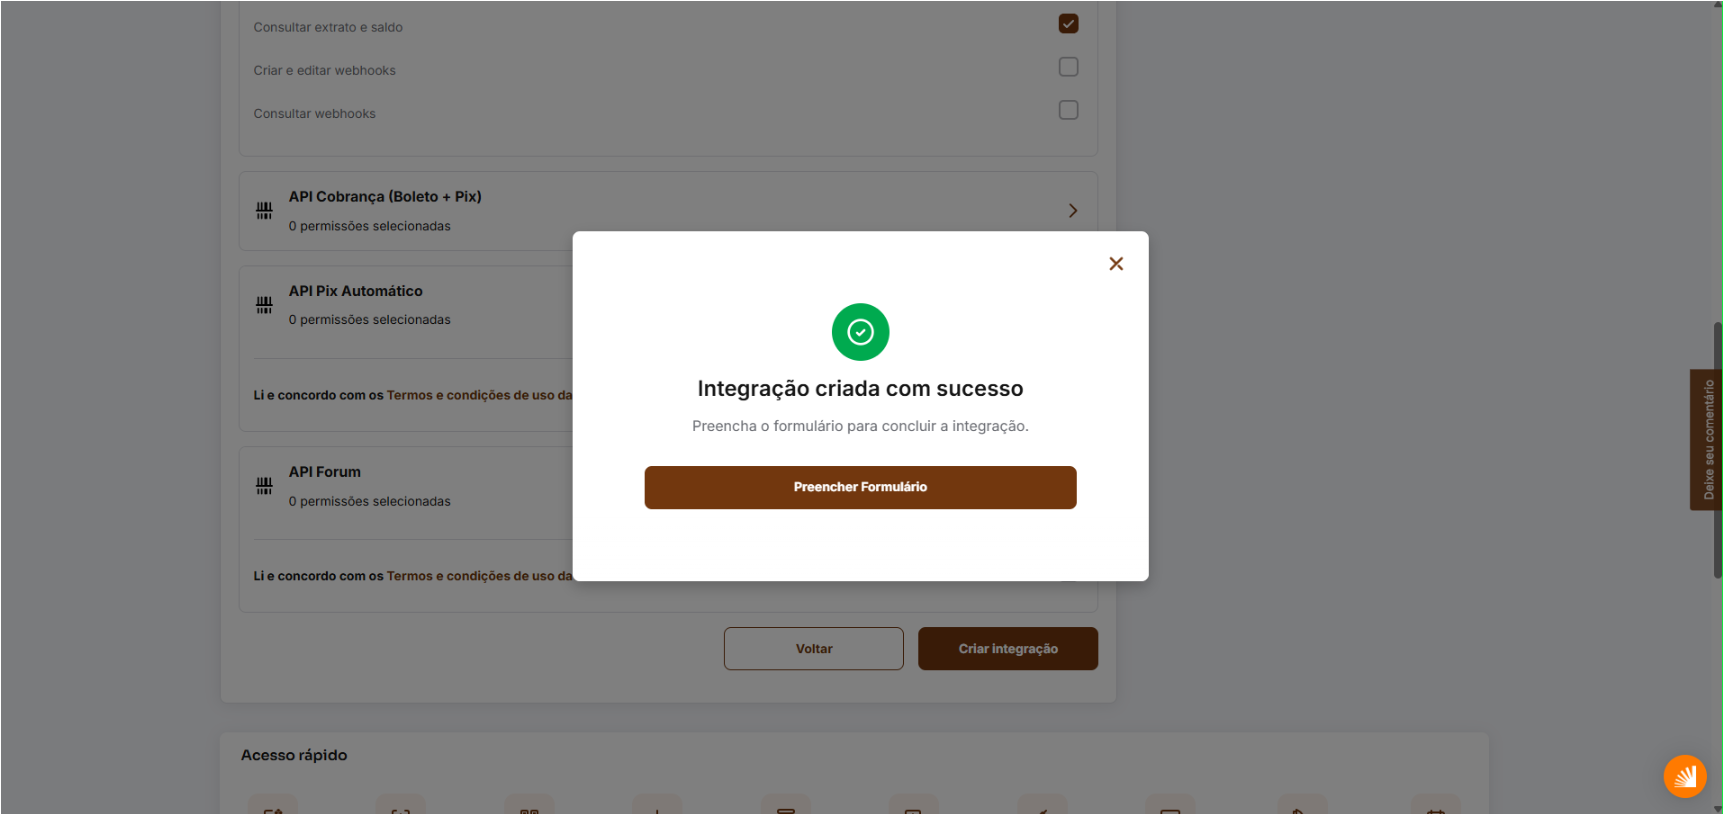
Banco Inter uses this form to better understand how the integration will be used.
You will need to fill in information about:
- **Your customers' activity**
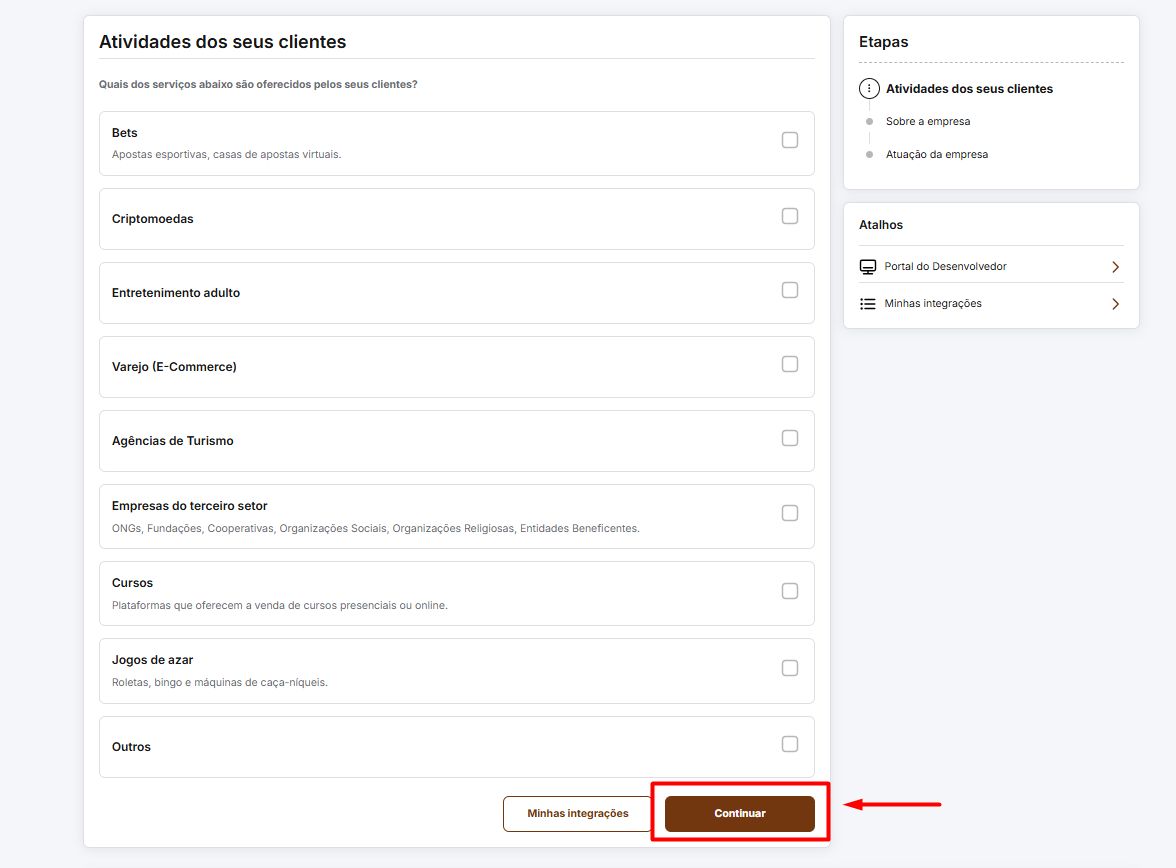
- **Company information**
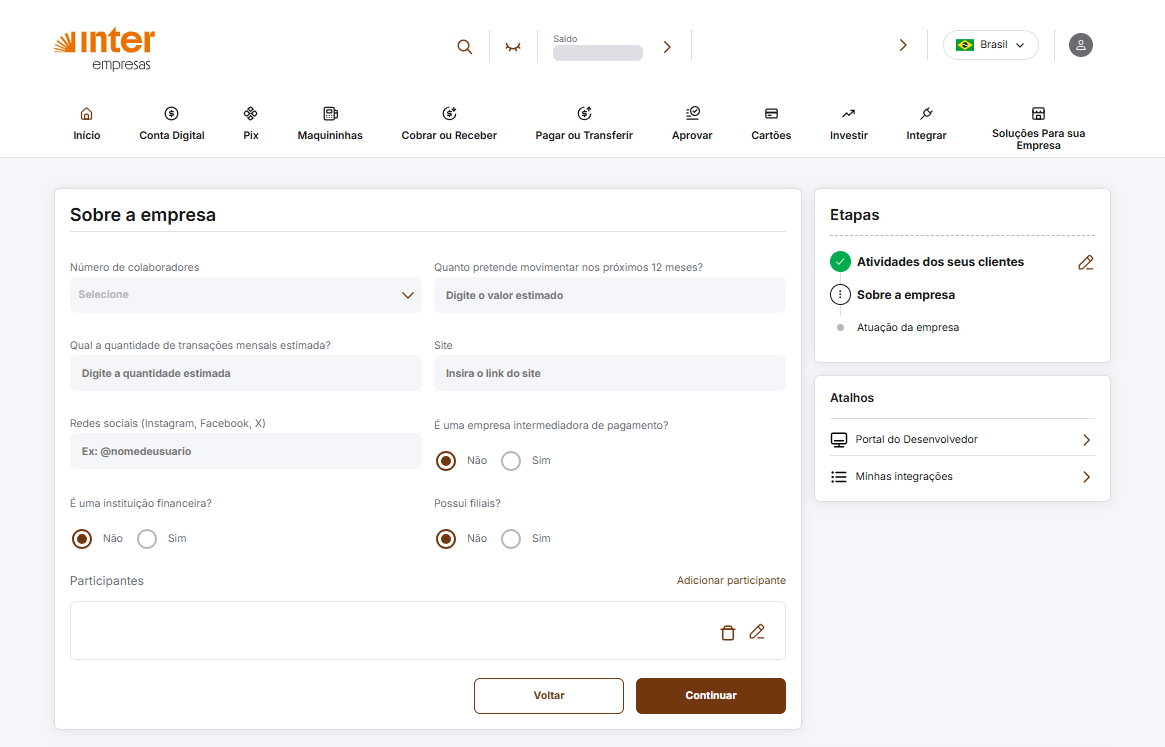
- **Company field of operation**
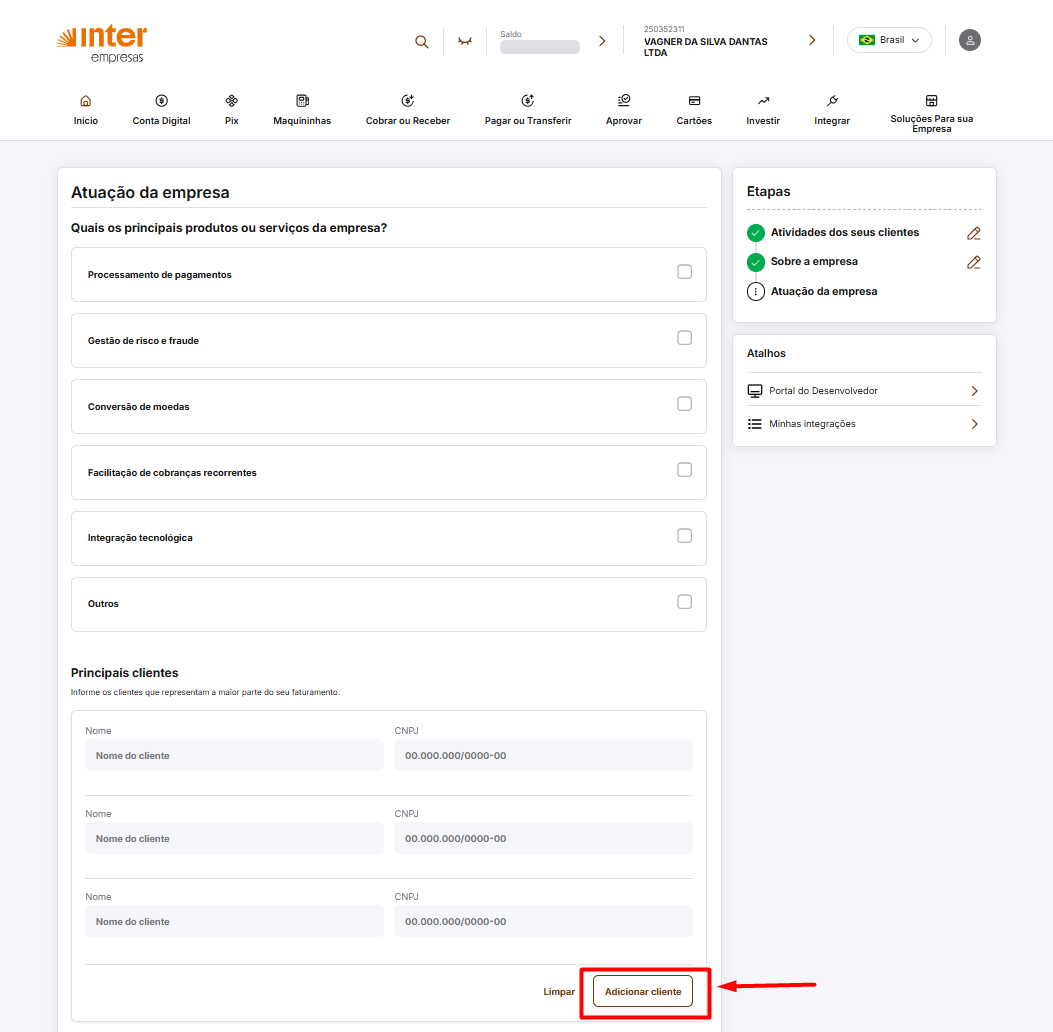
Fill in the data **according to your company's real information**.
When you are done, submit the form.
### Step 7 — Wait for Banco Inter's review
After the form is submitted, Banco Inter may perform a **validation of the information**.
In that case, a message will be displayed informing you that:
- **Seus dados estão em análise** (Your data is under review)
Click: **Acessar minhas integrações** (Access my integrations)
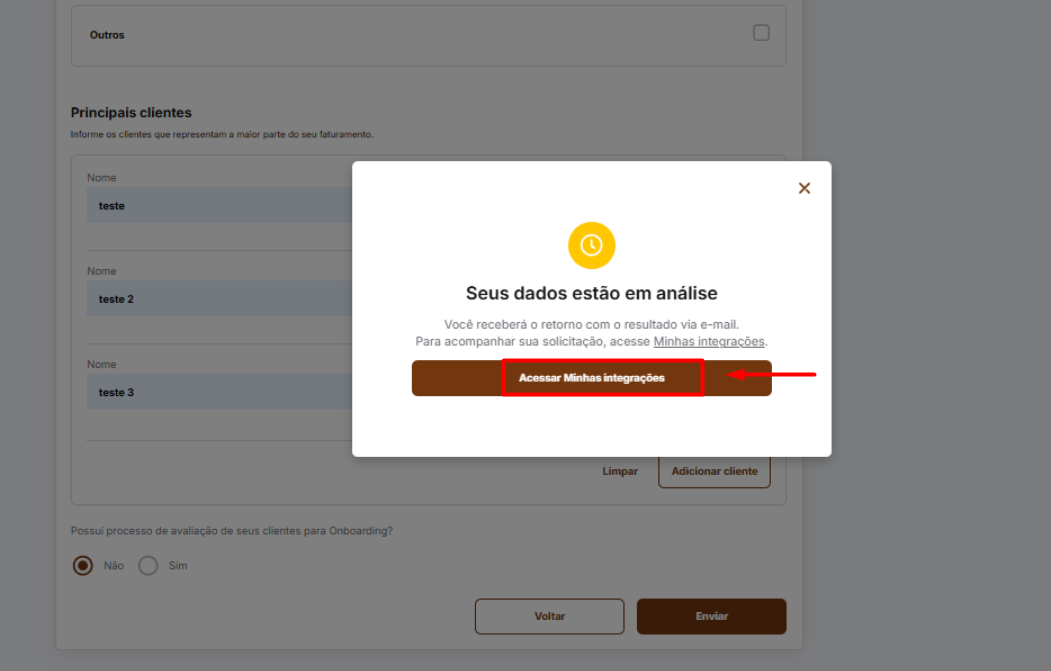
### Step 8 — Download the key and certificate
On the **Minhas integrações** (My integrations) screen:
1. Locate the integration you created (by the **name and description** defined earlier).
2. Check the integration's **status**.
Possible statuses:
- **Em validação** (Under validation) → wait for approval
- **Novo** (New) → the credentials can now be downloaded
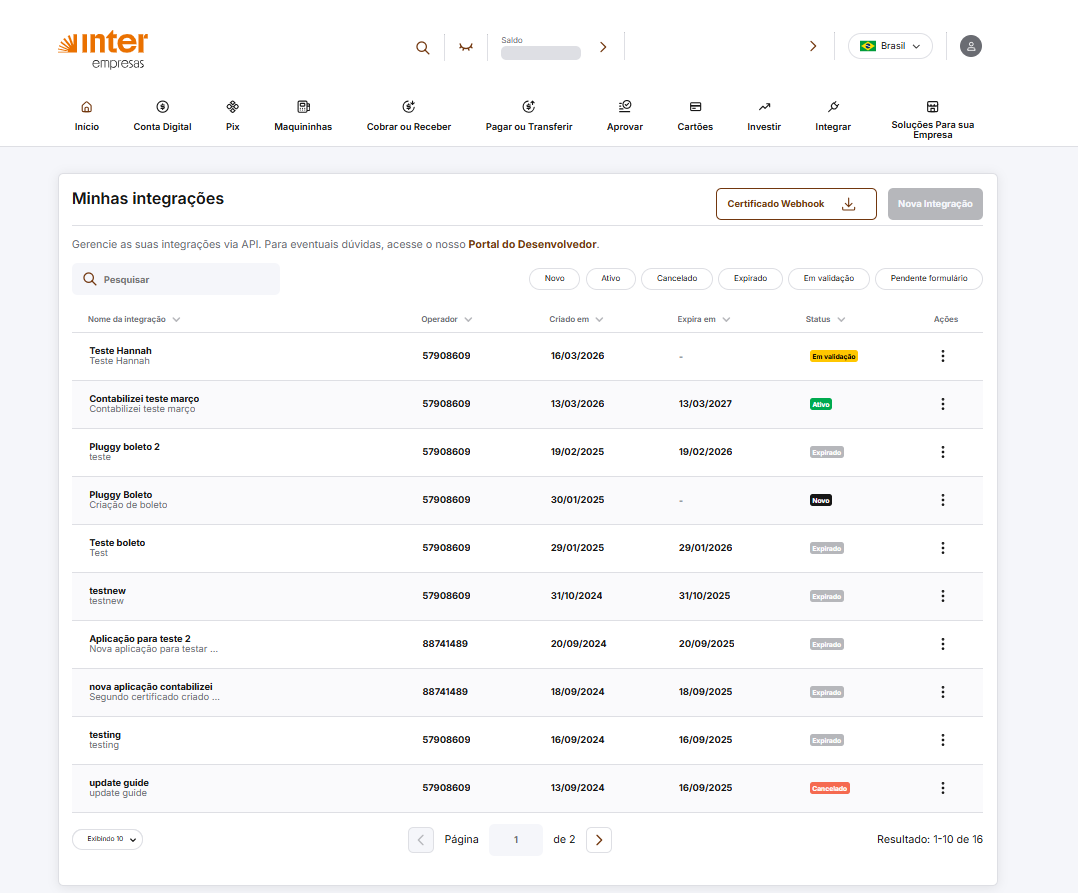
If the status is **Novo** (New):
1. Click the **three dots**
2. Select the option:
**Download chave e certificado** (Download key and certificate)
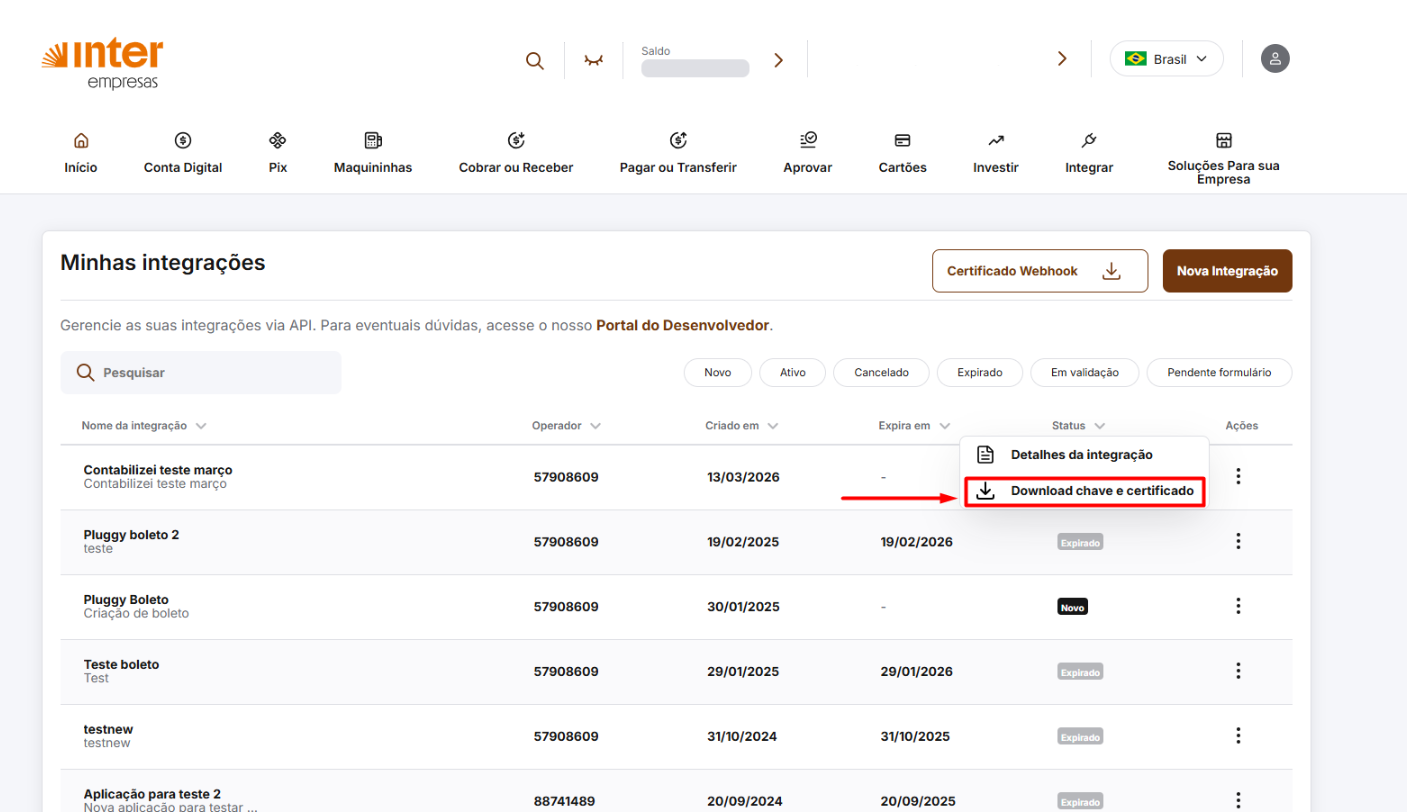
### Step 9 — Confirm the credentials download
A warning will be displayed informing you that:
- ⚠️ **The key and certificate can only be downloaded once.**
After reading the instructions, click:
**Sim, baixar** (Yes, download)
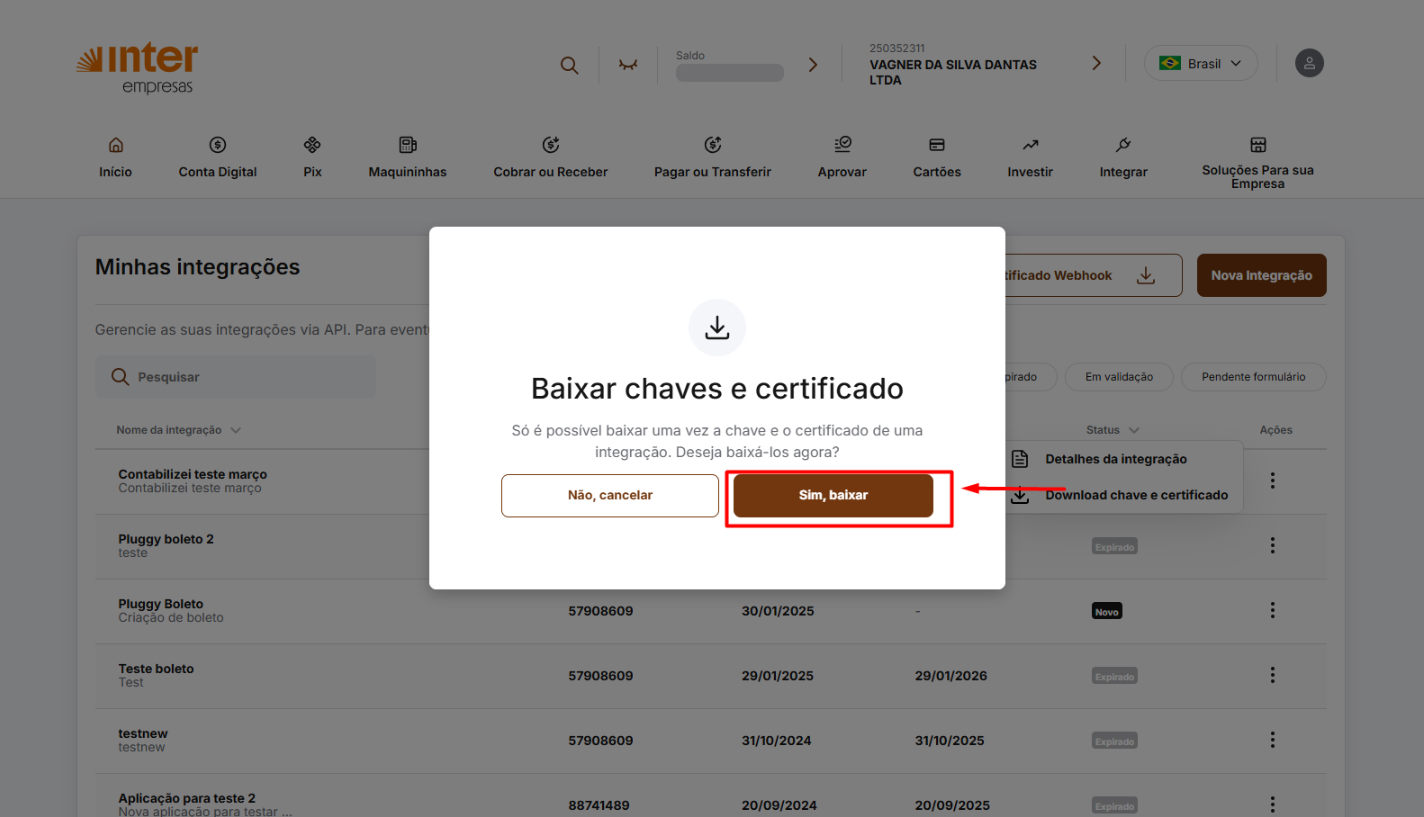
### Step 10 — Save the credentials
After confirming the download:
1. A **screen** will display:
1. **Client ID**
2. **Client Secret**
⚠️ **Save this information immediately**, as it **will not be shown again**.
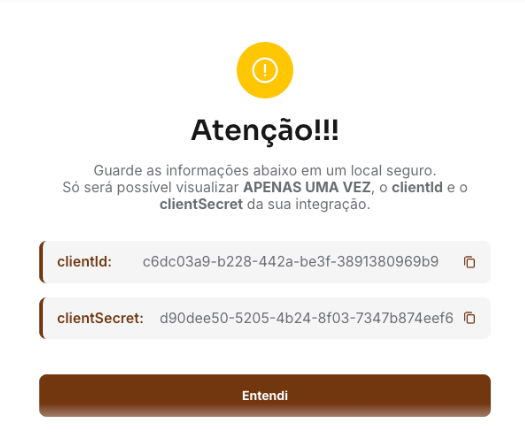
### Step 11 — Extract the key and certificate files
A **ZIP** file containing the integration files will also be downloaded.
Extract the **ZIP** file.
After extraction you will have two files:
- `Inter_API_Chave.key` → API key
- `Inter_API_Certificado.crt` → API certificate
**These files will be used in the connection with Pluggy.**
The integration will go through a validation process; after a few minutes its status will be updated to **Ativo** (Active) and it will be ready to use.
### Final step — Connect in Pluggy
Now open the **Pluggy widget** and enter the integration data.
Fill in the fields:
- **Client ID**
Paste the generated Client ID
- **Client Secret**
Paste the generated Client Secret
- **Key (.key)**
Upload the file:
`Inter_API_Chave.key`
- **Certificate (.crt)**
Upload the file:
`Inter_API_Certificado.crt`
Then click the **Conectar** (Connect) button.
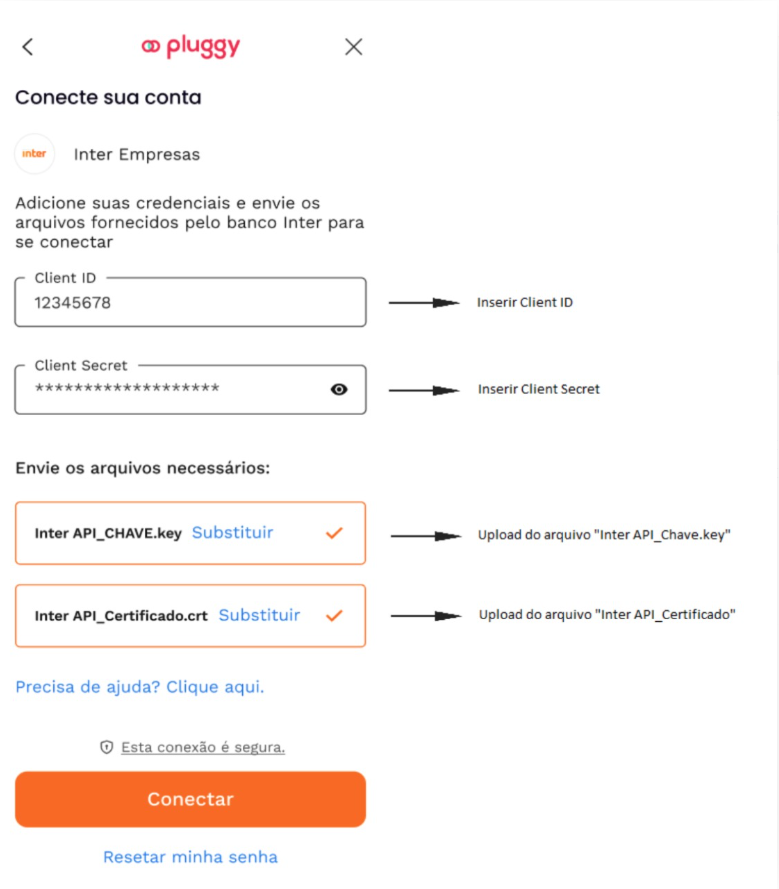
Your **Banco Inter Empresas** account will be connected to **Pluggy**.
**Done! The integration has been completed successfully.**
## Sicredi Tutorial
Source: https://docs.pluggy.ai/en/docs/developer-tools/tutorials/sicredi.md
The **Sicredi Empresas** connector asks for the following information:
1. **CNPJ**
2. **USERNAME** ("Usuário")
3. **PASSWORD** ("Senha")
🚩 These are the same credentials used in the Sicredi app.
**CNPJ:**
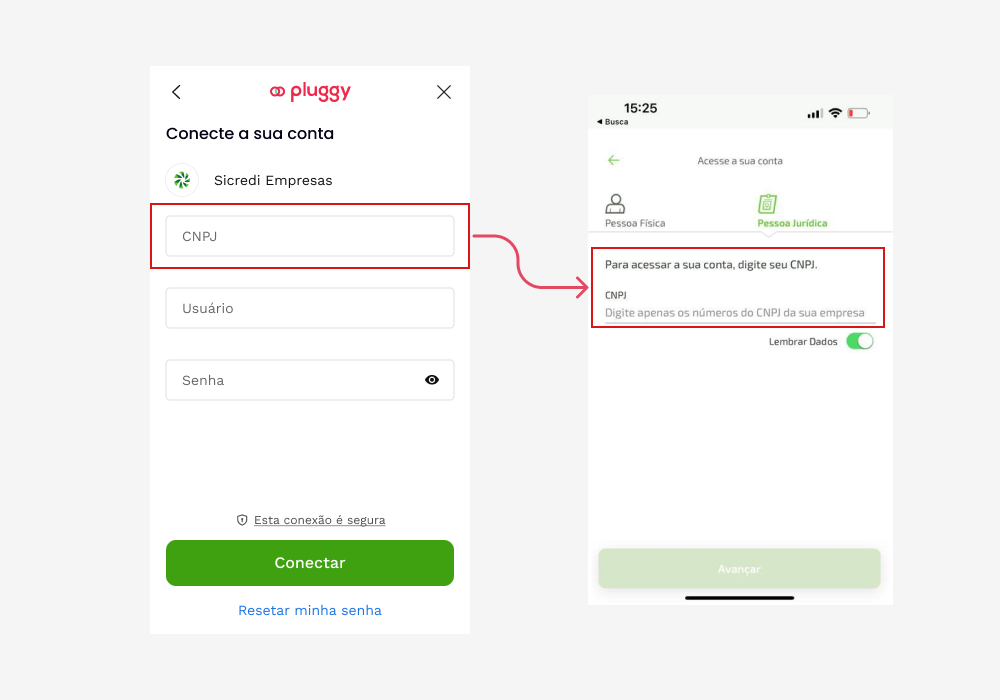
**Username ("Usuário"):**
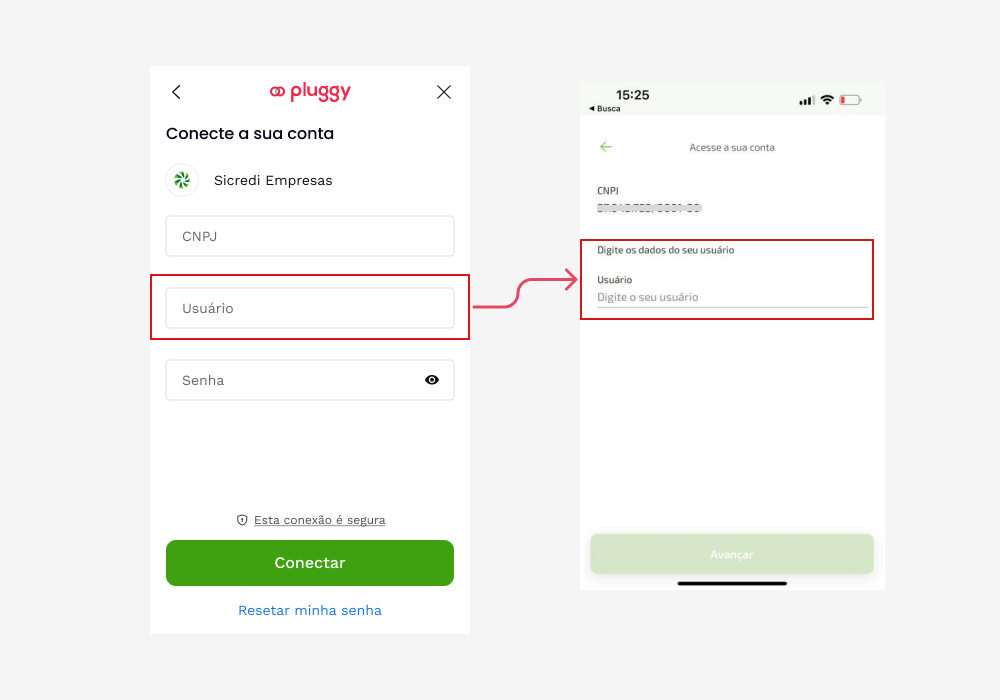
**Password ("Senha"):**
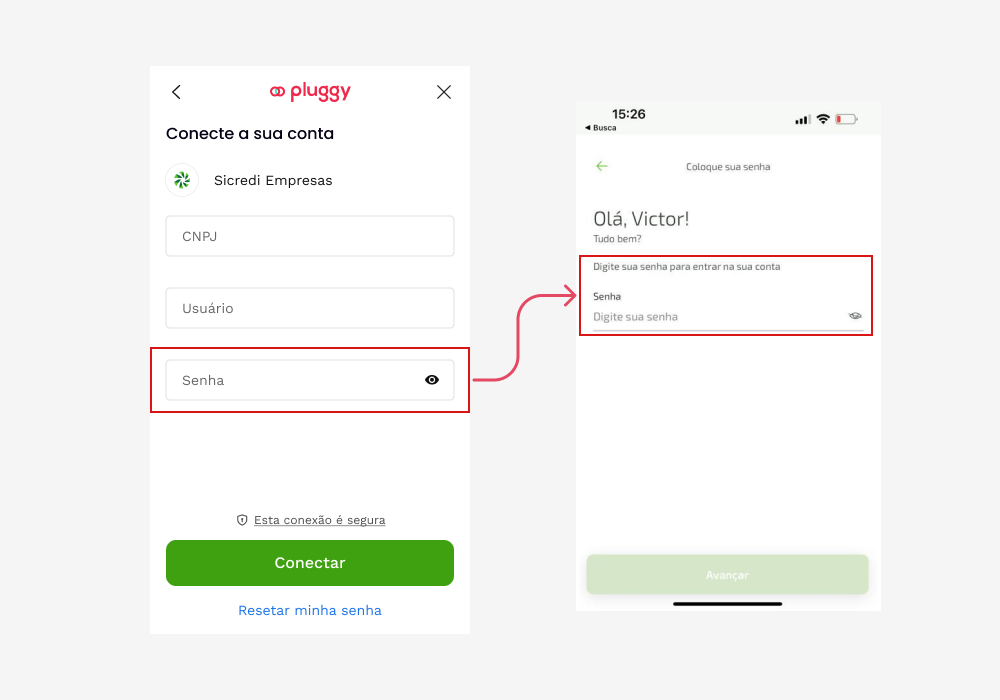
## Sicoob PJ Tutorial
Source: https://docs.pluggy.ai/en/docs/developer-tools/tutorials/sicoob-pj.md
The **Sicoob Empresas** connector asks for the following information:
1. **COOPERATIVE** ("Cooperativa")
2. **ACCESS KEY** ("Chave de Acesso")
3. **PASSWORD** ("Senha")
🚩 These are the same credentials used in Sicoob's Internet Banking and mobile app.
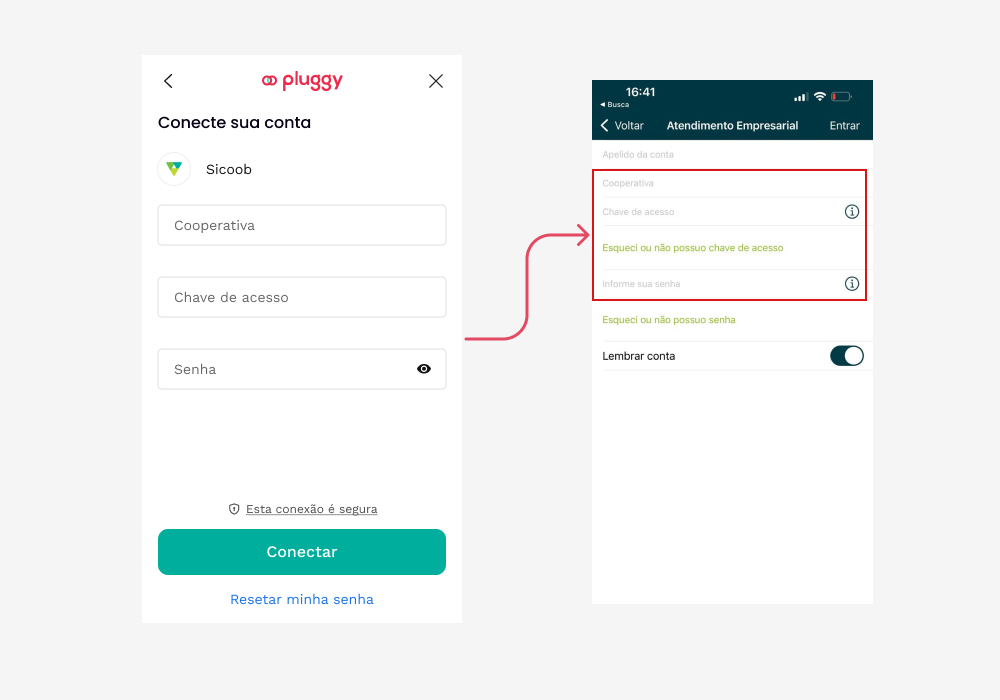
## Santander PJ Secondary User Tutorial
Source: https://docs.pluggy.ai/en/docs/developer-tools/tutorials/santander-pj-secondary-user.md
Here is a video showing how to create a secondary account in Santander; below it, you have the step-by-step guide!
The **Santander Empresas** connector asks for:
1. **AGÊNCIA** (branch)
2. **CONTA** (account)
3. **USUÁRIO** (username) and
4. **SENHA** (password)
The branch and account information is the same for both the main user and the secondary user; however, the username and password are specific to each individual connection.
In this tutorial we will show you how to create a secondary user so you can connect your data with **Pluggy**.
1. Go to the **Santander PJ** website: [https://www.santander.com.br/empresas](https://www.santander.com.br/empresas)
2. On the home page, log in with your **Agência** (branch) and **Conta** (account) information
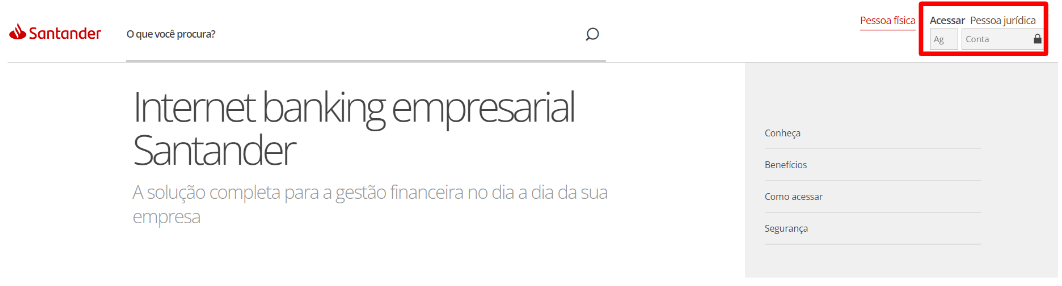
3. Enter your **Usuário** (username) and **Senha** (password):
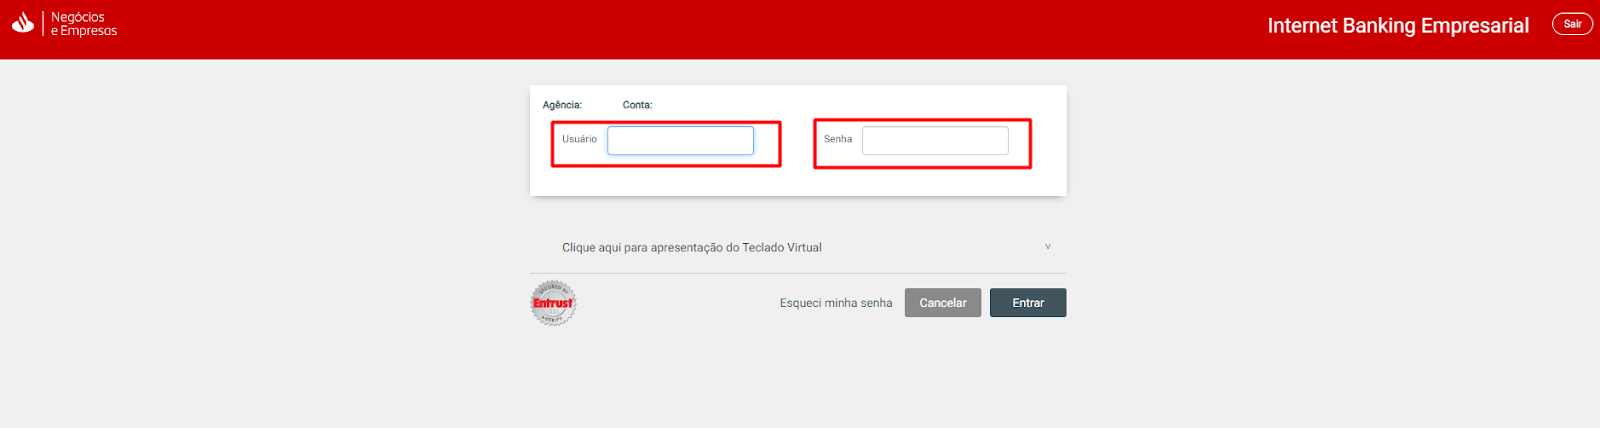
4. A **QR Code** will be displayed to authenticate the connection:
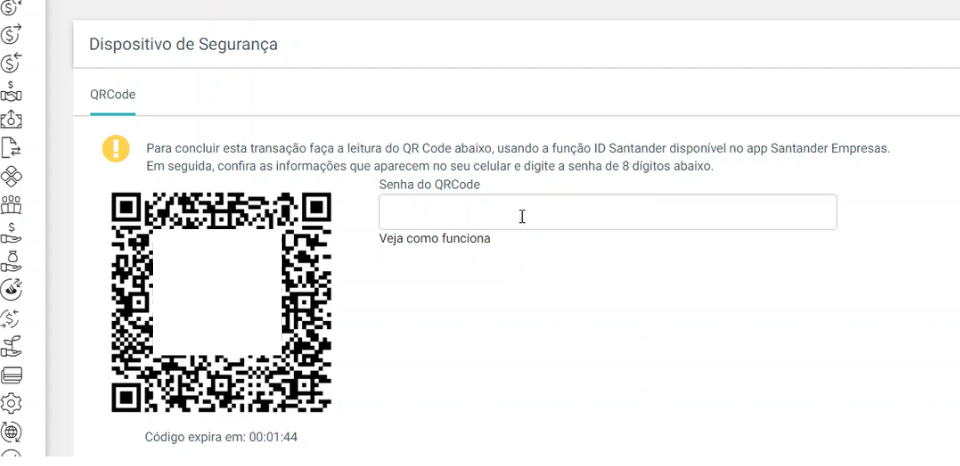
5. Open the **Santander app on your phone** as shown in the images below to get the **QR Code password** ("Senha do QRCode"):
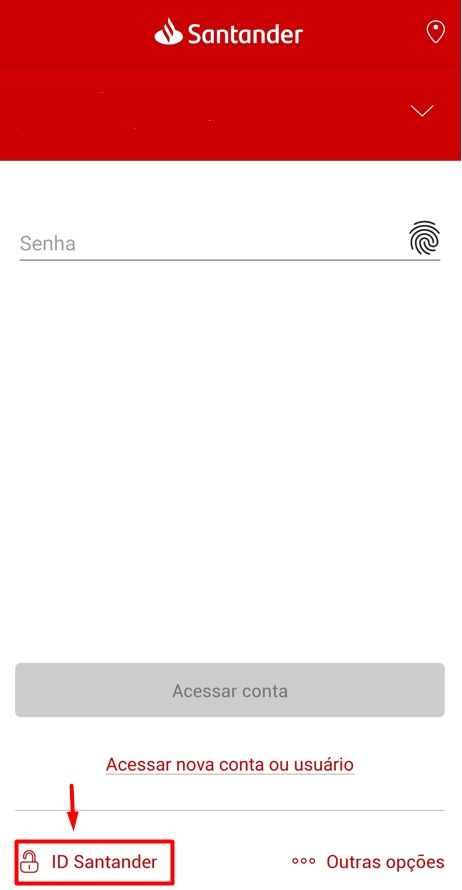
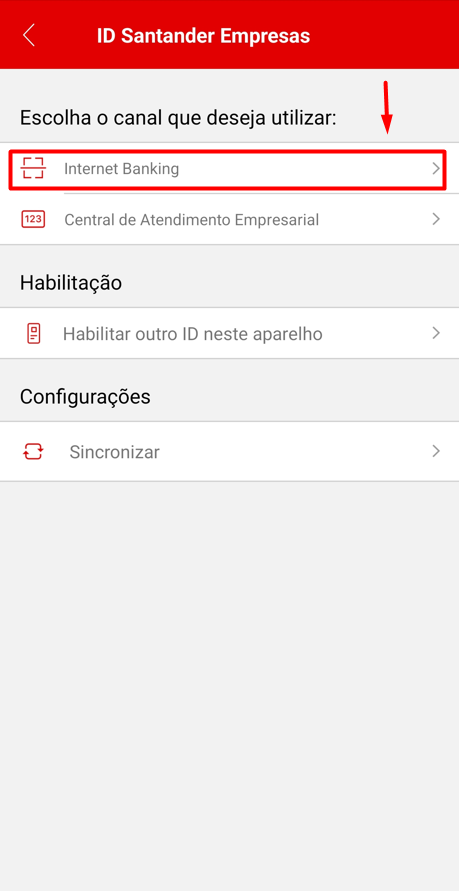
6. Enter the code shown on **your phone** in the "**Senha do QRCode**" (QR Code password) field in your web browser:
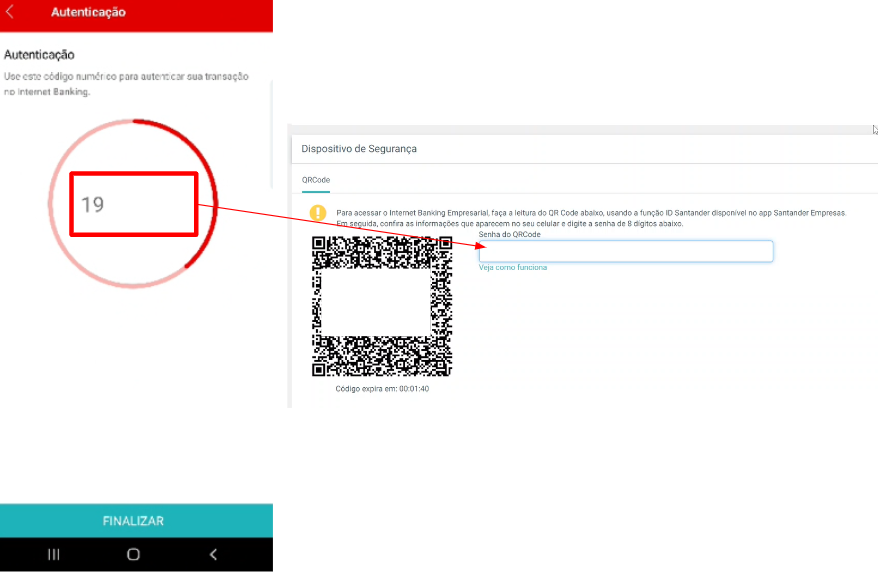
7. On your account's home screen, select the "**Configurações e ID Santander**" (Settings and Santander ID) menu:
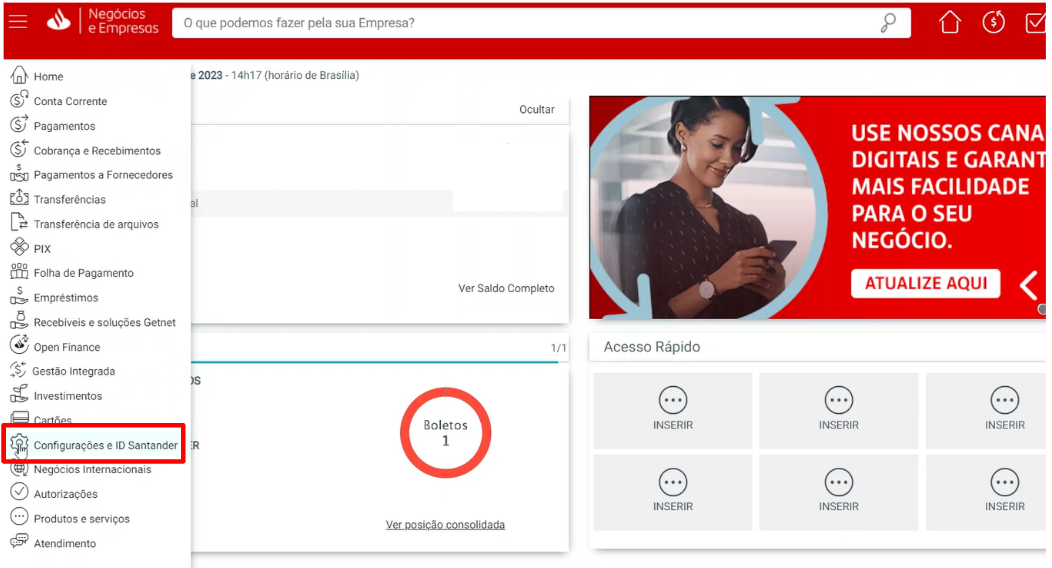
8. In the "**Usuário secundário**" (Secondary user) section, select "**incluir**" (add):
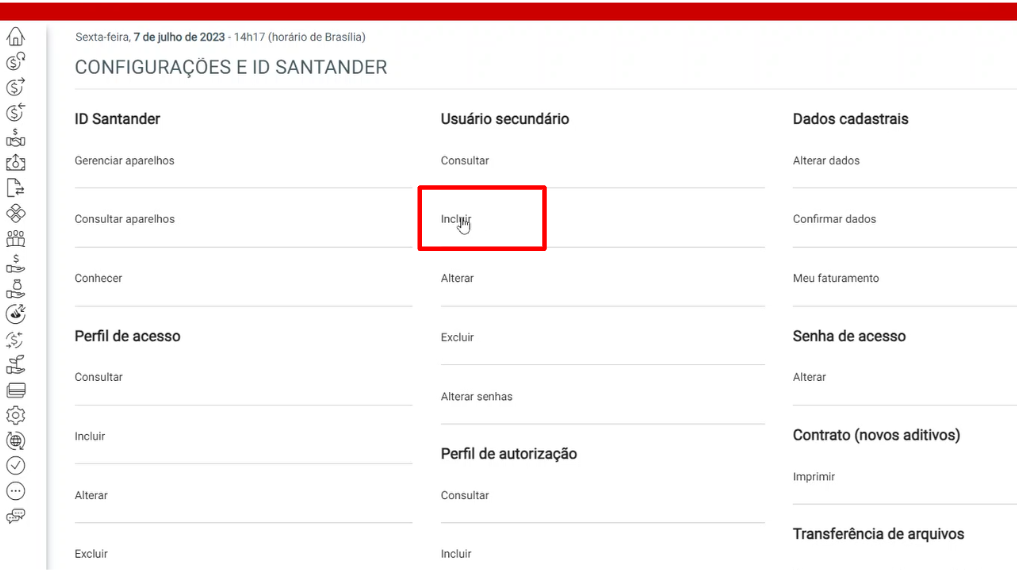
9. On the next page, fill in all the indicated information and click "**Continuar**" (Continue):
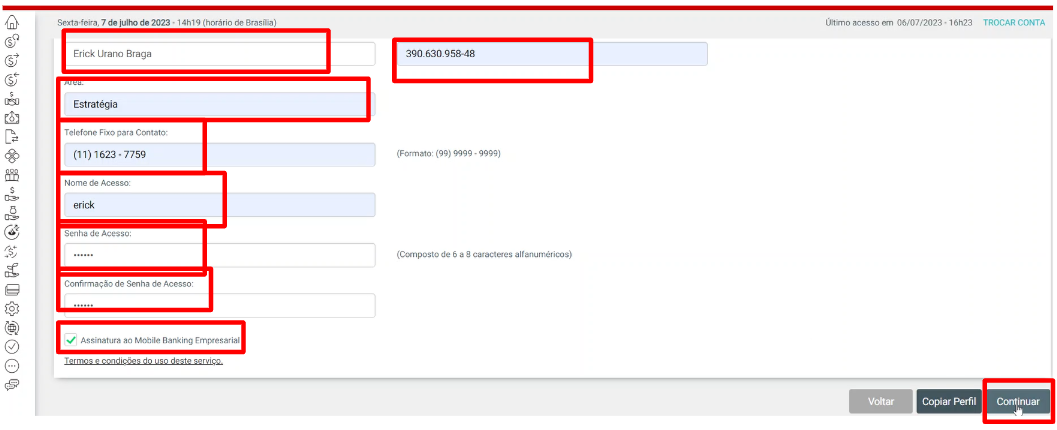
10. Check and select the fields as shown in the image, then click "**Continuar**" (Continue) in the bottom-right corner:

11. On the page displayed, **review the information** and click "**Continuar**" (Continue):
12. On the next page, **repeat the same process** from steps **4** to **6** for QR Code authentication.
13. The "**Inclusão finalizada. Veja seu comprovante**" (Registration complete. See your receipt) screen will be displayed
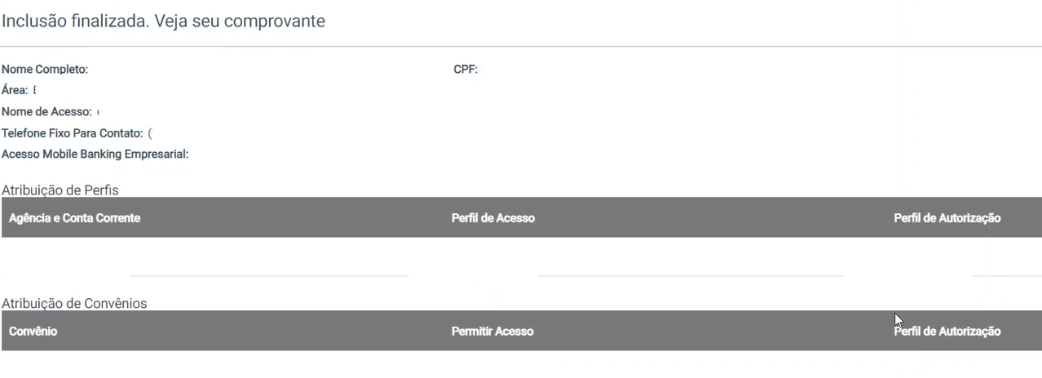
14. Now just use your secondary user to **connect** with **Pluggy**.
Note: **remember** that the **username** and **password** for your secondary user are the ones you created in **step 9 of this tutorial**.
## Santander PJ Tutorial
Source: https://docs.pluggy.ai/en/docs/developer-tools/tutorials/santander-pj.md
The **Santander Empresas** connector asks for:
1. **AGÊNCIA** (branch)
2. **CONTA** (account)
3. **USUÁRIO** (username) and
4. **SENHA** (password)
**These are the same credentials used in Santander's Internet Banking and mobile app.**
> **Important**
>
> **Use a computer to perform the connection, since it requires reading a QR Code.**
---
**Agência (branch):**
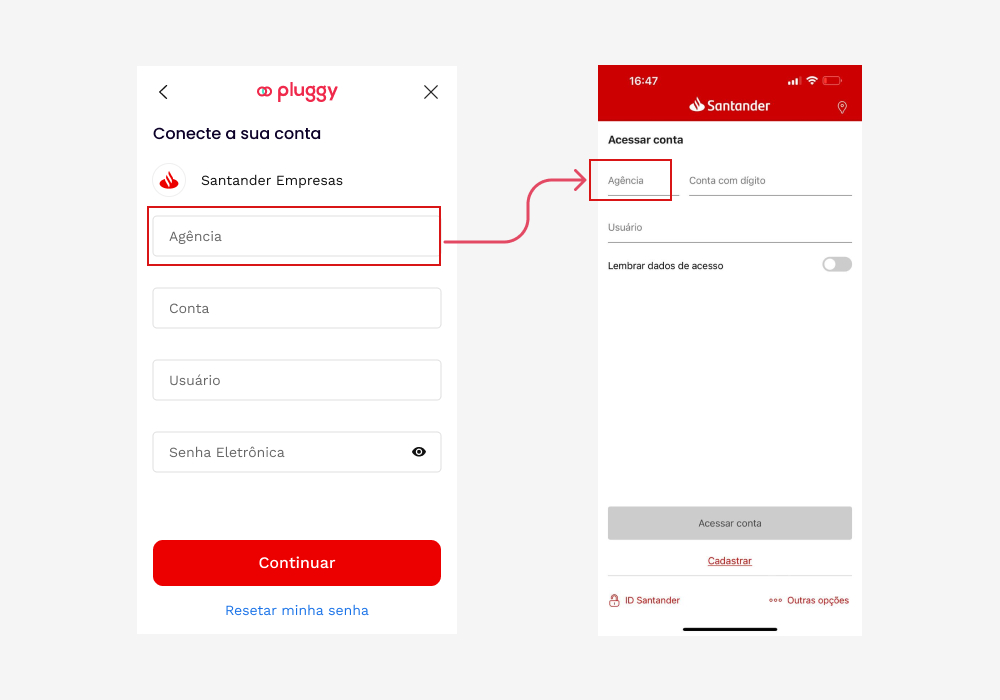
**Conta (account):**
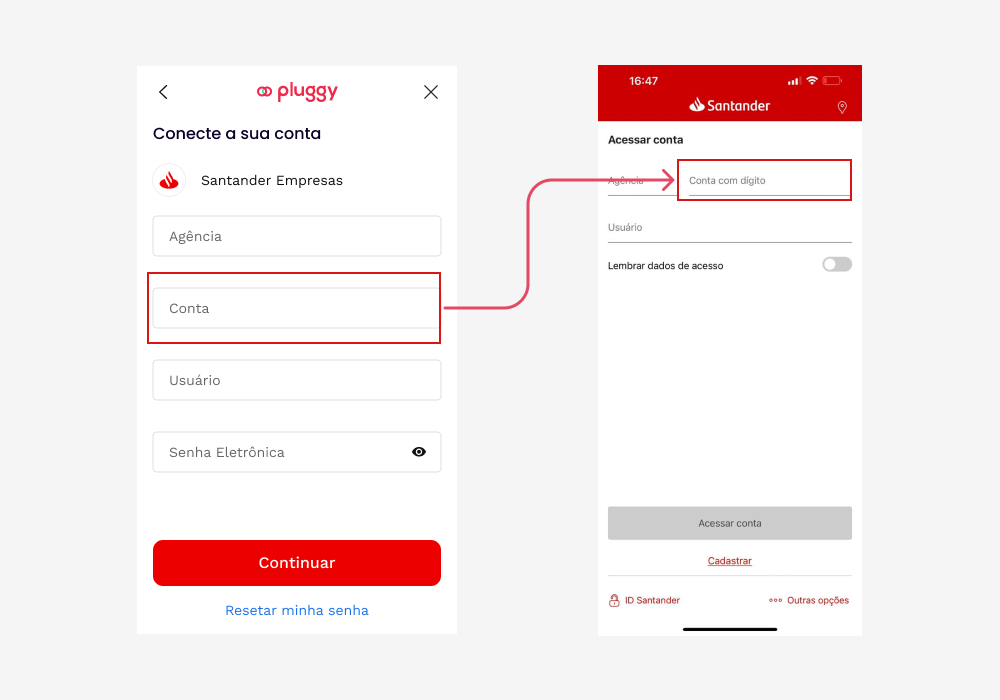
**Usuário (username):**
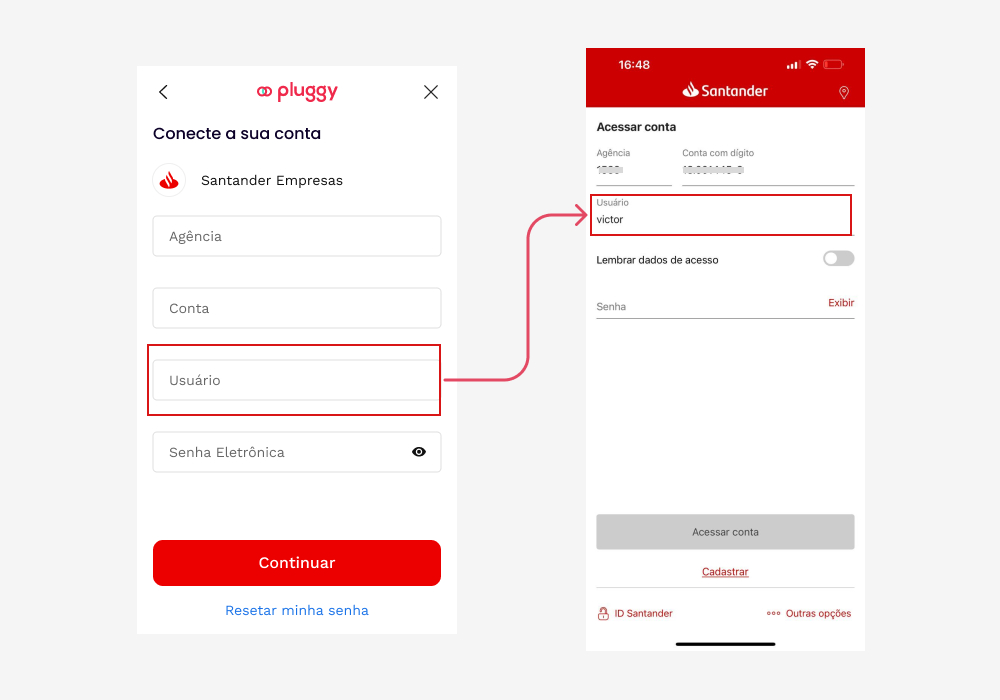
**Senha (password):**
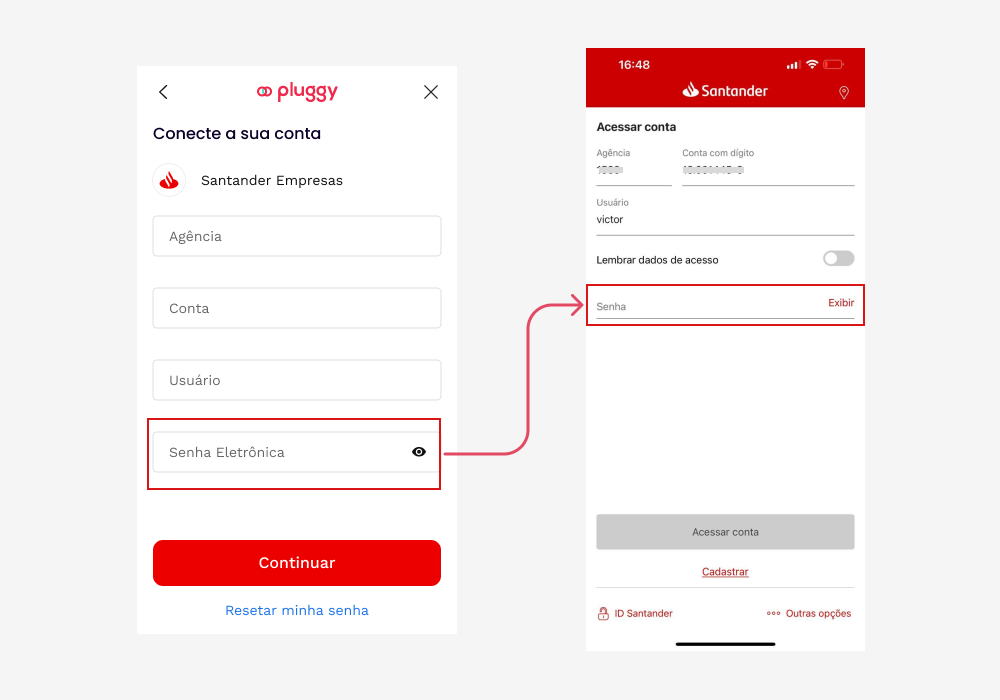
## Itaú PJ Tutorial
Source: https://docs.pluggy.ai/en/docs/developer-tools/tutorials/itau-pj.md
The **Itaú Empresas** connector asks for:
1. **AGÊNCIA** (branch)
2. **CONTA** (account)
3. **SENHA** (password) and
4. **CPF**
🚩 These are the same credentials used in Itaú's Internet Banking and mobile app.
> **Important**
>
> If the master user does not have **basic access** ("acesso básico") in addition to **full access** ("acesso completo"), you should create an **OPERADOR** (operator) access that has basic access, so the connection can be completed successfully.
---
**Agência and Conta (branch and account):**
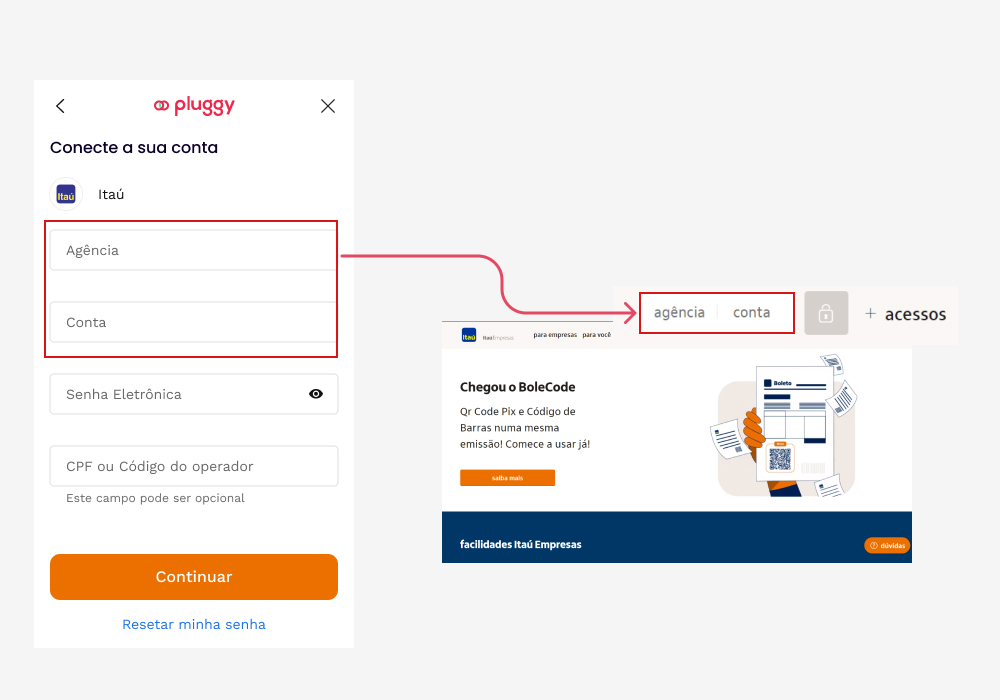
**Senha (password):**
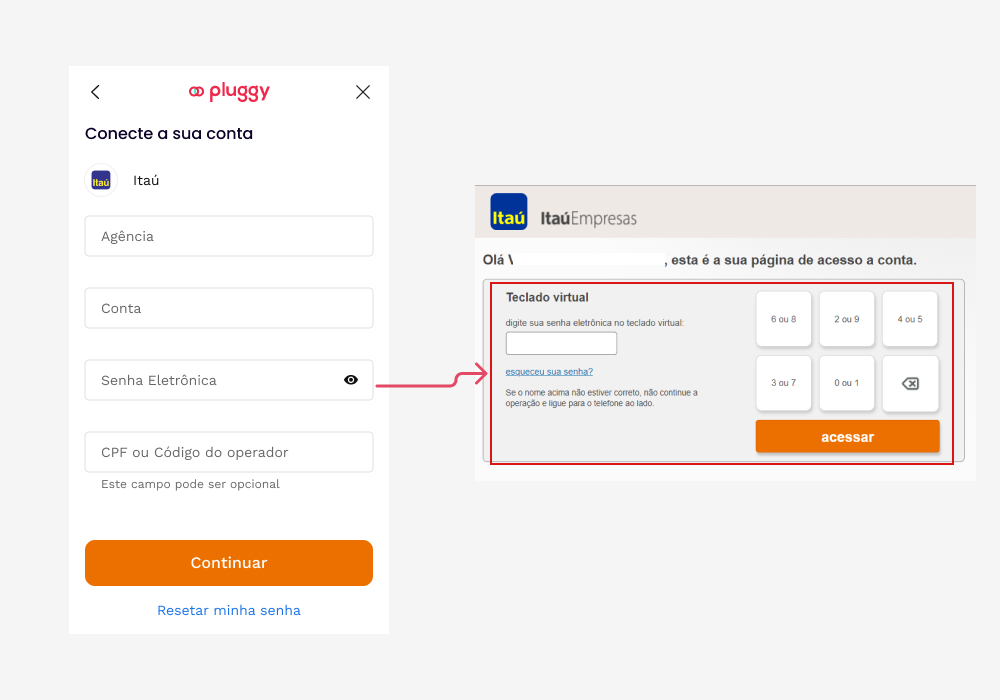
**CPF:**
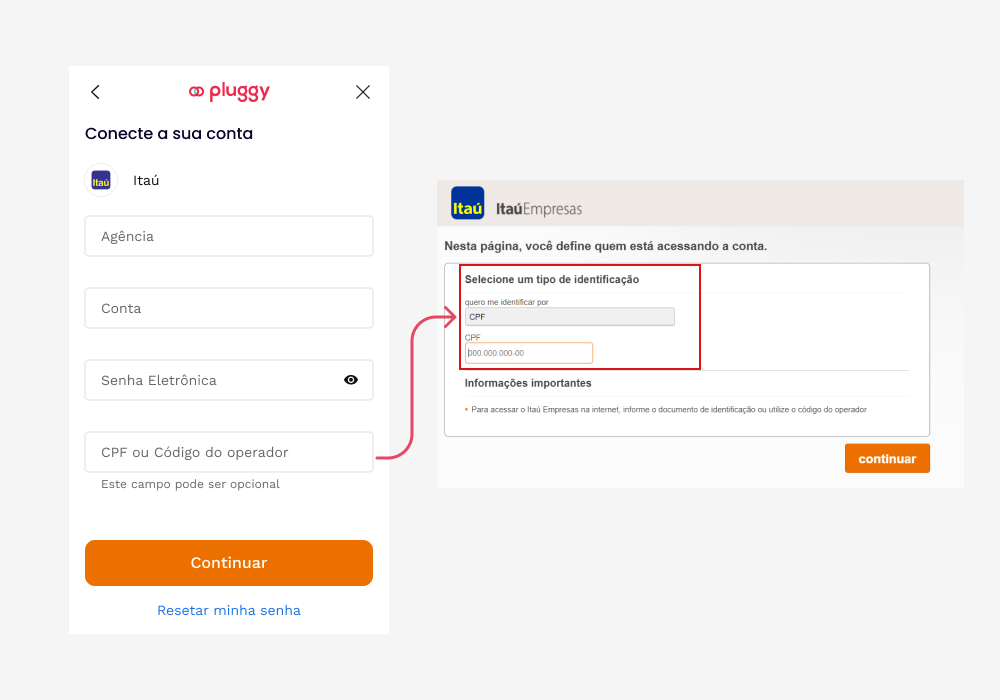
---
### Best practices for a successful connection
1. Make sure this access has the "ACESSO BÁSICO" (basic access) option enabled.
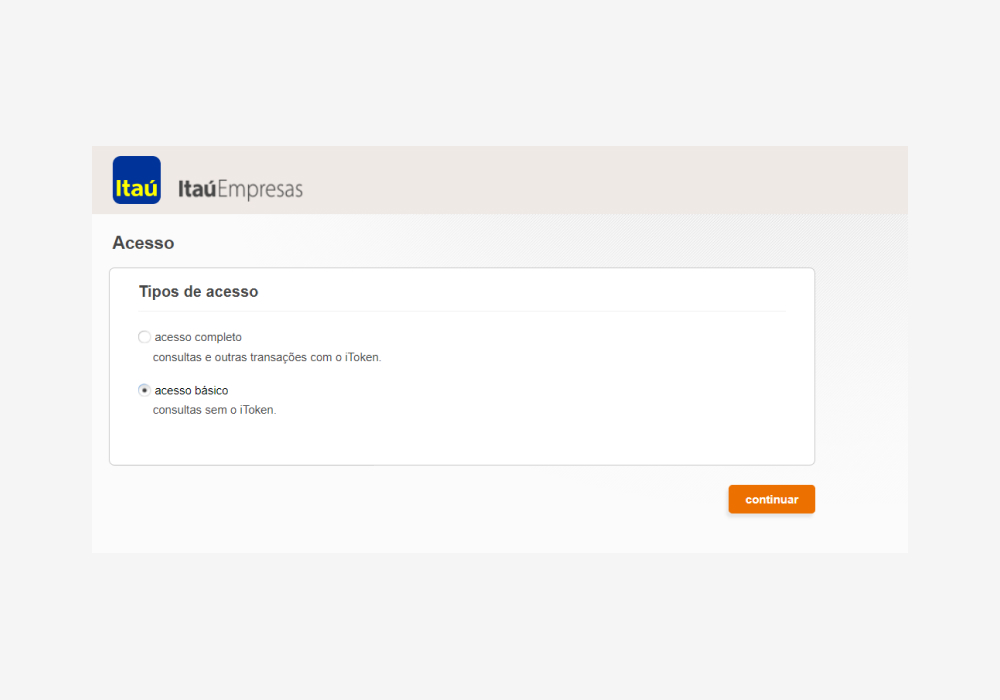
2. If the access does not have "ACESSO BÁSICO" (basic access) enabled, we recommend creating an "OPERADOR" (operator) access.
Go to **Área do cliente > Operadores e perfis** (Client area > Operators and profiles) and click the **Gestão de operadores** (Operator management) link.
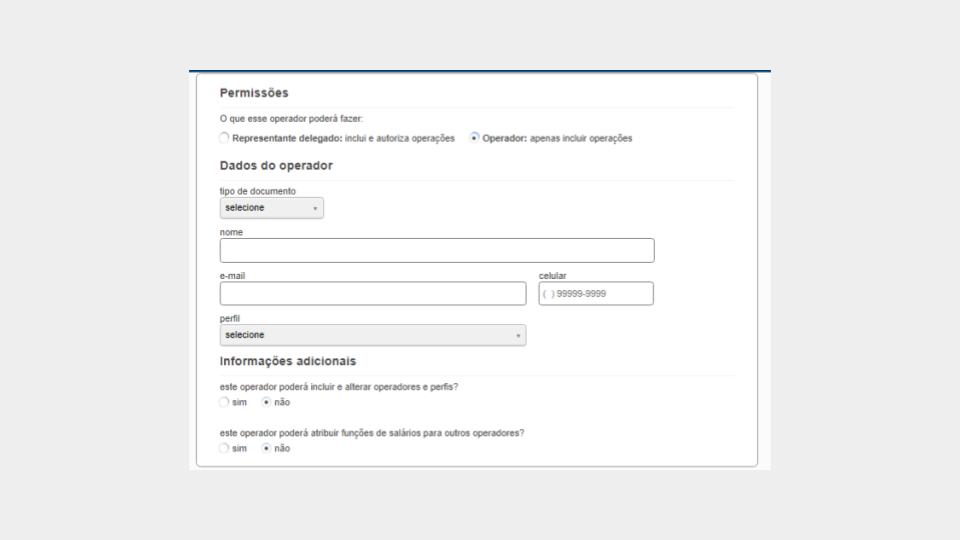
## Itaú PJ Tutorial — User Without a Token
Source: https://docs.pluggy.ai/en/docs/developer-tools/tutorials/itau-pj-user-without-token.md
How to create a user without a token in Itaú Empresas.
### Step 1 — Create an access profile
1. In Itaú's Internet Banking, go to the operator and profile management menu ("gestão de operadores e perfis").
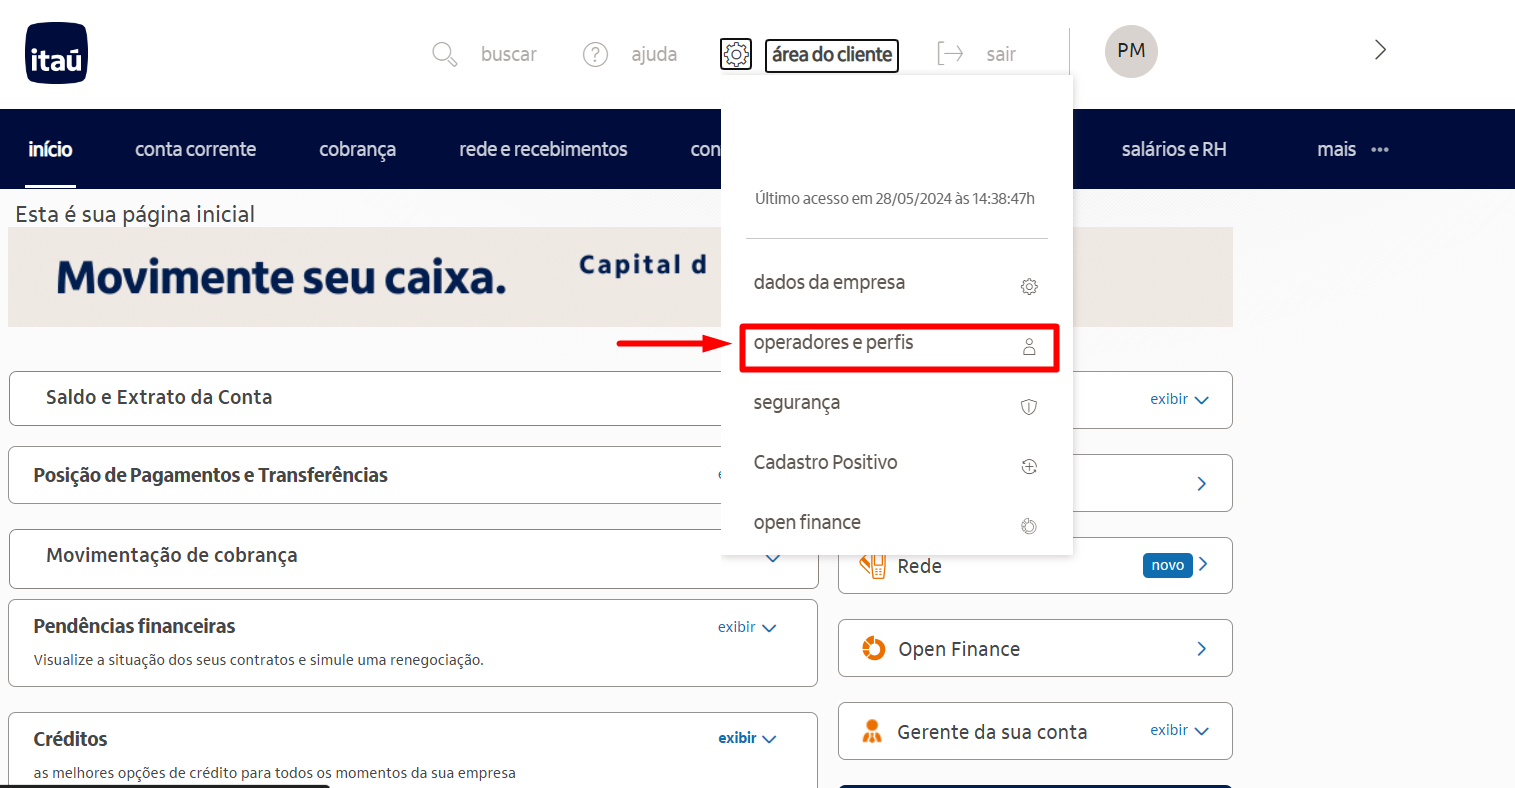
2. Create a new access profile.
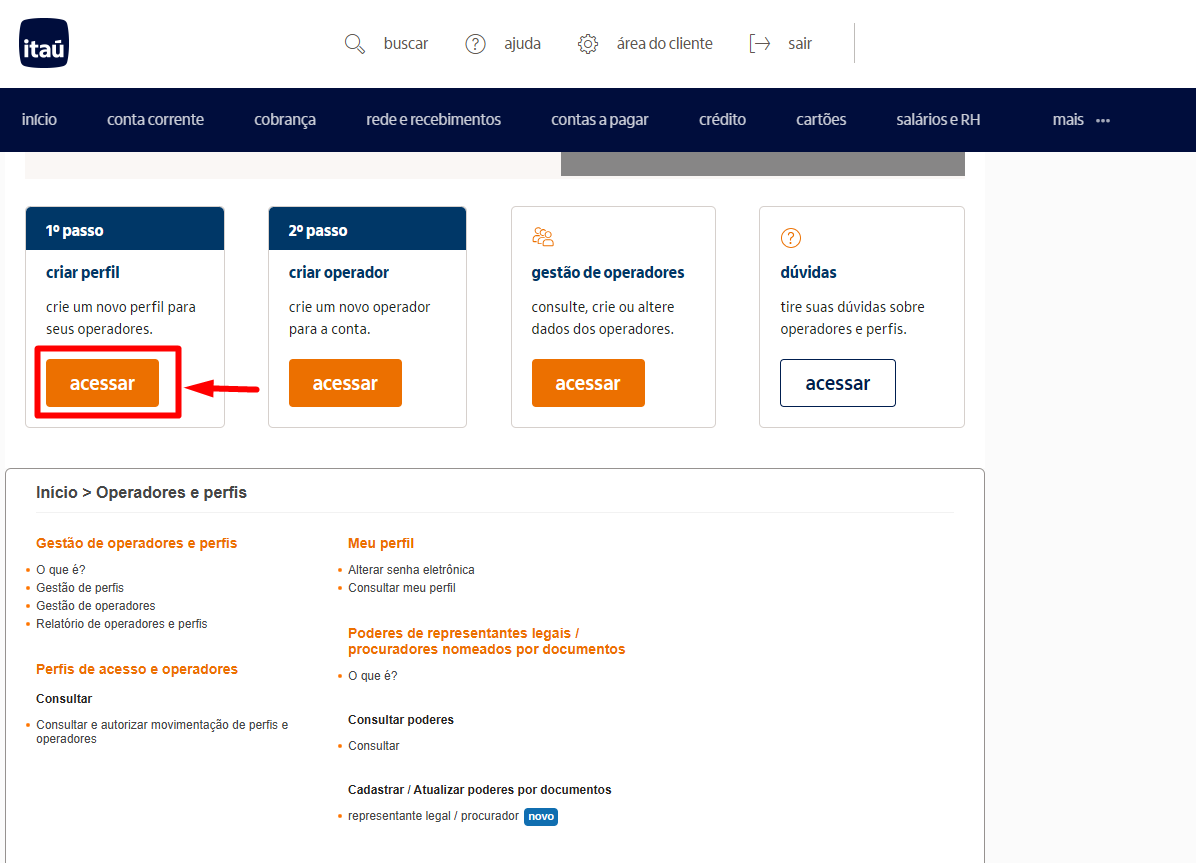
3. Enter a name for the profile ("Perfil Financeiro", for example), select the "Operador" (Operator) option and add the available account under "Conta do perfil" (Profile account).
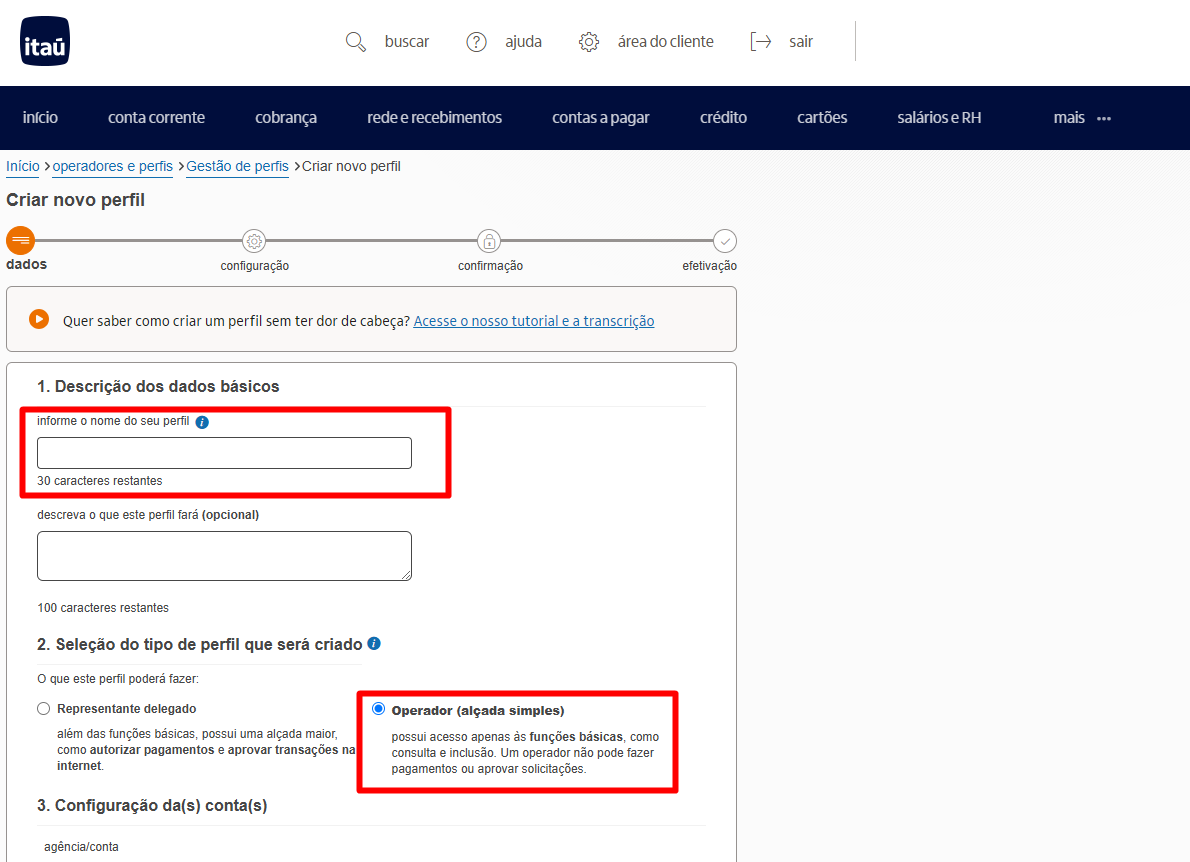
4. Select the financial service operations and set the same operations for all accounts.
5. Select the available account and the available operations: "**Selecionar todos**" (Select all).
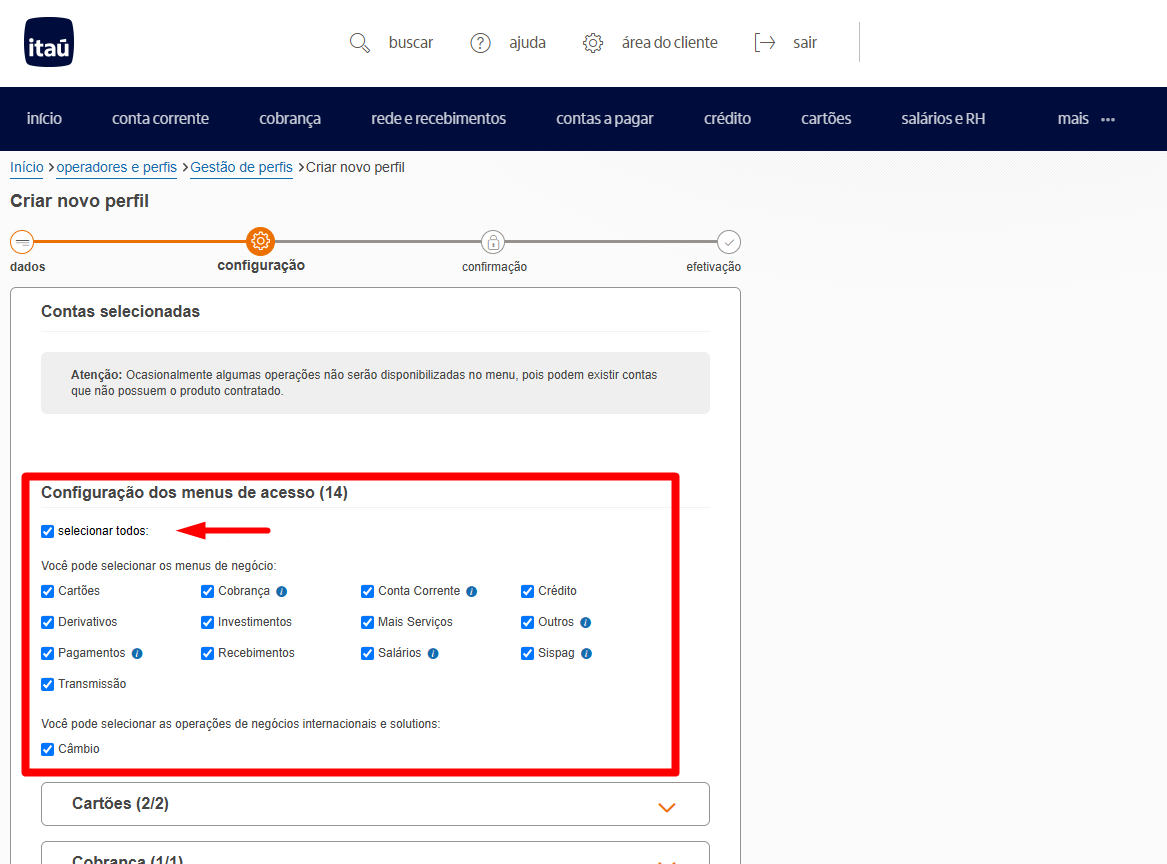
> **Important**
>
> You should link only one account to this access profile to enable the automatic bank integration. If you need to integrate more than one account, the recommended approach is to create additional access profiles.
### Step 2 — Add an operator
1. Go to the operator and profile management menu and create a new operator.
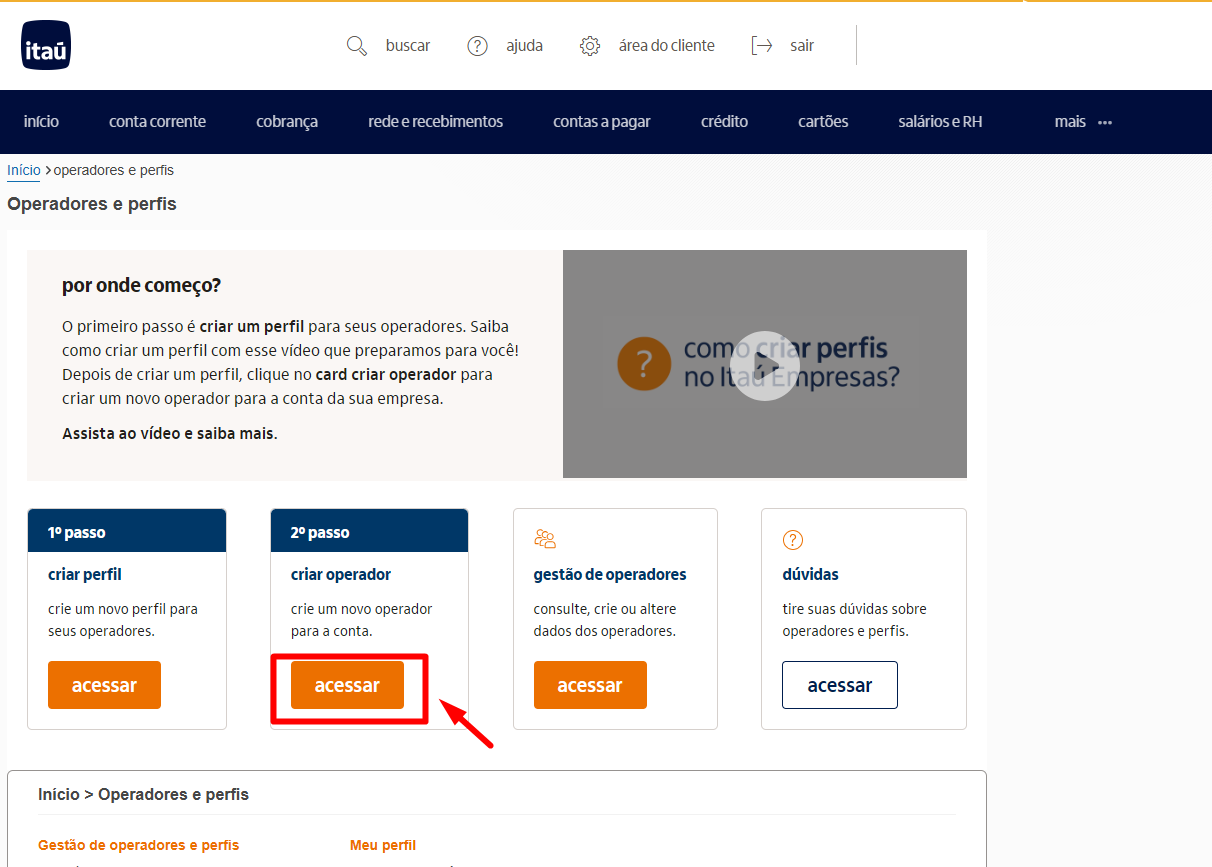
2. Allow the operator to only include operations.
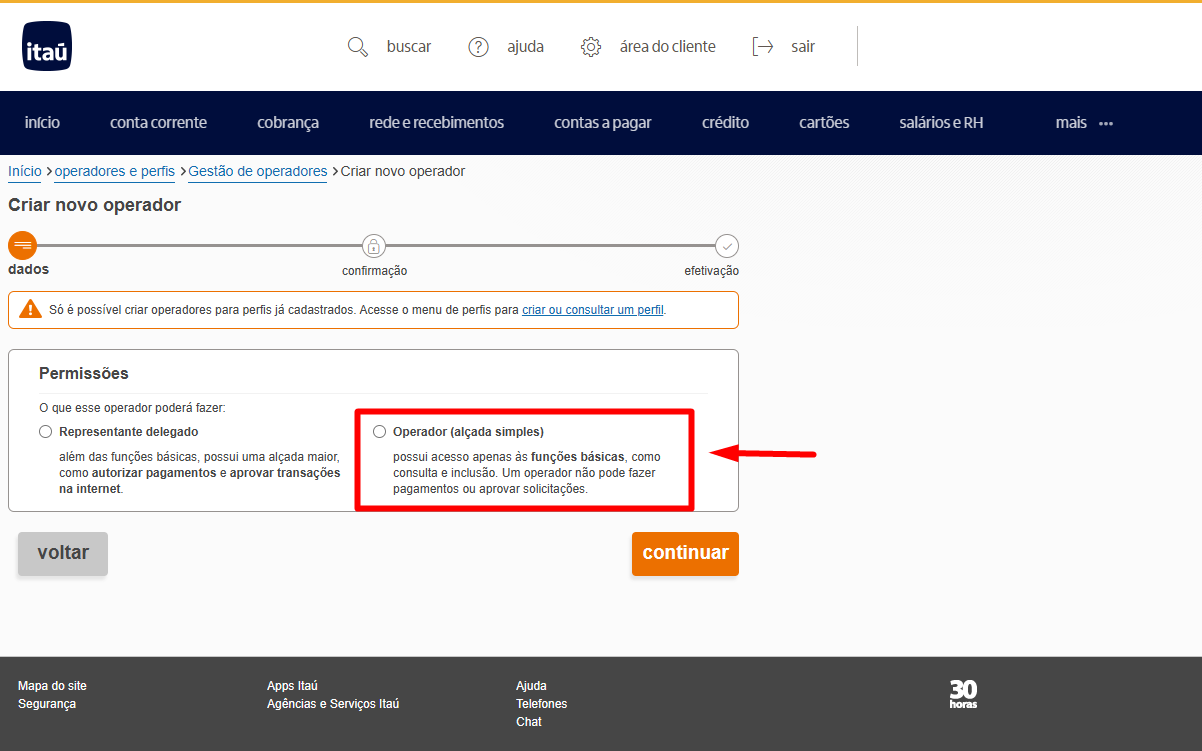
3. Provide one of the documents — CPF (Cadastro de Pessoas Físicas), RNE (Registro Nacional de Estrangeiro) or passport — and fill in the remaining data.
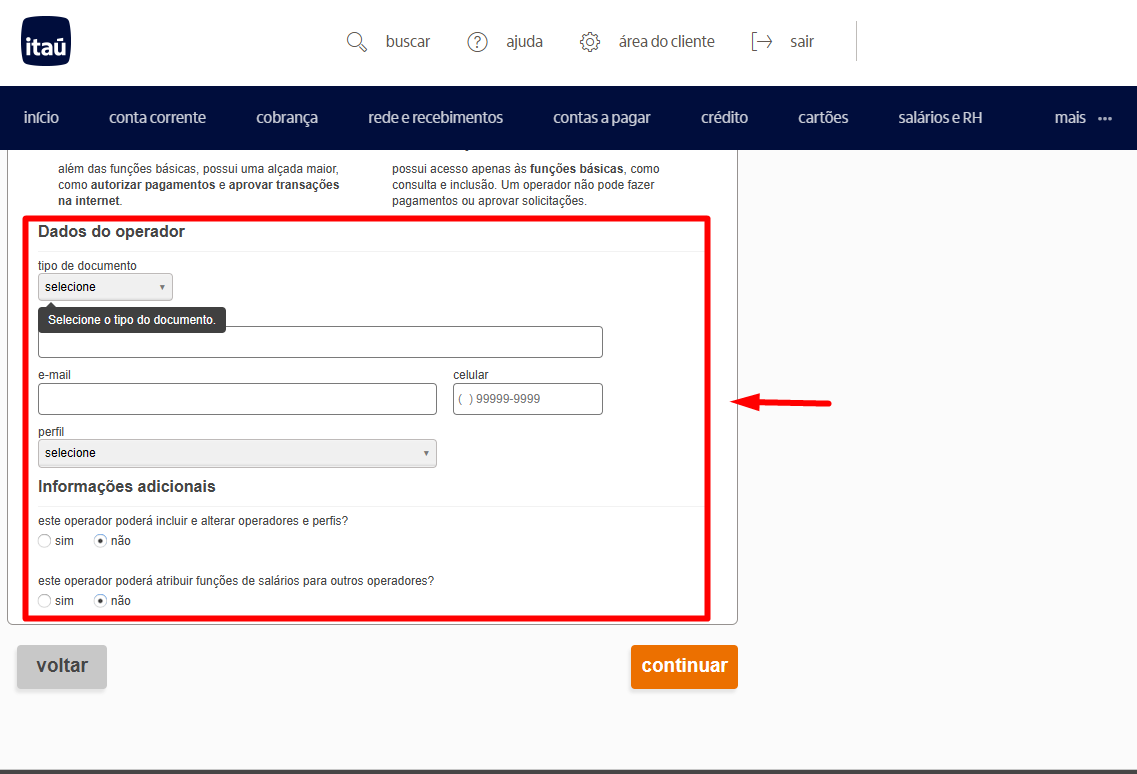
> **Note**
>
> The operator will not be able to edit or assign roles to other users.
4. Continue the process until the operator is created with permission to read the balance and statement transactions ("extrato").
### Step 3 — Validate the operator you created
1. Log in to Itaú's Internet Banking with the newly created operator credentials and change the numeric password.
This step must be done via the web for the process to be completed.
2. If the validation is done through the desktop or mobile app, the process will not work, since each scenario has different validations.
## Banco do Brasil PJ Tutorial — Device Authorization
Source: https://docs.pluggy.ai/en/docs/developer-tools/tutorials/bb-pj-device-authorization.md
The **Banco do Brasil Empresas** connector asks for:
- **CHAVE J** (J key, alphanumeric)
- **SENHA J** (J password, alphanumeric) and
- **8-digit password** ("Senha de 8 dígitos")
These are the same credentials used in Banco do Brasil's Internet Banking and mobile app.
> **Important**
>
> Use a device (computer and phone) that is authorized in the bank's Internet Banking.
The account used in the connection must have a mobile phone number registered, since it will receive a confirmation link to be entered at connection time.
**Chave J (J key):**
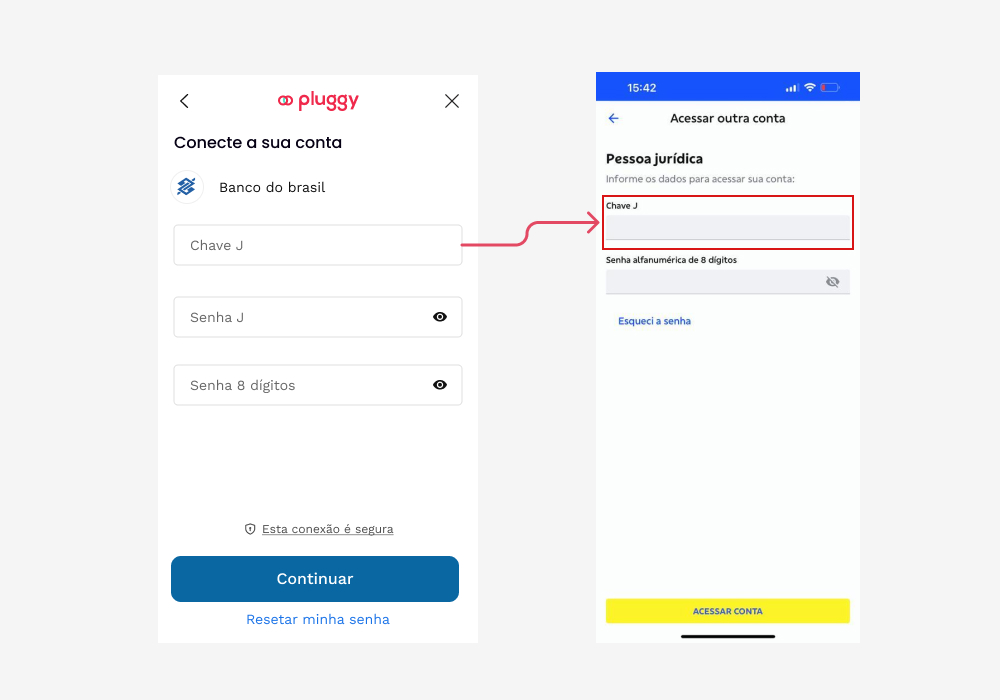
**Senha J (J password):** alphanumeric
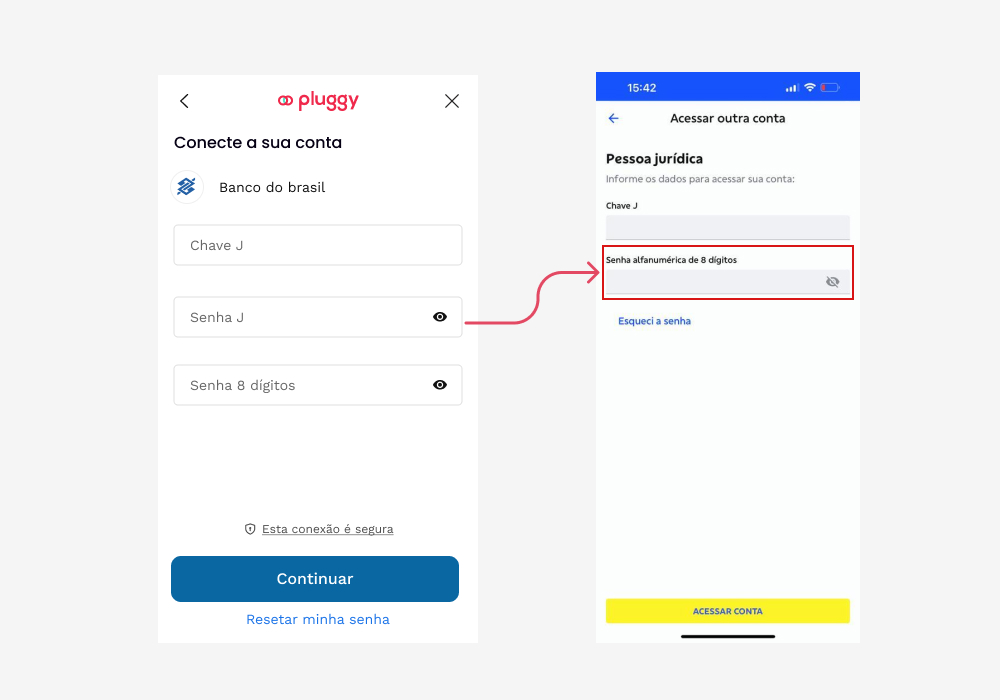
**8-digit password:** the password used after accessing Internet Banking
### How to authorize a device?
1. On the home page, open the menu and go to the ***"Autorizar e Consultar Smartphone/Tablet"*** (Authorize and view smartphone/tablet) section
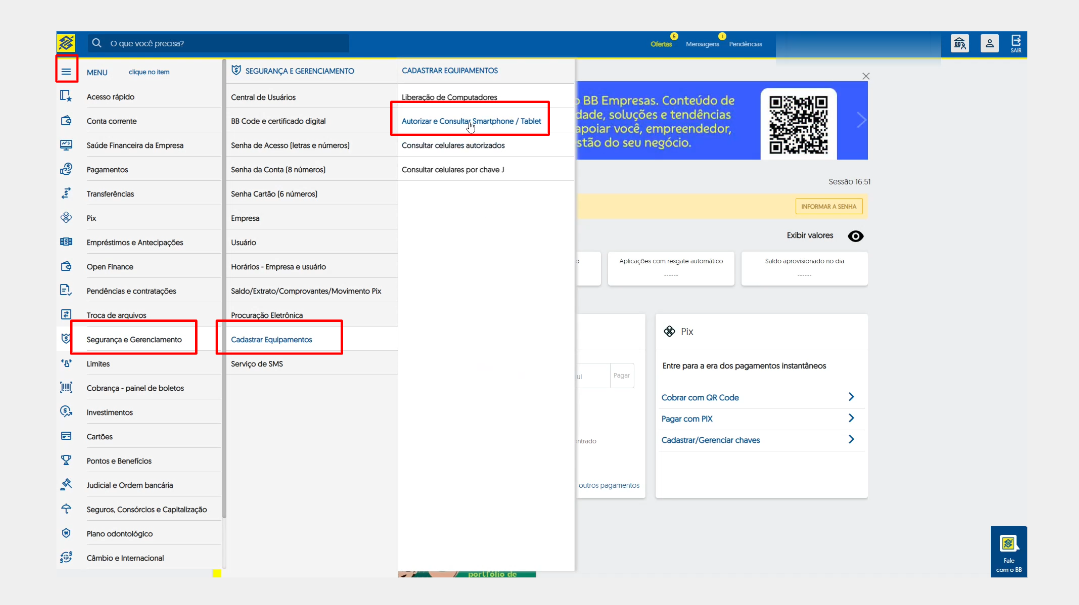
2. On the page displayed, select from the list the same device that appeared on the **Widget** screen. After selecting it, click ***"Detalhar"*** (View details);
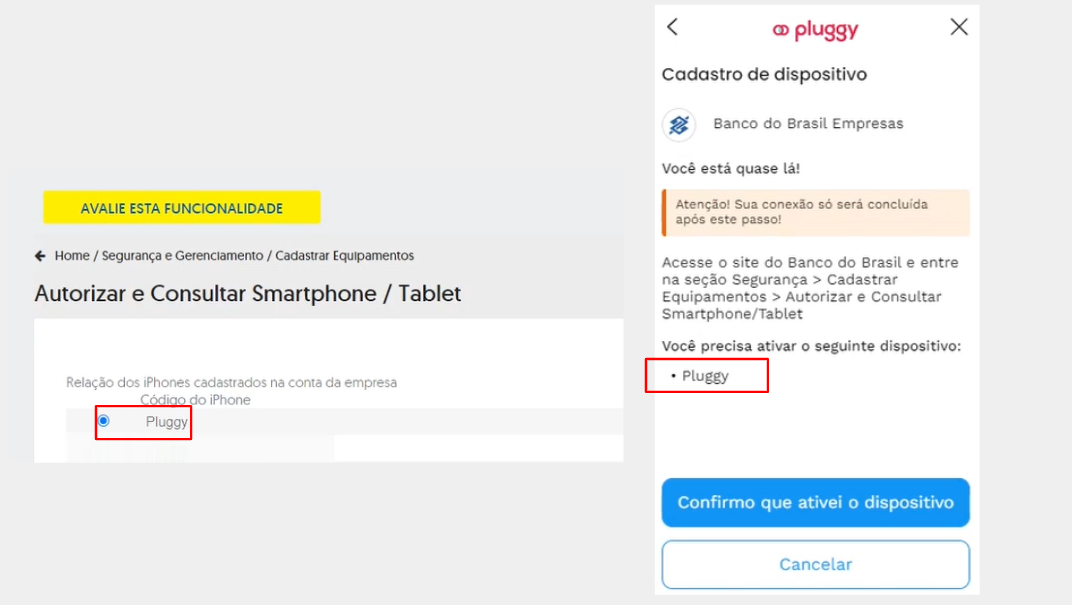
3. On the next page click ***"Autorizar"*** (Authorize), and on the following one click ***"Continuar"*** (Continue);
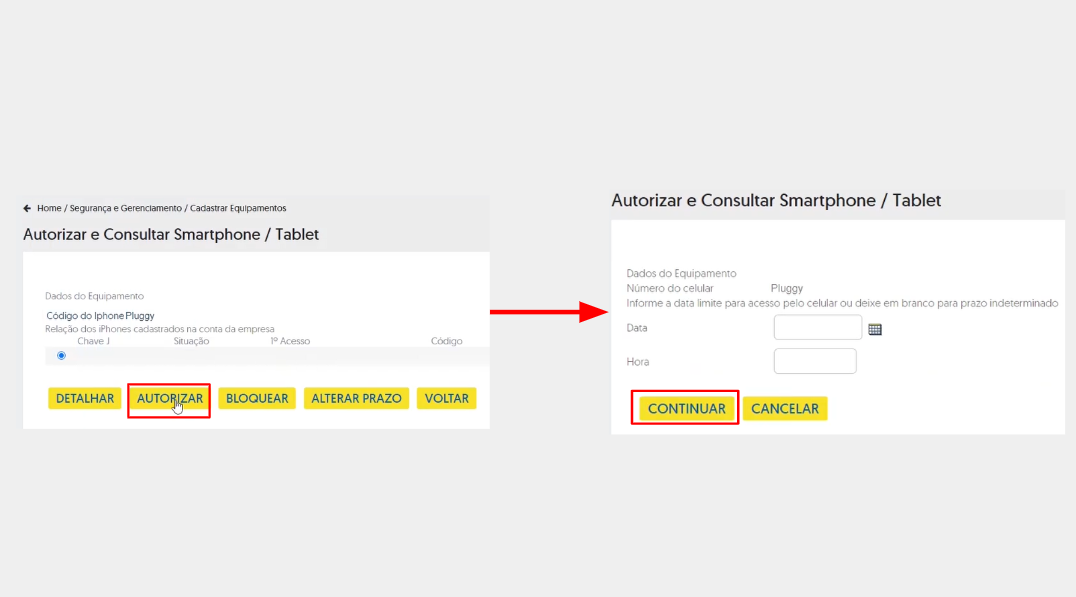
4. A screen with a **QR Code** will be displayed, which you must scan with the phone registered at **Banco do Brasil**; scanning the **QR Code** gives you access to the ***confirmation code*** ("Código de Confirmação");
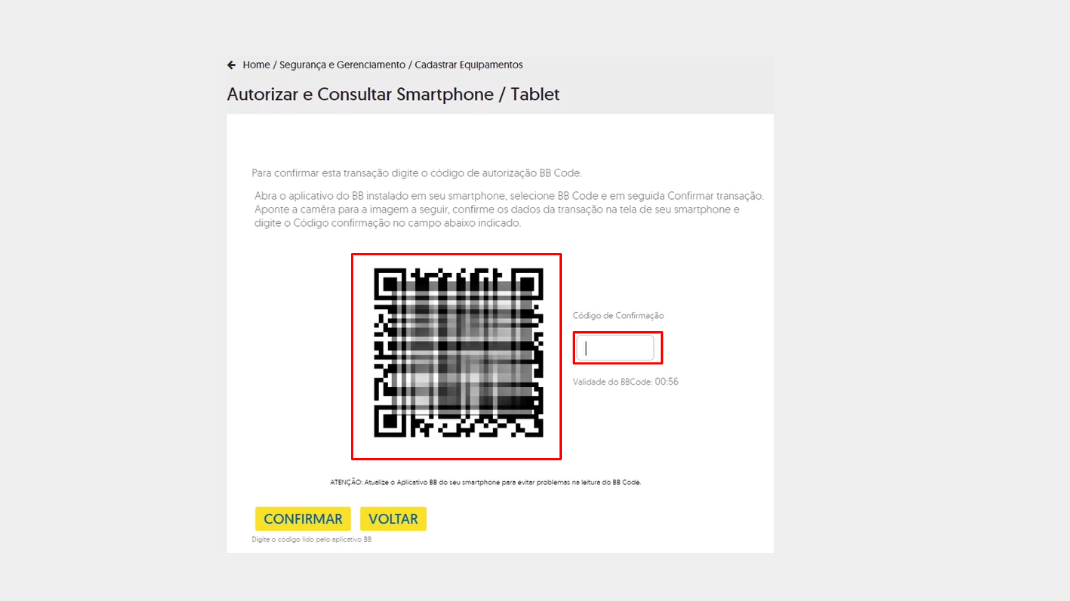
5. To scan the **QR Code**, open the Banco do Brasil app, tap the **"Ler QR Code e BB Code"** (Scan QR Code and BB Code) icon and scan the code. Tap **"Confirmar"** (Confirm) on your phone and the confirmation code will be shown on your phone's screen. Enter this code on the Banco do Brasil website and click **"Confirmar"** (Confirm).
6. Go back to the **Pluggy Widget** and click ***"Confirmo que ativei o dispositivo"*** (I confirm I have activated the device).
## Banco do Brasil PJ Tutorial
Source: https://docs.pluggy.ai/en/docs/developer-tools/tutorials/bb-pj.md
The **Banco do Brasil Empresas** connector asks for:
- **CHAVE J** (J key, alphanumeric)
- **SENHA J** (J password, alphanumeric) and
- **8-digit password** ("Senha de 8 dígitos")
These are the same credentials used in Banco do Brasil's Internet Banking and mobile app.
> **Important**
>
> Use a device (computer and phone) that is authorized in the bank's Internet Banking.
The account used in the connection must have a mobile phone number registered, since it will receive a confirmation link to be entered at connection time.
**Chave J (J key):**

**Senha J (J password):** alphanumeric

**8-digit password:** the password used after accessing Internet Banking
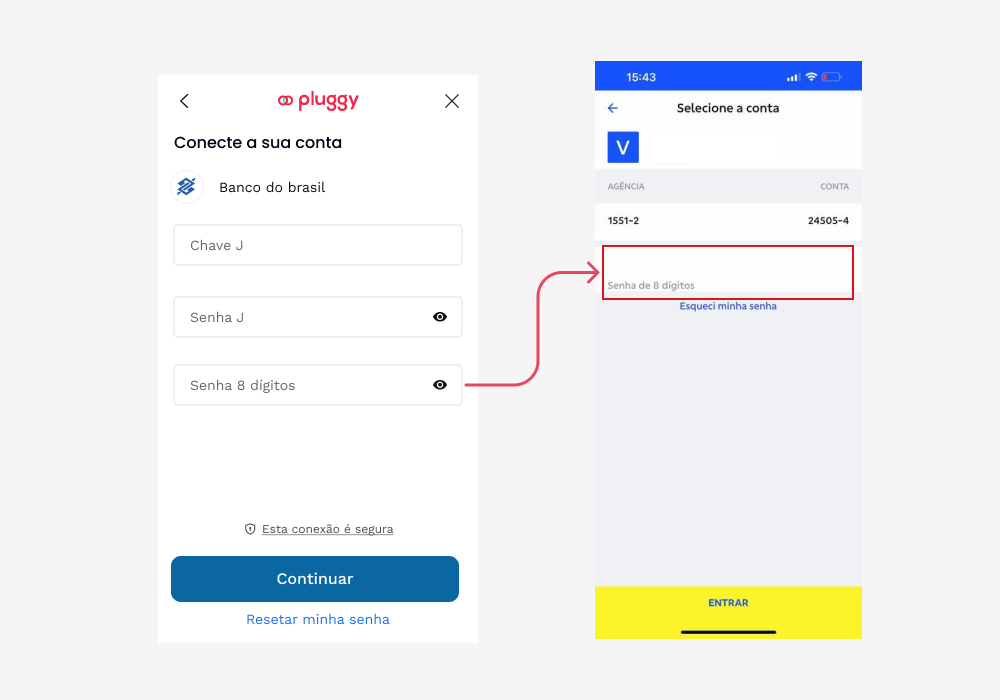
### How to connect?
1. After entering the requested credentials, click "CONECTAR" (Connect).
2. Select the registered mobile phone number and click "CONECTAR" (Connect).
🚩 To complete this step, you must have a mobile phone number registered at Banco do Brasil.
3. After step 2, a token will be sent to the chosen phone. Copy and paste the URL you received into the highlighted field. **Example of the URL received:** `https://www49.bb.com.br/sms/ato?c=aaaa1111bbbb`
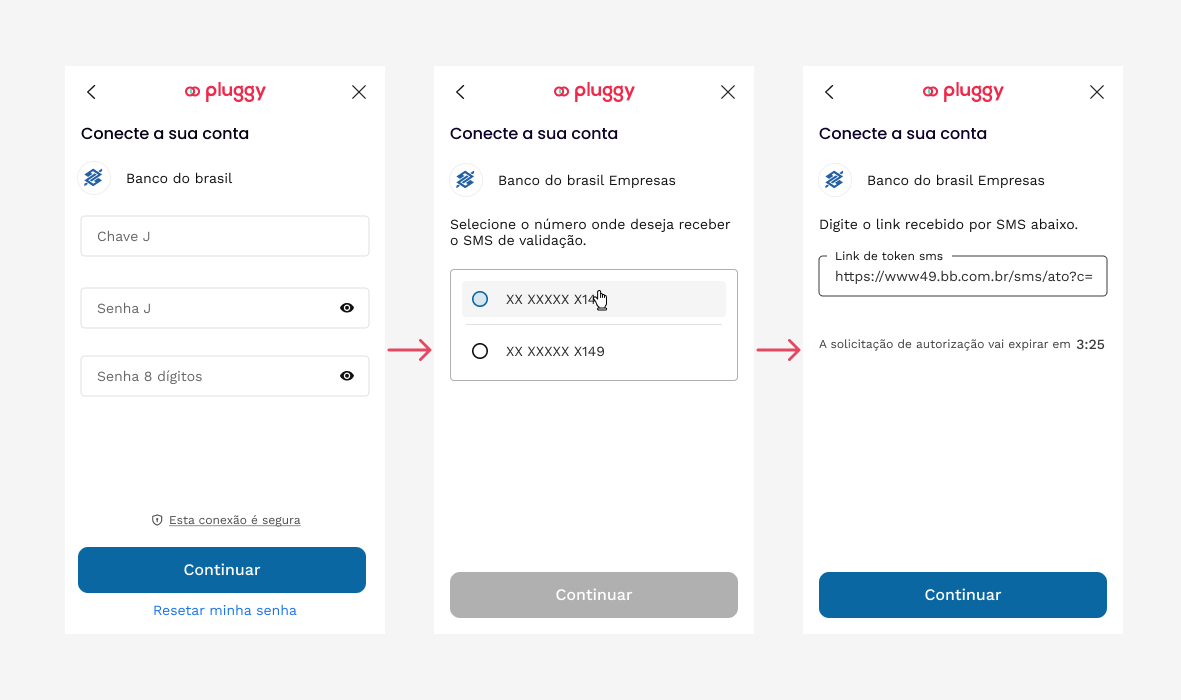
---
### Best practices for a successful connection
1. Register a mobile phone number by going to the **profile icon > atualização cadastral** (profile update)
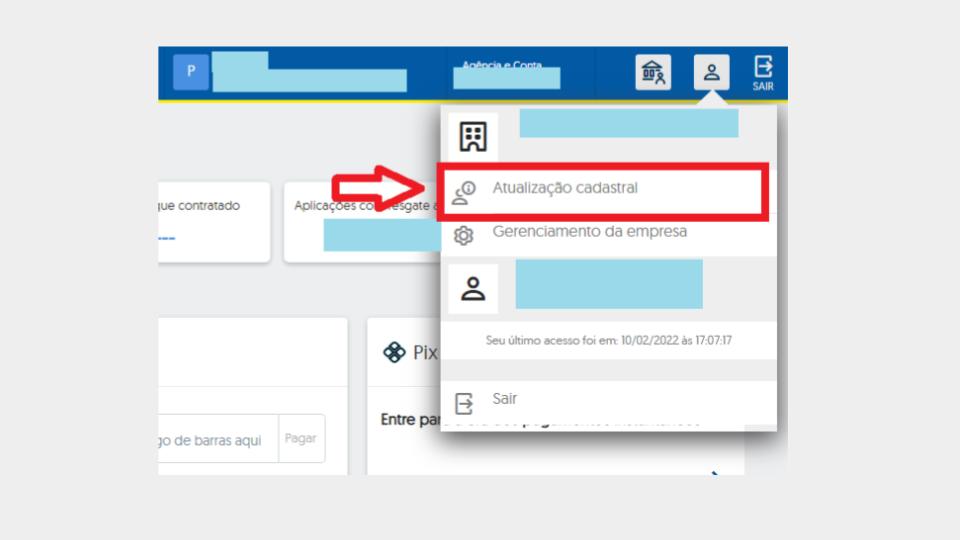
2. **Make sure the same mobile phone number is registered to receive SMS.**
Move your cursor to the left toward the menu icons and choose **Segurança > Serviço SMS > Adesão** (Security > SMS service > Enrollment).
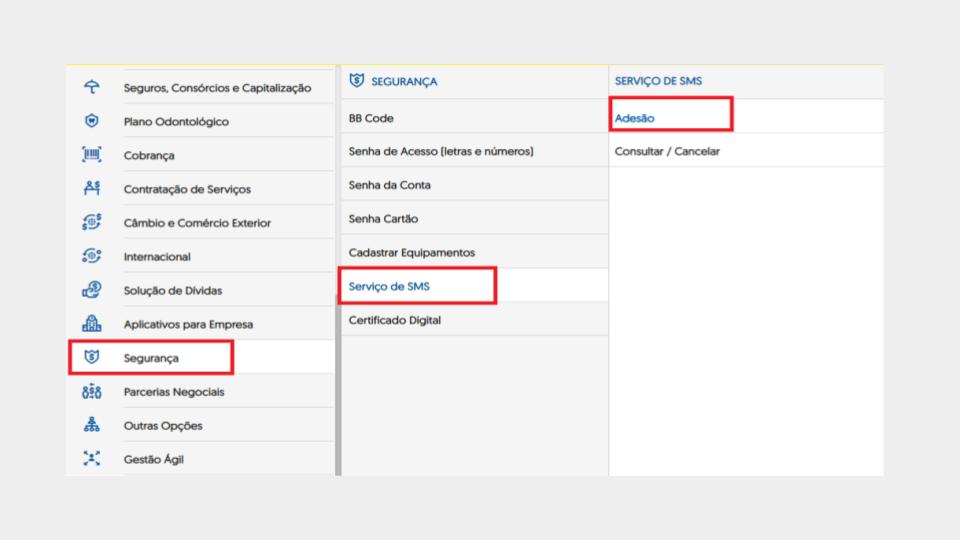
3. **Make sure your phone (the same one with the bank's app installed) is authorized at Banco do Brasil.**
To confirm this, open the menu on the left side and choose **Segurança > Cadastrar equipamentos > Autorizar e consultar smartphone/tablet** (Security > Register devices > Authorize and view smartphone/tablet).
A list with your phone model will appear — **select it and click the AUTORIZAR (Authorize) button.**
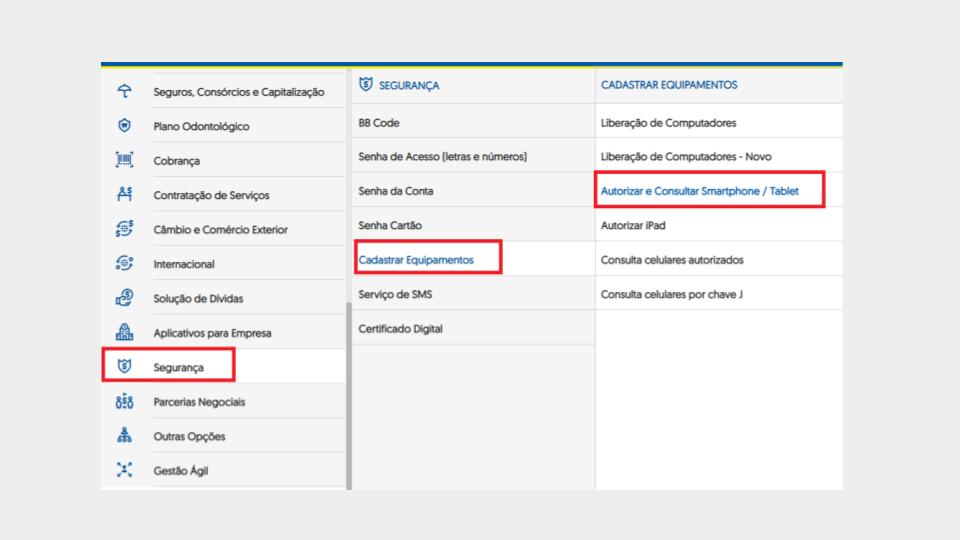
## Bradesco PJ Tutorial — Enable Mobile App Access
Source: https://docs.pluggy.ai/en/docs/developer-tools/tutorials/bradesco-pj-mobile-access.md
How to enable mobile app access for a **Bradesco Empresas** user:
1. Log in to Internet Banking using a **Master** user.
2. Go to the **Administração** (Administration) section and click **Consultar, Alterar, Bloquear/Desbloquear ou Excluir Usuários** (View, edit, block/unblock or delete users)
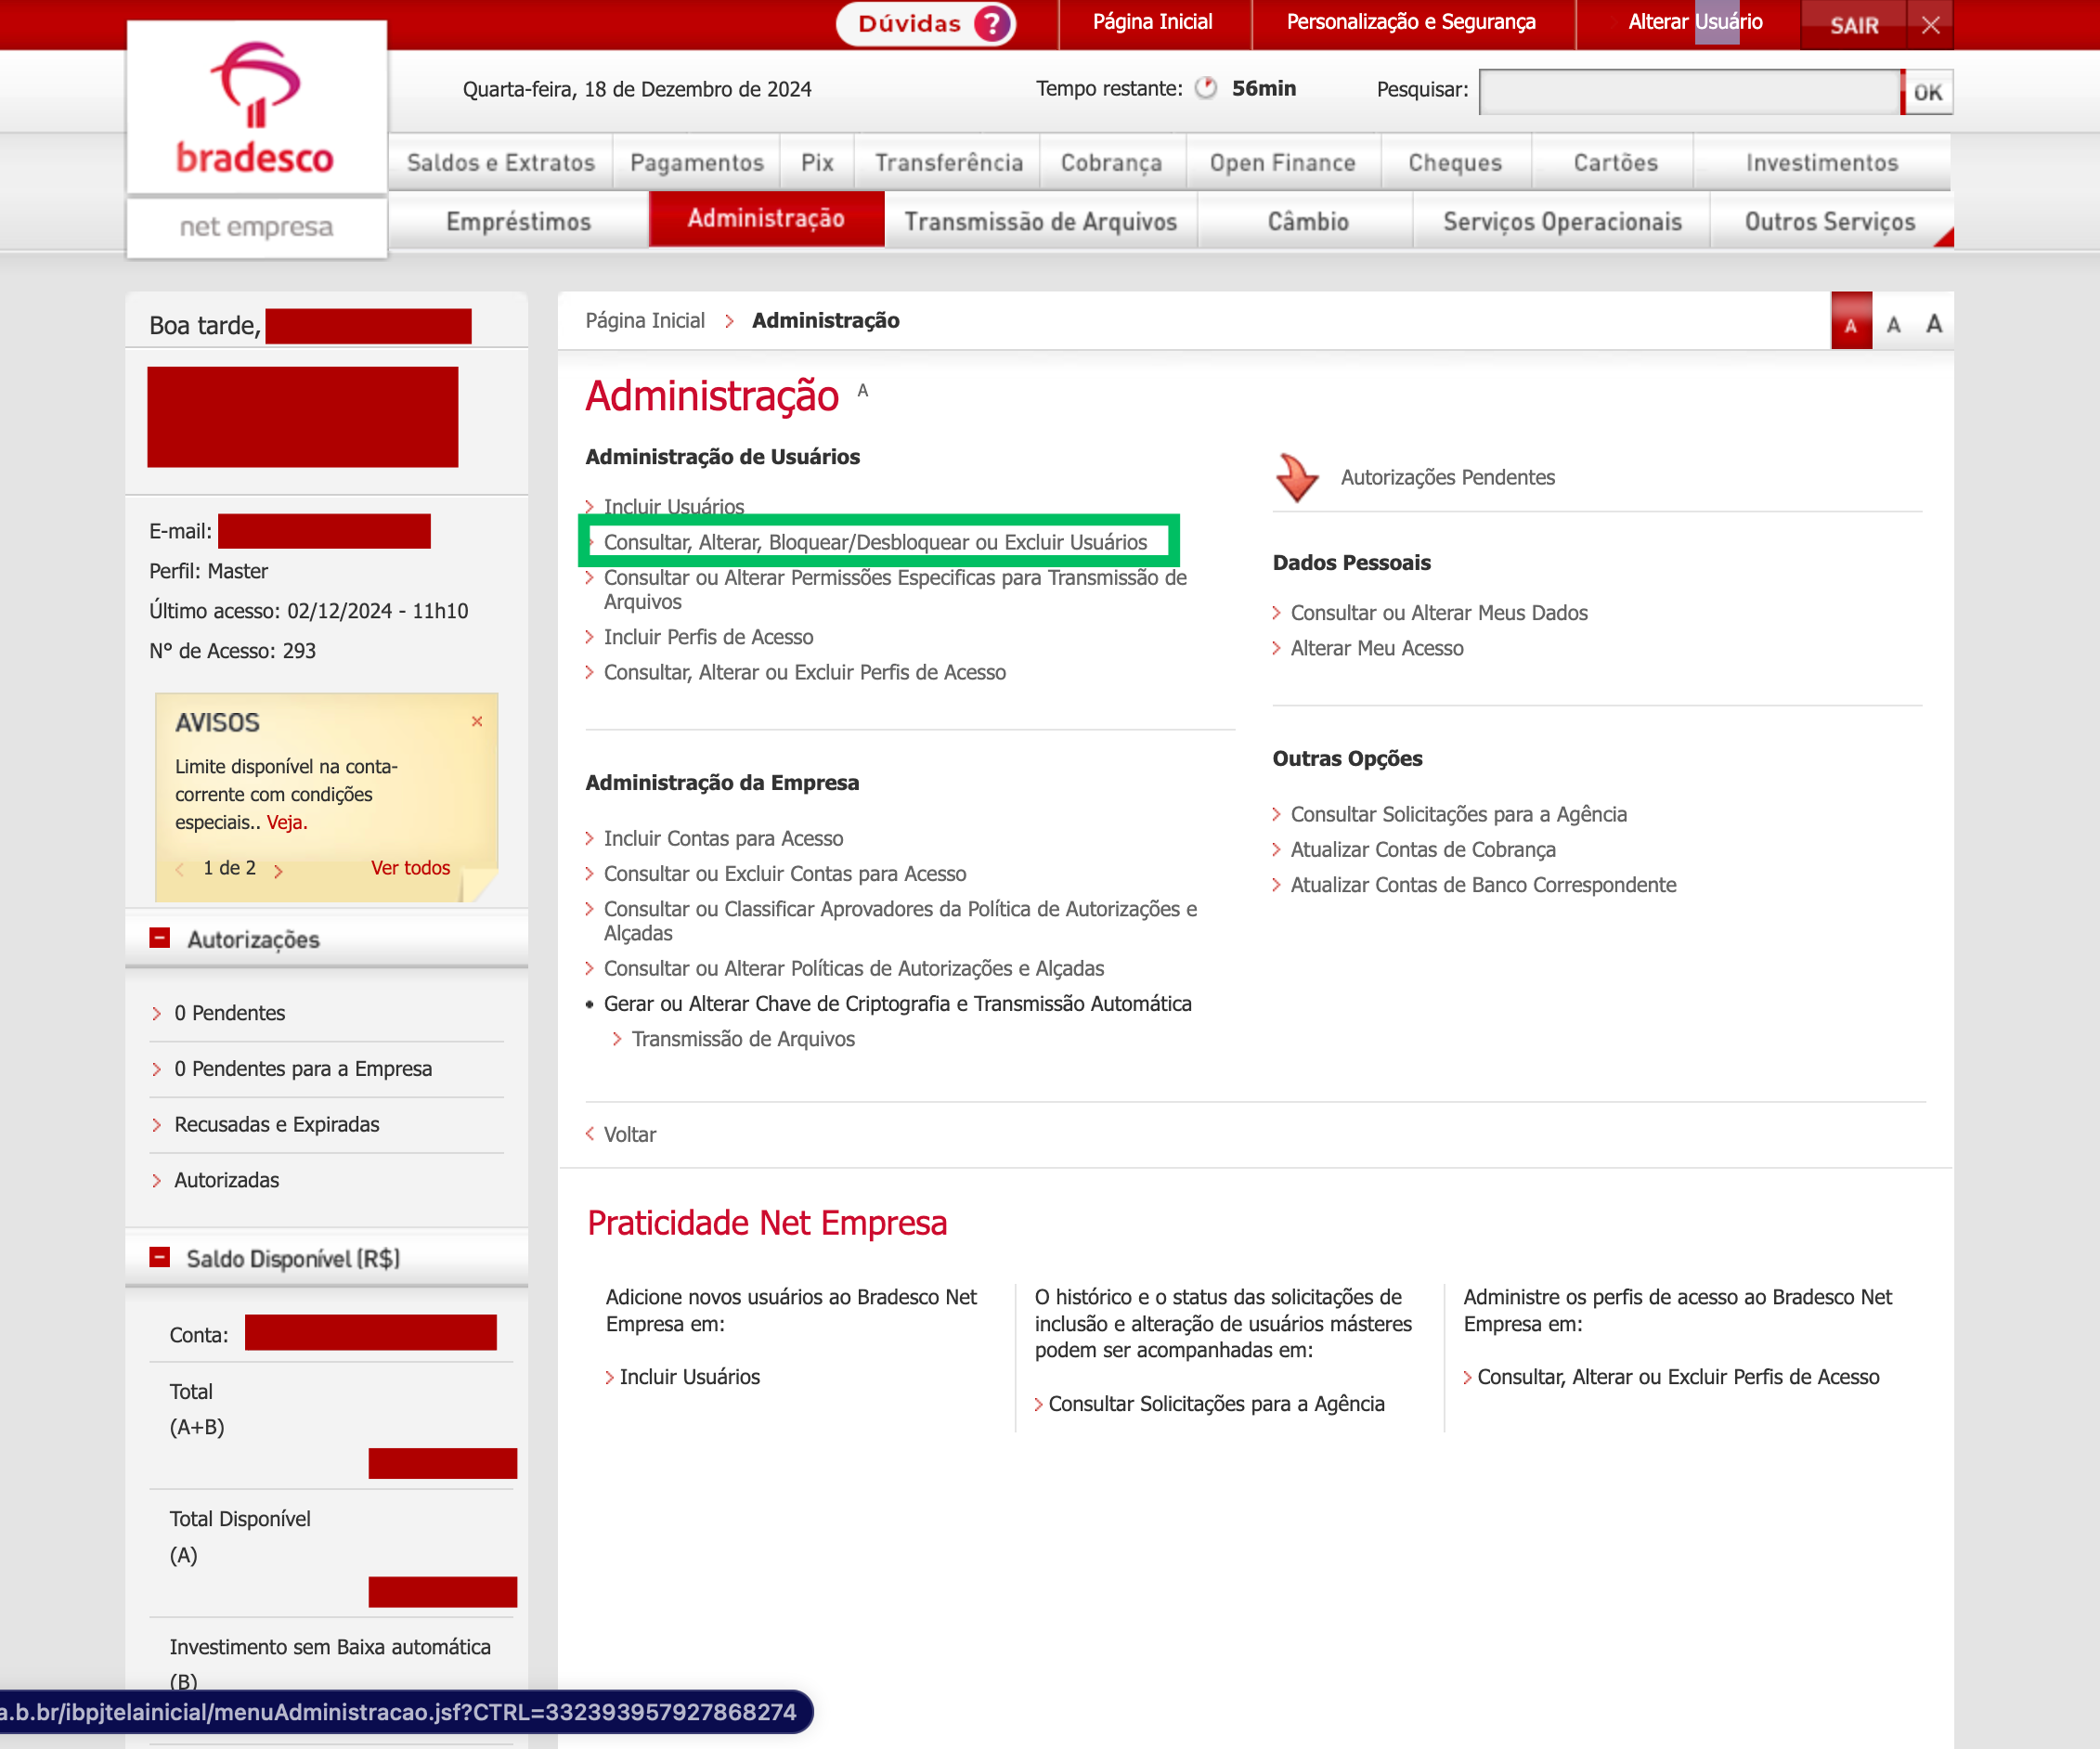
3. Click the edit button for the user you want to change
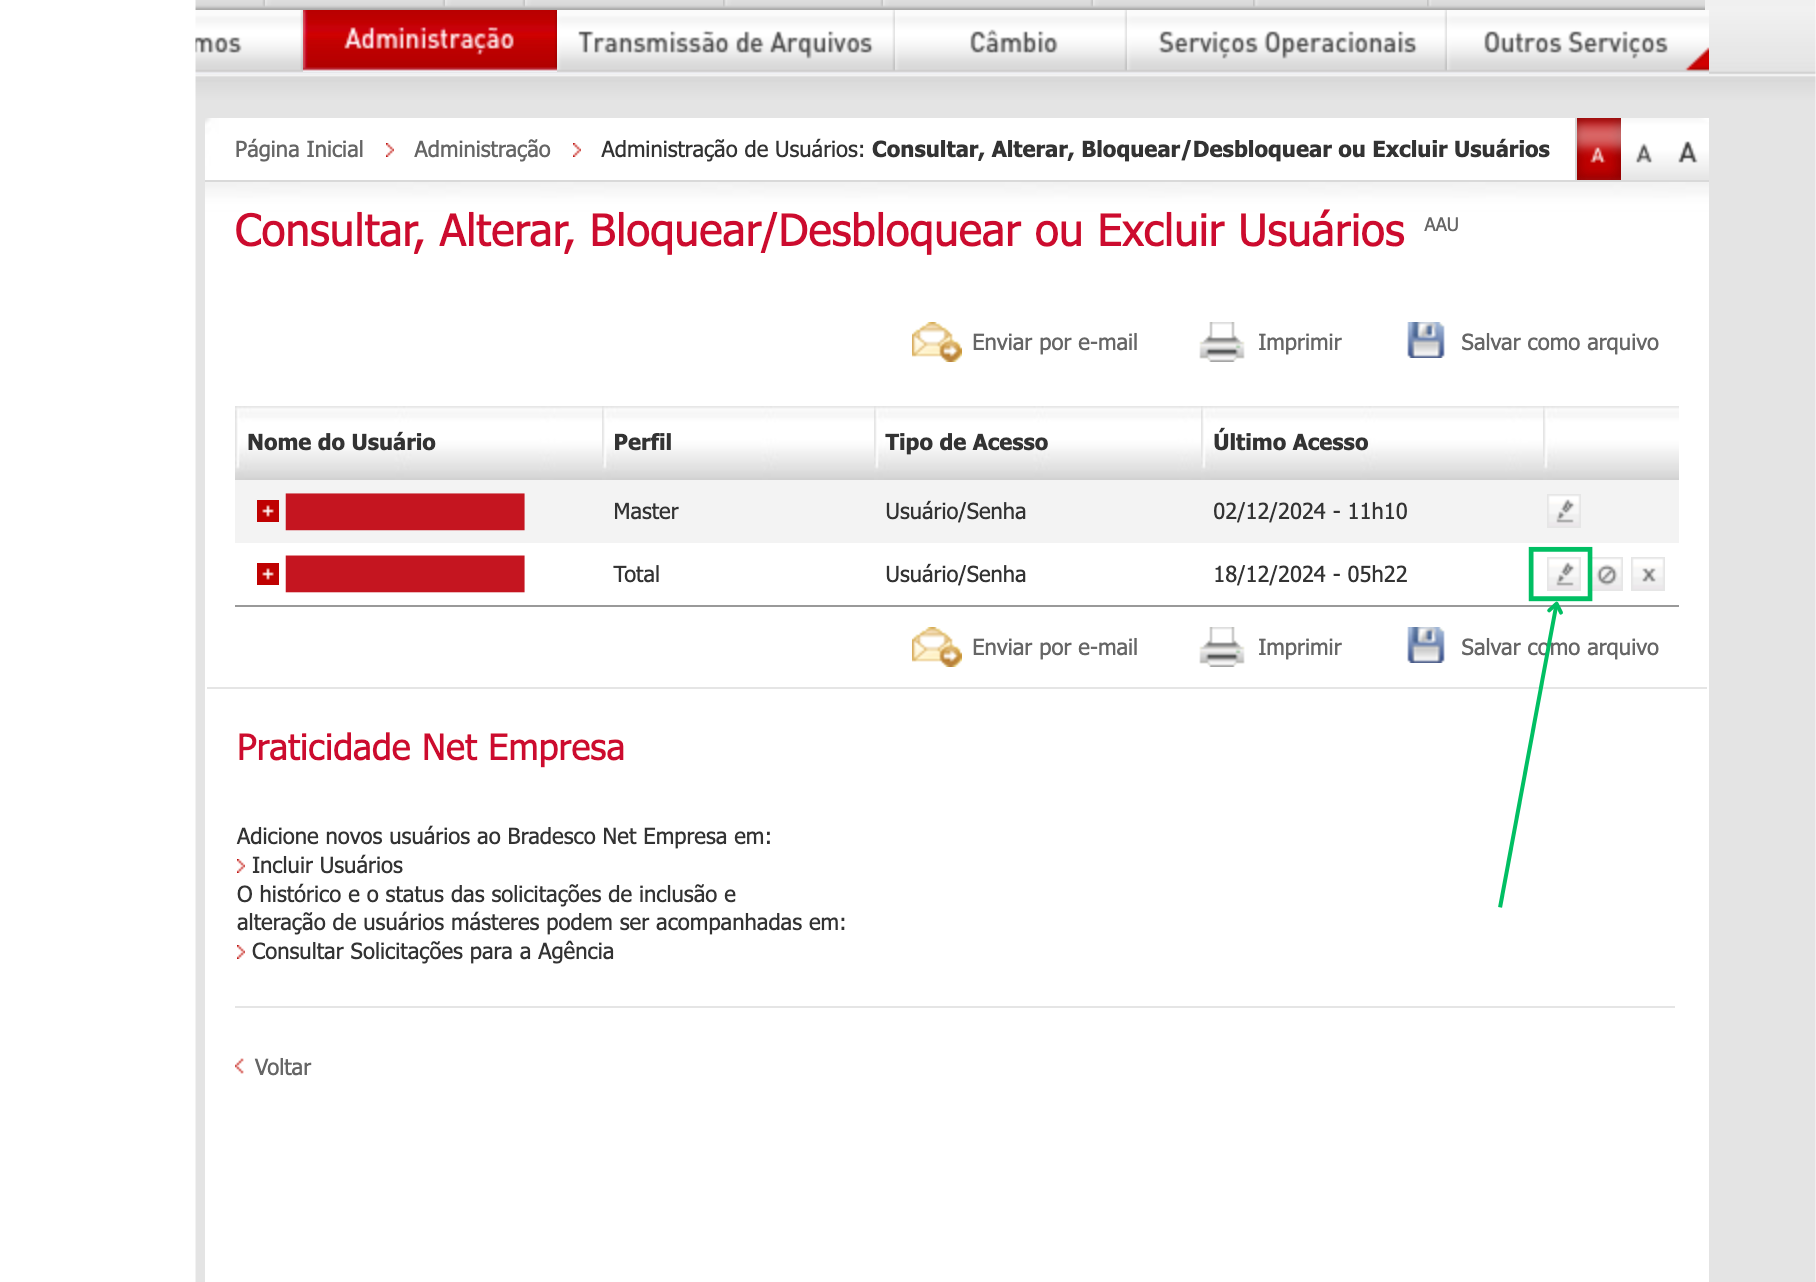
4. Select **Acesso pelo celular** (Mobile access) and **Liberar acesso ao Net Empresa pelo celular** (Enable Net Empresa access via mobile)
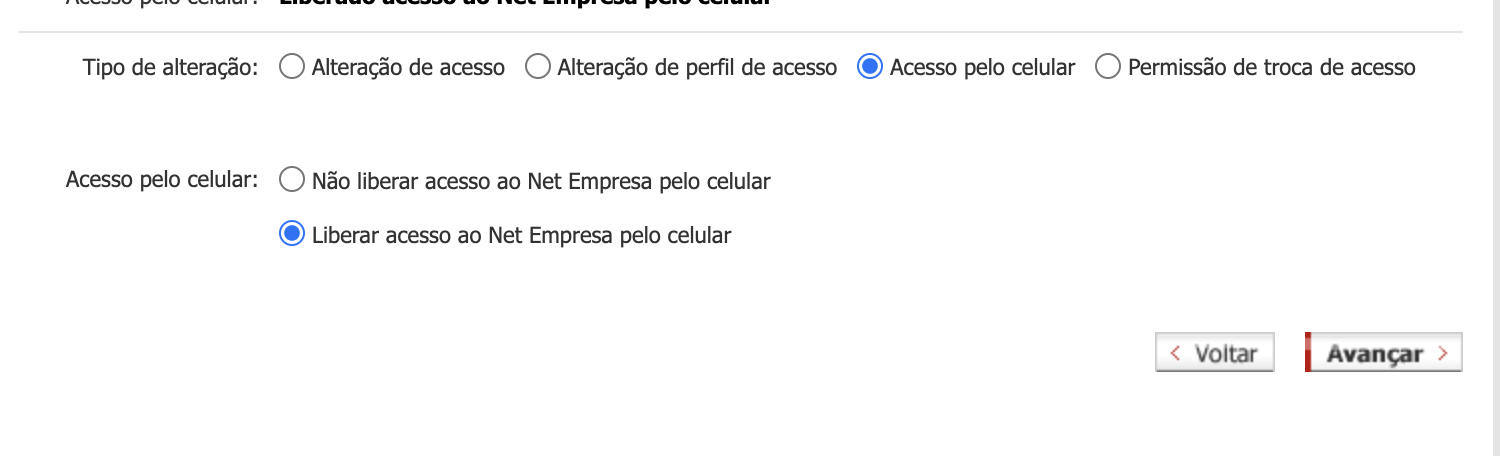
5. Save the changes
## Bradesco PJ Tutorial
Source: https://docs.pluggy.ai/en/docs/developer-tools/tutorials/bradesco-pj.md
The **Bradesco Empresas** connector first asks for your **USUÁRIO** (username) and **SENHA** (password), and after submitting them it asks for the **CHAVE DE SEGURANÇA** (security key) — **the same credentials used in Bradesco's Internet Banking and mobile app.**
> **Important**
>
> **To connect successfully, you must have the Bradesco app on your phone to generate the security key.**
---
**Usuário (username):** alphanumeric
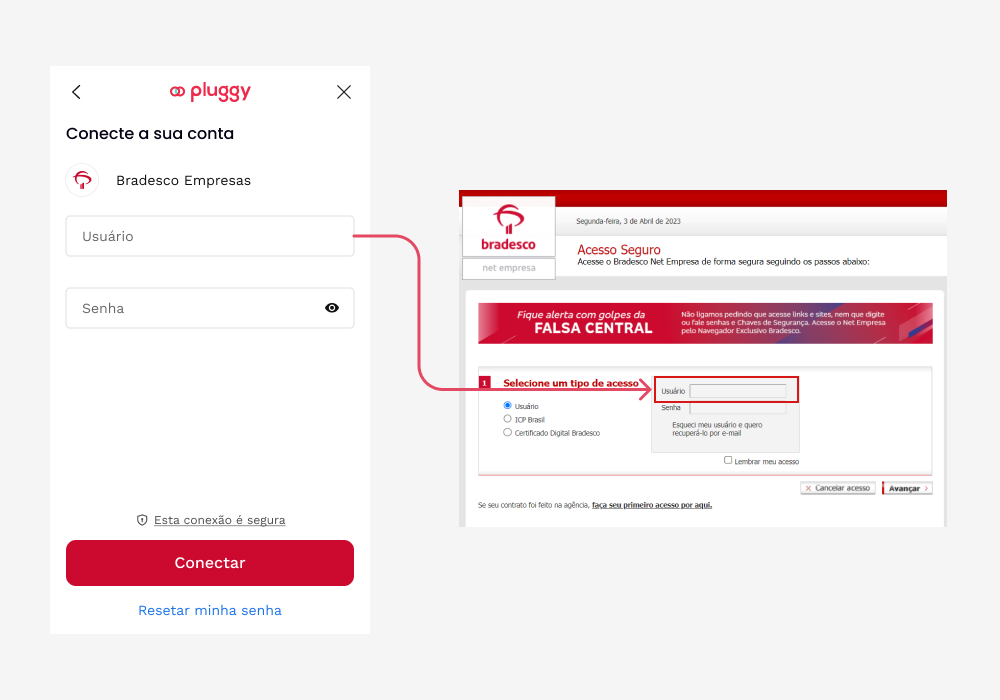
**Senha (password):** numeric
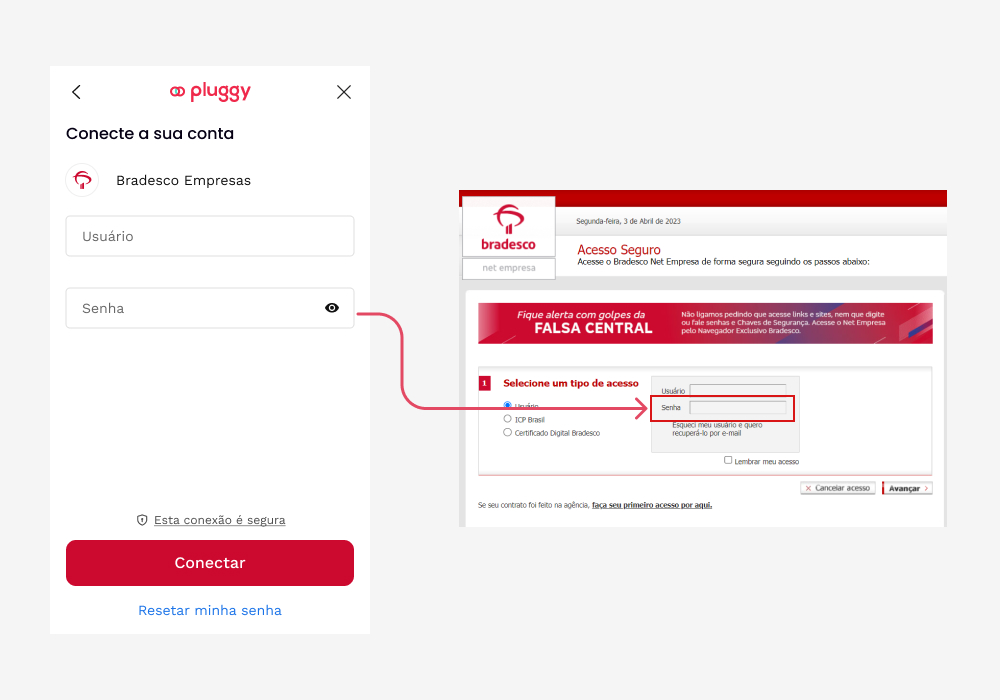
**Chave de segurança (security key):** numeric key shown on your phone's screen
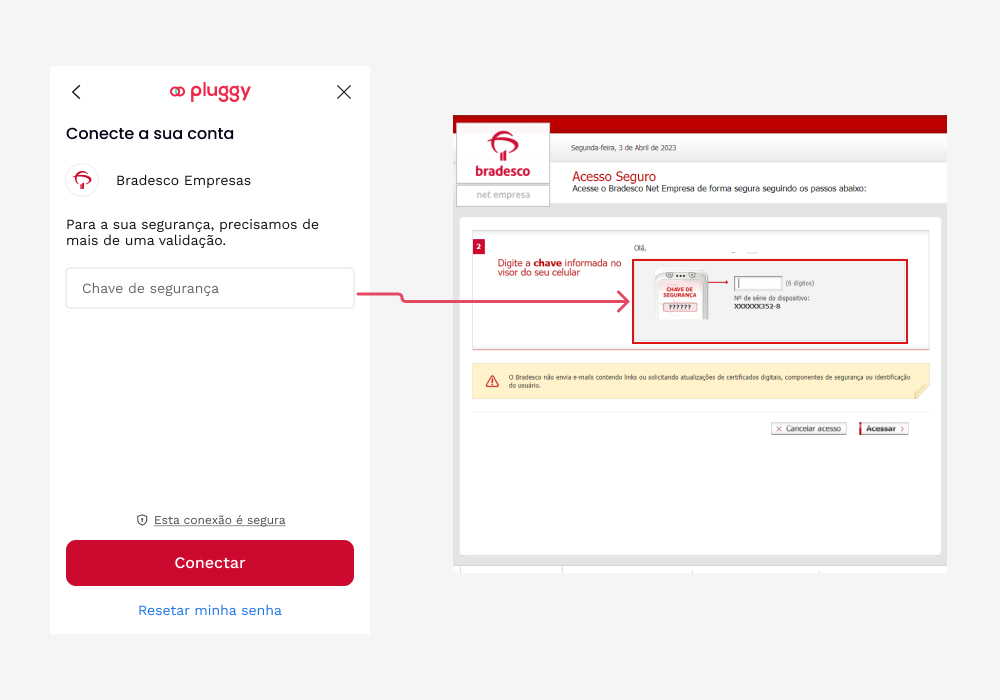
## Bradesco PF Open Finance Tutorial
Source: https://docs.pluggy.ai/en/docs/developer-tools/tutorials/bradesco-pf-of.md
> **Important**
>
> **To connect successfully, you must have the Bradesco app on your phone to generate the security key.**
---
To connect your Bradesco personal (Pessoa Física, PF) account, follow the steps below:
**Step 1 — Start the connection**
On the Bradesco connection screen:
- Enter the **account holder's CPF**
- Click the **"Conectar"** (Connect) button
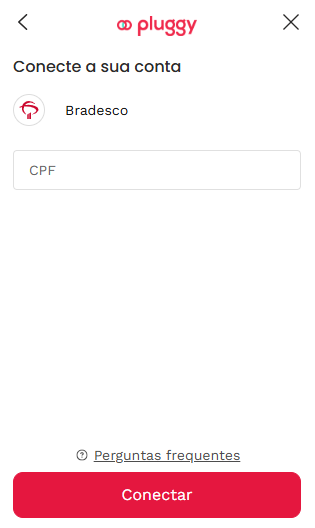
**Step 2 — Enter your account details**
- Enter your **branch and account** ("agência e conta") details
- Click **"Continuar"** (Continue)
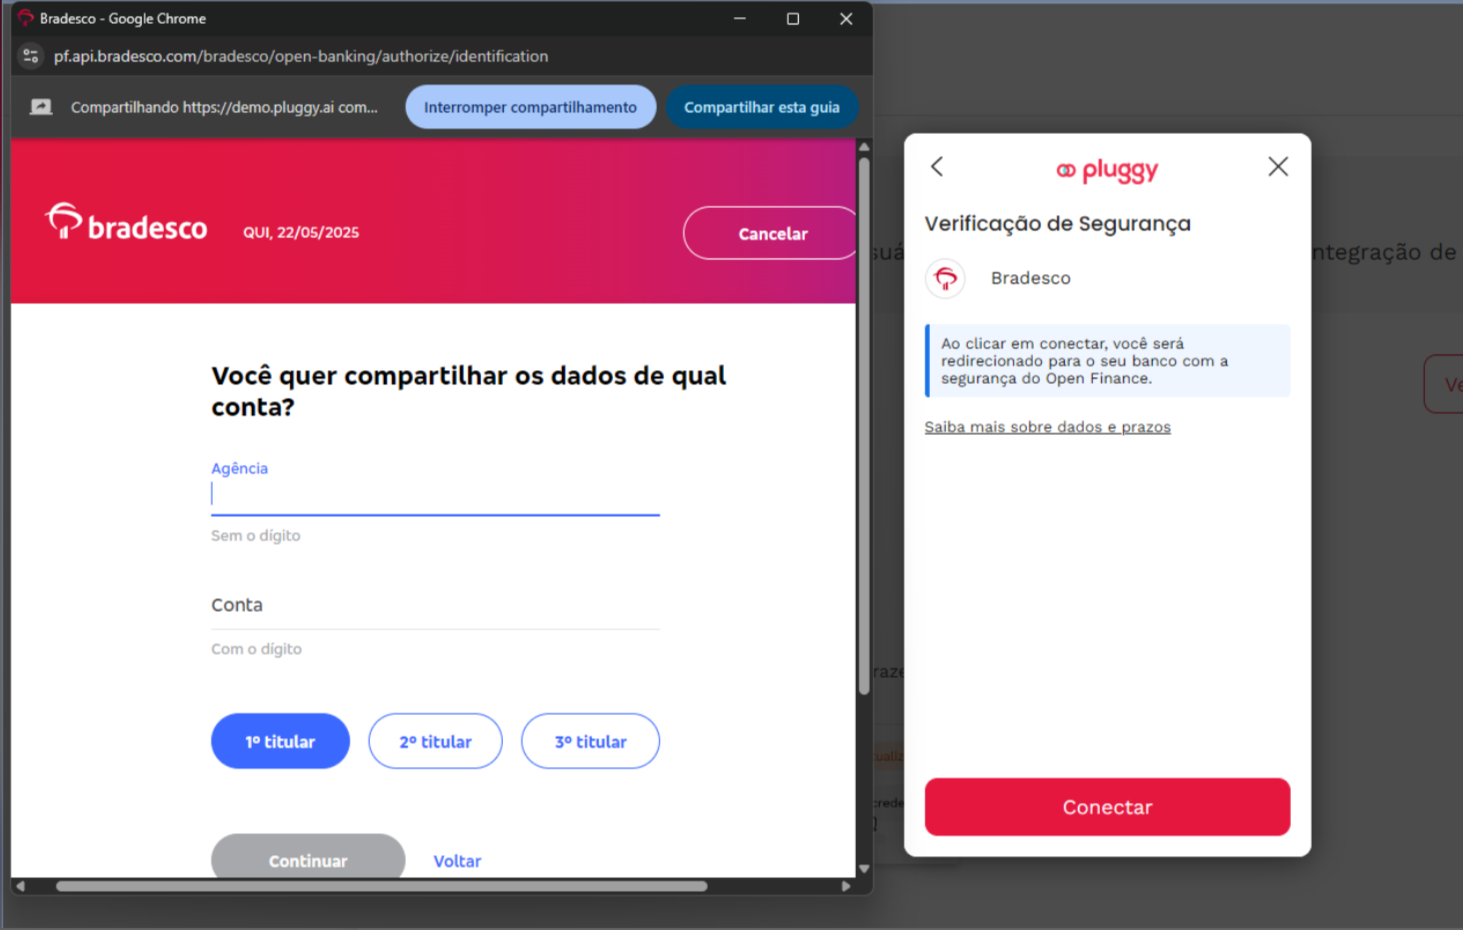
**Step 3 — Scan the QR Code**
- A QR Code will be displayed on the screen
- To proceed, you must **scan it** using the **Bradesco app on your phone**
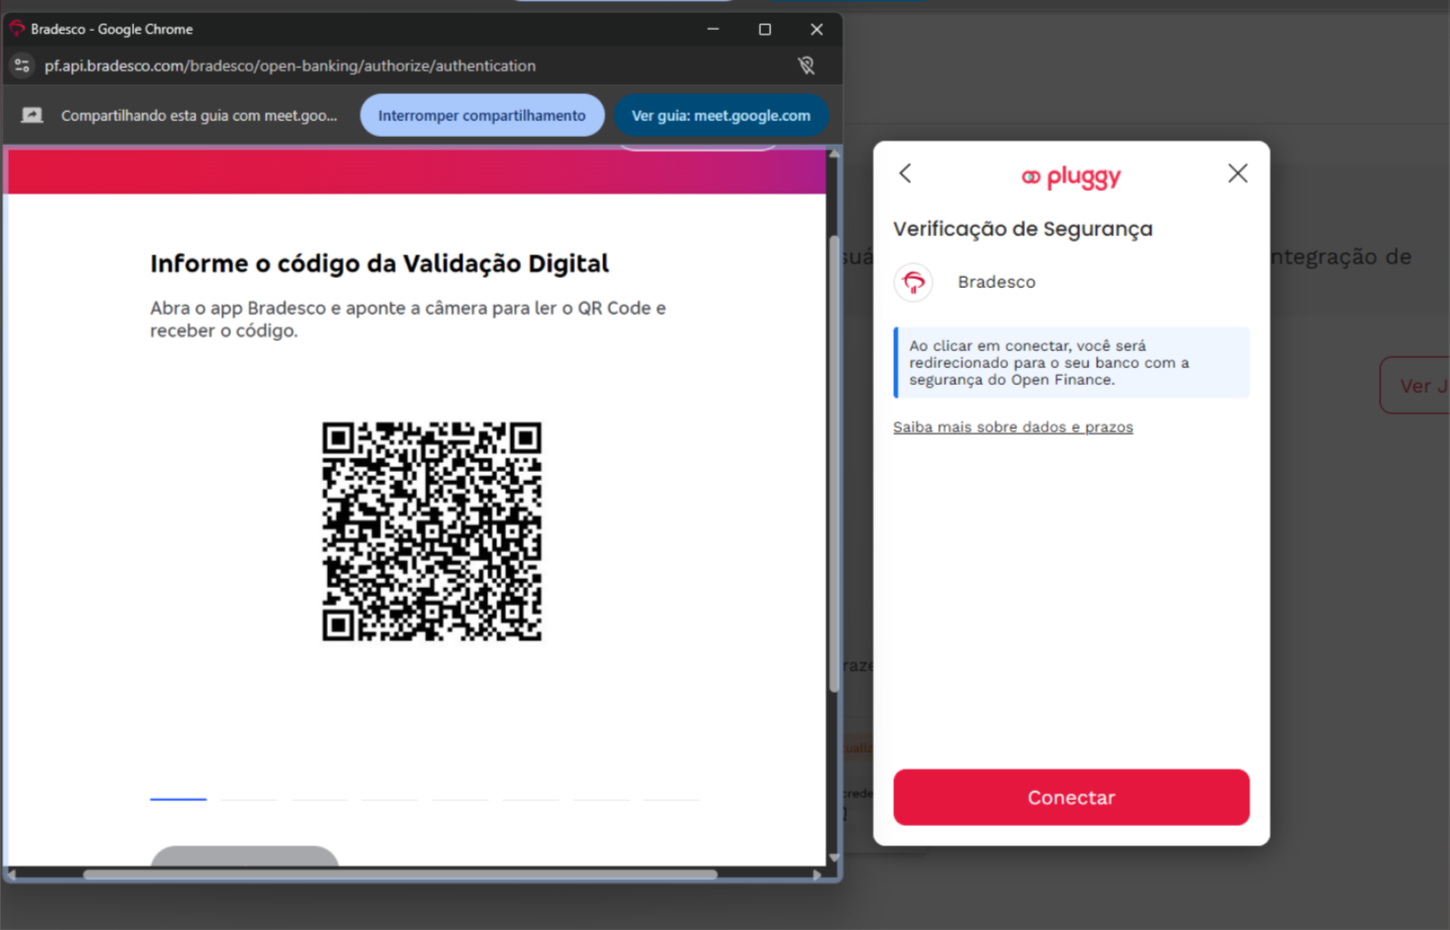
**Step 4 — Generate the code in the Bradesco app**
In the Bradesco app, follow the path below:
1. Open the **"Chave de Segurança"** (Security key) option
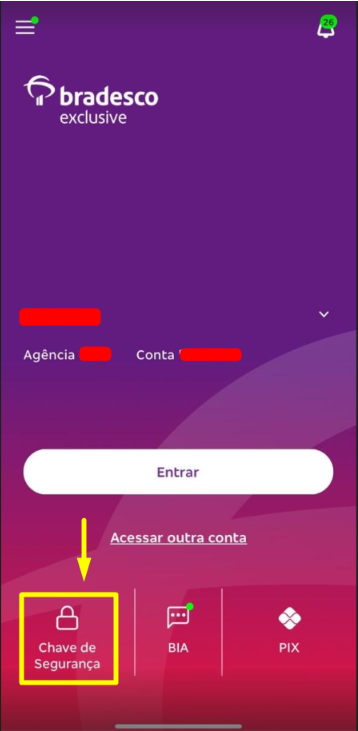
2. Select **"Validação digital"** (Digital validation)
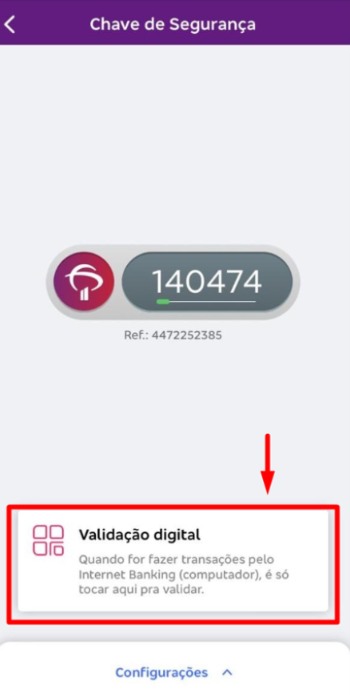
3. Scan the **QR Code** shown on the screen
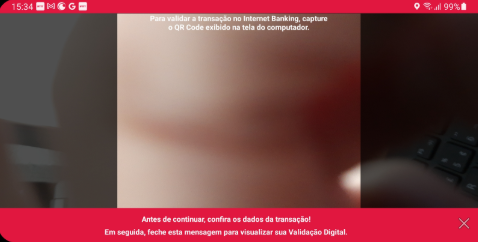
4. After scanning, a **validation code** will be generated
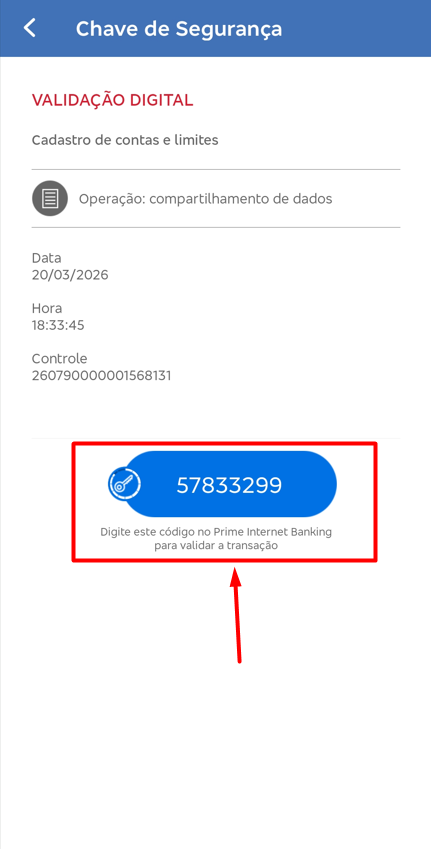
**Step 5 — Enter the validation code**
- Enter the generated code on the consent screen
- Click **"Continuar"** (Continue)
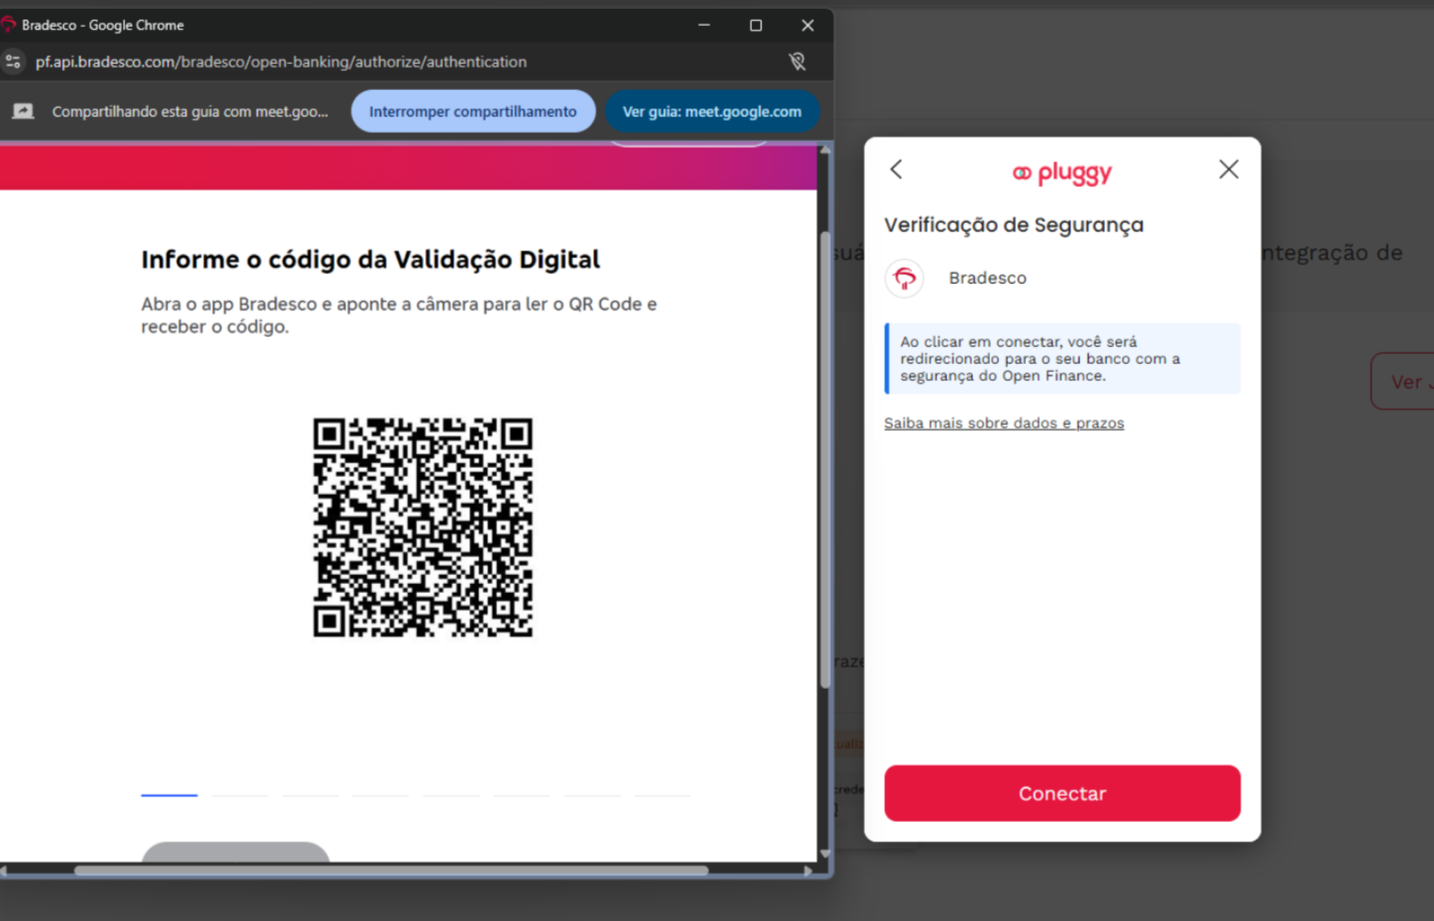
**Step 6 — Confirm with your password**
- Enter your **4-digit** Bradesco password
- Click **"Continuar"** (Continue)
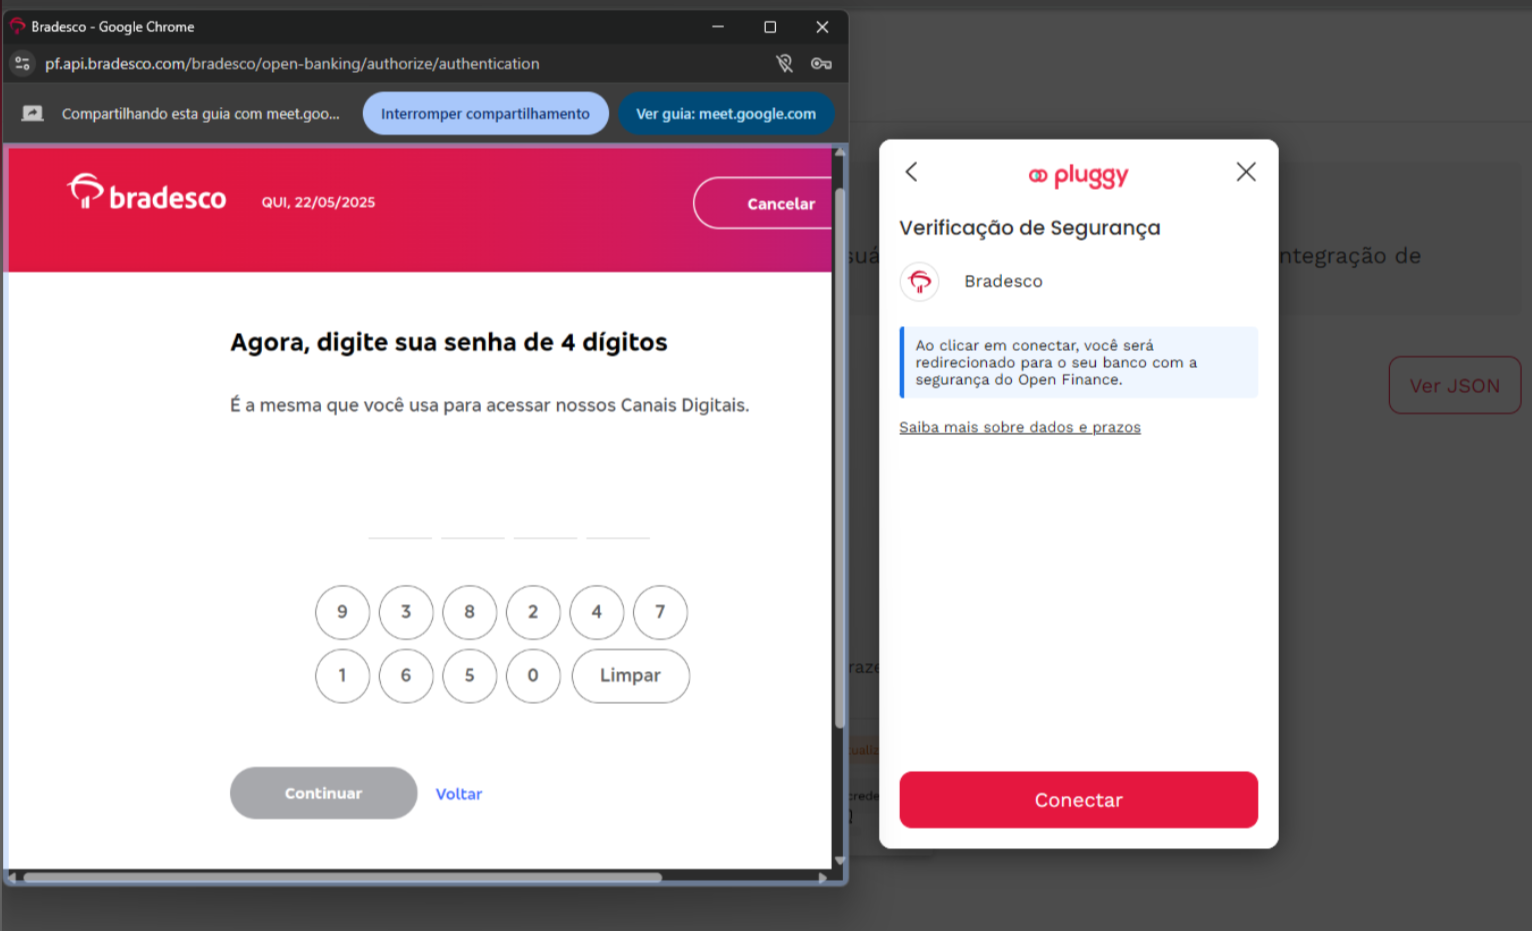
**Step 7 — Finish the consent**
- A summary of the information to be shared will be displayed
- Review the data
- Click **"Continuar"** (Continue) to confirm
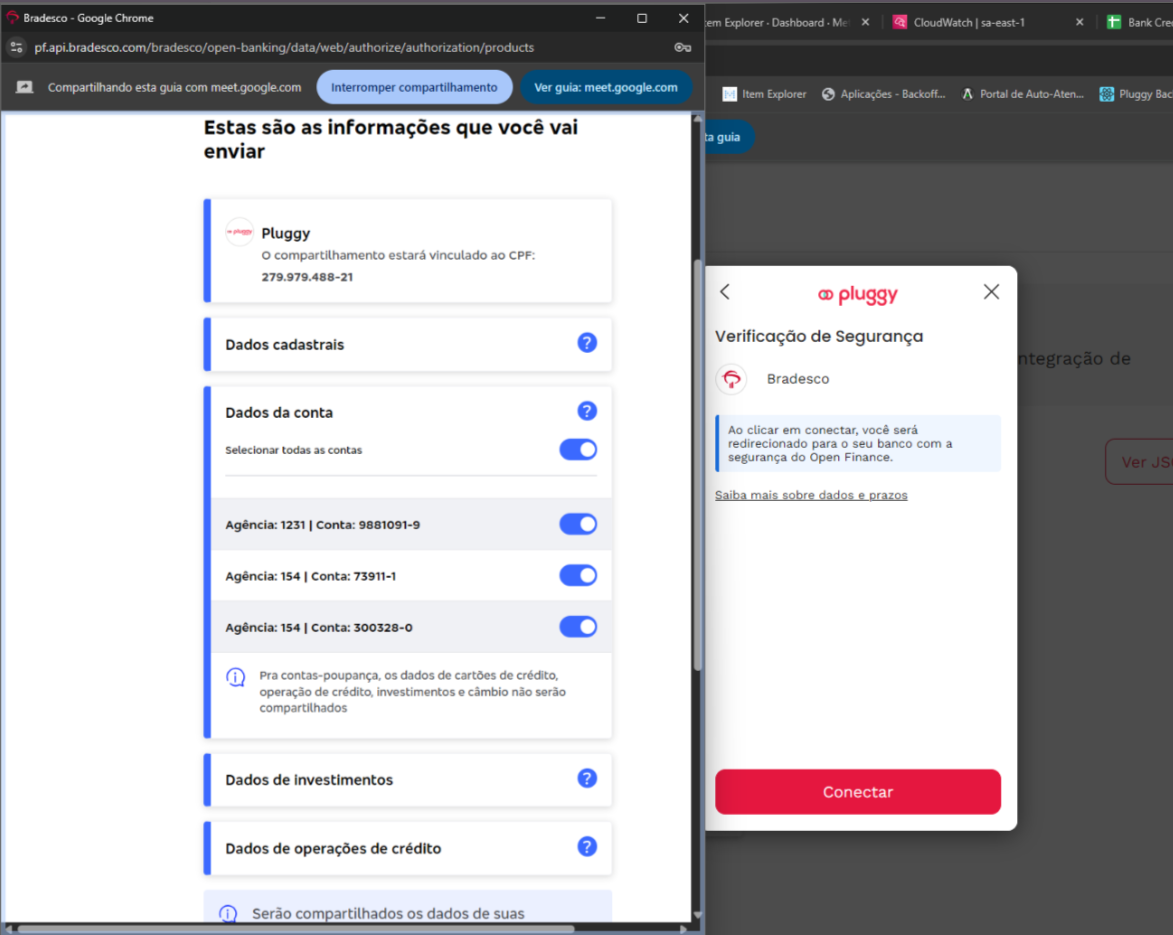
**Step 8 — Connection complete**
- You will be automatically redirected to the platform
- The connection will be completed **successfully**
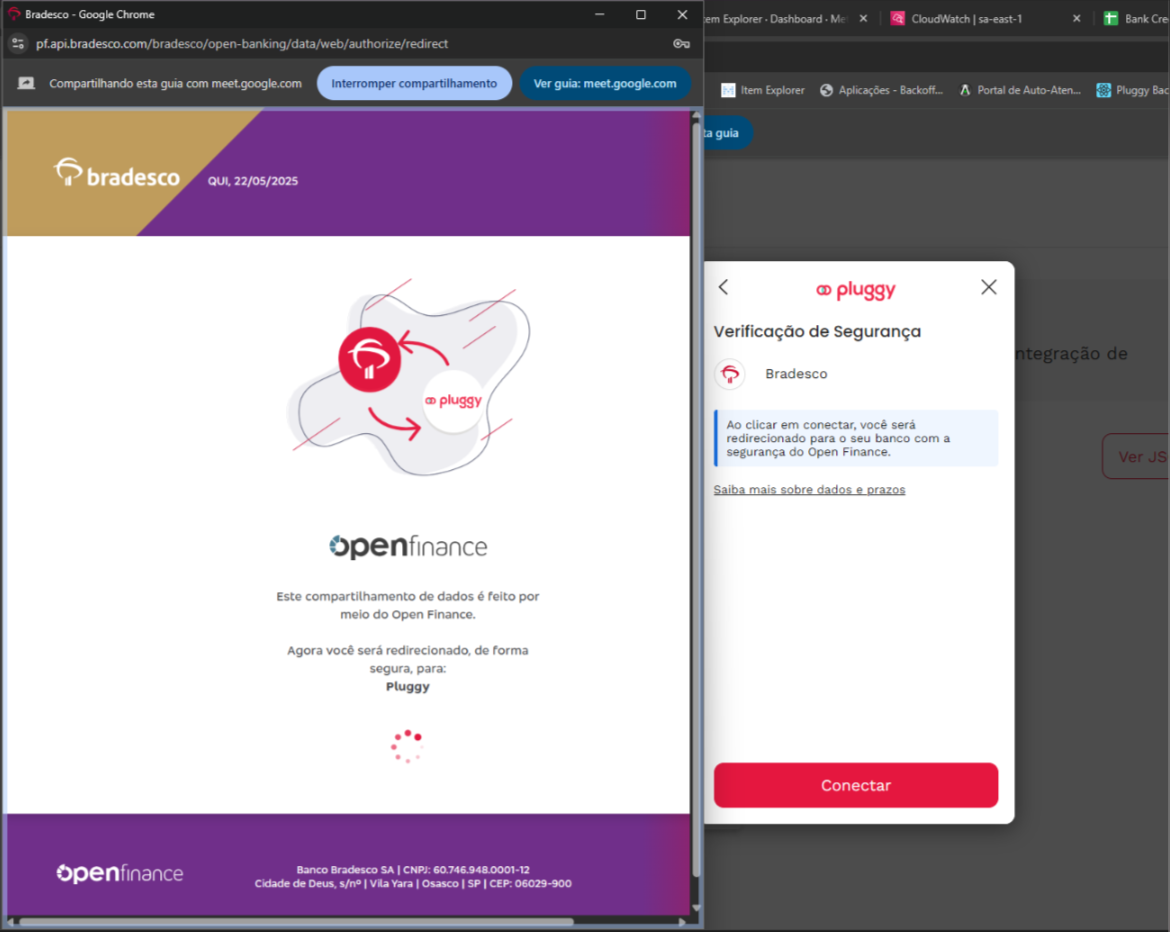
## Efí Bank PJ Tutorial
Source: https://docs.pluggy.ai/en/docs/developer-tools/tutorials/efi-pj.md
To connect Efí Bank Empresas with Pluggy, you first need to create an "authorization" to share your Efí Bank information with Pluggy.
This "authorization" is granted through a "registration" that you must create yourself inside your Efí Bank account. After creating this "registration" — which Efí Bank calls an "Integração" (Integration) — you will receive the "username and password" (Client ID and Client Secret) for it, as well as a "Certificado" (certificate). With these three pieces of information (Client ID, Client Secret and certificate) you will connect your Efí Bank Empresas account with Pluggy (see figure):
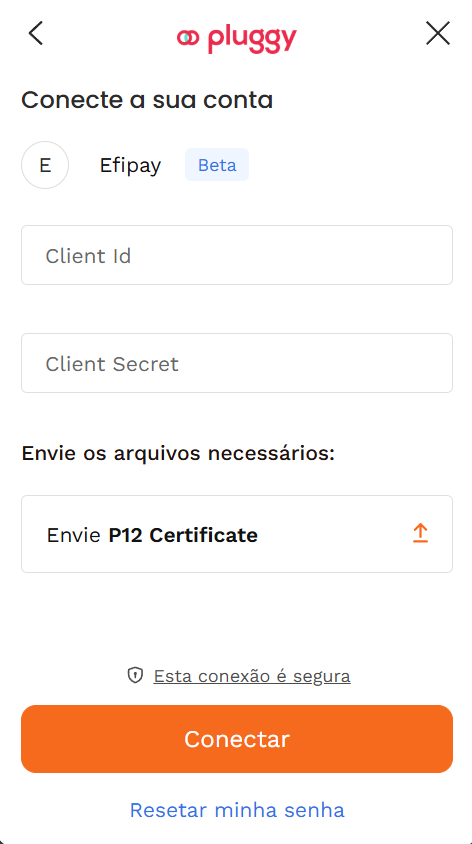
To create your application and obtain your access credentials (Client ID, Client Secret and certificate), follow the instructions below:
**Step by step**
1. Log in to your Efí Bank Empresas account [here](https://login.sejaefi.com.br/);
2. On your account's home page, open the "**API**" area in the left menu, go to the **Introdução** (Introduction) option and click "**Criar aplicação**" (Create application);
3. On the "**Criar aplicação**" (Create application) page, enter a name of your choice in the "**Nome da aplicação**" (Application name) field and click the "Continuar" (Continue) button;
4. On the "Selecione os escopos" (Select the scopes) page, you must define the integration scope. To do so, expand the "**API Extratos**" menu and select the options shown in the image, then expand the "**API Pix**" menu and select the options: "Consultar saldo" (View balance), "Solicitar relatórios" (Request reports) and "Consultar relatórios" (View reports).
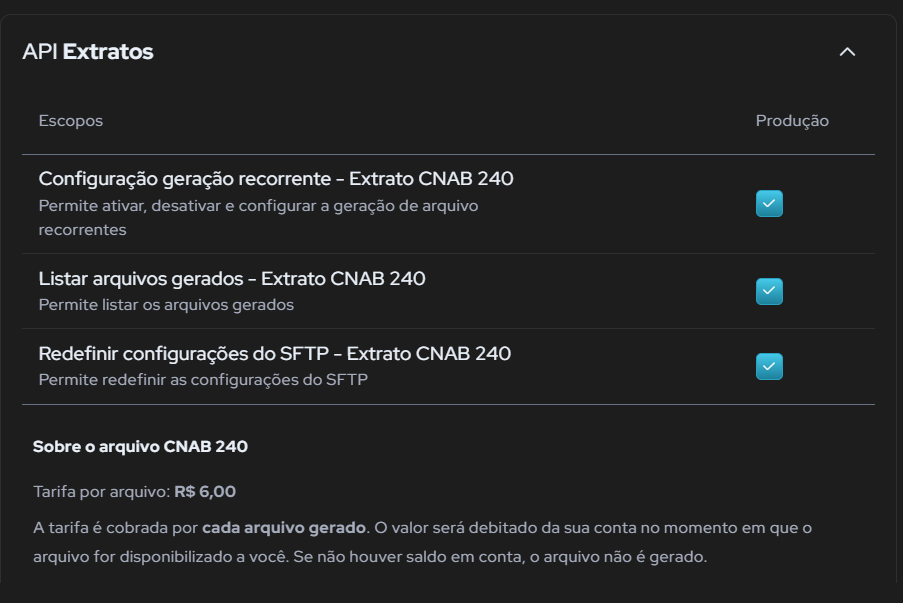
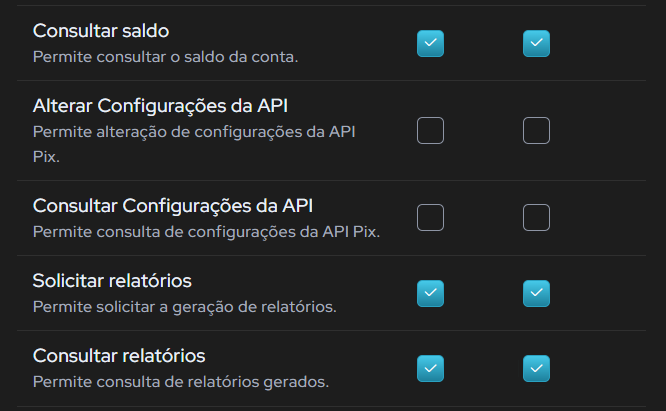
5. After selecting the options, click the "Continuar" (Continue) button.
6. An "**Assinatura eletrônica**" (Electronic signature) screen will be displayed. Just enter the code and click the "Continuar" (Continue) button.
7. After entering the code, the "**Sua aplicação foi criada.**" (Your application has been created.) screen will be displayed. At this point, you can copy your Client ID and Client Secret.
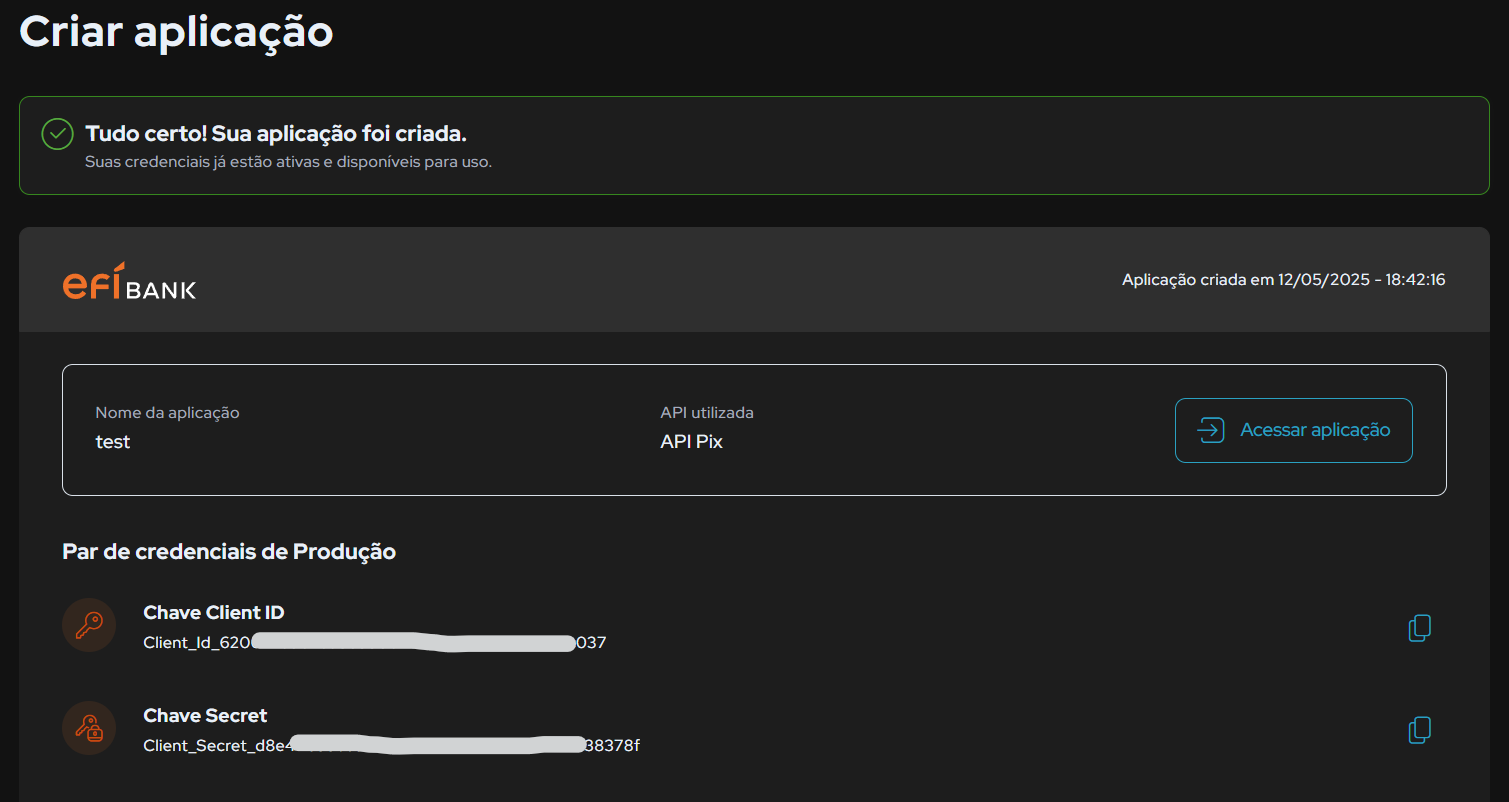
8. To create the certificate, open the "**Meus certificados**" (My certificates) area in the left menu and click "**Criar novo certificado**" (Create new certificate);
9. On the "**Criar novo certificado**" (Create new certificate) screen, enter a name of your choice in the "**Nome do certificado**" (Certificate name) field and click the "Criar certificado" (Create certificate) button;
10. After authenticating via QR Code, you will be able to download the certificate in p12 format.
11. Now just open the Pluggy Widget, paste the "Client ID" and "Client Secret" into the corresponding fields, upload the p12 certificate file and click the orange "Conectar" (Connect) button to connect your Efí Bank Empresas information with Pluggy.
> **Important**
>
> Due to Efí Bank limitations, transactions will be synced 1 day after the connection is created.
## Authentication
Source: https://docs.pluggy.ai/en/docs/reference/authentication.md
Every request carries one credential in the `X-API-KEY` header. There are two kinds, issued by two endpoints, and the difference between them is scope.
| Credential | Issued by | Lives | Reaches |
| --- | --- | --- | --- |
| **API Key** | [`POST /auth`](/reference/auth/auth-create) | 2 hours | Every endpoint. Server-side only. |
| **Connect Token** | [`POST /connect_token`](/reference/auth/connect-token-create) | 30 minutes | The Item it was issued for and a reduced view of its Accounts. Safe to hand to a client. |
## API Key
```http
POST https://api.pluggy.ai/auth
Content-Type: application/json
{ "clientId": "…", "clientSecret": "…" }
```
Response `200`:
```json
{ "apiKey": "…" }
```
`clientId` and `clientSecret` come from the [Dashboard](https://dashboard.pluggy.ai). They identify your application, so `POST /auth` belongs on your server and nowhere else. A `401` with `codeDescription` `CLIENT_KEYS_UNAUTHORIZED` means the pair is wrong; `CLIENT_DISABLED` means the application is switched off.
The key expires **2 hours** after it is issued. Reuse it until then — `POST /auth` has its own [rate limit](/reference/rate-limits), and requesting a key per call is the usual way to hit it.
## Connect Token
```http
POST https://api.pluggy.ai/connect_token
X-API-KEY: {apiKey}
Content-Type: application/json
{
"itemId": "…",
"options": {
"clientUserId": "…",
"webhookUrl": "https://…",
"oauthRedirectUri": "https://…",
"avoidDuplicates": true
}
}
```
Response `200`:
```json
{ "accessToken": "…" }
```
Everything in the body is optional. `itemId` scopes the token to an existing Item, for an update. `options` are applied to every Item created with the token:
| Option | Effect |
| --- | --- |
| `clientUserId` | Your identifier for the end user, stored on the Item and echoed in every `item/*` webhook. |
| `webhookUrl` | Where the events of those Items are delivered. |
| `oauthRedirectUri` | Where the user lands after an OAuth connect flow. |
| `avoidDuplicates` | Do not create a second Item for credentials that already have one. |
The only keys read at the root of the body are `itemId` and `options`. A `clientUserId` sent at the root is discarded — the call still returns `200`, and the Items end up with `clientUserId: null`. Backfill an affected Item with [`PATCH /items/{id}`](/reference/items/items-update).
The token expires **30 minutes** after it is issued. Issue one per connection: a new one each time you create or update an Item.
## Scope
A Connect Token is sent exactly like an API Key, in `X-API-KEY`. It can call [`GET /items/{id}`](/reference/items/items-retrieve) for its own Item and [`GET /accounts?itemId=`](/reference/account/accounts-list) with a reduced view of the data; anything else returns `403`. A token issued for one Item cannot read another, including Items created earlier with a different token.
## The flow, end to end
1. Your server calls `POST /auth` with `clientId` and `clientSecret` and keeps the API Key.
2. Your server calls `POST /connect_token` with that key and hands the `accessToken` to your client.
3. Your client — the [Connect Widget](/docs/connect-widget/introduction) or your own UI — creates or updates the Item with the token.
4. Your server reads the Item's data with the API Key.
Read the guide: [Authentication](/docs/authentication).
## Basic Concepts
Source: https://docs.pluggy.ai/en/docs/reference/basic-concepts.md
## Base URL
```
https://api.pluggy.ai
```
One environment. Test against the [Sandbox connectors](/docs/guides/sandbox) rather than a separate host.
## Transport
HTTPS with TLS 1.2 or later. Connections negotiating an older TLS version are rejected.
## Requests
REST over JSON. Send `Content-Type: application/json` on every request with a body, and the credential in `X-API-KEY` — see [Authentication](/reference/authentication). Verbs mean what they say: `GET` reads, `POST` creates, `PATCH` updates, `DELETE` removes.
## Responses
JSON. The API evolves without versions by **adding** fields to responses; nothing is removed or renamed. Your client has to accept and ignore fields it does not know — most HTTP libraries do by default, a strict deserializer may not.
Errors share one shape, whatever the endpoint:
```json
{
"code": 401,
"codeDescription": "CLIENT_KEYS_UNAUTHORIZED",
"message": "Client keys are invalid"
}
```
`code` repeats the HTTP status; `codeDescription`, when present, is the stable identifier to branch on; `message` is for people. Some errors add a `data` object. The status codes are listed in [Error Codes](/reference/error-codes).
## Pagination
Two models are in use. The `v2` endpoints paginate with a cursor; every other list endpoint still paginates by page number.
Cursors are how this API paginates from here on, and page-number pagination is being phased out. Where a `v2` cursor endpoint exists, write your integration against it.
### Cursor (`v2` endpoints)
Ask for the first page with your filters. The response carries the records and `next`: a ready-made query string for the following page.
```http
GET https://api.pluggy.ai/v2/transactions
?accountId={ACCOUNT_ID}
X-API-KEY: {apiKey}
```
```json
{
"results": [],
"next": "?accountId={ACCOUNT_ID}&after={CURSOR}"
}
```
| Field | Meaning |
| --- | --- |
| `results` | The records of this page. |
| `next` | The query string of the next page, or `null` on the last one. |
To continue, append `next` to the endpoint path exactly as received — it already carries your filters and the `after` cursor:
```http
GET https://api.pluggy.ai/v2/transactions
?accountId={ACCOUNT_ID}
&after={CURSOR}
X-API-KEY: {apiKey}
```
Never build or decode `after` yourself: the value is opaque and only valid as returned. A `null` `next` means there is nothing more to read. Cursor pagination is available on [`GET /v2/transactions`](/reference/transaction/transactions-list-by-cursor) and [`GET /v2/items`](/reference/items/items-list-by-cursor) — the latter is opt-in per team; ask support to enable it.
### Page number (other list endpoints)
Investments, investment transactions, payment customers, recipients and requests, and Smart Transfer pre-authorizations paginate by page:
```http
GET https://api.pluggy.ai/investments
?itemId={ITEM_ID}
&page=2
&pageSize=500
X-API-KEY: {apiKey}
```
```json
{
"total": 200,
"totalPages": 15,
"page": 1,
"results": []
}
```
| Field | Meaning |
| --- | --- |
| `total` | Records matching the request, across all pages. |
| `totalPages` | Pages needed to read them all. |
| `page` | The page in this response. |
| `results` | The records of this page. |
Two query parameters drive it: `page` (default `1`) and `pageSize` (default `500` where the endpoint accepts it — check the endpoint). To read everything, request `page=1`, then `page=2` … up to `totalPages`.
Every list endpoint outside `v2` paginates this way today, and these are expected to gain cursor equivalents. Keep the paging logic in one place in your integration: moving an endpoint across is then a change in one function rather than at every call site.
The page-based [`GET /transactions`](/reference/transaction/transactions-list) is available only until **2026-12-31**. Move to [`GET /v2/transactions`](/reference/transaction/transactions-list-by-cursor), which paginates by cursor as above.
Read the guide: [Basic concepts](/docs/developer-tools/basic-concepts).
## Error Codes
Source: https://docs.pluggy.ai/en/docs/reference/error-codes.md
## Error body
Every error, on every endpoint, has this shape:
```json
{
"code": 404,
"codeDescription": "ITEM_NOT_FOUND",
"message": "Item not found"
}
```
| Field | Meaning |
| --- | --- |
| `code` | The HTTP status, repeated. Always present. |
| `message` | A sentence for a person. Always present; not stable. |
| `codeDescription` | A stable identifier for the specific error, when the endpoint distinguishes several. Branch on this, not on `message`. |
| `data` | Extra detail for some errors — for instance, the Items that already exist when creating one would duplicate a connection. |
## Status codes
| Status | Meaning | Usually because |
| --- | --- | --- |
| `400` Bad Request | The request is invalid. | A missing or malformed field. |
| `401` Unauthorized | The credential is missing, wrong or expired. | An API Key past its 2 hours, or wrong `clientId`/`clientSecret` on `POST /auth` (`CLIENT_KEYS_UNAUTHORIZED`, `CLIENT_DISABLED`). |
| `403` Forbidden | The credential cannot reach this resource. | A Connect Token used outside its scope — see [Authentication](/reference/authentication). |
| `404` Not Found | No such resource. | An `id` that does not exist. |
| `405` Method Not Allowed | The endpoint does not support this verb. | |
| `406` Not Acceptable | A format other than JSON was requested. | |
| `409` Conflict | The request contradicts the current state of the resource. | A conflict updating an Item — see [`PATCH /items/{id}`](/reference/items/items-update). |
| `429` Too Many Requests | A rate limit was exceeded. | See [Rate Limits](/reference/rate-limits) for the limits and the `Retry-After` header. |
| `500` Internal Server Error | Something failed on our side. | Retry later. |
| `503` Service Unavailable | Temporarily offline for maintenance. | Retry later. |
Each endpoint's page in this reference lists the statuses it returns and, where the API distinguishes them, the `codeDescription` values.
## Creating and updating an Item
These come back from [`POST /items`](/reference/items/items-create) and
[`PATCH /items/{id}`](/reference/items/items-update). Where the text below shows a
`:placeholder`, the real message carries the value — a frequency, a wait, a
parameter name.
| `codeDescription` | Status | Message | What to do |
| --- | --- | --- | --- |
| `PARAMETERS_NOT_PROVIDED` | `400` | parameters were not provided | Send the connection's credentials to sync the item. |
| `ITEM_ALREADY_UPDATING` | `400` | An update is already in progress, wait until the last execution ends | This item is syncing. Wait for the execution to finish — success or error — before triggering another. |
| `ITEM_IS_ALREADY_UPDATING` | `400` | There is an active item for the set of credentials that hasn't finished executing | The same set of credentials is syncing on another item. Wait for it, so two sessions are not opened with the institution at once. |
| `CLIENT_IS_UPDATING_BEFORE_ALLOWED_FREQUENCY` | `409` | Client updates on this item are allowed at most every :minUpdateFrequencyAllowedInHours hours. Last update was at :lastUpdatedAt | Wait until the minimum frequency has passed since the last update. The limit is per team and adjustable — ask support if your use case needs a shorter one. |
| `LAST_EXECUTION_HAD_LOGIN_ERROR` | `400` | Last execution had a login error, you must update the parameters | The last sync failed to log in. Send new credentials before updating again. |
| `TOO_MANY_CONSECUTIVE_LOGIN_FAILURES` | `400` | must wait at least :readableBackoffTime after :maxConsecutiveFailedLoginAttempts consecutive login errors, last attempt was at :lastExecutionEndedAt (can retry after: :canRetryAfterDate) | A cooldown after repeated login errors, so the user's account is not locked by the institution. Retry after the time in the message. |
| `TOO_MANY_CONSECUTIVE_ERRORS` | `400` | There has been more than 5 failing syncronizations, please contact support | The connection failed too many times in a row. Report it to support with the `itemId`. |
| `ITEM_IN_ERROR_COOLDOWN` | `409` | This set of credentials recently failed to connect and is in a cooldown period, please try again later | These credentials failed recently and are in a cooldown. Retry after it passes. |
| `CONNECTOR_OFFLINE` | `409` | this connector is offline in this moment | The connector is not accepting executions right now. Try again later — see [status.pluggy.ai](https://status.pluggy.ai). |
| `CONNECTOR_REQUIRED_PARAMETER_VALIDATION_ERROR` | `400` | The parameter :parameter is required to be renewed for item update. | The connector now requires that parameter again. Send it to update the connection. |
| `ITEM_ORIGINAL_CONNECTED_WITH_DIFFERENT_ACCOUNT` | `409` | Item was originally connected with a different account, please use the original account | The credentials now point at a different account than the one the item was created with. Use the original account, or create a new item. |
| `ITEM_CREATION_LIMIT_EXCEEDED` | `409` | Client exceeded item creation limit (:itemsLimit items) for the current subscription level. | You reached the item limit of your subscription. Delete unused items or contact support. |
| `CLIENT_HAS_ITEM_UPDATES_DISABLED` | `409` | Client has item updates disabled | Updates were disabled for the team. Contact support. |
| `CREATE_ITEMS_API_FREE_DISABLED` | `400` | Free subscription can only create items through our Connect Widget | On the free subscription, items are created through the Connect Widget. |
| `SANDBOX_CLIENT_ITEM_UPDATE_NOT_ALLOWED` | `400` | Current client subscription level can only update Sandbox (Pluggy Bank) items | Your subscription level only allows updating Sandbox (Pluggy Bank) items. |
## MFA errors
Returned when sending a multi-factor parameter to an Item — see
[Updating an Item](/docs/connect-widget/updating-item).
| `codeDescription` | Status | Message | What to do |
| --- | --- | --- | --- |
| `ITEM_MFA_NOT_FOUND` | `404` | item has no mfa input request | The item is not waiting for an MFA input, so none can be submitted. |
| `ITEM_MFA_ALREADY_PROVIDED` | `400` | item has no mfa input request, it was already provided | Nothing to do — the MFA was already submitted. |
| `ITEM_MFA_EXPIRED` | `400` | Item's MFA parameter expired, please start a new update | The MFA window closed. Start a new update to sync the connection. |
| `ITEM_MFA_PARAMETER_EXPECTED_MISMATCH` | `400` | Item is expecting ':parameter' MFA param name | The item is waiting for a different parameter. Use the name in the message. |
| `MFA_PARAMERTER_WAS_ALREADY_USED_ERROR` | `400` | MFA parameter has to be updated from last execution | The value sent is the one already used in the last execution. Ask the user for a new one. |
That spelling is not a typo in this page: the API returns `PARAMERTER`. Match it
exactly if you branch on it.
Read the guide: [Errors Codes](/docs/developer-tools/error-codes).
## Rate Limits
Source: https://docs.pluggy.ai/en/docs/reference/rate-limits.md
Limits are counted **per endpoint, per IP, per minute**. Each limit is independent: exhausting `POST /auth` does not affect `GET /transactions`. Where one limit spans two endpoints, requests to either count against it.
## Limits
| Endpoint | Requests per minute per IP |
| --- | --- |
| `POST /auth` | 360 |
| `GET /transactions`, `GET /transactions/{id}` | 360 |
| `GET /investments`, `GET /investments/{id}` | 360 |
| `GET /investments/{id}/transactions` | 360 |
| `PATCH /items/{id}` | 20 |
`PATCH /items/{id}` is sized for user-triggered updates. Daily refreshes belong to [auto-sync](/docs/connections/item#auto-sync), not to a loop of `PATCH` calls.
## The 429 response
```json
{
"code": 429,
"message": "Too many requests. Please try again later (see Retry-After header in seconds)"
}
```
Further requests to that endpoint keep failing until the minute window resets. Three headers say how long:
| Header | Meaning |
| --- | --- |
| `RateLimit-Limit` | The limit for this endpoint, per minute. |
| `RateLimit-Reset` | Seconds until the counter resets and the endpoint accepts requests again. |
| `Retry-After` | The standard retry hint. Always `60`. |
Wait `RateLimit-Reset` seconds and retry. HTTP clients with standard retry behaviour (for example `got`) already honour `Retry-After` on a `429`.
## When you keep hitting a limit
- Reuse the API Key for its 2 hours instead of calling `POST /auth` per request — see [Authentication](/reference/authentication).
- Cap the parallelism of batch jobs against one endpoint and space the calls.
- Look for duplicated requests in normal operation.
- If the application genuinely needs more, contact support with the use case.
Read the guide: [Rate limits](/docs/developer-tools/rate-limits).
## Webhook
Source: https://docs.pluggy.ai/en/docs/reference/webhooks.md
A webhook is an HTTPS URL of yours that receives a `POST` with a JSON body when an event happens. Two ways to subscribe:
- **A Webhook resource** — [`POST /webhooks`](/reference/webhook/webhooks-create) with a `url` and an `event`. Delivers that event for every resource of the application.
- **`webhookUrl` on a resource** — set when creating an Item, a Connect Token or a Payment Request. Delivers every event, but only for that resource (or the Items created with that token).
## Webhook resource
```http
POST https://api.pluggy.ai/webhooks
X-API-KEY: {apiKey}
Content-Type: application/json
{
"url": "https://example.com/pluggy",
"event": "item/updated",
"headers": { "X-CLIENT-ID": "…" }
}
```
| Field | Required | Meaning |
| --- | --- | --- |
| `url` | yes | HTTPS only. `localhost` is not accepted — use a tunnel such as ngrok while developing. |
| `event` | yes | One event from the tables below, `item/all` for every Item event, or `all` for everything. |
| `headers` | no | Sent with every delivery to this URL — the way to pass an API key your endpoint requires. Only configurable through the API, never shown in the dashboard. |
Endpoints: [`GET /webhooks`](/reference/webhook/webhooks-list), [`POST /webhooks`](/reference/webhook/webhooks-create), and retrieve, update and delete on [`/webhooks/{id}`](/reference/webhook).
## Events
**Data**
| Event | Fires when |
| --- | --- |
| `item/created` | An Item was created and connected successfully. |
| `item/updated` | An Item was updated and synced successfully. |
| `item/deleted` | An Item was deleted. |
| `item/error` | An execution ended in error; `USER_AUTHORIZATION_PENDING` also fires this. |
| `item/waiting_user_input` | The Item needs input from the user (MFA) to continue. |
| `item/waiting_user_action` | The Item needs the user to act on their device — authorise in the bank app, scan a QR code. |
| `item/login_succeeded` | Login at the institution succeeded; data collection is running. |
| `connector/status_updated` | A connector changed status (`ONLINE`, `UNSTABLE`, `OFFLINE`). Carries `connectorId`. |
| `transactions/created` | New transactions after an update; carries `createdTransactionsLink` to fetch them. |
| `transactions/updated` | Transactions changed after an update; carries their ids. |
| `transactions/deleted` | Transactions removed after an update; carries their ids. |
Transaction events fire only when something changed; an update with no new transactions emits no `transactions/created`.
**Payments**
| Event | Fires when |
| --- | --- |
| `payment_intent/created` | A payment intent was created for a request. |
| `payment_intent/waiting_payer_authorization` | The intent needs the payer's authorisation. |
| `payment_intent/completed` | The intent completed. |
| `payment_intent/error` | The intent failed. |
| `payment_request/updated` | A payment request changed status. |
| `scheduled_payment/created`, `/completed`, `/error`, `/canceled` | One scheduled payment of an authorisation moved. |
| `scheduled_payment/all_created`, `/all_completed` | Every scheduled payment of an authorisation was created / completed. |
| `automatic_pix_payment/created`, `/completed`, `/error`, `/canceled` | A payment of an Automatic PIX request moved. |
| `smart_transfer_preauthorization/completed`, `/error` | A Smart Transfer pre-authorisation was approved, or failed. |
| `smart_transfer_payment/completed`, `/error` | A Smart Transfer payment settled, or failed. |
## Payload
Every notification carries:
| Field | Meaning |
| --- | --- |
| `event` | The event name. |
| `eventId` | Identifies the event; the same value when one event is delivered to several URLs. |
| `triggeredBy` | `USER` (a Connect Token, e.g. the widget), `CLIENT` (an API Key, e.g. a `PATCH`), `SYNC` (auto-sync) or `INTERNAL` (Pluggy support). Absent on `item/deleted`, `connector/status_updated` and `transactions/deleted`. |
| the entity's id | `itemId` on Item events, `transactionIds` on transaction events, `connectorId` on connector events, and so on per event. |
| `clientUserId` | On `item/*` events only — the value set through the Connect Token's `options`. Not on `transactions/*`: map those to your user through `itemId`. |
```json
{
"event": "item/updated",
"eventId": "d876fd7c-e9bd-4c4c-bd46-cc96c62aac29",
"itemId": "a5c763cb-0952-457b-9936-630f79c5b016",
"triggeredBy": "SYNC",
"clientUserId": "your-user-id"
}
```
## Delivery and retries
A delivery succeeds when your endpoint answers `2xx` **within 5 seconds**. Respond first, process afterwards — a slow handler is counted as a failure and retried.
On failure: three consecutive attempts; if all fail, three more after 1 hour; if those fail, a final three after 2 hours. Up to **9 deliveries** of one event. Exception: `item/login_succeeded` gets the three consecutive attempts only, with no delayed retries.
Read the guide: [Webhook](/docs/developer-tools/webhooks-ref) — payload examples per event, and troubleshooting.
## Server-Side SDKs
Source: https://docs.pluggy.ai/en/docs/reference/server-sdks.md
Three official server-side libraries wrap the API. Each is a thin client over the same endpoints in this reference; nothing is available in one that is not available over HTTP.
| Language | Package | Source |
| --- | --- | --- |
| Node.js | `pluggy-sdk` (npm) | [pluggyai/pluggy-node](https://github.com/pluggyai/pluggy-node) |
| .NET | `Pluggy.SDK` (NuGet) | [pluggyai/pluggy-net](https://github.com/pluggyai/pluggy-net) |
| Java | `ai.pluggy:pluggy-java` (GitHub Packages) | [pluggyai/pluggy-java](https://github.com/pluggyai/pluggy-java) |
## Install
**Node.js**
```bash
npm install --save pluggy-sdk
```
**.NET**
```powershell
Install-Package Pluggy.SDK
```
**Java (Maven)**
```xml
ai.pluggypluggy-java1.5.0
```
The Java package is published to GitHub Packages, so `~/.m2/settings.xml` needs the GitHub Packages server with a personal access token — see [GitHub's Maven registry guide](https://docs.github.com/en/packages/working-with-a-github-packages-registry/working-with-the-apache-maven-registry).
## Generate your own
The OpenAPI 3 document that this reference renders is public:
```
https://api.pluggy.ai/oas3.json
```
Point a generator at it for any other language. Community clients exist too, for example [pluggy-python](https://github.com/diraol/pluggy-python); they are not maintained by Pluggy.
Read the guide: [Server-Side SDKs](/docs/developer-tools/server-sdks).
## Product Updates | July/2026
Source: https://docs.pluggy.ai/en/changelog#2026.07
## Here are the main new features and improvements at Pluggy in July 2026.
July highlights
- **Major expansion of payment coverage**: 6 new connectors and 30 institutions that already existed for data now support payment initiation.
- Deprecation of **direct connectors for individuals (PF)**, with the affected connections being removed over the coming months.
- New `billForecastDate` and `billClosingDate` fields on credit card transactions and bills, and a new endpoint to delete categorization rules.
- New data connector via Open Finance: **Celcoin Baas** (individuals, in BETA).
- Several stability fixes in credit cards, investments, syncs and connectivity, plus the React Native SDK with OAuth on iOS.
## Breaking changes and deprecations
**Direct connectors for individuals (PF) are being discontinued.** Bradesco PF and Itaú have already been delisted, and XP is following the same path. Access is restricted to a limited set of applications; for all others, the connector is no longer returned.
**What to do:** migrate those connections to the equivalent Open Finance connector. **There is no automatic migration** — the end user has to make the connection again, and the history of the direct item is not transferred. **The affected connections will be removed over the coming months**, so it is worth planning the migration now.
**Dock connector (810) discontinued.** The brand left the Open Finance participant directory and the connector was delisted.
***
**Reminder — announced in June: transition to cursor pagination on the transactions endpoint.** Accounts created from June 2026 onwards already use the cursor-paginated endpoint by default, and the legacy endpoint (v1) is being gradually discontinued for those accounts.
**What to do:** if your integration still uses the legacy endpoint, migrate to the cursor-paginated one. Accounts created before June 2026 remain unaffected for now — we will give advance notice before any change for them.
## 📡 New Connectors
- **Major expansion of payment coverage** — 6 new payment-only connectors, with support for immediate PIX, scheduled PIX, Smart Transfer and Pix Automático: **Contabilizei** (businesses), **Nação BRB FLA** (individuals), **BBC Digital** (individuals), **Impact Bank** (individuals), **Revolut** (individuals) and **iFood Pago** (businesses).
- **30 institutions now support payments** — Institutions that already existed for data now accept immediate and scheduled PIX. For individuals (PF) and businesses (PJ): 6P Bank, Apex, Axiis Bank, Banco BRB, BPO Bank, Ella Bank, Health Cash, Hiperbanco, Imobi Bank, Lothus, Meirelles, Nitybank, Ovni, PagueVeloz Serasa, Rapidium Bank, Resolve Bank, Rhiza Bank, Simpbank, Snob Bank, Uze and Won Bank. Individuals only: Conta Universal, CRB Money, ESBank, Get Conta by Getnet, HausBank, iHold, POWPAY and Rico. Businesses only: XP Empresas.
- **Celcoin Baas (Open Finance, data)** — New connector for individuals, in BETA stage, with support for Accounts, Transactions and Identity.
## 🚀 New Features
- **Credit card: new `billForecastDate` and `billClosingDate` fields** — Credit card transactions and bills now return the forecast bill date and the closing date, as specified by Open Finance Brasil. **Note:** these fields are only returned for connections created after the implementation; earlier connections will not return these values.
- **New endpoint to delete categorization rules** — `DELETE /categories/rules/:id` lets you delete a categorization rule created previously, completing the management cycle through the API.
- **Open Finance: automatic recovery of failed connections** — Open Finance connections that accumulate 5 consecutive errors are now reprocessed automatically once a day, until a successful sync recovers them. Previously, those connections stayed stuck and required a manual reconnection.
## 💳 Payments
- **Pix Automático: charge with cancelled consent fixed** — Fixed a case where a Pix Automático charge could be processed even after the consent had been cancelled.
## 🔔 Webhooks
- **Fix for bulk retries** — Fixed a scenario where a large volume of retries was not being sent.
## 🖥️ Dashboard
- **Logo for dark mode** — You can now upload a specific logo for Connect's dark mode, in addition to the main logo. If none is uploaded, the light mode logo is used in both themes.
- **Development and production apps separated in the webhook list** — Fixed an issue where applications from both environments appeared mixed together when configuring webhooks.
- **Fixes in Payments** — Fixed the date shown for scheduled PIX, the creation of Pix Automático from the dashboard, and the recipient listing.
## 🐛 Fixes
- **Banco do Brasil: Rende Fácil balance** — Fixed a case where the balance showed as zero when the amount was invested in Rende Fácil. BB returns `availableAmount = 0` in that situation, and the invested amount is now taken into account in the account balance, as was already the case for Itaú.
- **Credit cards: bill dates and error isolation** — Fixed the closing and due dates when the institution returns bills out of chronological order, and fixed a case where a card with an error emptied the transactions of the other cards on the same item.
- **Investments** — Fixed the failure on Itaú PJ BBA accounts and improved the handling of rate limit errors in the investments connector.
- **More resilient syncs** — Avoided infinite runs on connections with `CONNECTION_ERROR`; fixed the dates used in partial syncs after a merge error; added a smart retry for first-time Sicoob connections that returned without data; fixed missing transactions on Sicoob (OF), on the BB PJ daily sync when `ACCOUNTS` was not among the products, and on Caixa PJ when the start date was earlier than the account opening.
- **Itaú: itemized SISPAG entries** — Fixed the handling of SISPAG salary entries that started being returned itemized after AUT MAIS was enabled.
- **Connectivity restored** — Stability restored on Nubank PF (Open Finance), XP and Celcoin.
- **Connect Widget: connect button** — Fixed cases where the connect button text did not appear or the button did not respond.
- **React Native SDK: OAuth connections on iOS** — `react-native-pluggy-connect@1.5.0` adds the `forceOauthInBrowser` prop. With `false`, OAuth opens in a WebView inside the app instead of the system browser, solving connections to regulated connectors that got stuck in `WAITING_USER_INPUT` until expiring on iOS. The default is still `true`, so the change is opt-in.
## Product Updates | June/2026
Source: https://docs.pluggy.ai/en/changelog#2026.06
## Here are the main new features and improvements at Pluggy in June 2026.
June highlights
- Transition to **cursor pagination** on the transactions endpoint for accounts created from June onwards, with the legacy endpoint (v1) being gradually discontinued.
- A more complete Open Finance, with new fields for investments (tax exemption, Anbima classification, brokerage note, Tesouro coupon), for credit cards (fee type and credit operation type), the counterparty ISPB code, reserved balances and the grace period date for fixed income.
- A more transparent Pix Automático, with debited account data, recipient bank, timestamps and reconciliation identifiers in the responses, plus fixes for retries and in the sandbox environment.
- Dashboard improvements, with a Customer ID filter in Payments and Portuguese as the default language for new accounts.
- Several stability fixes in connectors, credit card bills, Open Finance syncs, duplicated loans and in the Connect Widget.
## Breaking changes and deprecations
**Transition to cursor pagination on the transactions endpoint.** Accounts created from June 2026 onwards now use the transactions endpoint with cursor pagination by default. The legacy endpoint (v1) is being gradually discontinued for those accounts.
**What to do:** if your integration uses the legacy endpoint, migrate to the cursor-paginated one. The documentation and the guides already reflect the change, and the SDK has been updated to support it.
Accounts created before June 2026 are not affected at this time.
## 🚀 New Features
- **Open Finance: new investment fields** — New fields available for investments via Open Finance, including a tax exemption indicator (LCI/LCA/CRI/CRA), debtor data for CRI/CRA, remuneration frequency, price factor for variable income, Anbima fund classification, brokerage note number and coupon information for Tesouro Direto bonds.
- **Open Finance: new credit card fields** — New categorization fields on credit cards, including detailed fee type, credit operation type, card network information when classified as "other", and the reason for a zeroed limit.
- **Open Finance: new counterparty code on transactions** — Account transactions now return the ISPB code of the counterparty institution and an additional description for transactions classified as "other", improving categorization.
- **Open Finance: support for reserved balances** — New `hasReservedBalance` field and a dedicated endpoint to query blocked or reserved amounts in an account (e.g. court-ordered blocks, scheduled Pix), providing a more accurate view of the available balance.
- **Open Finance: `gracePeriodDate` field for fixed income** — Fixed income investments (CDB, LCI, LCA, CRI, CRA, Debentures) now return the grace period date via Open Finance.
- **More specific error codes on the balance endpoint** — The balance endpoint now returns more granular error codes, instead of grouping most failures under a generic error, making it easier for your integration to handle them.
- **`clientUserId` limit standardized** — The maximum length of the `clientUserId` field has been standardized at 500 characters across all API endpoints (Item, Connect Token and Investments), eliminating inconsistencies between the previous limits.
## 💳 Payments
- **Pix Automático: more complete payment responses** — Pix Automático authorization and payment responses now include more information: debited account data, recipient bank, authorization and update timestamps, detailed error reason and identifiers for reconciliation (`consentId`, `transactionIdentification`).
- **Pix Automático: fix to the retry logic** — Fixed the recording of dates on failed retry attempts, which now reflect the date of each individual attempt instead of the original payment date. The system also now avoids new automatic scheduling when the institution returns a period limit exceeded error.
- **Pix Automático: fixes in the sandbox environment** — Fixed the 500 error when cancelling a schedule and the failure to generate a payment request from the dashboard, both in sandbox mode.
- **Fix to the status of completed payments** — Fixed an issue where an already completed payment could have its status overwritten with an error when a subsequent intent expired or was rejected.
- **Smart Transfers: fix for preauthorizations** — Fixed an error that prevented Smart Transfer preauthorizations from being generated for customers who select certain recipient institutions.
## 🖥️ Dashboard
- **Customer ID filter in Payments** — The Payments > Customers section now lets you filter records directly by Customer ID, making it easier to find a specific customer's payments.
- **Portuguese as the default language** — The default dashboard language when creating a new account is now Portuguese (pt-BR).
## 🐛 Fixes
- **Santander PJ connector: transaction deduplication fixed** — Fixed a failure that incorrectly discarded distinct transactions that shared the same date, amount, description and balance, treating them wrongly as duplicates.
- **Credit cards (Open Finance): improved partial sync** — Bill fetching in partial syncs now correctly follows the transaction period, significantly increasing the share of transactions correctly associated with their bill.
- **Reliability in Open Finance syncs** — Fixed cases of false success in syncs that actually indicated instability, and merge errors (MERGE_ERROR) caused by transactions returned without a defined currency.
- **Loan duplication fixed** — Fixed the duplication of loans data on Open Finance connections, including the cleanup of existing duplicates.
- **Bradesco PJ connector: user validation restored** — Fixed the validation of unsupported users (USER_NOT_SUPPORTED), which had stopped working correctly.
- **Bradesco connector: error messages with accents fixed** — Fixed the encoding of special characters in error messages (e.g. invalid credentials), which displayed invalid characters to the end user.
- **Connectivity restored on direct connectors** — Connectivity restored on direct connectors that were blocked (Sicredi PJ and Bradesco PF).
- **Connect Widget: connector type filter fixed** — Fixed a bug where certain combinations of connector types passed to the widget did not display the expected connectors.
- **Connect Widget: individual/business mode in payments** — Fixed an issue where the widget did not correctly take into account the customer's account type (individual or business) when starting a payment flow, requiring a manual mode switch.
- **Connect Widget: notification overlap fixed** — Fixed an overlap between notification messages and the list of available accounts in the widget, which could make it harder to select the right account.
## 📚 Documentation
- **.NET SDK: cursor pagination support** — The .NET SDK has been updated to support cursor pagination, aligning it with the current capabilities of the API.
## Product Updates | May/2026
Source: https://docs.pluggy.ai/en/changelog#2026.05
## Here are the main new features and improvements at Pluggy in May 2026.
May highlights
- Support for the new alphanumeric CNPJ, ensuring compatibility with the new Receita Federal standard with no changes needed in your integration.
- Expansion of Open Finance, with new credit operation types, more complete identity data and support for connections with a high volume of accounts.
- Evolution of the API and the Dashboard, with new transaction filters, cursor pagination, advanced webhook filters and improvements to document upload.
- Improvements to the Connect Widget, including support for the Múltipla Alçada flow and clearer guidance for resource limit scenarios.
- Several stability fixes in connectors, transactions, payments, webhooks and syncing, plus updates to the SDKs and the documentation.
## 🚀 New Features
- **Support for the new alphanumeric CNPJ** — The Pluggy API now accepts and processes CNPJs in the new alphanumeric format required by Receita Federal, with no changes needed in your integration system.
- **Open Finance: new credit operation types available** — You can now retrieve data on financing, invoice financing and current account credit via Open Finance, significantly expanding the coverage of credit data available for analysis.
- **Open Finance: expanded identity fields** — Open Finance identification, qualification and financial relations data now return additional fields that were previously missing, increasing the completeness of the user's identity information.
- **API: new filter parameters on transactions** — New filter fields and pagination options have been added to the transactions API, allowing more precise and flexible queries of the data history.
- **Open Finance: support for items with a high volume of accounts** — Open Finance connections with a large number of accounts and linked resources now have data accessible across all endpoints, eliminating coverage gaps for customers with broad portfolios.
- **Widget: Múltipla Alçada screen** — The Connect Widget now includes a screen dedicated to the Múltipla Alçada flow, letting users in processes that require approval from multiple responsible parties complete the connection without friction.
- **Widget: guidance for the **`RESOURCES_LIMIT_EXCEEDED` status — The Connect Widget now displays a clear message and guidance to the user when an Open Finance connection reaches the resource limit, improving the experience in high-volume scenarios.
- **Sandbox: higher transaction volume for testing** — The sandbox environment now returns a larger volume of historical transactions, making it easier to develop and test features that depend on an extensive transaction history.
***
## 📡 New Connectors
- **Banrisul PJ available to all customers** — The Banrisul connector for businesses is now available to all Pluggy customers, with no need for manual enablement by the support team.
***
## 💳 Payments
- **PixAuto: explicit error when cancelling a payment on the same date** — When you try to cancel a PixAuto payment scheduled for the current day, the API now returns a clear and descriptive error, avoiding unexpected behavior or a silent failure.
***
## 🔔 Webhooks
- **Fix to the timing of the **`item/created`** event for Open Finance** — Fixed an issue where the `item/created` event was fired before the Open Finance connection was approved by the financial institution, causing premature notifications in your system.
***
## 🖥️ Dashboard
- **Date and time filtering on webhooks** — The webhooks panel now lets you filter events by date and time with minute precision, simplifying the investigation of events in specific time windows.
- **Document upload limit increased to 20 MB** — The Due Diligence form now accepts files of up to 20 MB, eliminating errors when uploading larger documents such as statements and contracts.
- **Cursor pagination on transactions** — The transaction listing in the Dashboard now uses cursor pagination, making navigation faster and more stable on accounts with a large volume of data.
***
## 🐛 Fixes
- **Historical reprocessing of Open Finance data restored** — The automatic retry of historical data on Open Finance connections has been re-enabled, ensuring greater completeness in the data returned for newly connected items.
- **EnrichmentAPI: authentication errors fixed** — Fixed errors that occurred when calling the Enrichment API with certain combinations of credentials.
- **Payments Widget: business institution list fixed** — Fixed an issue where, when starting a payment as a business, the institution list displayed was the one for individuals.
- **Banrisul: company selection and transaction history** — Fixed the incorrect company selection in the Banrisul connector and the return of transactions in historical sync mode.
- **Bradesco PF and Bradesco PJ: connectivity restored** — Resolved instabilities that prevented users from connecting and updating Bradesco PF and Bradesco PJ accounts.
- **Itaú PJ: connection errors resolved** — Fixed intermittent errors that prevented the automatic update of Itaú PJ accounts.
- **XP: missing SUSEP code on investment products** — Fixed the missing SUSEP code in the investment products returned by the XP connector, which affected the regulatory classification of assets.
- **Widget: action buttons not displayed correctly** — Fixed a rendering issue where the action buttons disappeared on certain Connect Widget screens.
- **Transaction data fixed for several institutions** — Fixed issues with the return of current account, credit card and investment transactions for the following institutions: Bradesco, Santander, Itaú, Banco do Brasil, Nubank, BTG Pactual, Sicredi, Sicoob, Caixa Econômica Federal, Caixa Tem, Banrisul, XP Banking, InfinityPay, Inter and C6.
***
## 📚 Documentation
- **Node.js SDK: complete cursor pagination** — The Node.js SDK has been updated with the cursor fields that were missing, enabling full use of cursor pagination in transaction listings.
- **Java SDK: cursor pagination support** — The Java SDK has been updated to support cursor pagination, aligning it with the current capabilities of the API.
- **Quickstart and dependencies updated** — The quickstart guide has been revised with content improvements and the pluggy-sdk dependencies have been updated to the latest versions.
## Product Updates | March/2026
Source: https://docs.pluggy.ai/en/changelog#2026.03
## Here are the main new features and improvements at Pluggy in March 2026.
**March highlights**
* Significant expansion of the payments features, with a complete new section in the dashboard and an evolution of the API.
* Progress on Pix Automático and Smart Transfers, with improvements to management, events and the consistency of the flows.
* Updates and greater stability in connectors, including BB Prev and CaixaPrev.
* Evolution of the dashboard with a new onboarding, more complete analytics and improvements to data visualization.
* Several fixes and stability improvements in syncing, webhooks and data quality.
⚠️ Some features are being rolled out gradually and may vary depending on the institution, the type of integration and the environment (sandbox or production). If something has not shown up for you yet, just reach out to us.
## 💳 Payments
March brought a significant expansion of the payment features, with a complete section in the dashboard and new capabilities in the API.
→ **Payments section in the Dashboard **— You can now manage your payment requests directly from the dashboard, with creation, search, filters, pagination and a detailed view of each request.
→ **Recipient management **— Register, edit and search payment recipients by name or CPF/CNPJ, all from the dashboard.
→** Payer management** — Register and manage your payers (customers) with a dedicated interface in the dashboard.
→ **PIX Automático management in the Dashboard** — Manage your PIX Automático schedules directly from the dashboard: view occurrences, track the status of each payment and cancel individual consents or schedules.
→ **Smart Transfers** — New Smart Transfers section in the dashboard to manage smart transfers.
→ **/balance endpoint** — New endpoint to check the available balance in the payment initiator.
→ **Boleto metadata (Inter PJ)** — Inter PJ boleto transactions now include detailed payment metadata.
→ **Expiration webhook** — You now receive a webhook when a payment request expires automatically.
→ **CONSUMED event in PIX Automático** — The CONSUMED event is now handled correctly in the PIX Automático flow.
→ **Fix to the supportsAutomaticPix field** — The supportsAutomaticPix field now returns the correct values for each institution.
→ **Invalid character fix** — Fixed an issue with invalid characters in the payer name on PIX Automático transactions.
***
## 📡 New Connectors
→ **BB Prev (new version)** — The BB Prev connector has been migrated to a more modern and stable version.
→ **CaixaPrev (update)** — The CaixaPrev connector has been reviewed and updated for greater reliability.
***
## 🚀 New Features
→ **Pending transactions (Open Finance)** — Transactions with "pending" status are now automatically updated to "posted" when confirmed by the institution.
→ **BrasilPrev** — multi-fund support — You can now view investments broken down by fund in BrasilPrev.
→ **Alphabetical ordering in the Widget** — Institutions in the Pluggy Connect Widget are now displayed in alphabetical order to make them easier to find.
→ **Payments in the bill model (Open Finance)** — The payment list is now returned in the bill model via Open Finance.
→ **Upgrade banner for v2** — Dashboard v1 users now see a banner inviting them to migrate to the new version.
***
## 🖥️ Dashboard
→ **New onboarding** — Redesigned welcome experience with guided steps, collaborator invitations and entry animations.
→ **Full-screen Due Diligence** — The Due Diligence form is now a full-screen multi-step wizard, more intuitive and better organized.
→ **Production Checklist** — The production readiness checklist has been redesigned as a "Request Production Access" card with an automatic health check of the integration.
→ **Overview for Sandbox** — The overview page has been redesigned for sandbox users, with integration tips and an analytics page.
→ **Syncer statistics** — New sync metrics with a retry chart, an updatable items KPI and per-item deduplication.
→ **Filter by connector** — You can now filter the sync statistics by a specific connector.
→ **Items by institution chart** — New chart with a list or chart view and a multi-select connector filter.
→ **Lag by connector** — Donut chart showing the update lag per connector, with each institution's brand colors.
→ **Event payload** — You can now view the full payload of webhook events directly in the details drawer.
→ **Pending invitations** — New interface to manage pending team invitations.
***
## 🔔 Webhooks
→ **Duplicate webhooks fix** — transactions/created webhooks are no longer sent when the execution does not actually create a new transaction.
***
## 🐛 Fixes
→ **Data fixes across several institutions** — Fixed issues with transactions and accounts not being returned or being duplicated in: Caixa Econômica Federal, Sicredi, Nubank, Santander, Inter, Banco do Brasil, C6, Banrisul, Mercado Pago, Bradesco, Wise, 99 Pay, Itaú and Sicoob.
→ **Automatic retry for merge errors** — Implemented a retry mechanism for consistent merge errors, reducing sync failures.
→ **Itaú PJ — invalid credentials** — Fixed an error that returned a generic message instead of indicating invalid credentials on Itaú PJ.
→ **Item deletion** — The delete item action now correctly removes the item via the API.
→ **Open Finance investments** — Fixed an issue where investments were mixed up when new ones appeared in a different order.
→ **Banrisul transactions** — Fixed the ordering of transactions that were returned in ascending order by the institution.
→ **Banco Paulista removed** — Banco Paulista has been removed from the Open Finance connector list as it was discontinued.
***
## 📚 Documentation
→ **Playground updated** — The Playground has been updated to make it easier to test each type of payment available.
## Product Updates | February 2026
Source: https://docs.pluggy.ai/en/changelog#2026.02
## Here are the main new features and improvements at Pluggy in February 2026.
**February highlights**
* Launch of the new Pluggy Dashboard, with separate environments, guided onboarding and team management.
* New recurring Pix capabilities via PixAuto, including scheduling and automatic retry.
* Connector expansion with Conta Bemol PF and Inter PJ for MEI.
* Improvements to webhooks, including retry from the dashboard and custom authentication.
* Several fixes and stability improvements in connectors and data syncing.
***
## 🖥️ New Dashboard
We have launched the **new Pluggy Dashboard**, completely redesigned to make managing your integration easier.
→ **Separate environments** — you can now easily switch between Development and Production straight from the side menu. Your applications, events and filters adjust automatically to the selected environment.
→ **Guided onboarding for new users** — when you create your account, you will be guided through 4 practical steps: generating your first connect token, integrating the widget and configuring webhooks — all straight from the dashboard.
→ **Interactive tour** — a step-by-step tour introduces the main areas of the dashboard so you can get started quickly.
→ **Complete overview** — track your daily connections, execution statuses and distribution by institution with detailed charts and filters by connector and period.
→ **Digital Due Diligence** — fill in and submit your compliance form directly from the dashboard, with document upload and status tracking.
→ **Widget customization** — see your branding changes in real time, upload your logo with drag-and-drop and get a visual indicator when there are pending changes.
→ **Team management** — invite collaborators by email, define roles and manage pending invitations.
→ **Bulk webhook retry** — select a time range and resend webhooks directly from the dashboard.
→ **Connector alerts** — receive automatic notices when connectors used in your integration are offline or unstable.
***
## 💳 Payments / PixAuto
→ **Pix payment scheduling** — you can now schedule recurring Pix payments via PixAuto.
→ **Automatic retry** — Pix payments that fail are retried automatically, with no need for manual intervention.
→ **First payment identification** — the API now indicates when a payment is the first of a series, making it easier to keep track in your system.
→ **Revoked payment link** — payment links are automatically deactivated when the user's consent is revoked, ensuring security.
***
## 📡 New Connectors
→ **Conta Bemol Física** — connect Conta Bemol accounts for individuals via Open Finance.
→ **Inter PJ for MEI** — individual microentrepreneurs are now supported by the regulated Inter PJ connector.
***
## 🔔 Webhooks
→ **Custom authentication headers** — your webhooks now receive the authentication headers you configure, making validation on your server easier.
→ **Retry by time range** — resend webhooks from a specific period in case you missed an event.
→ **Retry from the dashboard** — resend webhooks directly from the interface, without having to use the API.
→ **Automatic deactivation of inactive URLs** — webhook URLs that have not received events for an extended period are automatically deactivated to avoid unnecessary calls.
→ **Webhook limit per event** — there is now a configurable limit of webhooks per event type for better organization.
***
## 🚀 New Features
→ **Account subtype (Open Finance)** — the `accountSubtype` field is now returned in the API response, providing more detail about the type of account connected.
→ **Filter by transaction creation date** — filter transactions by the date they were detected by Pluggy, useful for identifying new transactions since the last sync.
→ **Duplicate connection prevention** — during account selection with MFA, accounts that are already connected are blocked to avoid duplicates.
→ **CNPJ validation (Bradesco PJ)** — the CNPJ entered in the form is validated against the institution, avoiding connection errors.
***
## 🐛 Fixes
→ **Transaction dates** — fixed invalid dates on credit card transactions (Caixa) and boletos (Bradesco PJ).
→ **PDF statement (Itaú PJ)** — PDF statement download restored for Itaú PJ accounts.
→ **Itaú PJ connection** — resolved a connection error caused by permission expiration.
→ **Historical sync** — fixed an infinite loop that could occur during the sync of historical data via Open Finance.
→ **Duplicate transactions** — eliminated the duplication of transactions with the same identifier on the Banrisul and Banco do Brasil connectors.
→ **Webhook delivery** — fixed scenarios where transaction updated, item deletion and account creation webhooks were not delivered correctly (affected Inter MEI and Santander).
→ **Data fixes** — targeted adjustments to transactions on several connectors: Itaú, Bradesco, Santander, Banrisul, Banco do Brasil, Nubank, Sicredi, Caixa, BTG and Inter.
***
## 📚 Documentation
→ **Documentation for LLMs** — our documentation is now optimized for use with language models (AI), making AI-assisted integrations easier.
→ **Smart Transfers** — Smart Transfers documentation updated with the new capabilities.
→ **SDKs** updated to reflect the latest API features.
## Atualizações de Produto | Setembro 2025
Source: https://docs.pluggy.ai/en/changelog#2025.09
## Changes
- **Added**: New Open Finance connectors in BETA: Dock PF, QI SCD PF, QI SCD PJ
- **Added**: OAuth deep links support - oauthRedirectUri now accepts deep links for mobile app authentication
- **Changed**: Credit card warning for cards without consent or unavailable now always visible on Open Finance connections
- **Fixed**: Santander Open Finance pagination counting with page-size=100; adaptive limit (500 pages/200k transactions)
- **Changed**: Added Nubank PF/PJ to duplicate blocking whitelist to avoid duplicate transactions
- **Added**: Sandbox support for Múltipla Alçada (multiple approval) functional flow in widget with multiple CPF testing
- **Fixed**: Open Finance credit card future transactions - corrected incorrect status; removes billId if billPostDate exceeds current date
- **Changed**: Closing balance calculation updated: closingBalance = availableBalance + blockedBalance
## [Atualizações de Produto] Agosto-25
Source: https://docs.pluggy.ai/en/changelog#2025.08
## Changes
- **Changed**: EfiPay accounts now returned on item creation via PIX API
- **Added**: Sicoob Open Finance automatic retry on resources endpoint (status 202/503)
- **Changed**: Open Finance connector products field now reflects only supported resources
- **Added**: Open Finance historical sync automatic retry for empty historical syncs with daily execution up to 1 year
- **Changed**: Open Finance Identity filtering on financialRelationships.accounts; additionalInfo mapped to address
- **Changed**: Rico connector - removed ACCOUNTS and TRANSACTIONS flows; maintained Identity and Investments
- **Changed**: Bradesco PJ boleto/PIX payment data recovery improved 10x faster with more precise matching
## [Atualizações de Produto] Julho-25
Source: https://docs.pluggy.ai/en/changelog#2025.07
## Changes
- **Added**: New Open Finance connectors in BETA: Itaú Emps, 99PAY, Banco C6, Banco CSF, Banco Inter, Banco Master, Banco Mercantil, BRB, Crefisa, Midway, PagSeguro
- **Added**: 46+ new institutions for payments
- **Changed**: Improvements to paymentData object in Sicredi PJ, Bradesco PJ, Itaú PJ
- **Added**: Balance field added to Banco do Brasil PJ transactions
- **Changed**: Improved return of pension data for BTG and XP
- **Removed**: ITI connector (Open Finance, id 638) - delisted August 13
- **Removed**: Rico connector (Pluggy, id 205) - delisted August 12; available via Open Finance
## [Atualizações de Produto] Junho-25
Source: https://docs.pluggy.ai/en/changelog#2025.06
## Changes
- **Added**: 4 new regulated Open Finance connectors: Santander Corretora (812), Santander Corretora Empresas (813), PagueVeloz/Serasa (814-815)
- **Added**: PIX Automático product launch with webhook support
- **Added**: Boleto receipt data now available for Santander PJ
- **Changed**: Updated Inter PF connection instructions in Widget
- **Changed**: Itaú PJ performance improvement - 15% connection time reduction
- **Changed**: Enhanced pension data for XP and BTG
- **Changed**: React Native SDK updated
- **Removed**: B3 CEI connector discontinued due to security measures by institution
## [Atualizações de Produto] Maio-25
Source: https://docs.pluggy.ai/en/changelog#2025.05
## Changes
- **Added**: Rede Celcoin (PF & PJ) Open Finance connector
- **Added**: Webhook management via Pluggy Dashboard with advanced event details and resend capability
- **Added**: New field endToEndId for payment identification in completed scheduled payments
- **Added**: New payment filters for Recipients, Customers, and Requests (by pixKey, name, email, cpf, cnpj, date range)
- **Changed**: Boleto receipt data added for Sicredi PJ
- **Removed**: Genial Investimentos connector discontinued due to institution security measures
- **Removed**: Sicoob (PF & PJ) connector discontinued; migration to regulated Open Finance required
## [Atualizações de Produto] Abril-25
Source: https://docs.pluggy.ai/en/changelog#2025.04
## Changes
- **Added**: Boleto receipt data for Inter PJ
- **Added**: 8 new payment institutions: Dock, 99pay, Swap, Azimut, BMS, ModalMais trader, Listo, Iugu
- **Changed**: Itaú PJ performance improvement - 15% reduction in connection time
- **Changed**: Updated Inter PF connection instructions in Widget
- **Fixed**: Itaú PJ transactions without payment data and connections not updating daily
- **Fixed**: Bradesco PJ recaptcha flow errors impacting automatic updates
- **Fixed**: Payment cancellation bug for future scheduled payments
- **Removed**: Clear Investimentos non-regulated connector discontinued; regulated access remains available
## [Atualizações de Produto] Março-25
Source: https://docs.pluggy.ai/en/changelog#2025.03
## Changes
- **Added**: EQI Investimentos Open Finance connector
- **Changed**: Stability adjustments for Sicoob PJ connector
- **Added**: Interest and penalty information added to the boleto issuance API (Inter PJ only)
- **Changed**: Improved error clarity in payments API
- **Changed**: Enhanced payments documentation
- **Changed**: Implemented regulatory masking of recipient account data in /recipient endpoint (agency, account number, account type, full CPF, account opening date)
- **Fixed**: Resolved deleted transaction cases in Itaú PF, Itaú PJ, and Bradesco PJ
- **Fixed**: Fixed multiple investment return issues with XP
- **Fixed**: Corrected Open Finance credit card transactions that were consolidated without invoice linkage
## [Atualizações de Produto] Fevereiro-25
Source: https://docs.pluggy.ai/en/changelog#2025.02
## Changes
- **Added**: New transaction webhooks: transactions/created, transactions/updated, transactions/deleted for precise data synchronization
- **Added**: Boleto payment data for Itaú PJ and Bradesco PJ connectors including barcode, digitizable line, payment status, and fine/interest/discount data via boletoMetadata object
- **Added**: Boleto issuance API for issuing boletos (currently available only for Inter PJ)
- **Changed**: Automatic application and redemption transactions now retrieved for Itaú PJ
- **Changed**: Open Finance consent time increased to 20 minutes
- **Changed**: Provider error messages added to webhook error events
- **Added**: Automatic refund endpoint implemented for smart account scenarios
- **Fixed**: Multiple Payment API stability improvements and error visibility enhancements
- **Fixed**: Resolved connectivity issues affecting Bradesco PF and XP Investimentos (unregulated)
## [Atualizações de Produto] Janeiro-25
Source: https://docs.pluggy.ai/en/changelog#2025.01
## Changes
- **Added**: Next Empresas Open Finance connector
- **Added**: New transactions/created webhook for synchronizing transactions created, updated, or deleted in the platform
- **Changed**: Email field in payment customer creation is now optional (previously required)
## [Atualizações de Produto] Dezembro-24
Source: https://docs.pluggy.ai/en/changelog#2024.12
Keep up with what's new at Pluggy in December!
# 📡 **New Connectors**
### 🌟 Open Finance connector: Neon
We have added one more institution to our list of Open Finance connections! Neon is a connector for individuals (PF) and returns account, credit card, transaction, investment and registration data. *Daily updates* are supported.
**Interested? Talk to our team!**
### 🌟 Open Finance connector: Player's Bank
We have added one more institution to our list of Open Finance connections! Player's Bank is a connector for individuals (PF) and returns account, credit card, transaction and registration data. *Daily updates* are supported.
**Interested? Talk to our team!**
***
## 🚀 Features
The **Pluggy Connect** widget now accepts CPF and CNPJ (`openFinanceParameters`) so that the user does not have to fill them in manually when the customer already has that information stored. This way, the user can skip those fields, drastically reducing the time needed to connect Open Finance institutions and improving the overall experience.
[Read more](https://docs.pluggy.ai/docs/environments-and-configurations#available-configurations)
## ✨ Improvements
* We expanded the scope of the total withdrawal status (`TOTAL_WITHDRAWAL`) in our **XP Wealth** investment connectors..
* New [error scenarios](https://docs.pluggy.ai/docs/payment-intent-statuses) have been added to the payment validations, aiming at greater security and a better experience.
* We created a new connection to Bradesco PJ that provides a much more stable connection.
* We expanded the scope of paymentData for SISPAG transactions in the Itaú PJ connector.
* Check out the new sections in our documentation:
* [Payment data OF coverage](https://docs.pluggy.ai/docs/payment-data-open-finance-coverage)
* [Investments OF coverage](https://docs.pluggy.ai/docs/investments-open-finance-coverage)
* [Recurring payment analysis API guide](https://docs.pluggy.ai/docs/recurring-payments-1)
## 📈 Optimizations
* We made improvements to the Open Finance connectors in the mobile flow.
* Communication for OF connections that have a pending authorization to share credit card data has been improved, adding warnings when necessary.
**Questions? Talk to our team!**
***
Keep an eye out for the next updates! We continue to evolve our Open Finance platform for you. Your feedback is always welcome!
If you have not tried **[Meu Pluggy](https://meu.pluggy.ai/)** yet, take the chance and check it out now!
## Product Updates | December-24
Source: https://docs.pluggy.ai/en/changelog#2024.12
Keep up with what's new at Pluggy in December!
# 📡 **New Connectors**
### 🌟 Open Finance connector: Neon
We have added one more institution to our list of Open Finance connections! Neon is a connector for individuals (PF) and returns account, credit card, transaction, investment and registration data. *Daily updates* are supported.
**Interested? Talk to our team!**
### 🌟 Open Finance connector: Player's Bank
We have added one more institution to our list of Open Finance connections! Player's Bank is a connector for individuals (PF) and returns account, credit card, transaction and registration data. *Daily updates* are supported.
**Interested? Talk to our team!**
***
## 🚀 Features
The **Pluggy Connect** widget now accepts CPF and CNPJ (`openFinanceParameters`) so that the user does not have to fill them in manually when the customer already has that information stored. This way, the user can skip those fields, drastically reducing the time needed to connect Open Finance institutions and improving the overall experience.
[Read more](https://docs.pluggy.ai/docs/environments-and-configurations#available-configurations)
## ✨ Improvements
* We expanded the scope of the total withdrawal status (`TOTAL_WITHDRAWAL`) in our **XP Wealth** investment connectors..
* New [error scenarios](https://docs.pluggy.ai/docs/payment-intent-statuses) have been added to the payment validations, aiming at greater security and a better experience.
* We created a new connection to Bradesco PJ that provides a much more stable connection.
* We expanded the scope of paymentData for SISPAG transactions in the Itaú PJ connector.
* Check out the new sections in our documentation:
* [Payment data OF coverage](https://docs.pluggy.ai/docs/payment-data-open-finance-coverage)
* [Investments OF coverage](https://docs.pluggy.ai/docs/investments-open-finance-coverage)
* [Recurring payment analysis API guide](https://docs.pluggy.ai/docs/recurring-payments-1)
## 📈 Optimizations
* We made improvements to the Open Finance connectors in the mobile flow.
* Communication for OF connections that have a pending authorization to share credit card data has been improved, adding warnings when necessary.
**Questions? Talk to our team!**
***
Keep an eye out for the next updates! We continue to evolve our Open Finance platform for you. Your feedback is always welcome!
If you have not tried **[Meu Pluggy](https://meu.pluggy.ai/)** yet, take the chance and check it out now!
## [Atualizações de Produto] Novembro-24
Source: https://docs.pluggy.ai/en/changelog#2024.11
## Changes
- **Added**: Categorizer - Recurring payments data analysis from transaction history
- **Added**: Categorizer - Custom categorization rules via matchType parameter
- **Added**: Duplicate connection prevention during account creation
- **Added**: Porto Bank Open Finance connector (PF) - accounts, credit cards, transactions, investments, identity data
- **Changed**: Pluggy Itaú PJ connector performance and stability enhancements
## [Atualizações de Produto] Outubro-24
Source: https://docs.pluggy.ai/en/changelog#2024.10
## Changes
- **Added**: Payment receipt data for paid boletos including penalties, interest, and discounts
- **Added**: Categorizer user behavior analysis showing spending patterns and investment activity
- **Added**: Pluggy Connectors: Mercado Bitcoin (crypto exchange), Conta Simples (digital platform)
- **Added**: Open Finance Connectors: Itaú BBA, Monte Bravo, Toro Investimentos, Toro Investimentos Empresas, Santander Cartões, Santander Cartões Empresas
- **Changed**: All transaction types now included in Open Finance connections
- **Changed**: Open Finance connection flow UX improvements
- **Changed**: Scheduled Payments product UX enhancements
## Q3 (Jun-Sep) 2024
Source: https://docs.pluggy.ai/en/changelog#2024.Q3
## Changes
- **Added**: Smart Transfers enabling fund movement between same-user accounts (same CNPJ)
- **Changed**: Transaction categorization precision improved to 99.9%
- **Changed**: Merchant extraction enhanced for CNPJ-provided transactions
- **Added**: Banco Rendimento connector (PF, auto-update capable)
- **Added**: OAuth oauthRedirectUri parameter for mobile redirect handling
- **Added**: New identity data: financialRelationships for risk profiling
- **Changed**: SDK Flutter updated to version 3.0.0
- **Changed**: Caixa connection now requires QR code reading
- **Changed**: Itaú PF transaction stability enhanced
- **Changed**: Itaú PJ synchronization delays reduced significantly
## Q1 (Jan-Mar) 2024
Source: https://docs.pluggy.ai/en/changelog#2024.Q1
# :exclamation: New Product Alert
Batch Payment is available for all customers to review. You can dig into this feature in [this docs](https://docs.pluggy.ai/docs/bulk-payment-step-by-step).
Now you can pay multiple Pix, Boletos, and Taxes on a single transaction to multiple destinations using Pluggy's Smart Accounts.
Smart Accounts are accounts created for businesses to make easy transactions for them.\
This resource is also used for Transactional PIX through Pix QR, allowing customers to confirm the PIX reception as an alternative to PIS (Payment Initiation).
## ✨ Features ✨
* [OAS 3 ](https://api.pluggy.ai/oas3.json) of Pluggy's API it's publicly available for SDKs to be autogenerated.
* We have added Sicoob PF to our pool of Direct connections supporting all types of investments.
* Bank Cora PJ now supports login with account selection.
* XP supports redemption transfers for investments.
* Advisor connectors were created for XP Wealth & BTG Wealth, returning accounts, transactions, investments & investments transactions for all the advisor's customers.
* New connectors have been added for Open Finance Regulado, for the latest list review the [GET /connectors?isOpenFinance=true](https://docs.pluggy.ai/reference/connectors-list)
* Regulado connectors retrieving Fixed Incomes now are enhanced with Investment Data from Pluggy's sources.
## 🛠 Technical Additions
* Open Finance connector now syncs their health status with the Central Bank, providing webhooks of `connector/update` when they are unhealthy.
## :bug: Improvements
* Regulado connectors have received an improved performance boost on the first connections that collect the hole data of the user.
* Many more improvements!
## Q2 (Apr-Jun) 2024
Source: https://docs.pluggy.ai/en/changelog#2024.Q2
# 🚀 INSS - New Data Source Available
We've launched this new connector called "INSS" that is returning new products associated with benefits from the user (Creditos Consignados, Benefit history, Pensions, etc).
Connector is available for tests and we are rapidly adding support for new products as customers require. Stay tuned!
# 🚀 Scheduled Payments!
Now through Payment Initiation, you can schedule PIX to be executed on a Date, Week, Month, or Custom configuration so it can automatically generate the PIX on your user's bank account.
## ✨ Features ✨
### Data
* We have created new Direct connectors:
* **Semear**: recovering accounts, transactions & identity.
* **BB Previdencia**: Recovering Previdencia Investments.
* We are providing the list of `consents` related to an `item`, it can be listed from our [API](https://docs.pluggy.ai/reference/consents-list).
### Payments
* We have added Pix QR & Pix Key as destinations for Bulk Payment & Single Payments.
* Bulk Payments APP has been improved to download payment receipts and can be also recovered through [API](https://docs.pluggy.ai/reference/payment-request-receipt-retrieve).
* Manage SmartAccount management methods to [withdraw pix received](https://docs.pluggy.ai/reference/smart-account-transfer-create) when needed.
## Q2 (Apr-Jun) 2024
Source: https://docs.pluggy.ai/en/changelog#2024.Q2
# 🚀 INSS - New Data Source Available
We've launched this new connector called "INSS" that is returning new products associated with benefits from the user (Creditos Consignados, Benefit history, Pensions, etc).
Connector is available for tests and we are rapidly adding support for new products as customers require. Stay tuned!
# 🚀 Scheduled Payments!
Now through Payment Initiation, you can schedule PIX to be executed on a Date, Week, Month, or Custom configuration so it can automatically generate the PIX on your user's bank account.
## ✨ Features ✨
### Data
* We have created new Direct connectors:
* **Semear**: recovering accounts, transactions & identity.
* **BB Previdencia**: Recovering Previdencia Investments.
* We are providing the list of `consents` related to an `item`, it can be listed from our [API](https://docs.pluggy.ai/reference/consents-list).
### Payments
* We have added Pix QR & Pix Key as destinations for Bulk Payment & Single Payments.
* Bulk Payments APP has been improved to download payment receipts and can be also recovered through [API](https://docs.pluggy.ai/reference/payment-request-receipt-retrieve).
* Manage SmartAccount management methods to [withdraw pix received](https://docs.pluggy.ai/reference/smart-account-transfer-create) when needed.
## Q1 (Jan-Mar) 2024
Source: https://docs.pluggy.ai/en/changelog#2024.Q1
# :exclamation: New Product Alert
Batch Payment is available for all customers to review. You can dig into this feature in [this docs](https://docs.pluggy.ai/docs/bulk-payment-step-by-step).
Now you can pay multiple Pix, Boletos, and Taxes on a single transaction to multiple destinations using Pluggy's Smart Accounts.
Smart Accounts are accounts created for businesses to make easy transactions for them.\
This resource is also used for Transactional PIX through Pix QR, allowing customers to confirm the PIX reception as an alternative to PIS (Payment Initiation).
## ✨ Features ✨
* [OAS 3 ](https://api.pluggy.ai/oas3.json) of Pluggy's API it's publicly available for SDKs to be autogenerated.
* We have added Sicoob PF to our pool of Direct connections supporting all types of investments.
* Bank Cora PJ now supports login with account selection.
* XP supports redemption transfers for investments.
* Advisor connectors were created for XP Wealth & BTG Wealth, returning accounts, transactions, investments & investments transactions for all the advisor's customers.
* New connectors have been added for Open Finance Regulado, for the latest list review the [GET /connectors?isOpenFinance=true](https://docs.pluggy.ai/reference/connectors-list)
* Regulado connectors retrieving Fixed Incomes now are enhanced with Investment Data from Pluggy's sources.
## 🛠 Technical Additions
* Open Finance connector now syncs their health status with the Central Bank, providing webhooks of `connector/update` when they are unhealthy.
## :bug: Improvements
* Regulado connectors have received an improved performance boost on the first connections that collect the hole data of the user.
* Many more improvements!
## Initial Platform Launch
Source: https://docs.pluggy.ai/en/changelog#1.0.0
# Initial Platform Launch
We are excited to announce the initial release of the Pluggy developer documentation platform.
## What's New
### Developer Documentation Platform
- Comprehensive guides for integrating with the Pluggy API
- Step-by-step tutorials for common use cases
- Multi-language support (English and Portuguese)
### Interactive API Reference
- Full documentation for 35+ API endpoints
- Request and response examples
- Interactive parameter exploration
### AI-Powered Assistance
- Natural language search across all documentation
- AI Q&A assistant powered by Claude
- Context-aware answers with source references
## Getting Started
Visit our [Getting Started guide](/docs/getting-started) to begin integrating with Pluggy.
## December 2023 (Monthly Update)
Source: https://docs.pluggy.ai/en/changelog#2023.12
# 🚀 Test now our Payment Initiation product!
Now you can receive payments from any bank with only one api call!
Payments app
## ✨ New Features ✨
🌟 **Payment Initiation Product Now Available!**
* Explore our new Payment Initiation product. Check out the [documentation](https://docs.pluggy.ai/docs/payment-initiation-introduction) for more details.
### Credit Card Processor Connectors
* We've expanded our offerings to include support for Credit Card Processors connectors!
### Caixa Direct Connectors
* Added support for investment transactions in the Caixa direct connector.
### New Institution Connectors
* **Newly Added:**
* BTG Corporate
* Banco Paulista and Banco Paulista Empresas
* SafraPay and SafraPay Empresas
* Safra Financeira and Safra Financeira Empresas
* Citi Empresas
* Investimentos BB
* Uber Conta by Digio
* Banco do Nordeste do Brasil S.A. (PF & PJ)
* Ágora Investimentos
* Getnet (Credit Card Processor)
### Sandbox
* We have added `user-ok-acquiring` to test our Credit Card Processor data model.
## 🛠 Technical Additions
### Connectors Query Filters
* Added `isOpenFinance` and `supportsPaymentInitiation` flags to our GET `/connectors` endpoint for enhanced filtering.
### Credit Card Metadata Model
* New property added: `cardNumber` to our `creditCardMetadata` model.
### Performance Enhancements
* Improved performance for **Itau PF**.
***
Stay tuned for more updates and enhancements as we continue to evolve and expand our Open Finance platform. Your feedback is always welcome!
BTW, if you didn't test [Meu Pluggy](meu.pluggy.ai) check it out!
My Pluggy App
## December 2023 (Monthly Update)
Source: https://docs.pluggy.ai/en/changelog#2023.12
# 🚀 Test now our Payment Initiation product!
Now you can receive payments from any bank with only one api call!
Payments app
## ✨ New Features ✨
🌟 **Payment Initiation Product Now Available!**
* Explore our new Payment Initiation product. Check out the [documentation](https://docs.pluggy.ai/docs/payment-initiation-introduction) for more details.
### Credit Card Processor Connectors
* We've expanded our offerings to include support for Credit Card Processors connectors!
### Caixa Direct Connectors
* Added support for investment transactions in the Caixa direct connector.
### New Institution Connectors
* **Newly Added:**
* BTG Corporate
* Banco Paulista and Banco Paulista Empresas
* SafraPay and SafraPay Empresas
* Safra Financeira and Safra Financeira Empresas
* Citi Empresas
* Investimentos BB
* Uber Conta by Digio
* Banco do Nordeste do Brasil S.A. (PF & PJ)
* Ágora Investimentos
* Getnet (Credit Card Processor)
### Sandbox
* We have added `user-ok-acquiring` to test our Credit Card Processor data model.
## 🛠 Technical Additions
### Connectors Query Filters
* Added `isOpenFinance` and `supportsPaymentInitiation` flags to our GET `/connectors` endpoint for enhanced filtering.
### Credit Card Metadata Model
* New property added: `cardNumber` to our `creditCardMetadata` model.
### Performance Enhancements
* Improved performance for **Itau PF**.
***
Stay tuned for more updates and enhancements as we continue to evolve and expand our Open Finance platform. Your feedback is always welcome!
BTW, if you didn't test [Meu Pluggy](meu.pluggy.ai) check it out!
My Pluggy App
## September 2023 (Monthly Update)
Source: https://docs.pluggy.ai/en/changelog#2023.09
### 🚀 **Open Finance Update: Bills, Investments & Identity Now Supported!**
#### Dive into the latest enhancements and additions we brought to you this month.
### ✨ **New Features** ✨
* 🌐 **Open Finance Flow Enhancements**:
* Introduced [Investments](https://docs.pluggy.ai/docs/investments).
* Rolled out [Bills](https://docs.pluggy.ai/docs/credit-card-bills).
* Launched support for [Loans](https://docs.pluggy.ai/docs/loans)
* Implement [Identity](https://docs.pluggy.ai/docs/identities) product.
* 🏦 **Connectors**:
* Enabled Mutual Funds and Fixed Income Investment Transactions for **Bradesco PJ** and **Banco do Brasil PJ**.
* Sold Investments are now marked as `TOTAL_WITHRAWAL` in **Itau PF** and **Inter PF**.
* Added Multiple Accounts support in **Ailos PF**.
* Welcomed **EQI** as our new Connector. Discover its range of supported products [here](https://docs.pluggy.ai/docs/connectors-coverage#investment).
* Added support for investment transactions in **Inter PF**
* Add account selection flow in the **XP Connector**.
* 🛠 **Technical Additions**:
* Enhanced our connector model with `isSandbox` and `isOpenFinance` flags.
* Added pagination for [Investments response](https://docs.pluggy.ai/reference/investments-list) using `page` and `pageSize` query parameters.
### 🛠 **Bug Fixes** 🛠
* Addressed LCA Investments response discrepancies in **Caixa** Connectors.
* Multiple fixes for **Rico Investimentos** product retrieval.
* Rectified Pix QR payment data anomalies in **Bradesco PJ**.
### ℹ️ **Important Notices** ℹ️
* 📢 Integration Update: The **Inter QR** and **Inter PF** connectors have been unified. The consolidated connector is now identifiable with an ID of 215.
## September 2023 (Monthly Update)
Source: https://docs.pluggy.ai/en/changelog#2023.09
### 🚀 **Open Finance Update: Bills, Investments & Identity Now Supported!**
#### Dive into the latest enhancements and additions we brought to you this month.
### ✨ **New Features** ✨
* 🌐 **Open Finance Flow Enhancements**:
* Introduced [Investments](https://docs.pluggy.ai/docs/investments).
* Rolled out [Bills](https://docs.pluggy.ai/docs/credit-card-bills).
* Launched support for [Loans](https://docs.pluggy.ai/docs/loans)
* Implement [Identity](https://docs.pluggy.ai/docs/identities) product.
* 🏦 **Connectors**:
* Enabled Mutual Funds and Fixed Income Investment Transactions for **Bradesco PJ** and **Banco do Brasil PJ**.
* Sold Investments are now marked as `TOTAL_WITHRAWAL` in **Itau PF** and **Inter PF**.
* Added Multiple Accounts support in **Ailos PF**.
* Welcomed **EQI** as our new Connector. Discover its range of supported products [here](https://docs.pluggy.ai/docs/connectors-coverage#investment).
* Added support for investment transactions in **Inter PF**
* Add account selection flow in the **XP Connector**.
* 🛠 **Technical Additions**:
* Enhanced our connector model with `isSandbox` and `isOpenFinance` flags.
* Added pagination for [Investments response](https://docs.pluggy.ai/reference/investments-list) using `page` and `pageSize` query parameters.
### 🛠 **Bug Fixes** 🛠
* Addressed LCA Investments response discrepancies in **Caixa** Connectors.
* Multiple fixes for **Rico Investimentos** product retrieval.
* Rectified Pix QR payment data anomalies in **Bradesco PJ**.
### ℹ️ **Important Notices** ℹ️
* 📢 Integration Update: The **Inter QR** and **Inter PF** connectors have been unified. The consolidated connector is now identifiable with an ID of 215.
## August 2023 (Monthly Update)
Source: https://docs.pluggy.ai/en/changelog#2023.08
Hey! Welcome to the August updates! 🌸
Before we dive into the changelog, there's some news everyone should be aware of.
### 1️⃣ We now support Regulated Open Finance connections! 🎉
##### If you're interested and want to learn more, [check it out here](https://docs.pluggy.ai/docs/open-finance-regulated)!
### 2️⃣ On 01/10, we will deprecate our connector Inter Investimentos (with id 234) and will solely utilize the connector Inter (with id 215).
##### The connector will carry the same data. If you have any questions or need assistance with your integration, please reach out to us!
### ✨ Features
* We've introduced the **Ailos Cartões PJ** connector.
* We've added the **XP - Wealth** connector.
* You can now configure which products to execute within a Pluggy Connection using the Pluggy Connect Widget! Learn more about [Pluggy Connect configuration here](https://docs.pluggy.ai/edit/environments-and-configurations).
* We've added support for Fixed Income transactions made at Itau Corretora in the **Itau PF** connector.
* We've included the last transaction in Sold investments for the **Inter PF** connector.
* We've introduced support for Mutual Funds and Fixed Income in the **Bradesco PJ** connector.
* We've added the **Cora PJ** connector.
* We've added support for payment data regarding Pix QR transactions in Bradesco PJ.
* We've incorporated `status` and `holderType` fields for `Accounts`.
* We've added support for the Acquiring **Stone** connector with some modifications to our data model.
* We now display `TOTAL_WITHDRAWAL` for sold investments in **Itau PF**.
* We've introduced support for CPF access in the **XP** connector.
## ❤️ Improvements
* We've enhanced the UX for QR flow in Pluggy Connect.
* We've addressed login issues with Itau PJ.
## August 2023 (Monthly Update)
Source: https://docs.pluggy.ai/en/changelog#2023.08
Hey! Welcome to the August updates! 🌸
Before we dive into the changelog, there's some news everyone should be aware of.
### 1️⃣ We now support Regulated Open Finance connections! 🎉
##### If you're interested and want to learn more, [check it out here](https://docs.pluggy.ai/docs/open-finance-regulated)!
### 2️⃣ On 01/10, we will deprecate our connector Inter Investimentos (with id 234) and will solely utilize the connector Inter (with id 215).
##### The connector will carry the same data. If you have any questions or need assistance with your integration, please reach out to us!
### ✨ Features
* We've introduced the **Ailos Cartões PJ** connector.
* We've added the **XP - Wealth** connector.
* You can now configure which products to execute within a Pluggy Connection using the Pluggy Connect Widget! Learn more about [Pluggy Connect configuration here](https://docs.pluggy.ai/edit/environments-and-configurations).
* We've added support for Fixed Income transactions made at Itau Corretora in the **Itau PF** connector.
* We've included the last transaction in Sold investments for the **Inter PF** connector.
* We've introduced support for Mutual Funds and Fixed Income in the **Bradesco PJ** connector.
* We've added the **Cora PJ** connector.
* We've added support for payment data regarding Pix QR transactions in Bradesco PJ.
* We've incorporated `status` and `holderType` fields for `Accounts`.
* We've added support for the Acquiring **Stone** connector with some modifications to our data model.
* We now display `TOTAL_WITHDRAWAL` for sold investments in **Itau PF**.
* We've introduced support for CPF access in the **XP** connector.
## ❤️ Improvements
* We've enhanced the UX for QR flow in Pluggy Connect.
* We've addressed login issues with Itau PJ.
## July 2023 (Monthly Update)
Source: https://docs.pluggy.ai/en/changelog#2023.07
Hey! Welcome to our July product updates! ❄️ Hope you're having a great winter!
## ✨ Features
* We've added support for Loans! See more information [here](https://docs.pluggy.ai/docs/loans).
* We've added Investment Transaction for our Inter PF connector!
* We've added the possibility to encrypt user credentials before sending them to our API and have added support for it in Pluggy Java!
* We've added the `receiverReferenceId` field to our `PaymentData` model and support for it in the Itaú PJ connector!
* We've added support for Fixed Income and Mutual Funds investments in Itau PJ!
* We've added support for BTG multiple accounts!
* We've introduced a new flow in Safra with device authorization!
* We've added a Loans preview on our [Demo page](https://demo.pluggy.ai/).
* We've added support for the `quantity` field in Real Estate Funds in our XP connector!
* We've added the Ailos Cartōes PJ connector!
* We've added the XP - Assessor connector!
## ❤️ Improvements
* We've improved the login flow of **Inter PJ** with enhanced certificate validation.
* We've improved product stability for the Caixa PJ and PF connectors.
* We've enhanced error handling in Pluggy Connect when an item is already updating to improve the UX.
* We've improved Santander PJ credit card stability.
## ℹ️ Information
* We've removed Warren from our list of connectors.
## July 2023 (Monthly Update)
Source: https://docs.pluggy.ai/en/changelog#2023.07
Hey! Welcome to our July product updates! ❄️ Hope you're having a great winter!
## ✨ Features
* We've added support for Loans! See more information [here](https://docs.pluggy.ai/docs/loans).
* We've added Investment Transaction for our Inter PF connector!
* We've added the possibility to encrypt user credentials before sending them to our API and have added support for it in Pluggy Java!
* We've added the `receiverReferenceId` field to our `PaymentData` model and support for it in the Itaú PJ connector!
* We've added support for Fixed Income and Mutual Funds investments in Itau PJ!
* We've added support for BTG multiple accounts!
* We've introduced a new flow in Safra with device authorization!
* We've added a Loans preview on our [Demo page](https://demo.pluggy.ai/).
* We've added support for the `quantity` field in Real Estate Funds in our XP connector!
* We've added the Ailos Cartōes PJ connector!
* We've added the XP - Assessor connector!
## ❤️ Improvements
* We've improved the login flow of **Inter PJ** with enhanced certificate validation.
* We've improved product stability for the Caixa PJ and PF connectors.
* We've enhanced error handling in Pluggy Connect when an item is already updating to improve the UX.
* We've improved Santander PJ credit card stability.
## ℹ️ Information
* We've removed Warren from our list of connectors.
## June 2023 (Monthly Update)
Source: https://docs.pluggy.ai/en/changelog#2023.06
Hey! Welcome to our June product updates! ❄️
We are happy to announce that you can see your billing data from our [**Dashboard**](https://dashboard.pluggy.ai). Take control of your billing!
:sparkles: Features
* We added our Billing dashboard as you see above! It will be changing so you can have the best experience while using Pluggy ❤️.
* In Connect Widget, now we warn and prevent the user from blocking the account after 2 consecutive login errors.
* We have added support for multiple accounts in **Sicredi PJ**.
* We have added support for Pix QR code payment data support in **Itau PJ**.
* We have added support for no MFA accounts in **BTG**.
* We have added `issuerName` and `cnpj` in our **investments** data model.
* We have added support for non-existing accounts in **Genial** to improve the User Experience when a user is connecting his account and miss spells their user/email.
:heart_decoration: Improvements
* We improved the errors in Connect Widget to improve the Developer Experience while integrating the app.
* We improved the stability of the connections in **Santander PJ**.
* We improved the stability in transactions product in **Caixa**.
* We improved the User Experience in our **Caixa** connector when a user connects an account after **USER\_AUTHORIZATION\_NOT\_GRANTED** status.
* We have improved our `MOVE_SECURITY` step so moving securities will be less painful for all our users.
* We have improved our `login` step in our **Inter PJ** connect.
## June 2023 (Monthly Update)
Source: https://docs.pluggy.ai/en/changelog#2023.06
Hey! Welcome to our June product updates! ❄️
We are happy to announce that you can see your billing data from our [**Dashboard**](https://dashboard.pluggy.ai). Take control of your billing!
:sparkles: Features
* We added our Billing dashboard as you see above! It will be changing so you can have the best experience while using Pluggy ❤️.
* In Connect Widget, now we warn and prevent the user from blocking the account after 2 consecutive login errors.
* We have added support for multiple accounts in **Sicredi PJ**.
* We have added support for Pix QR code payment data support in **Itau PJ**.
* We have added support for no MFA accounts in **BTG**.
* We have added `issuerName` and `cnpj` in our **investments** data model.
* We have added support for non-existing accounts in **Genial** to improve the User Experience when a user is connecting his account and miss spells their user/email.
:heart_decoration: Improvements
* We improved the errors in Connect Widget to improve the Developer Experience while integrating the app.
* We improved the stability of the connections in **Santander PJ**.
* We improved the stability in transactions product in **Caixa**.
* We improved the User Experience in our **Caixa** connector when a user connects an account after **USER\_AUTHORIZATION\_NOT\_GRANTED** status.
* We have improved our `MOVE_SECURITY` step so moving securities will be less painful for all our users.
* We have improved our `login` step in our **Inter PJ** connect.
## May 2023 (Monthly Update)
Source: https://docs.pluggy.ai/en/changelog#2023.05
:sparkles: Features
* We have added the product `MOVE_SECURITY` that allows users do Security Portability in a few minutes ⚡.
* We have added additional cads support to **Inter PF** connector.
* We have added support to split transactions related to "Sispag Fornecedores" on the Itau Business connector, providing granular payment data for each transaction associated with the grouped one. This provides a detailed view of consolidated transactions.
* We added the `consecutiveFailedLoginAttempts`to our `Item` response, that enable applications & Pluggy Connect to avoid blocking accounts due to multiple consecutive invalid credentials.
:heart_decoration: Improvements
* We have improved **Nubank** accounts response performance and stability.
* We have improved the **Bradesco PF** credit cards response fixing bill dates for installments.
* We have improved the stability of **Banco do Brasil PF** login.
* We have improved the stability of **Ailos PF** login.
* We have improved the credit card transactions with installments recalculating the date in **Santander PF**.
* We have improved the transactions response in **Santander PJ** supporting the `Provider Code`.
* We have improved credit cards response in **Banco do Brasil PF** by adding **balanceCloseDate**.
* We improved our Deel connector, providing a single access for Contractors & Businesses, to collect their financial data. Providing the Business with their employee's contracts & their payments.
## May 2023 (Monthly Update)
Source: https://docs.pluggy.ai/en/changelog#2023.05
:sparkles: Features
* We have added the product `MOVE_SECURITY` that allows users do Security Portability in a few minutes ⚡.
* We have added additional cads support to **Inter PF** connector.
* We have added support to split transactions related to "Sispag Fornecedores" on the Itau Business connector, providing granular payment data for each transaction associated with the grouped one. This provides a detailed view of consolidated transactions.
* We added the `consecutiveFailedLoginAttempts`to our `Item` response, that enable applications & Pluggy Connect to avoid blocking accounts due to multiple consecutive invalid credentials.
:heart_decoration: Improvements
* We have improved **Nubank** accounts response performance and stability.
* We have improved the **Bradesco PF** credit cards response fixing bill dates for installments.
* We have improved the stability of **Banco do Brasil PF** login.
* We have improved the stability of **Ailos PF** login.
* We have improved the credit card transactions with installments recalculating the date in **Santander PF**.
* We have improved the transactions response in **Santander PJ** supporting the `Provider Code`.
* We have improved credit cards response in **Banco do Brasil PF** by adding **balanceCloseDate**.
* We improved our Deel connector, providing a single access for Contractors & Businesses, to collect their financial data. Providing the Business with their employee's contracts & their payments.
## April 2023 (Monthly Update)
Source: https://docs.pluggy.ai/en/changelog#2023.04
:sparkles: Features
* We have created the `USER_NOT_SUPPORTED` error code, to provide better UX for users that cannot connect to certain Financial Institutions.
* We have added support for **Transactions** & **Identity** on our *Iti connector*, removing it entirely from beta.
* We have launched the "Caixa Previdencia" connector, which allows Caixa users to share their previdencia information aligned with our Previdencia Portability product.
* We launched the [Income Report product](https://docs.pluggy.ai/docs/income-report-beta), which is right now available only for *XP Investmentos*.
* In Connect Widget, we have a new flow to alert the users when they introduce invalid credentials to prevent them from blocking their own accounts.
* In Connect Widget, we have added a new flag called `allowFullscreen` to decide how to display it on mobile devices, whether fullscreen or modal.
:heart_decoration: Improvements
* In Connect Widget, we improved the UI and UX OAuth flow, by providing specific errors with instructions to the user.
## April 2023 (Monthly Update)
Source: https://docs.pluggy.ai/en/changelog#2023.04
:sparkles: Features
* We have created the `USER_NOT_SUPPORTED` error code, to provide better UX for users that cannot connect to certain Financial Institutions.
* We have added support for **Transactions** & **Identity** on our *Iti connector*, removing it entirely from beta.
* We have launched the "Caixa Previdencia" connector, which allows Caixa users to share their previdencia information aligned with our Previdencia Portability product.
* We launched the [Income Report product](https://docs.pluggy.ai/docs/income-report-beta), which is right now available only for *XP Investmentos*.
* In Connect Widget, we have a new flow to alert the users when they introduce invalid credentials to prevent them from blocking their own accounts.
* In Connect Widget, we have added a new flag called `allowFullscreen` to decide how to display it on mobile devices, whether fullscreen or modal.
:heart_decoration: Improvements
* In Connect Widget, we improved the UI and UX OAuth flow, by providing specific errors with instructions to the user.
## March 2023 (Monthly Update)
Source: https://docs.pluggy.ai/en/changelog#2023.03
We are ending our Q1 with this news!!
:sparkles: Features
* We added `eventId` on our [webhooks payload](https://docs.pluggy.ai/docs/webhooks#payload-parameters). This field identifies the event itself univocally allowing our clients to be sure if the event is already processed.
* As part of our **Q1-2023 Hackathon**, we have shipped a lot of connectors that are in BETA and ready to get feedback for our users:
* Lemon Cash (Retail Bank)
* Iti (Retail Bank)
* Wise (Retail Bank)
* Warren Investimentos (Broker)
* Deel (Contractors & Business - Digital Economy)
* OnTop (Digital Economy)
* Stone (PSP)
* Splitwise (Personal Finance Management).
* MeuVivo (Telecommunication)
* ContaAzul (Invoicing)
* We are launching our [MeuPluggy](https://meu.pluggy.ai) consent management platform where all the users that shared their access through our platform can manage their consents, review their data and revoke any access that they want to restrict. **This is automatically provided for all our customers.**
* [OAuth v2](https://docs.pluggy.ai/docs/connect-an-account#oauth-v2) has been launched at Pluggy, for some new connectors provided in the news above. This new flow allows tracking the user's connection through the complete flow.
* We added `consecutiveFailedLoginAttempts` to our item entity in order to warn users when they’re about to cause ACCOUNT\_LOCKED on their own accounts.
* We launch [INCOME REPORTS](https://docs.pluggy.ai/docs/income-report-beta) new product for XP connector!!
* We have added the "Item's Execution" overview page to our dashboard, you can now go deeper into the item's health by analyzing the item by its ID.
* 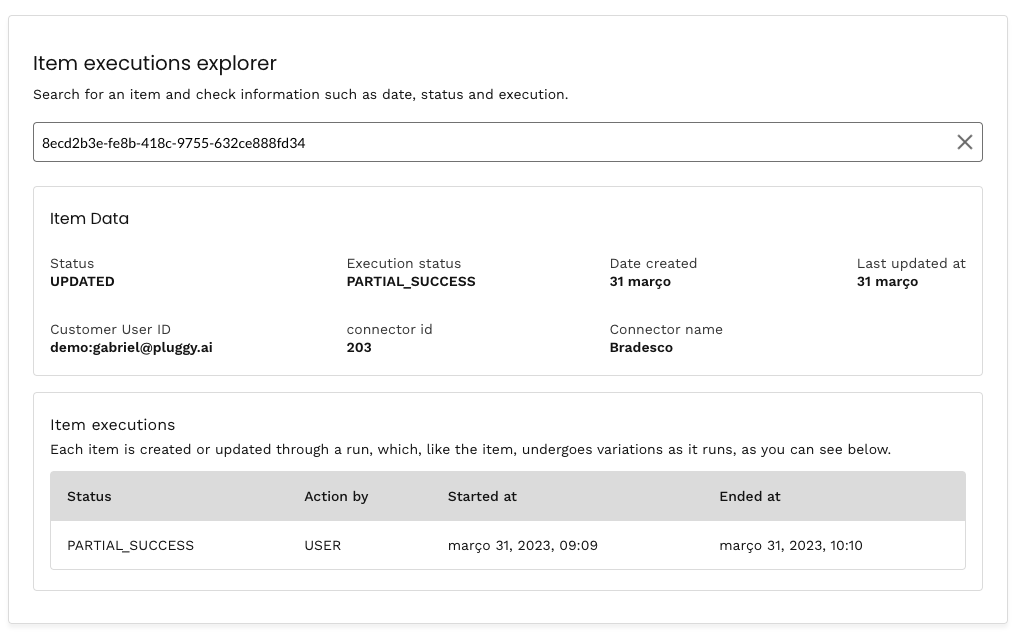
:heart_decoration: Improvements
* We have improved our [Categorization documentation](https://docs.pluggy.ai/docs/transaction-categories), providing more insights about this feature, and what else can be achieved from this.
:dizzy_face: Sad news
* To improve scalability and performance with Investment transactions, we are not deprecating the `transactions` field in `GET /investments` and `GET /investments/{id}` in favor of our paginated [Investment Transactions](https://docs.pluggy.ai/reference/investment-transactions-list) endpoint. We will no longer return the \`transactions´ field in Investments for new Applications, created from 21st March 2023 onward.
## March 2023 (Monthly Update)
Source: https://docs.pluggy.ai/en/changelog#2023.03
We are ending our Q1 with this news!!
:sparkles: Features
* We added `eventId` on our [webhooks payload](https://docs.pluggy.ai/docs/webhooks#payload-parameters). This field identifies the event itself univocally allowing our clients to be sure if the event is already processed.
* As part of our **Q1-2023 Hackathon**, we have shipped a lot of connectors that are in BETA and ready to get feedback for our users:
* Lemon Cash (Retail Bank)
* Iti (Retail Bank)
* Wise (Retail Bank)
* Warren Investimentos (Broker)
* Deel (Contractors & Business - Digital Economy)
* OnTop (Digital Economy)
* Stone (PSP)
* Splitwise (Personal Finance Management).
* MeuVivo (Telecommunication)
* ContaAzul (Invoicing)
* We are launching our [MeuPluggy](https://meu.pluggy.ai) consent management platform where all the users that shared their access through our platform can manage their consents, review their data and revoke any access that they want to restrict. **This is automatically provided for all our customers.**
* [OAuth v2](https://docs.pluggy.ai/docs/connect-an-account#oauth-v2) has been launched at Pluggy, for some new connectors provided in the news above. This new flow allows tracking the user's connection through the complete flow.
* We added `consecutiveFailedLoginAttempts` to our item entity in order to warn users when they’re about to cause ACCOUNT\_LOCKED on their own accounts.
* We launch [INCOME REPORTS](https://docs.pluggy.ai/docs/income-report-beta) new product for XP connector!!
* We have added the "Item's Execution" overview page to our dashboard, you can now go deeper into the item's health by analyzing the item by its ID.
* 
:heart_decoration: Improvements
* We have improved our [Categorization documentation](https://docs.pluggy.ai/docs/transaction-categories), providing more insights about this feature, and what else can be achieved from this.
:dizzy_face: Sad news
* To improve scalability and performance with Investment transactions, we are not deprecating the `transactions` field in `GET /investments` and `GET /investments/{id}` in favor of our paginated [Investment Transactions](https://docs.pluggy.ai/reference/investment-transactions-list) endpoint. We will no longer return the \`transactions´ field in Investments for new Applications, created from 21st March 2023 onward.
## February 2023 (Monthly Update)
Source: https://docs.pluggy.ai/en/changelog#2023.02
Happy Carnaval from Pluggy! :tada:\
This month we did a little more than enjoy the holidays, and here is just the summary of it.
:sparkles: Features
* We have added the `ACCOUNT_CREDENTIALS_RESET` execution error for users that face this situation forced by the financial institution to refresh due to expired credentials or new measures taken by the institution. No synchronization will happen until the item is updated with the new set of credentials.
* We are returning the `metadata` response for **Nuinvest**, **BTG Pactual** & **Orama** allowing Previdencia Portability for the financial institution.
* We added the `investorProfile` field to our `identity` product, which indicates the investor's personality and motivation for investing. This is already being recovered on **XP Investimentos** & **BTG Pactual**, adding it to more institutions for the next month.
* **XP Investimentos** & **Ailos** now supports the product **Credit Card** and it's **Transactions**, returning up to 12 months of historic data.
:heart_decoration: Improvements
* We have improved **Genial Investimentos** investment transaction's response with Taxes, Transfers & Sales operations.
* Warnings now have more details about the `code` related to the warning and, if provided, will return the `providerMessage` a user-friendly message directly from the financial institution.
From recent updates, all SDKs have been updated and are kept updated to the latest changes that our API occurs. Please visit the specific SDK public GitHub repository for more information.
:dizzy_face: Sad news
* We have deprecated our **C6 Connector** due to security restrictions from the financial institution. For the time being it won't be available, until something change in the future. All existing connections can still be recovered from our API.
## February 2023 (Monthly Update)
Source: https://docs.pluggy.ai/en/changelog#2023.02
Happy Carnaval from Pluggy! :tada:\
This month we did a little more than enjoy the holidays, and here is just the summary of it.
:sparkles: Features
* We have added the `ACCOUNT_CREDENTIALS_RESET` execution error for users that face this situation forced by the financial institution to refresh due to expired credentials or new measures taken by the institution. No synchronization will happen until the item is updated with the new set of credentials.
* We are returning the `metadata` response for **Nuinvest**, **BTG Pactual** & **Orama** allowing Previdencia Portability for the financial institution.
* We added the `investorProfile` field to our `identity` product, which indicates the investor's personality and motivation for investing. This is already being recovered on **XP Investimentos** & **BTG Pactual**, adding it to more institutions for the next month.
* **XP Investimentos** & **Ailos** now supports the product **Credit Card** and it's **Transactions**, returning up to 12 months of historic data.
:heart_decoration: Improvements
* We have improved **Genial Investimentos** investment transaction's response with Taxes, Transfers & Sales operations.
* Warnings now have more details about the `code` related to the warning and, if provided, will return the `providerMessage` a user-friendly message directly from the financial institution.
From recent updates, all SDKs have been updated and are kept updated to the latest changes that our API occurs. Please visit the specific SDK public GitHub repository for more information.
:dizzy_face: Sad news
* We have deprecated our **C6 Connector** due to security restrictions from the financial institution. For the time being it won't be available, until something change in the future. All existing connections can still be recovered from our API.
## January 2023 (Monthly Update)
Source: https://docs.pluggy.ai/en/changelog#2023.01
## Changes
- **Added**: Empiricus Investimentos connector (BETA)
- **Added**: Ethereum Network connector (BETA, Web3 via Metamask)
- **Added**: XP Investimentos Conta Digital checking account (12-month history)
- **Added**: hide function for Pluggy Connect widget (background connection)
- **Added**: Webhook events viewing in Dashboard
- **Added**: nextAutoSyncAt field in GET /item/{id} endpoint
- **Added**: Product warnings in Item statusDetail field
- **Added**: transactions/deleted webhook event
- **Added**: Pluggy WhatsApp bot for banking account connections
- **Changed**: BTG Pactual and XP Investimentos performance enhancements
- **Changed**: Sandbox connector testing across all login flows
- **Changed**: Pluggy Connect widget visual and performance improvements
- **Changed**: Genial Investimentos mobile token password support
- **Changed**: Sicoob PJ company selection feature
- **Changed**: Demo App integrated with Dashboard
## January 2023 (Monthly Update)
Source: https://docs.pluggy.ai/en/changelog#2023.01
## Changes
- **Added**: Empiricus Investimentos connector (BETA)
- **Added**: Ethereum Network connector (BETA, Web3 via Metamask)
- **Added**: XP Investimentos Conta Digital checking account (12-month history)
- **Added**: hide function for Pluggy Connect widget (background connection)
- **Added**: Webhook events viewing in Dashboard
- **Added**: nextAutoSyncAt field in GET /item/{id} endpoint
- **Added**: Product warnings in Item statusDetail field
- **Added**: transactions/deleted webhook event
- **Added**: Pluggy WhatsApp bot for banking account connections
- **Changed**: BTG Pactual and XP Investimentos performance enhancements
- **Changed**: Sandbox connector testing across all login flows
- **Changed**: Pluggy Connect widget visual and performance improvements
- **Changed**: Genial Investimentos mobile token password support
- **Changed**: Sicoob PJ company selection feature
- **Changed**: Demo App integrated with Dashboard
## December 2022 (Monthly Update)
Source: https://docs.pluggy.ai/en/changelog#2022.12
Hello, and welcome to our **December** (Work in progress) changelog!\
Even though there is a World Cup, we delivered many features you can use to empower your applications.
:sparkles: Features
* We have delivered and it's in **BETA** the **Avenue Broker Connector**!\
You can now recover your checking account, transactions and investments (mutual funds, equities & ETFs).\
This is already available in our [dashboard](https://dashboard.pluggy.ai) for you to enable on your application.\
Feel free to reach out with any problems or doubts.
* **Genial Broker** keeps growing support for asset transactions, now we are returning transactions for assets of type Securities, Fixed Income & Equities.
* Pss it's coming home! **Portfolio Yield** is on public **BETA**. Providing a historic & whole view of your user's portfolio performance month over month. We are preparing the beta launch for *XP Investimentos* accounts.\
Reach out to [support@pluggy.ai](mailto:support@pluggy.ai) or chat with us, if you want to join the BETA!
* Did you know the [Opportunities](https://docs.pluggy.ai/docs/opportunity) product? It provides a great vision of what products are the financial institutions offering to your users. This provides a competitive battleground to deliver improved products to your users. Now available on the **Itau Business** connector as well!
* We have improved the `health` object that now provides **statistics about your recent connections on the connector and recent connection rate** (percentage of healthy connections) that can be recovered when listing the connectors, check it out under the [API Reference](https://docs.pluggy.ai/reference/connectors-list).
```json Connector's list response
{
"page": 1,
"total": 1,
"totalPages": 1,
"results": [
{
"id": 201,
"name": "Itaú",
"type": "PERSONAL_BANK",
"credentials": [],
"products": [],
"health": {
"status": "ONLINE",
"stage": null,
"details": {
"connectionRateLast6Hours": 94.3,
"connectionsLast6Hours": 53
}
}
}
]
}
```
:heart_decoration: Improvements
* We have sped up the process of recovering customized Terms & Conditions.\
Did you know that terms & conditions can be customized?
* Major improvement on **XP Investimentos**! After a significant blocker, and some weeks of instability, we launched the v2 of the connector improving the performance of the connection by more than 50%.\
Due to the blocker, we are not returning Equities & Securities transactions.
* **Banco do Brasil** it's returning future transactions as `PENDING` now available for all Credit Cards & Accounts.
* When a Connector requires [an MFA Token to execute an update](https://docs.pluggy.ai/reference/items-update) (ie. Bradesco PF), the API will require this input to be different from the previous one. If not, it will return an HTTP 400 error.
```json HTTP 400 error
{
"code": 400,
"message": "MFA parameter has to be updated from last execution"
}
```
* We have increased the "Sandbox" coverage for all the different flows available (yep, there are too many!!). It's important for you to test each one of those.
* Sandbox connectors can be found with `connectorId` lower than 99.
* If you are using the *Pluggy Connect* widget, you will have the following experience.
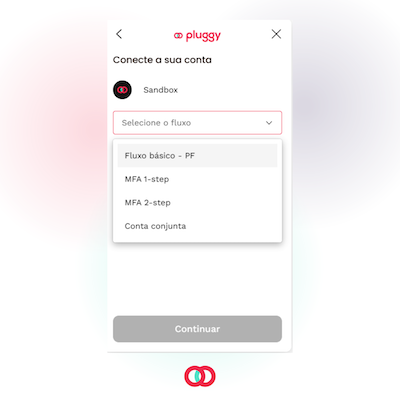
:ballot_box_with_check: Fixed
* Fixed `clientUserId` not being propagated to item connections for **MercadoPago** connector. This only affected *Pluggy Connect* connections.
## Remember, we are one text message away!
For any doubt, issues, or BETA access, please reach out through our chat. We will get back to you as soon as possible.\
Also, you can check out our latest Dashboard features that will improve your day-to-day.
## December 2022 (Monthly Update)
Source: https://docs.pluggy.ai/en/changelog#2022.12
Hello, and welcome to our **December** (Work in progress) changelog!\
Even though there is a World Cup, we delivered many features you can use to empower your applications.
:sparkles: Features
* We have delivered and it's in **BETA** the **Avenue Broker Connector**!\
You can now recover your checking account, transactions and investments (mutual funds, equities & ETFs).\
This is already available in our [dashboard](https://dashboard.pluggy.ai) for you to enable on your application.\
Feel free to reach out with any problems or doubts.
* **Genial Broker** keeps growing support for asset transactions, now we are returning transactions for assets of type Securities, Fixed Income & Equities.
* Pss it's coming home! **Portfolio Yield** is on public **BETA**. Providing a historic & whole view of your user's portfolio performance month over month. We are preparing the beta launch for *XP Investimentos* accounts.\
Reach out to [support@pluggy.ai](mailto:support@pluggy.ai) or chat with us, if you want to join the BETA!
* Did you know the [Opportunities](https://docs.pluggy.ai/docs/opportunity) product? It provides a great vision of what products are the financial institutions offering to your users. This provides a competitive battleground to deliver improved products to your users. Now available on the **Itau Business** connector as well!
* We have improved the `health` object that now provides **statistics about your recent connections on the connector and recent connection rate** (percentage of healthy connections) that can be recovered when listing the connectors, check it out under the [API Reference](https://docs.pluggy.ai/reference/connectors-list).
```json Connector's list response
{
"page": 1,
"total": 1,
"totalPages": 1,
"results": [
{
"id": 201,
"name": "Itaú",
"type": "PERSONAL_BANK",
"credentials": [],
"products": [],
"health": {
"status": "ONLINE",
"stage": null,
"details": {
"connectionRateLast6Hours": 94.3,
"connectionsLast6Hours": 53
}
}
}
]
}
```
:heart_decoration: Improvements
* We have sped up the process of recovering customized Terms & Conditions.\
Did you know that terms & conditions can be customized?
* Major improvement on **XP Investimentos**! After a significant blocker, and some weeks of instability, we launched the v2 of the connector improving the performance of the connection by more than 50%.\
Due to the blocker, we are not returning Equities & Securities transactions.
* **Banco do Brasil** it's returning future transactions as `PENDING` now available for all Credit Cards & Accounts.
* When a Connector requires [an MFA Token to execute an update](https://docs.pluggy.ai/reference/items-update) (ie. Bradesco PF), the API will require this input to be different from the previous one. If not, it will return an HTTP 400 error.
```json HTTP 400 error
{
"code": 400,
"message": "MFA parameter has to be updated from last execution"
}
```
* We have increased the "Sandbox" coverage for all the different flows available (yep, there are too many!!). It's important for you to test each one of those.
* Sandbox connectors can be found with `connectorId` lower than 99.
* If you are using the *Pluggy Connect* widget, you will have the following experience.

:ballot_box_with_check: Fixed
* Fixed `clientUserId` not being propagated to item connections for **MercadoPago** connector. This only affected *Pluggy Connect* connections.
## Remember, we are one text message away!
For any doubt, issues, or BETA access, please reach out through our chat. We will get back to you as soon as possible.\
Also, you can check out our latest Dashboard features that will improve your day-to-day.

